Release2Me System Workflow
The Release2Me System Workflow provides you with an easy-to-use, simple way to hold print jobs in a queue for release at an MFP by an authenticated user.
Dispatcher Phoenix will automatically install the Dispatcher Phoenix Release2Me printer, which uses the Dispatcher Phoenix Printer Driver. You should use the Release2Me printer from other Windows applications to print directly to this Release2Me System Workflow. If you want to use another printer, you must change the LPR queue name to match the LPR queue name of the other printer. You can edit the LPR queue name in the LPR Queue Name field from the Release2Me System Workflow configuration window.
Release2Me also comes with print reporting and print delegation features to help monitor printer usage and secure printouts.
Note: Accessing the Release2Me feature is only supported on MFPs running a Graphical User Interface.
Getting Started
After installing the Release2Me package, a shared, system-defined workflow for Release2Me will automatically be installed and appear under a newly created folder called “System Workflows” in the Workflow List of the Dispatcher Phoenix main application screen, as in the following illustration:
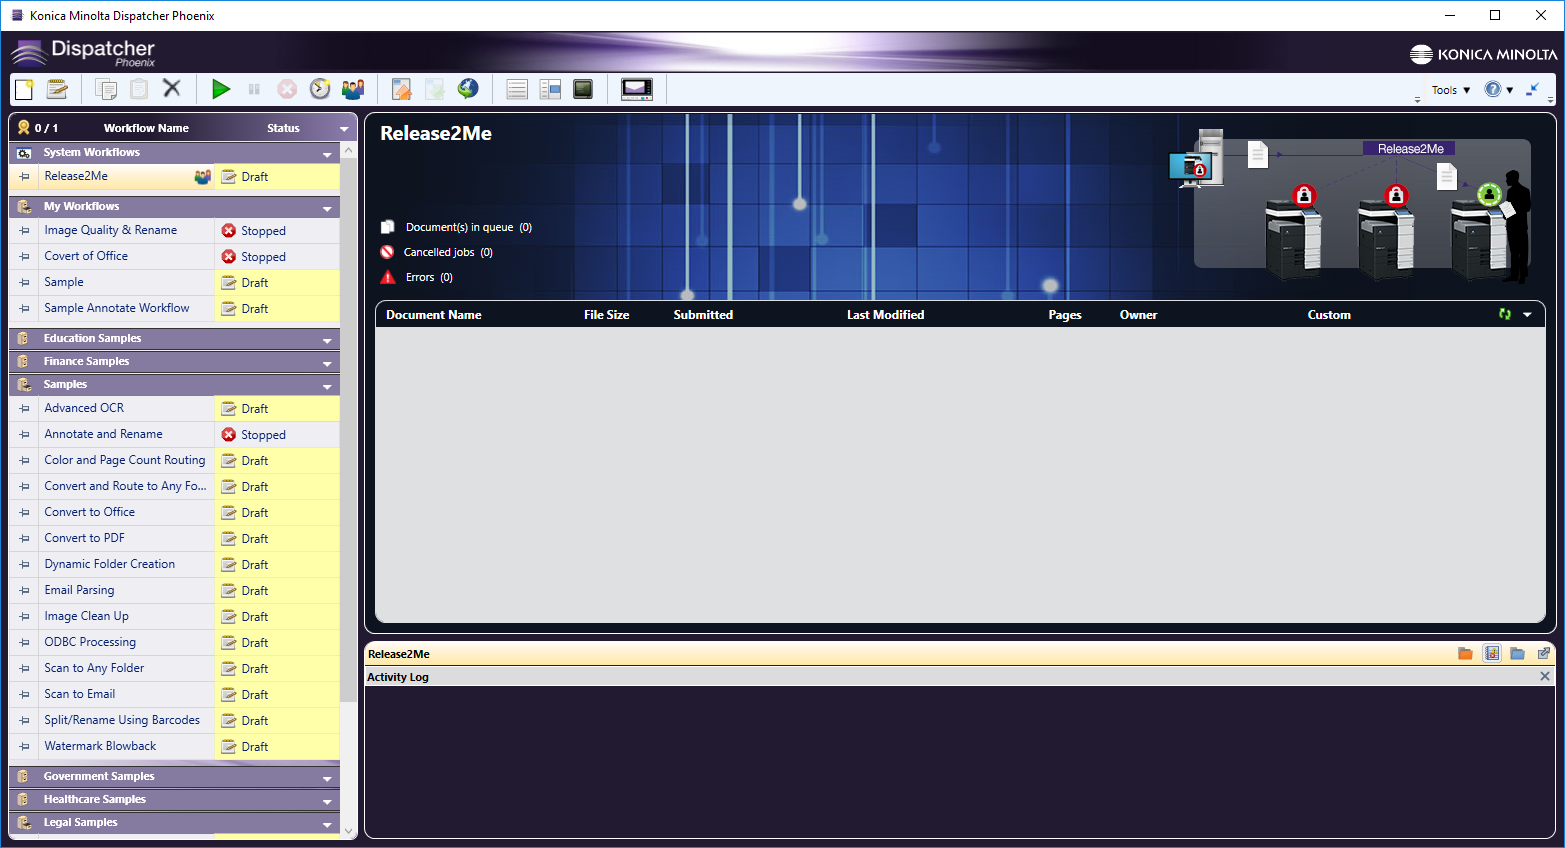
In the Workflow Preview area, an interactive panel for Release2Me will appear. On this panel, you can do the following:
-
View how many documents are currently in queue. The print jobs are listed and the number of print jobs in queue is displayed next to the “Document(s) in queue” text.
-
Select the Cancelled jobs link to view/access the print jobs that have been canceled and sent to an Output Folder.
-
Select the Errors link to view/access print jobs that have gone out on error and sent to an Output Folder.
-
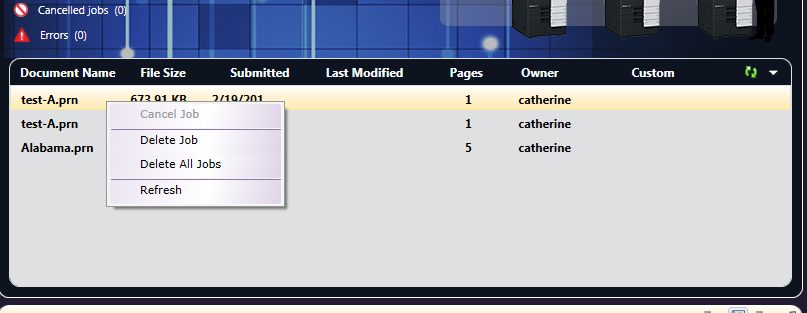
Cancel or delete print jobs listed in the queue by right-clicking on the print job and choosing from the menu that appears, as in the following illustration:
-
Choose the Cancel Job option to cancel that specific print job. The file will go out on the No transition.
-
Choose the Delete Job option to permanently delete that specific print job.
-
Choose the Delete All Jobs option to permanently delete all existing print jobs held in the Print Queue.
-
Choose the Refresh button to refresh the contents of the print queue list. You can also refresh the print queue by selecting the Refresh button on the upper right hand side, as in the following illustration:

- View the Activity Log of the system workflow. The Activity Log appears by default; however, you can also view Inputs and Outputs in that area using the folder icons on the right-hand side of the Activity Panel.
Note: Unlike other Dispatcher Phoenix workflows, LiveFlo animations are not available in the Release2Me’s Workflow Preview area.
Using the System Workflows Folder
The System Workflows folder in the Workflow List differs from other folders in the Workflow List. Some of the capabilities available for other folders are not enabled for System Workflows, including:
-
Export the folder
-
Copy/Paste workflows in the folder
-
Delete the folder
-
Launching of the Workflow Builder tool
-
Shifting workflows to and from this folder
-
Creating a new workflow in this folder
-
Deleting the folder
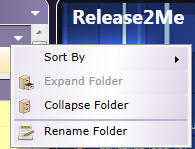
Click on the down arrow in the System Workflows menu to do the following:
-
Sort workflows within the folder by Name or Status.
-
Expand or collapse the folder.
-
Rename the folder.
See the following illustration:
Note: The System Workflows folder will always appear on top of the Workflow List, as the first folder listed.
Configuring for Release2Me
To start using the Release2Me feature on your MFPs, do the following:
-
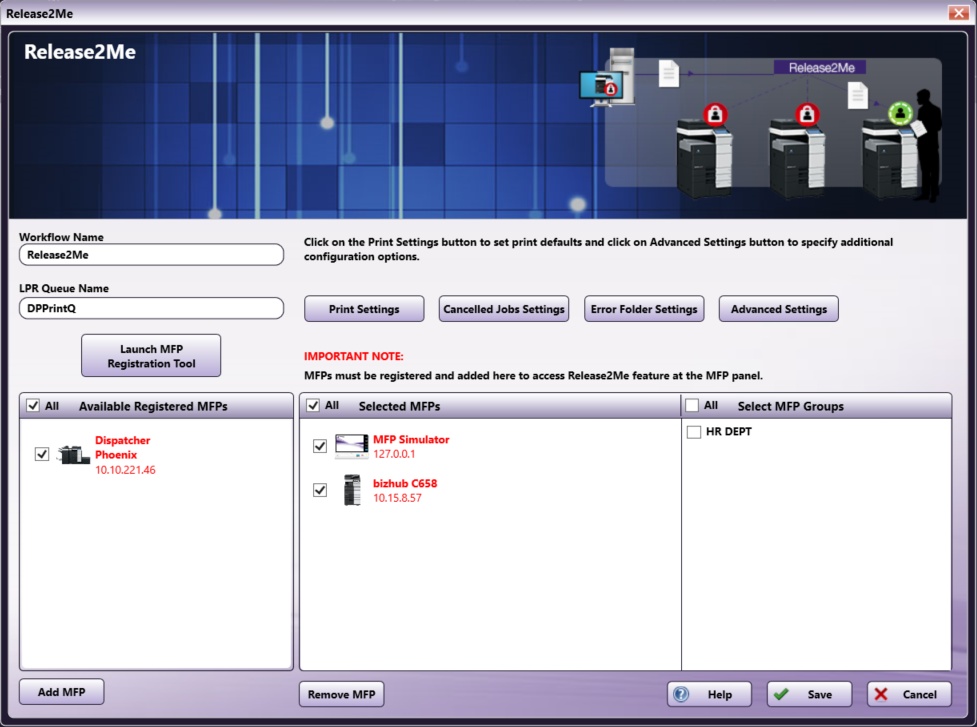
Edit the Release2Me workflow by either double-clicking on the workflow in the System Workflows folder or by selecting it and clicking on the Edit icon.
-
The Release2Me System Editor will appear, as in the following illustration:
-
The Available Registered MFPs area will display all of the MFP devices that have been registered for use with Release2Me and other workflows. You can access the MFP Registration tool directly from the Release2Me node by clicking on the Launch MFP Registration Tool button.
Move the MFP icon(s) from the Available Registered MFPs area to the Selected MFPs box by doing one of the following:
-
Drag-drop the MFP icons.
-
Check the boxes next to one or more MFP icons; then select the Add MFP button.
-
Check the All box to select all MFPs listed; then select the Add MFP button.
-
-
Select the Save button to save your changes.
Running Release2Me
Once your system defined workflow has been configured with the correct MFPs, you can start using Release2Me functionality with your print jobs. Do the following:
-
Ensure that the Release2Me workflow is running.
-
Print a document using the Dispatcher Phoenix Release2Me Printer that is installed as part of the Release2Me solution.
-
The print job will appear listed in the Release2Me panel in the Dispatcher Phoenix main application.
-
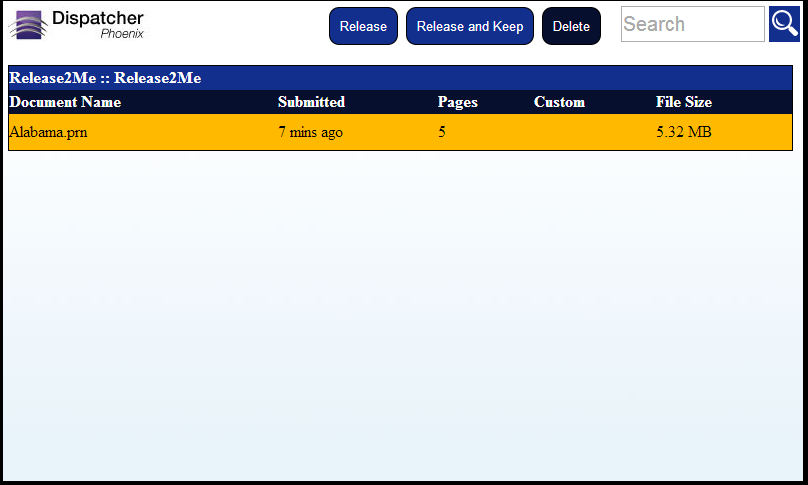
Authenticate at the MFP to access your Release2Me queue, which resembles the following illustration:
-
Select the Release button to print the file and remove it from the Release2Me queue.
-
Select the Release and Keep button to print the file but keep a duplicate copy of it in the Release2Me queue for future use. This means that the file will stay in the Release2Me queue until it has either been released or deleted at a later date.
-
Select the Delete button to remove the file from the Release2Me queue without printing it.
-
You can also use the Search field with type ahead functionality to filter the list of print jobs that are displayed. Begin typing characters into the Search field and the list of print jobs will be automatically and instantly filtered based on what you entered.
-
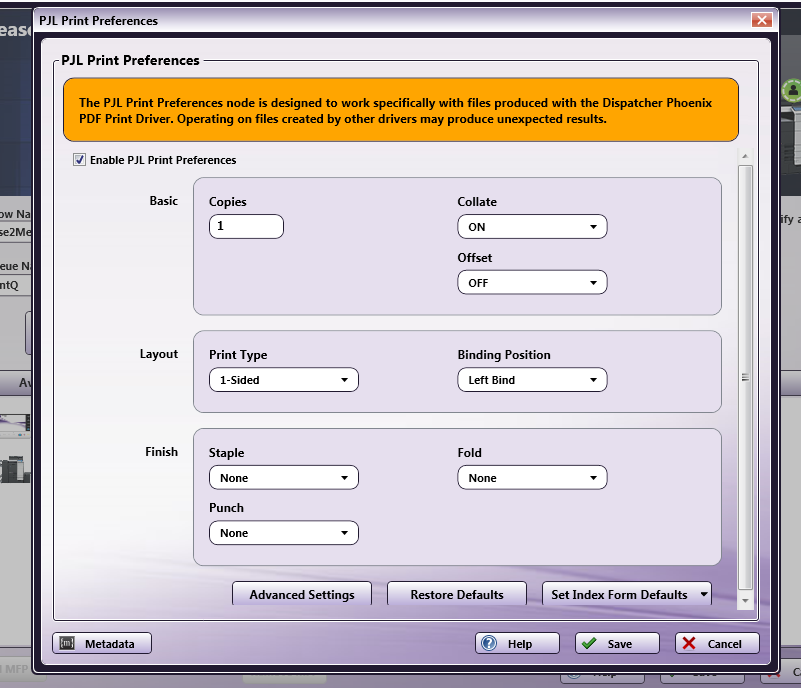
Once you Release or Release and Keep a print job, you can specify print preferences for the job, using a screen that resembles the following illustration:

Note: The print preferences fields that appear are customizable.
Configuring Release2Me Options – Print Settings
By default, the system-defined workflow applies default print preferences to your print job, which can be customized at the panel after a job is released. You can disable this feature, customize the default print settings, customize the print settings fields that appear on the panel, and specify additional PJL headers.
Important! These settings are designed to work with the Dispatcher Phoenix Print Driver. Support for other drives will vary. Settings specified here will not necessarily override PS and PCL files.
Do the following:
-
Double-click on the Release2Me workflow to open it in the System Editor.
-
Select the Print Settings button. The following pop-up screen appears:
-
To prevent this form from appearing on the panel, uncheck the Enable PJL Print Preferences box. With this box disabled, the default print preferences will be applied to each released print job, and users will not be able to modify those default settings at the panel.
-
With PJL Print Preferences enabled, you can specify default settings for the following Basic settings:
-
Copies - Enter the number of copies to print.
-
Collate - Choose ON, OFF, or None to keep existing settings in incoming documents.
-
Offset – Choose ON, OFF, or None to keep existing settings in incoming documents.
-
-
With PJL Print Preferences enabled, you can specify default settings for the following Layout printing preferences:
-
Print Type – Choose 1-Sided, 2-Sided, Booklet, or None to keep existing settings in incoming documents.
-
Binding Position – Choose Left Bind, Right Bind, Top Bind, or None to keep existing settings in incoming documents.
-
-
With PJL Print Preferences enabled, you can specify default settings for the following Finish printing preferences:
-
Staple – Choose Corner, 2 Position, or None to keep existing settings in incoming documents.
-
Fold – Choose Center Fold or None to keep existing settings in incoming documents.
-
Punch – Choose 2 Hole, 3 Hole, or None to keep existing settings in incoming documents.
-
Note the following:
-
Booklet overrides Collate, Staple, and Punch settings. With the Booklet Layout, Staple and Punch are set to Off and Collate is set to On.
-
Fold overrides Staple, Punch, Collate, and Offset settings. With the Fold Finish, Collate is set to On, Offset is set to Off, and Staple and Punch are set to Off.
-
Staple overrides Offset. With the Staple Finish, Offset is set to Off.
-
To add custom PJL headers to incoming documents, select the Advanced Settings button.
-
To restore the PJL Print settings to their default values, select the Restore Defaults button.
-
By default, a screen will appear with the Copies, Print Type, and Staple fields after a print job has been released; however, you can customize the fields that appear at the panel by selecting the Set Index Forms Defaults button. A drop-down palette will appear, which allows you to choose the fields that you want to appear at the panel after a print job has been released. See the following illustration:
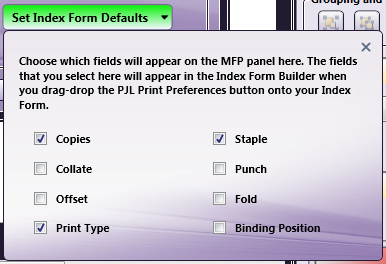
Note: If you choose three fields (or less), they will be displayed as buttons on the Index Form; however, if you choose more than three fields, they will be displayed in drop-down list format.
Configuring Release2Me Options - Cancelled Job Settings
You can configure settings for cancelled print jobs. Do the following:
-
Double-click on the Release2Me workflow to open it in the System Editor.
-
Select Cancelled Job Settings.
An Output Folder Node will open, as shown in the following illustration:

The box for Absolute Path is enabled by default and cannot be disabled. The output folder has to be an absolute path or else the files will be lost. If the error folder is configured, cancelled jobs will be sent to the error folder instead.
For more details on how to configure this node, please see the Output Folder Node page.
Configuring Release2Me Options - Error Folder Settings
You can configure settings for error print jobs. Do the following:
-
Double-click on the Release2Me workflow to open it in the System Editor.
-
Select Error Folder Settings.
An Output Folder Node will open, as shown in the following illustration:
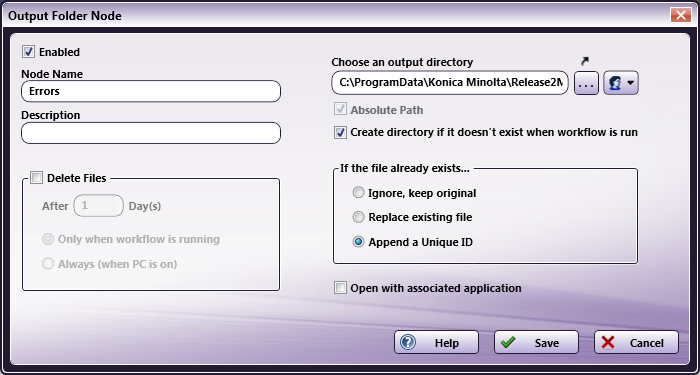
The box for Absolute Path is enabled by default and cannot be disabled. The output folder has to be an absolute path or else the files will be lost.
For more details on how to configure this node, please see the Output Folder Node page.
Configuring Release2Me Options – Advanced Settings
You can configure the following advanced settings:
-
Whether or not Dispatcher Phoenix should delete unclaimed jobs in the queue automatically, and the number of days after which print jobs will be deleted from the queue.
-
Additional information about each print job to be displayed in the Print Queue.
Do the following:
-
Double-click on the Release2Me workflow to open it in the System Editor.
-
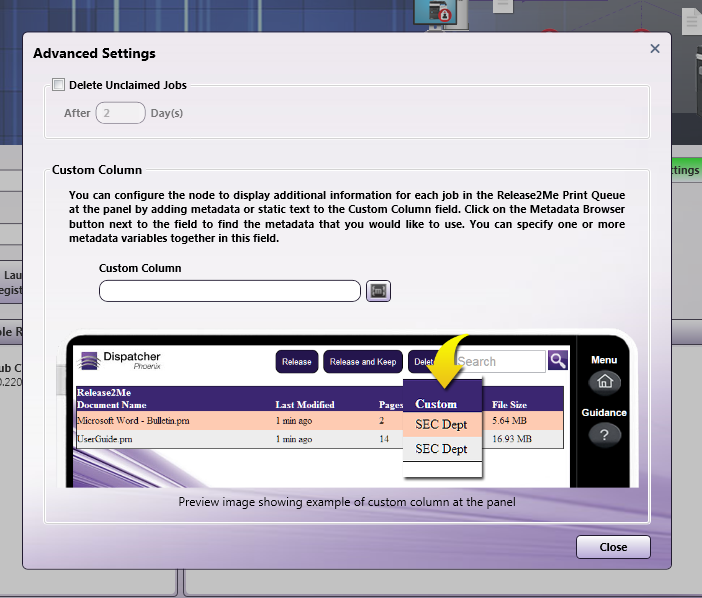
Select the Advanced Settings button. The following pop-up screen appears:
-
To have Dispatcher Phoenix automatically delete unclaimed jobs in the queue, check the Delete Unclaimed Jobs box; then enter the number of days after which your print jobs will be deleted form the queue.
-
By default, the Release2Me queue displays the file name, submitted date, total number of pages, and file size of each print job. You can add additional information about the print job using metadata. Do the following:
a. Click on the Browse for metadata button next to the Custom Column field.
b. The Metadata Browser window will appear. Find and select the metadata that you are interested in; then drag it over to the Custom Column field. You can add multiple metadata variables to this field.
-
Select the Save button to keep your changes.
Specifying Additional PJL Headers
You can also use this node to do the following:
-
Add additional PJL headers to incoming documents.
-
Modify the values of existing PJL headers in incoming documents.
-
Delete existing PJL headers from incoming documents.
Important! Adding custom PJL headers may cause the document to print incorrectly. Make sure you know which PJL headers are suitable for the specific device you are printing to.
Do the following:
-
To get started, select the Advanced Settings button. The following palette will appear:
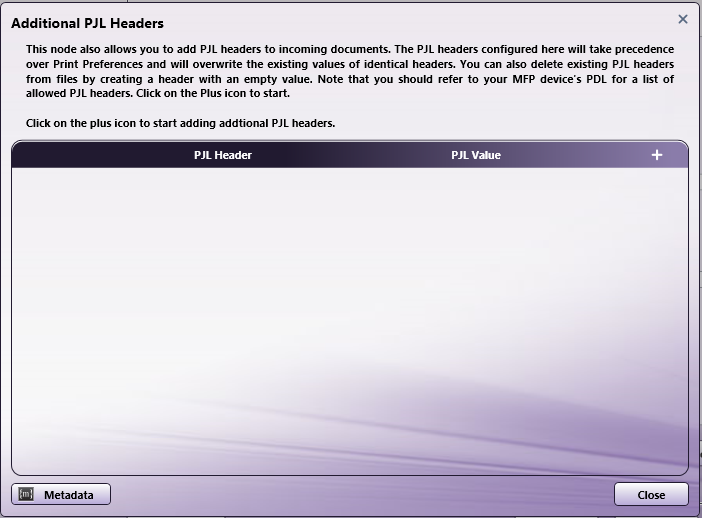
-
Click on the + button. An empty row will appear, as in the following illustration:
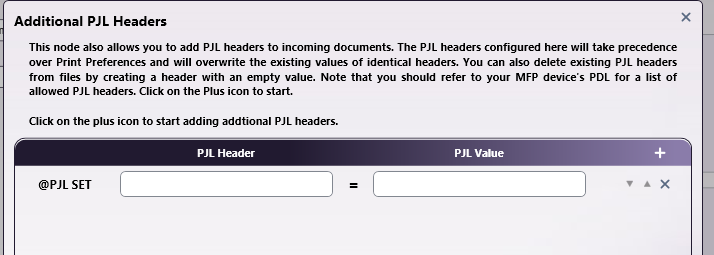
-
Enter the name of the PJL Header next to the @PJL SET label and its corresponding value after the = sign.
-
Continue adding rows as necessary.
-
To delete a row, click the X button.
-
To move a row up or down in the list, click the arrow buttons.
-
If you create a PJL Header row with an empty value, that specific PJL Header in incoming documents will be removed.
Any value specified here will overwrite existing values for the same PJL Header in incoming documents.