Konica Minolta® MFP Panel Node
Dispatcher Phoenix can take advantage of Konica Minolta MFP devices which run bizhub Extended Solution Technology (bEST). The MFP Panel node allows you to submit documents directly into a workflow with preconfigured scan settings. Since the node is accessed from the device panel, the workflow runs immediately with no scheduling. The workflow must, however, be running in order to be accessible to the MFP Panel node.
Note: The MFP must have the WebDAV Client enabled in order to transmit documents to Dispatcher Phoenix.
Metadata included when scanning can be used in other nodes, such as the Output Folder node and the Email Out node.
Note: When the system is under heavy load, performance of external services may be impacted. As such, we recommend that heavy processing be done on a faster system with multiple cores.

This node will not work if the Image Log Transfer setting is enabled on the MFP. To disable this setting, do the following on the device control panel:
-
Select Utility.
-
Select Administrator Settings.
-
Select Security Settings.
-
Make sure Image Log Transfer Settings is OFF.
-
Click OK when done.
MFP Registration
Before they can be used by a MFP Panel node, MFP devices must be registered through Dispatcher Phoenix so that the application recognizes the MFPs from which it can receive input. To launch the MFP Registration Tool, do one of the following:
- Select MFP Registration Tool… from the Tools pull-down menu of the main application screen,

or
- Select the Launch MFP Registration Tool button from the MFP Panel node properties window.

When Your IP Address Changes…
If your IP address changes after Dispatcher Phoenix installation, you must update the IP address before you can connect to Dispatcher Phoenix. To update, take the following steps:
- Open Dispatcher Phoenix Web and sign in with Administrator privileges.
- Click on the Devices tile.
- Click on the Defaults button.
- Click the Refresh button next to the bEST Server Host Name / IP Address field.
- Click Save to preserve your changes.
Note: Any changes made on the Defaults window are saved but not applied to or validated against any device until the device is either registered for the first time or unregistered and then registered again.
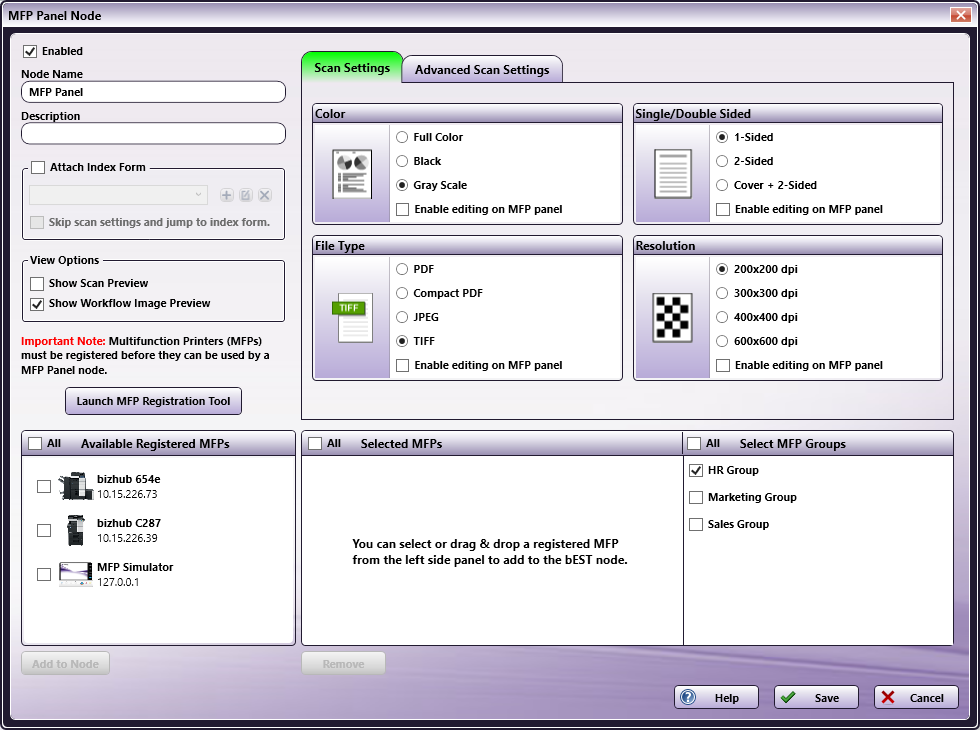
MFP Panel Node Setup
Once the MFP has been registered, you can use it with a MFP Panel node in Dispatcher Phoenix.
-
Make sure the Enabled box is checked to use this location as an input source. When unchecked, this input will be ignored; documents will not be collected from this node location.
-
In the Node Name field, enter a name for the MFP Panel node.
-
In the Description field, enter a description for the MFP Panel node. This is not required, but it can make the node easier to recognize when there are multiples. If the description is long, you can hover the mouse over the field to read its entire contents.
-
To add an index form to the workflow, check the Attach Index Form box.
-
If you would like to go directly to the Index Form when accessing your workflow at the device panel, check the Skip scan settings and jump to index form box.
With this setting enabled, you will not be able to modify any scan settings at the device panel; instead, you will go directly to the Index Form once you tap on the Dispatcher Phoenix app button (if the workflow is the only one running) or tap on the workflow in the Workflow List screen (if multiple workflows are running).
-
In the View Options area, check the box for Show Scan Preview to view a preview of your scanned document at the MFP. Check the box for Show Workflow Image Preview to view a preview of your workflow image at the MFP.
-
On the Scan Settings tab, predefine the settings for the MFP to use when scanning a document. These settings mirror those available to the user at the MFP. Not all scanning options are supported on all MFP devices. In these cases, such as color settings on a black and white MFP, the user settings here will be ignored.
-
On the Advanced Scan Settings tab, you can select advanced settings for the MFP to use when scanning a document. Options are:
- Blank Page Removal - Choose whether to remove or keep blank pages.
- Separate Scan - Choose whether to scan as single pass or multi-pass.
- Document Sizes - Choose whether the documents being scanned will be the same size or different sizes.
Important! The additional scan functionality available via Advanced Scan Settings is only supported on devices with OpenAPI version 4.13 or higher as listed below:
- bizhub C287, C227
- bizhub 367, 287, 227
- bizhub C368, C308, C258
- bizhub 958, 808
- bizhub C658, C558, C458
- bizhub 558, 458, 368, 308
- bizhub 658e, 558e, 458e, 368e, 308e
- bizhub C759, C659
- bizhub C3851FS, C3851, C3351
- bizhub 4752, 4052

-
To edit Scan Settings or Advanced Scan Settings at the device panel, check the Enable editing on MFP panel check box associated with the Scan Setting that you are interested in. If you do not enable this option, the Scan Setting will not be editable on the MFP.
Note: With the native interface, simplex/duplex options cannot be controlled from the MFP Panel node window. For example, if you would like to scan 2-sided, you must specify that setting on the device control panel, not on the MFP Panel node window. Simplex/duplex options can be changed on the control panel even if the Enable editing on MFP panel option is disabled.
-
Available Registered MFPs - This area contains all of the MFP devices that have been registered for use with MFP Panel nodes. To add certain MFP(s) to the MFP Panel node, you must move the MFP icon(s) from this box to the Selected MFPs box by doing one of the following:
-
Dragging-and-dropping the MFP icons.
-
Checking the All box to select all MFPs listed or checking the boxes next to the MFP icons; then clicking on the Add to Node button.
Once an MFP has been added to the node, it will no longer be listed in this box.
-
-
Selected MFPs - This area contains the registered MFPs that the MFP Panel node may scan from. To remove an MFP from this area, you can do one the following:
-
Drag-and-drop the MFP(s) back into the Available Registered MFPs box, or
-
Check the All box to select all MFPs listed or check the boxes next to the MFP icons; then click on the Remove button.
-
-
Select MFP Groups - This area allows you to add any pre-assembled MFP group you would like to any workflow without having to stop and edit anything.

-
Help - Access online help about the node.
-
Save - Keep the definition for this node.
-
Cancel - Exit the window without saving any changes.
 Firewall Note
Third-party firewall applications, including some anti-virus software, may block ports used by Dispatcher Phoenix MFP Panel nodes. By default, MFP Panel nodes use port 50808 (port 50809 for SSL connections). However, this port number is configurable, so it may differ if the number has been changed. If the connection fails, the following message will display on the device panel:
“Connecting to server…”
To allow MFP Panel nodes to connect properly, please consult your firewall application documentation to either stop blocking port 50808, port 50809, or to allow access by the workflow engine process, “blox-erl.exe.”
Running a MFP Panel Node Workflow
Now that the MFP Panel node has been set up and included as part of a workflow, you can run a MFP Panel workflow from the device panel.
Note: Before workflows can be accessed at the MFP, they must be running in Dispatcher Phoenix. Make sure you click the Start button (![]() ) to start any of your MFP Panel workflows that you would like to run from the device panel.
) to start any of your MFP Panel workflows that you would like to run from the device panel.
-
At the device panel, tap on the App button to see all registered applications, or the Dispatcher Phoenix button to go directly to your Dispatcher Phoenix workflows.
When starting the application using an SSL connection, the MFP may display the following message: “This page is protected. Information will be encrypted for sending and receiving.” To hide this message, use the MFP web browser to go to a site that uses SSL (such as https://www.google.com) and select the checkbox labeled: “Do not show this message again” when the message is displayed.
-
You may have to log in at the MFP in order to access your Dispatcher Phoenix workflow (if you have registered your MFP to prompt for user authentication.
To log in to Dispatcher Phoenix at the device panel, enter your Windows login information in the required fields; then tap on the arrow button.
Note: If the computer that Dispatcher Phoenix is installed on belongs to an Active Domain, the default user name is assumed to belong to the domain. In this case, to log in with local user credentials, you will have to enter the computer name along with the local Windows user name (e.g., “local-pc\jane”). As a shortcut, you can substitute a “.” as the computer name (e.g., “.\jane”).

- If you have configured the MFP with the “Show recent users” authentication option, a User Search button will appear to the right of the Username field, as in the following illustration:

- You can enter a character or a string of characters in the Username field and a list of user names which match or include the characters entered will appear on the right-hand side of the screen. This type ahead feature is only available on newer MFP models.
Note: The list of recent users is cached at the MFP. Deleted users won’t be reflected on the MFP until Dispatcher Phoenix is unregistered and then reregistered on the MFP.
In the following illustration, the user typed in “mar” and the user names that included those characters were automatically displayed:

Note: Although you can still search for user names on older MFPs, the type ahead feature will not be available. To search for user names from the Login screen on older MFPs, enter a character or a string of characters in the Username field; then tap on the User Search button. You will then be directed to the User List screen, which displays the results of your filtered search.
- To view ALL recently logged-in users, tap on the User Name Search button next to the Username field or press Ctrl + F on the keyboard.
A list of previously logged-in users (up to 1000) will appear on a User List screen which has navigational arrows that allow you to scroll up and down, as in the following illustration:

On this screen, you can do the following:
- Tap on the user name button that you want to use to log into Dispatcher Phoenix. You will be brought back to the Login screen with the user name that you selected automatically populated in the Username field,
or
-
Narrow the list of user names currently displayed by entering a character or a string of characters in the empty Search field provided.
-
On newer MFP models, the filter will be automatically applied, as soon as you begin to enter characters in the Search field.
-
On older MFPs, enter a character or a string of characters in the empty Search field provided; then tap on the Search button to display the results of the filtered search.
-

-
Once you access the Dispatcher Phoenix application at the MFP, the Workflow List screen will appear, displaying an alphabetically sorted list of each MFP Panel node workflow that is currently running (if multiple workflows are running at the same time). On the Workflow List screen, select a workflow by tapping on the appropriate workflow button.
- If only one workflow is running, this Workflow List screen will not appear; instead, the Workflow Details screen for the running workflow will automatically appear.
-
Depending on the configuration of the MFP, you will see either a graphical or native view of the Workflow List:
Workflow List - Graphical:

Workflow List - Native:

The graphical view of the Workflow List includes the following:
-
Navigational arrows so you can scroll up and down.
-
Icon to identify shared workflows on the lower right hand side of the workflow button, as in the following illustration:

- A Search field that can be used to filter the workflows listed. Note that you can only search on the workflow’s name, not any other attributes of the workflow. Press Ctrl + F to move the input focus to this field.
-
-
Use the Workflow List’s Search field to narrow the list of workflows currently displayed. You can enter a character or a string of characters in the field and the filter will be automatically applied, as soon as you begin to enter characters.

Note: For older MFPs, you must tap on the Search button to begin the search.
If your search does not bring up any results, a message will appear on the MFP, similar to the following illustration:

Note: Tapping on the Dispatcher Phoenix logo at the top left hand side of the screen will clear the filtered results of your search.
-
Once you choose a workflow, the Workflow Details screen will appear. Depending on the configuration of the MFP, you will see either a graphical or native view:
Workflow Details - Graphical:

Workflow Details - Native:

- With the graphical view, icons will appear in the Workflow Customization area if the workflow includes an Index Form, customizable Advanced Bates Stamp nodes, Redact nodes, and/or Highlight/Strikeout nodes, as in the following illustration:

- A red blinking star will appear next to the Index Form icon if the Index Form includes a required field, as in the following illustration:

This red blinking star will not appear if the Index Form includes a required field that is pre-populated when the Form first loads on the MFP (such as a drop-down list that is populated with entries from a database or an Output Folder field with a default value already configured in it).
-
Place your documents to be scanned in the document feeder of the MFP. You can either tap on the Scan button on the panel or press the blue Start button on the MFP to start the scan. If using the MFP’s blue Start button, you will not receive a notification message on the panel that your document has been scanned and submitted to Dispatcher Phoenix.
If you have enabled the Show Scan Preview option, you will see a preview of the scanned document on the panel. On some MFPs, this option also allows you to select the direction of the document to be scanned. To enable/disable this Original Direction Confirmation screen, log into the MFP as Administrator and then go to the Preview Settings screen (Utility > Administrator Settings > System Settings > Preview Settings).
Note: The Show Scan Preview feature is only available on newer MFPs and supported only on MFPs with Graphical User Interfaces. In addition, this feature is not supported on the bizhub PRO 951.
When the Show Scan Preview option is enabled, you must tap on the Send Now button to send the document to the Dispatcher Phoenix workflow.
-
Press the Home button to cancel and return to the main Workflow List screen.
Note: Depending on the MFP model and firmware, the Scan Settings and/or Index Form data may not be retained between scans when using Dispatcher Phoenix via the MFP Native User Interface.
Running Dispatcher Phoenix on Native User Interface
When running Dispatcher Phoenix on MFPs with Native User Interfaces, please note the following limitations/exceptions:
-
Simplex/Duplex options cannot be controlled from the MFP Panel node properties window within the Dispatcher Phoenix application. For example, to scan 2-sided, you must specify that setting directly on the device control panel, not in the MFP Panel node window. Simplex/duplex options can be changed on the control panel even if the Enable editing on MFP panel option is disabled within the MFP Panel node window.
-
Depending on MFP model and firmware, Scan Settings and/or Index Form data may not be retained between scans.
-
Customizing Bates Stamps and Redact/Highlight/Strikeout search terms at the MFP is not supported.
-
Due to MFP limitations, Index Form field labels may be truncated.
-
Index Forms do not use Action buttons; instead, events are triggered when the user changes the contents of the field.
-
The ability to create a new folder at the MFP is not supported.
-
The maximum number of controls (fields and labels) that can be added to an Index Form is 19.
-
Index Forms for connectors, such as Box and WebDAV, cannot include prepopulated default values for the user name and password fields.