LPR In Node
LPR In is an optional node that collects print jobs from an LPR Client like the Windows Printer Queue. Similar to the Print to File process, the LPR Client converts files into a format that can be used by other process nodes in the workflow. In other words, the LPR In Node allows the Dispatcher Phoenix application to appear like a network printer for job submissions. The data format of the converted files will depend on the print driver but, in most cases, is PCL or Postscript.
Some imaging applications, such as Windows Picture and Fax Viewer, will rename output files when printing. In this case, to prevent files from overwriting each other, you may choose to either not use that application or add a rename process to your workflow. Microsoft Paint and Adobe Photoshop do not rename files.
In order for this node to work correctly, the port for LPR printing must be configured with a queue name that will also be specified in the LPR In node. Once the LPR port and the LPR In node have been set up correctly and Windows Services have been started, you can print from any application and the files will be sent directly to the LPR In node to initiate the workflow.
LPR Metadata included with the print job can be used in other nodes, such as the Output Folder node and the Email Out node.
Note: When the system is under heavy load, performance of external services may be impacted. As such, we recommend that heavy processing be done on a faster system with multiple cores.
Examples of use include:
-
To parse for Postscript commands in the data files generated by the LPR print driver (using parsing nodes such as Parse and Insert to insert tray calls or other manufacturer commands); note that parsing the original content of these files may or may not be successful depending on the print driver selected.
-
To avoid tying up your company’s printer during optimal business hours and speed up the printer’s output processing time since the LPR print driver spools first.
-
To send documents collected from the LPR In node to two different places in the workflow: one branch leading to a printer and the other branch leading to an Output folder for archival purposes.
-
To print from multiple PCs to one workflow.
Important! If Windows LPD/LPR Service is installed, Dispatcher Phoenix’s LPR Service will be incompatible with it since both services use Port 515. While Dispatcher Phoenix LPR Service is in use, you will need to stop (or uninstall) the Windows LPD/LPR Service. To stop the Windows LPD/LPR Service in, do the following:
-
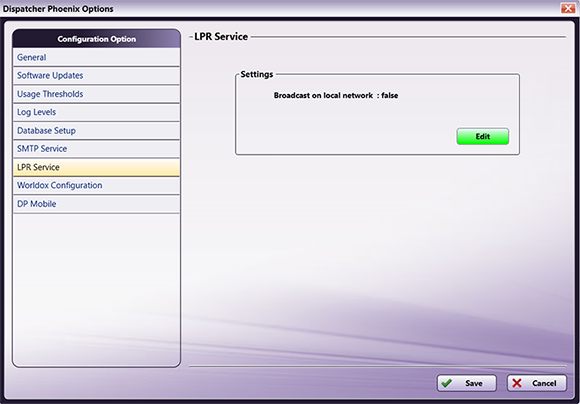
Open up Dispatcher Phoenix and go to Tools on the right hand side of the top toolbar. Then select Options and the following image will appear:
-
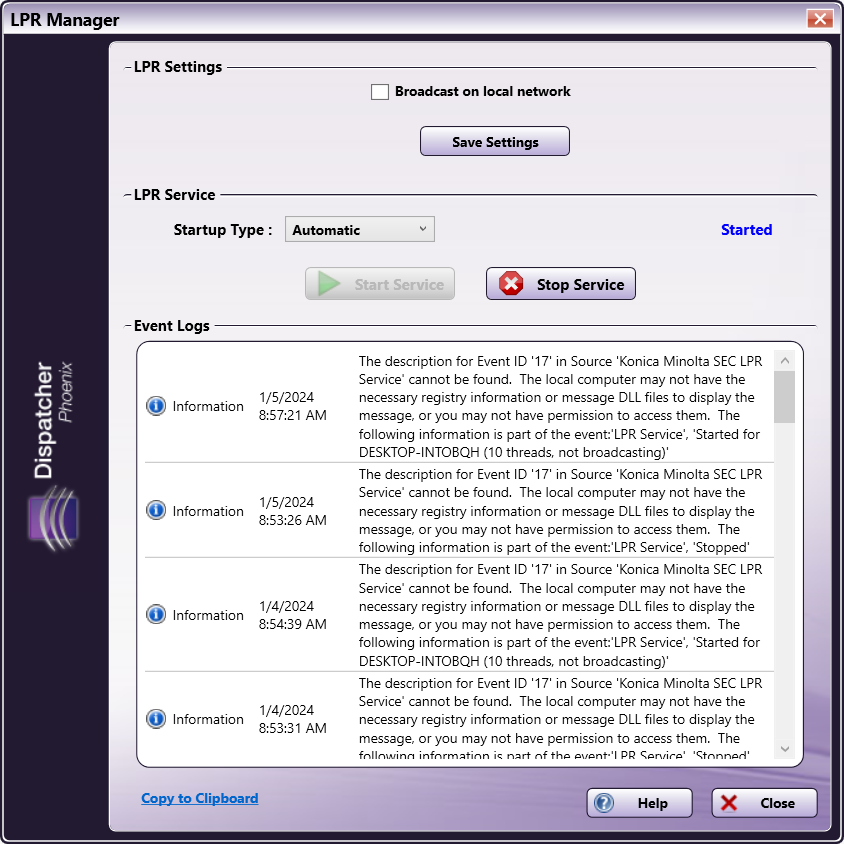
Go down to LPR Services and then click on Edit in the settings box. A window will pop up asking to make changes. Click Yes, and then the following image will appear:
-
Click Stop Service, and then you can close out.
Note: Enable “Broadcast on local network” only if you want others to be able to locate your LPR printer.
Using this Node
Using this node involves the following steps:
Step #1 Configuring the LPR Port
Step #2 Configuring the LPR In node
Step #3 Starting the Windows Service
Step #4 Starting the LPR Service
 Note Firewall Note
Third-party firewall applications, including some anti-virus software, may block the port used by Dispatcher Phoenix LPR In nodes. By default, the LPR In node uses port 515. To allow LPR In collection to function properly, please consult your firewall application documentation to either stop blocking port 515 or to allow access by the workflow engine process, “blox-erl.exe.”
(These instructions are for Windows 10)
Step #1 Configuring The LPR Port
To use the LPR In node, you must first configure the LPR port, do the following:
-
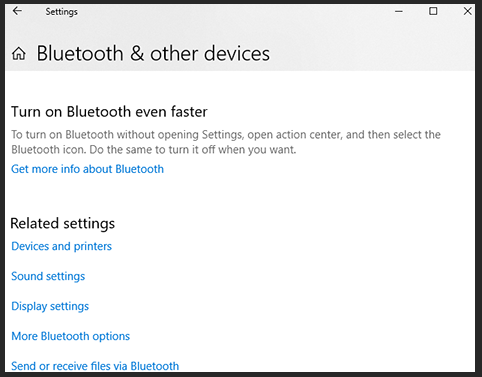
Either go to your Start menu and click the Settings icon or look up Bluetooth and other device settings in the Start search bar. From here the following illustration will appear:
-
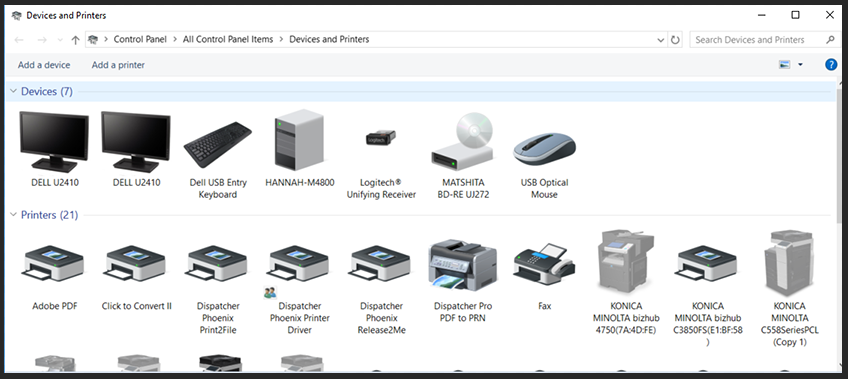
Click on Devices and printers under Related settings, and you will be brought to the following window:
-
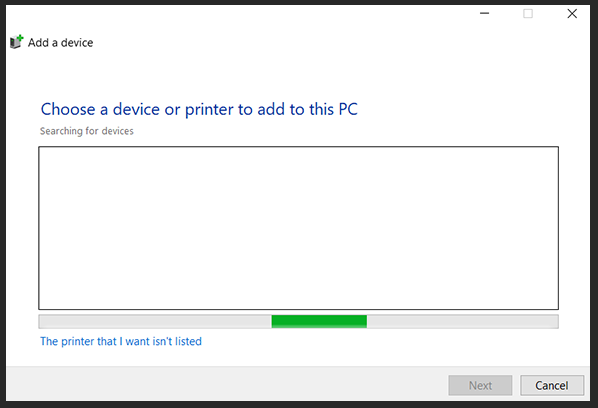
Click on Add a printer to choose a printer as shown in the following illustration. At the bottom, select The printer that I want isn’t listed to manually add your printer.
-
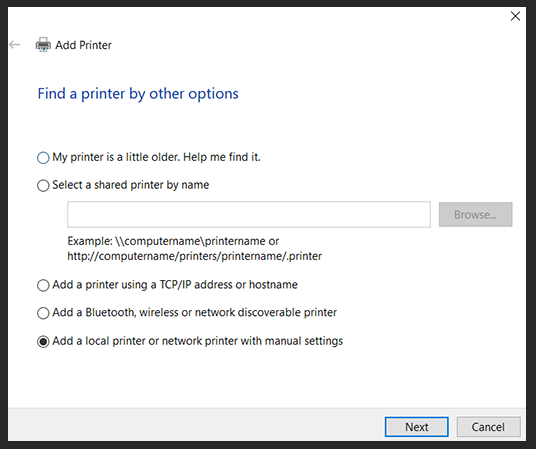
On the Add Printer menu, select the bottom circle next to Add a local printer or network printer with manual settings and click Next as shown in the following illustration:
-
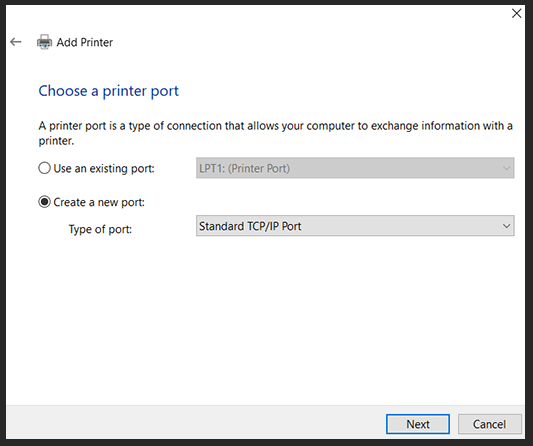
Select Create a new port and select Standard TCP/IP Port in the field next to it, as shown in the following illustration:
-
Type the Hostname or IP address, but don’t check the box to query the printer. Then click Next as demonstrated in the following illustration:
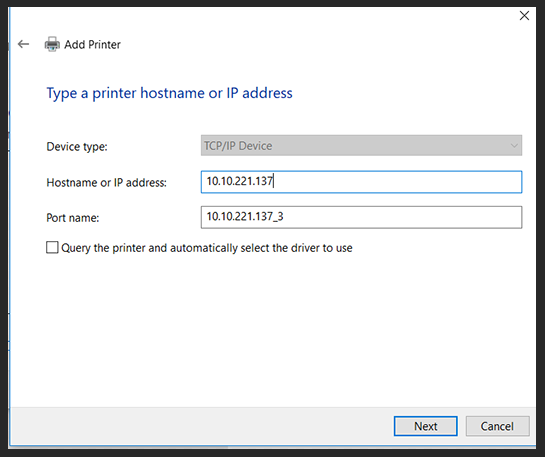
Note: If you’re unsure of your IP address, type Command Prompt in the Windows Start menu and type in ipconfig. Hit Enter and then look for the numbers next to IPv4 Address.
-
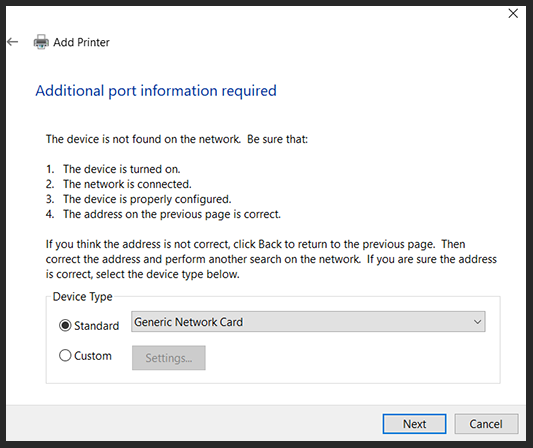
The Detecting TCP/IP port message will appear, and once that is finished the Additional port information required window will appear. Leave everything as it appears with the Standard Device Type checked, and then click Next as shown in the following illustration:
-
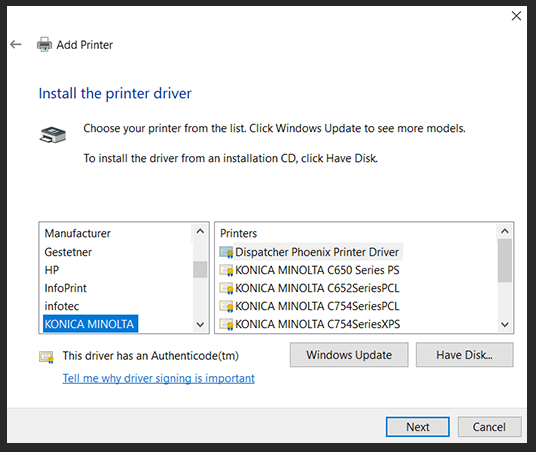
Select KONICA MINOLTA in the Install the printer driver window, and click on the printer you want to connect to. Then click Next as shown in the following illustration:
-
Use the driver that is currently installed, and then click Next as shown in the following illustration:

-
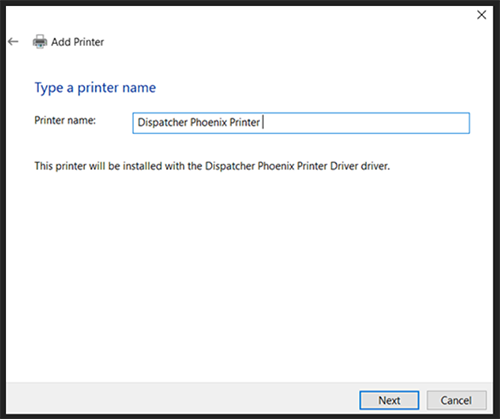
Enter a name for your printer and then click Next as shown in the following illustration:
-
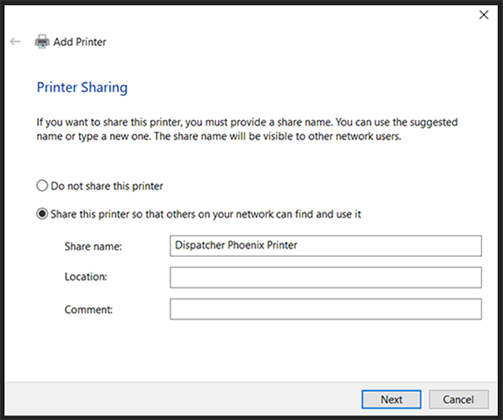
Share the printer and click Next as shown in the following illustration:
-
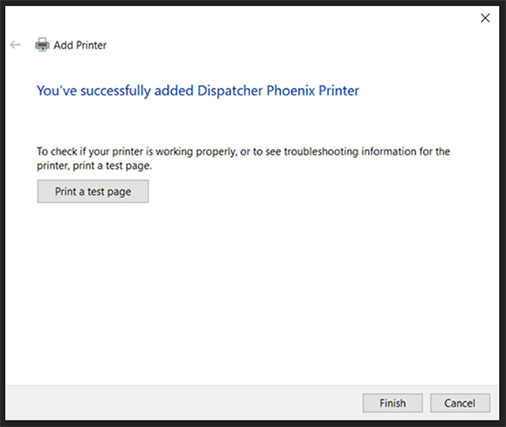
Print a test page or just click Finish.
-
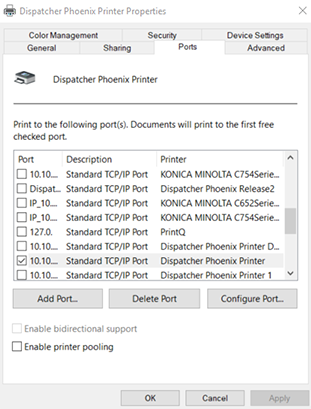
Once the printer is added, go back to the Devices and printers page to find the printer you just added, right-click on it, and then select Printer properties. Go to Ports at the top and then click Configure Port at the bottom as shown in the following illustration:
-
Select the LPR circle under Protocol and create a queue name. Then click OK as shown in the following illustration::
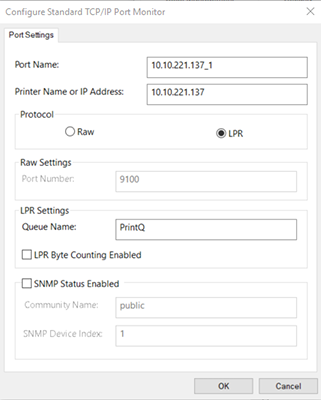
Note: The queue name must match the name you designate in the LPR node, and if your workflow contains multiple LPR In nodes, each queue name must be unique.
Step # 2 Configuring the LPR In Node
Now you can include the LPR In node as part of your workflow. Drag an LPR In node into the Workflow Builder canvas; then double-click on the icon to open the LPR In Node window. Use the Properties panel on the right side of the screen to define how the node looks in the workflow, and use the LPR In Node window for the actual LPR In definition.
The LPR In Node window resembles the following illustration:
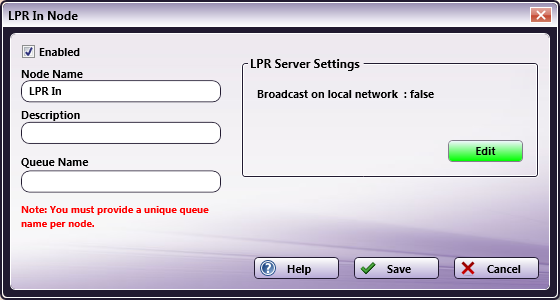
On the LPR In Node window, do the following:
-
Make sure the Enabled box is checked. When unchecked, this input will be ignored and documents will not be processed from this input location.
-
In the Node Name field, enter a meaningful name for the “Collect from” node.
-
In the Description field, enter a description of the LPR In node. This is not required, but can be helpful with multiple collection points. If the description is too long, you can hover the mouse over the field to read its entire contents.
-
In the Queue Name field, enter the same queue name that was specified for the LPR port.
-
If you need to edit the settings of the LPR Service, select the Edit button to launch the LPR Manager.
-
Select the Save button when you are done. You can also select the Help button to access online help, or select the Cancel button to exit the window without saving any changes.
Step # 3 Starting the Windows Service
To start the Windows Service, do the following:
-
Access the Windows Run window by either searching for “Run” from the Start menu or by pressing the Windows Key + R. The Run window will appear, as in the following illustration:

-
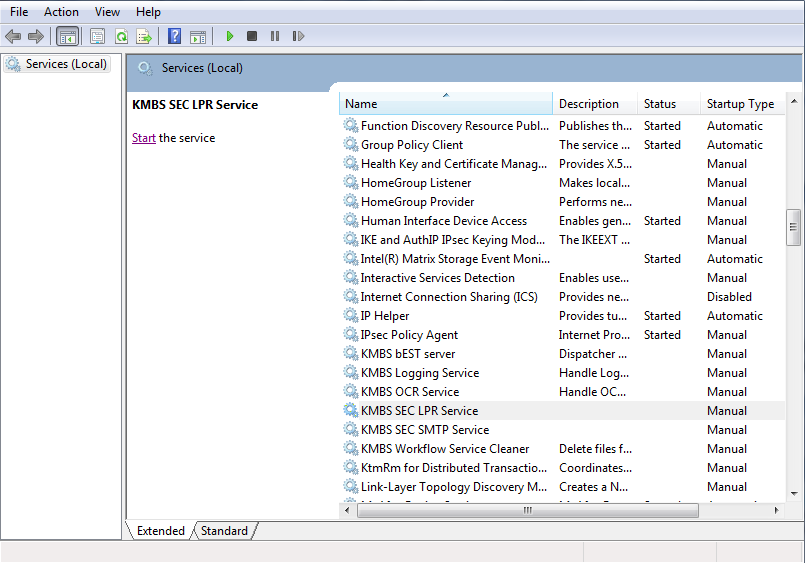
On the Run window, enter services.msc in the Open field; then select the OK button. The Start Services window will appear, as in the following illustration:
-
On the Start Services window, select the KMBS SEC LPR Service; then click the Start the service link.
Step # 4 Starting the LPR Service
Make sure that the LPR Service is running before you run a workflow that contains an LPR In node. The LPR Service can be started by selecting the Start Service button on the LPR Manager, which is accessed from either the LPR In node or from the Tools menu on the main application screen.
Note: When LPR is installed separately (after the initial installation of the application), it will not be configured to start automatically. Additional configuration may be necessary before running the LPR Service successfully.
The LPR Manager resembles the following illustration:
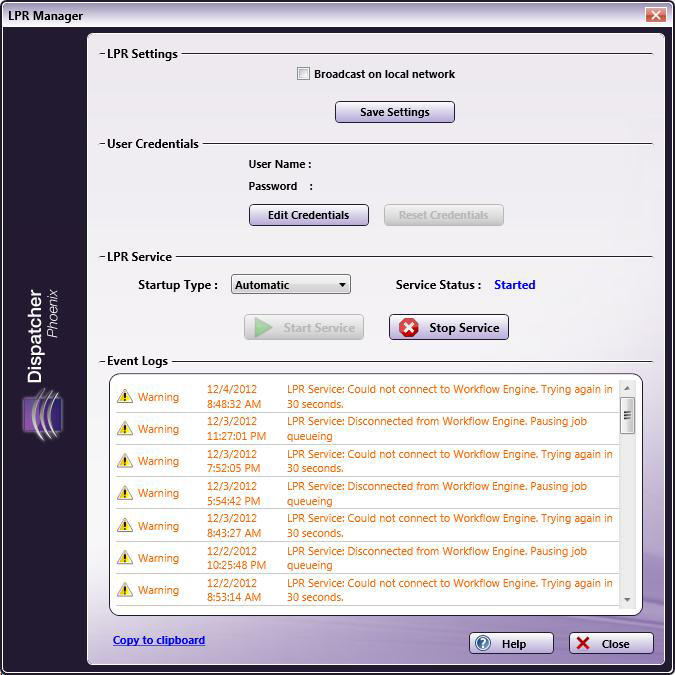
The LPR Manager allows you to edit LPR Service settings.
Note: In order for any changes to take effect, the service must be restarted.
LPR Settings
-
Broadcast on local network. This check box allows you to enable or disable automatic discovery of the LPR print driver on the networks. When this option is enabled, the LPR printer will “announce” its presence on a local network. In this way, you could use a discovery tool like Bonjour for Windows to easily find the LPR printer. When using an mDNS client to install or configure a Windows printer, the LPR queue name may need to be configured separately to match the LPR In node’s queue name.
Note: In order to use this option, you must have the Bonjour for Windows service installed on your system.
-
Save Settings. Click on this button to save the LPR Settings you may have configured.
User Credentials
When Dispatcher Phoenix is first installed, this area appears blank, and the default user name and password for SEC Workflow Services is automatically used. The User name and Password areas only become populated if you change your user credentials for this service.
-
If you need to change the credentials that are used to authenticate against the Workflow Services running (e.g., you have changed the Workflow Services password or want to use the Windows logged-in user’s credentials), select the Edit Credentials button.
This will open the Windows Credential pop-up where you can choose a new user name and enter the appropriate password.
-
To restore your changed credentials to use the default user name and password, select the Reset Credentials button. The user name and password will appear blank again.
-
Restart the LPR Service after making any changes to your credentials.
LPR Service
This section of the LPR Manager allows you to activate inbound communication with the LPR driver.
-
Startup Type Select how the LPR Service should start. These options are in sync with the Windows Services Manager. Options are:
-
Automatic (Delayed Start) - The service starts shortly after all other services designated as Automatic have been started (typically 1-2 minutes after the system boots). This option is only available on Windows 8 and higher Operating Systems.
-
Automatic - The service starts when the system first starts.
-
Manual - In order to start the service, the user must the Start Service button on this window every time the PC starts.
-
Disabled - The user is prevented from starting the service at any point.
-
-
Start Service button. Select this button to start the LPR Service.
-
Stop Service button. Select this button to stop the LPR Service. By default, the LPR Service will not be running when the application first starts.
Event Logs
This section of the LPR Manager displays the LPR Service’s event logs.
- Copy to clipboard. Click this link to copy the event logs to the clipboard.

