Laserfiche Connector
The Laserfiche Connector node is used to distribute processed documents into a monitored folder for collection by Laserfiche’s Enterprise Content Management (ECM) platform. The node creates an LST file that captures document information formatted in XML along with a copy of the original document. These files are then stored in a folder that is monitored by Laserfiche.
An LST file is a Data List file and pertains to various kinds of information used by multiple types of programs, including Laserfiche. A typical LST file contains a list of information, separated by line breaks, and are normally viewable in plain text format which allows them to be edited by a basic text editor. The files exported by Dispatcher Phoenix will contain data that will be transferred to Laserfiche.
Note: On some operating systems, the UTF16 encoding does not allow users to open the created XML files from the Laserfiche Connector in Google Chrome or Internet Explorer.
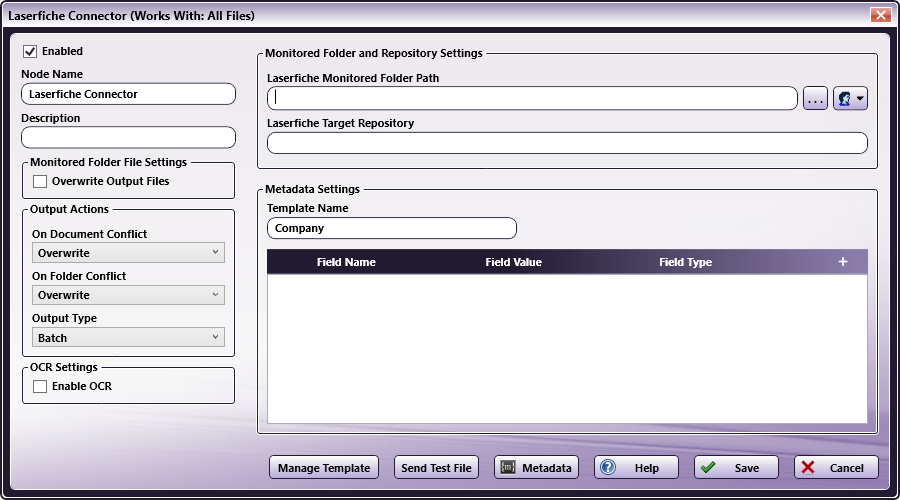
To open the Laserfiche Connector node, add a distribution node for Laserfiche to the workflow, then double-click on it.
Do the following:
-
Check the Enabled box when there are multiple output locations. When unchecked, this output will be ignored. While the workflow will still validate, documents will not be output and may be lost.
-
In the Node Name field, enter a meaningful name for the Laserfiche Connector node.
-
In the Description field, enter a description for the Laserfiche Connector node. Although this is not required, it can be helpful when you have more than one output destination. If the description is long, you can hover the mouse over the field to read its entire contents.
-
In the Monitored Folder File Settings area, select the box next to Overwrite Output File to overwrite files with the same name in the Monitored Folder.
-
In the Output Actions area, specify the following options:
-
From the On Document Conflict drop-down list, choose the action Laserfiche will perform if a document in Laserfiche already exists with the outgoing document’s name. Options are:
- Overwrite the existing document with the new document.
- Merge the two documents together.
- Make Unique to store the document with a new, unique name.
-
From the On Folder Conflict drop-down list, choose the action Laserfiche will perform if a folder in Laserfiche already exists with the same name as the target folder.
- Overwrite the existing folder with the new folder.
- Merge the two folders together.
- Make Unique to create a folder with a new, unique name.
-
From the Output Type drop down, select how files are submitted to the Laserfiche Import Agent. Options are:
- A Batch LST file will be created containing information on all of the submitted files.
- An Individual List (LST) file type will be created for each file going through the Dispatcher Phoenix Workflow.
-
-
In the OCR Settings section, select the box next to Enable OCR. By selecting this option, Laserfiche will OCR the document when it is imported by the Laserfiche Import Agent.
-
In the Monitored Folder and Repository Setup area, specify the following configuration:
-
In the Laserfiche Monitored Folder Path field, choose the Windows directory to which the generated LST files containing Laserfiche XML data will be sent to.
-
In the Laserfiche Target Repository field, enter the path to the target folder in the Laserfiche repository to which the document will be uploaded.
-
-
In the Metadata Settings area, do the following:
-
In the Template Name field, enter the name of the Laserfiche template to be used. This template must already exist on the Laserfiche server.
-
Click the + button to add a field entry to the template.
-
In the field Name, enter a relevant name for the document/entry field. This is the document metadata. Names of fields are defined in the template.
-
In the field Value, enter a value for the field. Or, use the Metadata button at the button of the configuration window to open the Metadata Browser. Then, drag-and-drop the metadata key into the field value.
-
In the field Type, use the drop down to select the type of the value being entered into the field. Options are:
- Text
- Number
- Currency
- Date
- Phone
-
-
Select the Manage Template button to enter custom changes to your Laserfiche template or restore the template to its default settings.
-
Select the Send Test File button to generate a sample LST file containing a sample document and send it to the configured monitored folder to verify that both Dispatcher Phoenix and the Laserfiche applications are configured correctly.
-
Select the Save button to keep your Laserfiche Connector settings. You can also select the Help button to access online help and select the Cancel button to exit the window without saving any changes.
Managing Laserfiche Templates
To successfully route files to Laserfiche from a Dispatcher Phoenix workflow, an XML template is required. This XML template contains all of the information Laserfiche will need in order to properly index and store the document within your content structure.
Each Laserfiche Connector node will begin with a generic template to pass information to Laserfiche, as illustrated below:
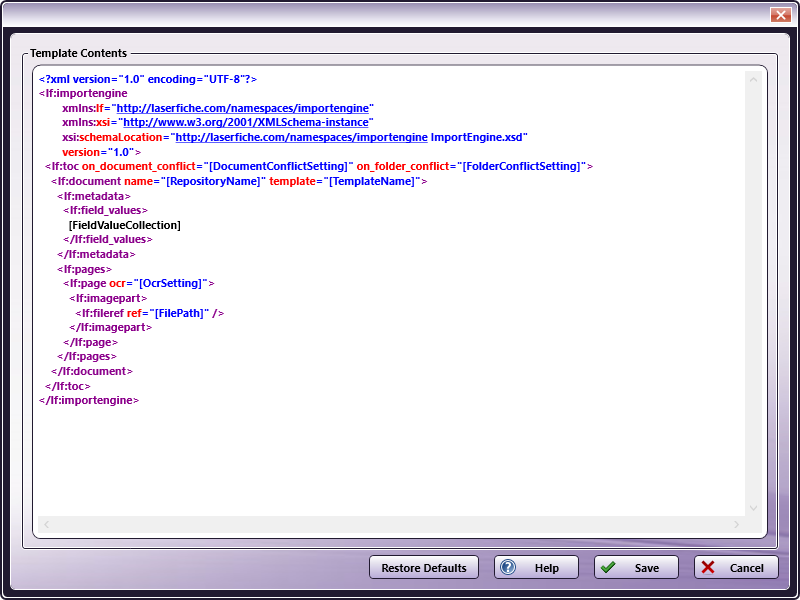
To edit this template:
-
Select the Manage Template button from the Laserfiche Connector configuration window.
-
Enter custom changes using XML to your Laserfiche template.
-
If you’d made changes by mistake or wish to restore the template to its default settings, click the Restore Defaults button at the bottom of the Template Contents window.
-
Select the Save button to keep your Laserfiche Connector settings. You can also select the Help button to access online help and select the Cancel button to exit the window without saving any changes.