Output Folder
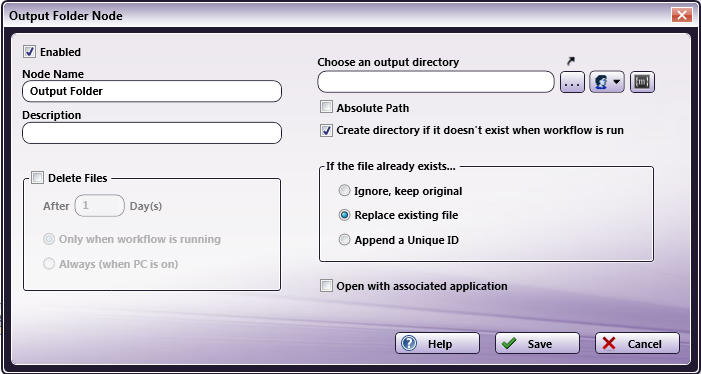
The Output Folder node distributes files to a designated folder. To open the Output Folder Node window, add a node for Output Folder and double-click on it.
-
Enabled - Check this box when multiple output locations exist. When unchecked, this output will be ignored. While the workflow will still validate, documents will not be output and may be lost.
-
Node Name - Enter a meaningful name for the Output Folder node.
-
Description - Enter a description for the Output Folder node. Although this is not required, it can be helpful when you have more than one output destination. If the description is long, you can hover the mouse over the field to read its entire contents.
-
Delete Files - Check the box to activate the fields in this area. Next, then enter the number of days after which your files will be deleted from the output location. Note that it may take approximately 30 minutes before files are deleted. If you do not want the files deleted, leave the check box empty. If you check this box, you should specify whether you want the files deleted:
-
Only when workflow is running. When this option is enabled, files are deleted when the workflow is running. Files will also be deleted if Dispatcher Phoenix is closed but the workflow is running as a service.
-
Always (when PC is on). When this option is enabled, files are deleted when the PC is on. Dispatcher Phoenix does not have to be open in order for files to be deleted.
Note: If the Delete Files box is checked, all files in the output folder (even files that are unassociated with Dispatcher Phoenix) will be deleted.
-
-
Choose an Output Directory - Click on the ellipsis button or the curved arrow to find and select the output location. You can enter the output directory name or use dynamic variables in this field.
-
To browse for workflow metadata, click on the Metadata button. The Metadata Browser window appears. Using this window, you can drag-and-drop variable names from the Select Metadata Key area to the Choose an output directory open text field, as in the following illustration:
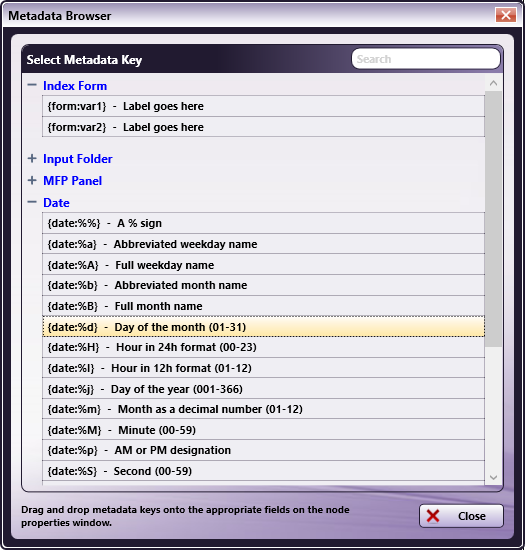
In this window, each dynamic variable is enclosed in curly brackets ("{" “}”). This tells the application that a dynamic variable is being used. Next, the type of dynamic variable is specified.
To create a folder using two different kinds of dynamic variables, a back slash (\) should be added between the two variables (e.g., {fs:DesktopDirectory}\{date:%B}{date:%Y})
In addition, to create subfolders within a folder, each folder name or dynamic variable should be separated by a back slash (\) (e.g., {fs:DesktopDirectory}\{date:%p}\{date:%p})
Note: In the case of dynamic variables that encompass a short period of time, for example seconds or minutes, the Dispatcher Phoenix interface may not always monitor these dynamically created folders. The new folders will still be created, as necessary, when files are processed, reflecting the new time data in each folder name. However, the Output Nodes section will not be able to monitor and display the contents of these new folders.
-
-
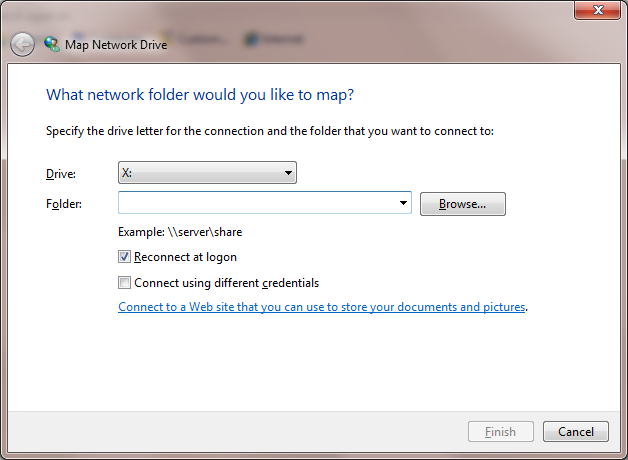
When distributing to a new mapped network drive, make sure that the Reconnect at Logon box is checked when you specify the network drive on the Map Network Drive window. When adding a new folder to an existing mapped network drive, you must disconnect from the mapped network first (by right-clicking on the drive and selecting the Disconnect option) before reconnecting on the Map Network Drive window. At this point, you may need to enter your network credentials again.
-
When creating an Output Folder that points to a network directory, you will need to enter network credentials. If the specified path is a custom path, network credentials can still be specified for it. For example, if you are using metadata variables to create a folder on the network share (e.g., \\server\data\{email:to} or {form:path}\{form:user}), you can enter credentials for the path to ensure that the folder is dynamically created.
Note: Dispatcher Phoenix only supports CIFS and SMB network shares.
To add or modify network credentials, select the Network Credentials button to the right of the ellipsis button; then, choose Add/Edit Network Credentials to open up the Network Credentials pop-up window.
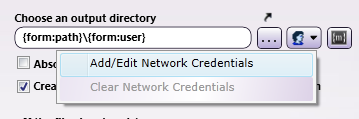
To remove any network credentials that have been specified, select the Clear Network Credentials option.
On the Network Credentials window, you can select your username and enter the appropriate password.
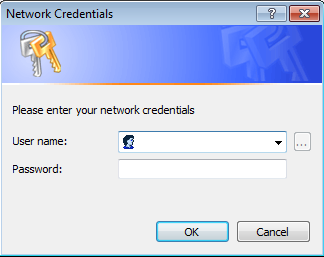
Note: Passwords will be stored in encrypted format with the workflow.
If the expanded path is an absolute path, network credentials will be ignored when the workflow is running.
-
This field will also accept and store the username and password as part of the path name. For example, if you enter:
<file://test:test@servername/folder/user>, the username and password (test, test) will be used as the network credentials; in this case, any user-provided network credentials (entered on the Network Credentials window) will be ignored and the password will not be encrypted. -
If this Output Folder node has been used in an Index Form that is associated with this workflow, the following icon will appear to the left of the Choose an output directory entry field:
 . Click on that icon to open up the Index Form that contains the Output Folder.
 -
To make sure that the output location entered never changes per user, check the Absolute Path box. This option disables any kind of substitutions performed on the location. The default setting (unchecked) is to allow for replacing the path with predetermined file system variables.
Note: When creating a workflow that will be shared, this option should be disabled (since files will not be distributed to the folder unless the user running the workflow has permission to write to that folder).
-
Check the Create directory if it doesn’t exist when workflow is run box to create a new output folder. When using variables to create an output directory, make sure this checkbox is enabled so that the folders will be created when the workflow runs.
Note: If the directory does not exist when the workflow is run and you choose not to create it automatically, files will be lost as they have no destination. It is recommended that, if you choose not to create the new folder, you use an error transition to prevent file loss should the directory not exist.
-
If the file already exists… - Choose one of the following options:
-
Ignore, keep original - To prevent duplicate processed files.
-
Replace existing file - If this process supersedes the previous process.
-
Append a Unique ID - To keep both versions of a processed file.
-
-
Open with associated application - Check this box to open the files, after they have been processed and filed, using the application associated with the file type.
-
Help - Click this button to access Online Help.
-
Save - Click this button to retain your Output folder attributes.
-
Cancel - Click this button to exit the window without saving any changes.
 Firewall Note
Third-party firewall applications, including some anti-virus software, may block ports used by Dispatcher Phoenix output folders. Dispatcher Phoenix uses SMB/CIFS protocols to access Windows directories. By default, SMB/CIFS requires a number of different ports depending on operating system and network requirements. If the connection fails, check the workflow log for the following message:
Failed to access directory: ‘\\server\share\path\to\file’
To allow Windows directories to be accessed properly, please consult your firewall application documentation to allow access by the workflow engine process, “blox-erl.exe.”
Using OCR Zones To Create Folders
To create folders based on an incoming document’s OCR zones, use the following syntax:
{ocr:zone.name of zone[page number]}
For example, to reference a defined OCR zone called ‘client’ on page one of a document, you would enter the following: {ocr:zone.client[1]}. To create the ‘client’ OCR zone folder on your Desktop, you would enter the following: {fs:DesktopDirectory}\{ocr:zone.client[1]}. With this example, if the OCR zone extracts ‘ABCD,’ a folder on your Desktop named ABCD would be automatically created.
Special Note About Output Folders
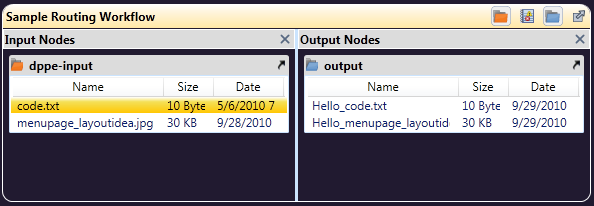
Outputs, in general, act as endpoints for the workflow. Once a file comes to an output node, that workflow or branch of the workflow is done. However, output folders pose an exception to that rule. Unlike other output types, such as printers or email, files may continue along the workflow after reaching an output folder node.
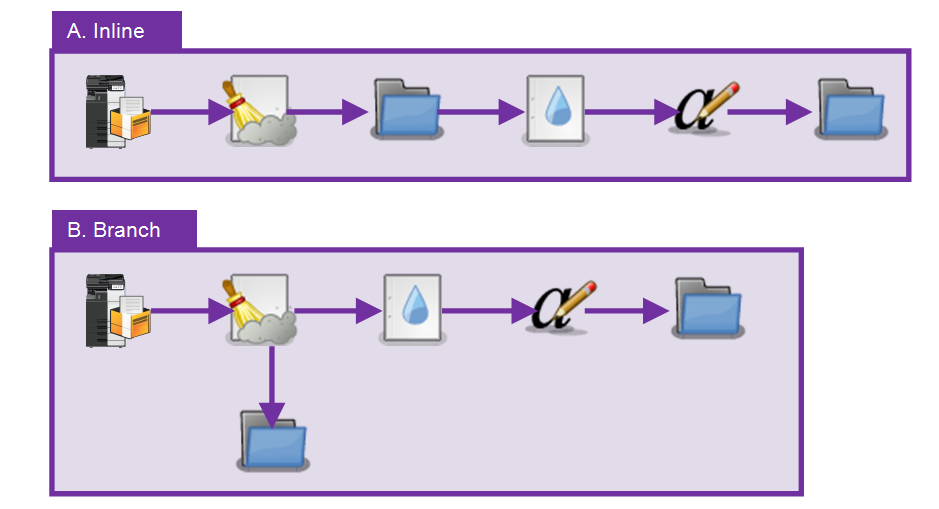
In the example above, both workflows provide the same result. Each takes an input from an MFP scanner and despeckles the file. The resulting file is saved to a folder prior to being watermarked and annotated and then sent to a second output folder. The difference is that Workflow A (Inline) performs an immediate save of the file, then passes files through the output folder, while Workflow B (Branch) performs an intermediate save outside of the main flow of the workflow. There are certain advantages and disadvantages of using the Workflow A (Inline) method:
| Advantages | Disadvantages |
|---|---|
| Performance: Perhaps the biggest advantage to keeping the output folder in line with the rest of the workflow is an increase in performance. Since this method requires only a single process (as opposed to the two required by the Branch method - one to copy the file to the folder and a second to move the file along to the watermark), less resources are needed and processing speed is increased. | Important! As a special case, there are certain limitations which are also placed on output folders. Even though the folder appears as being an input to the next step in the workflow, the output folder will only pass along files received as part of the workflow. This means that any files that previously existed in the folder or were placed there outside of the workflow (copied from your desktop, for example), will not be included with the files being processed and therefore remain untouched in the folder. |
| Catch Errors: Errors during processing are caught more easily. Measures must be taken, namely through the use of the Error Connector Type, to ensure that files are processed properly. | Halted Processing: Since there is no other path to the rest of the workflow, if an error occurs at the point of saving to the output folder (a disconnected network drive, for example), the workflow will halt processing and the job will not complete. |