FTP
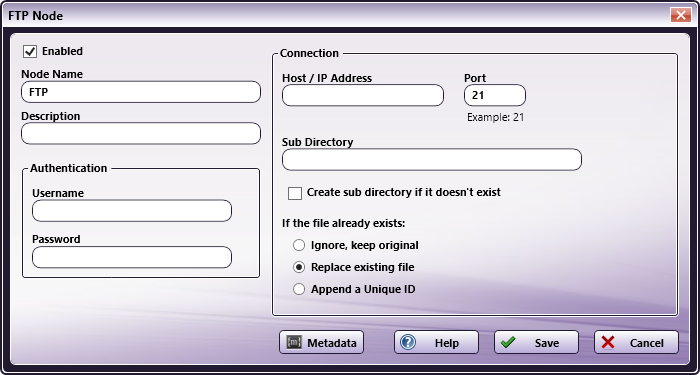
The FTP node distributes output files to an FTP server. To open the FTP node window, add an FTP node to the workspace and double-click on it.
-
Enabled - Check this box when multiple output locations exist. When unchecked, this output will be ignored. While the workflow will still validate, documents will not be outputted and may be lost.
-
Node Name - Enter a meaningful name to the FTP node.
-
Description - Enter a description for the FTP node. This is not required, but it can be helpful when you have more than one output destination. If the description is long, you can hover the mouse over the field to read its entire contents.
-
Authentication - Use this area to enter the following information to access an account on this FTP server:
- Username
- Password
-
Connection - Enter the system information for the FTP server:
-
Host/IP Address - Enter the identifying host name for this server or its IP address.
-
Port - Enter the port used by the server for FTP communication (default is 21).
-
Sub Directory - Enter the path to the desired destination directory on the FTP server. A leading forward slash is not required unless referencing the root directory on the server.
- Create sub directory if it doesn’t exist - Check this box to create a new sub directory.
-
-
If the file already exists: - Specify your preference for file processing when a filename in the workflow to be exported matches a filename in the destination directory. Select one of the following options:
-
Ignore, keep original - Select this option to cancel the export of the file and preserve the original file in the destination directory. This option prevents duplicate processed files.
-
Replace existing file - Select this option to overwrite the original file in the destination directory and replace it with the exported file.
-
Append a Unique ID - Select this option to append the filename of the exported file with a unique ID to distinguish it from the original file in the destination directory. This option retains both versions of a processed file.
-
-
Metadata - To browse for workflow metadata, click on this button. The Metadata Browser window appears. Using this window, you can drag-and-drop variable names from the Select Metadata Key area to the appropriate open text fields.
-
Help - Click this button to access Online Help.
-
Save - Click this button to retain the FTP definition.
-
Cancel - Click this button to exit the window without saving any changes.
FTP Configuration
Dispatcher Phoenix supports FTP and FTP-SSL (FTPS) using SSL and TLS. Depending on the configuration of the FTP Server you may need to change the port from 21 (the default) to either 990 (the default for SSL/TLS), or to whatever port for which the FTP Server has been configured.
Dispatcher Phoenix supports SSH-FTP (SFTP), but only as an output using the SFTP Out node.
 Firewall Note
Third-party firewall applications, including some anti-virus software, may block ports used by Dispatcher Phoenix FTP nodes. By default, FTP uses port 21. However, this port number is configurable and, in the case of passive-mode FTP, possibly arbitrarily defined by the server, so it may differ from the default value. If FTP connections fail, check the workflow log for the following message:
Failed to connect to ftp.com:21 <ftp://ftp.com:21>
To allow FTP to function properly, please consult your firewall application documentation to either stop blocking port 21 or to allow access by the workflow engine process, “blox-erl.exe.”