Barcode Writer

The Barcode Writer node is used to create one or more customized barcodes and barcode labels and position them on scanned image files. You have the option of creating Code 3 of 9 and Code 128 barcodes. The barcode fonts needed for this node are installed automatically with the Barcode Writer module.
With this node, barcodes can be positioned vertically or horizontally anywhere on the page. You can also rotate barcodes at 90° angles. Other advanced positioning and formatting options are also available, including shrinking the size of the page content and shifting the content’s position on the page to make room for barcodes. This node works with TIFF, JPG, GIF, PNG, BMP, and PDF files.
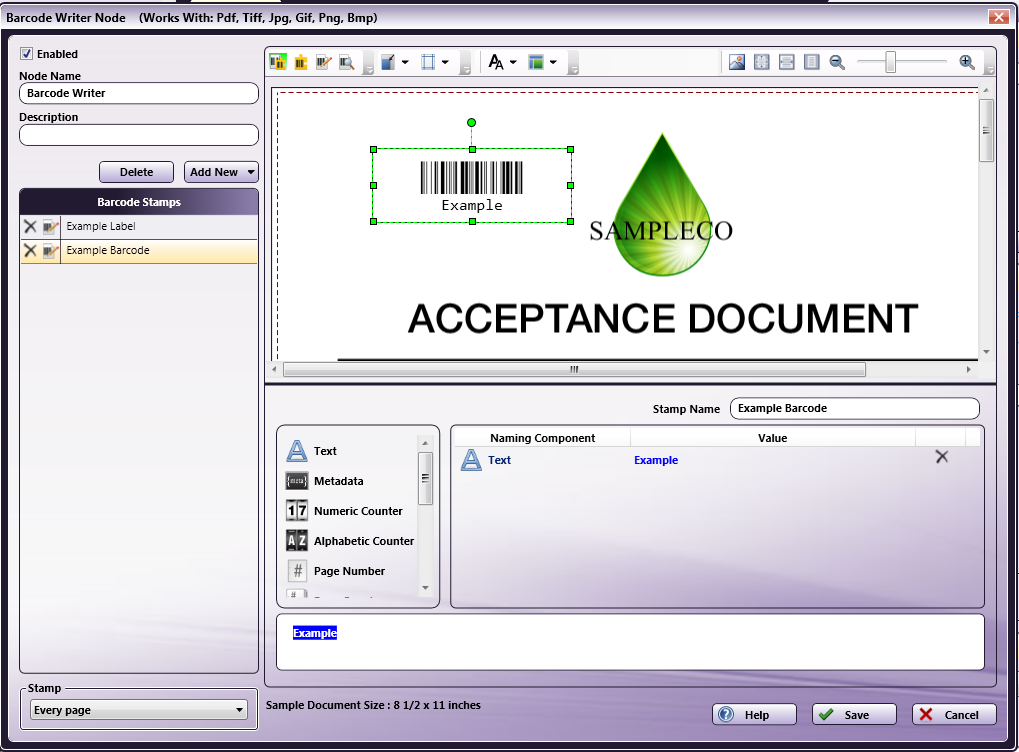
To open the Barcode Writer node properties window, add a process node for Barcode Writer onto the Workflow Builder canvas and double-click on it. The Barcode Writer node window resembles the following illustration:
Barcode Stamps List
In the Barcode Stamps list area, you can do the following:
-
Arrange the order of the barcodes/labels. When working with multiple barcodes and/or barcode labels that overlap each other on the page, you can change their order by dragging-and-dropping the barcode/labels listed.
-
Edit the name of a Barcode or Barcode Label. To change the name used to identify a barcode or barcode label, either click on the Edit icon next to its name, or double-click on the name.
-
Delete the defined barcode or barcode label. Either click on the Delete icon next to the name, or select the barcode or barcode label in the Barcode Stamps list and press the Delete key on your keyboard. A confirmation message will appear to ensure that you really want to delete the barcode/label.

Edit Barcodes Area
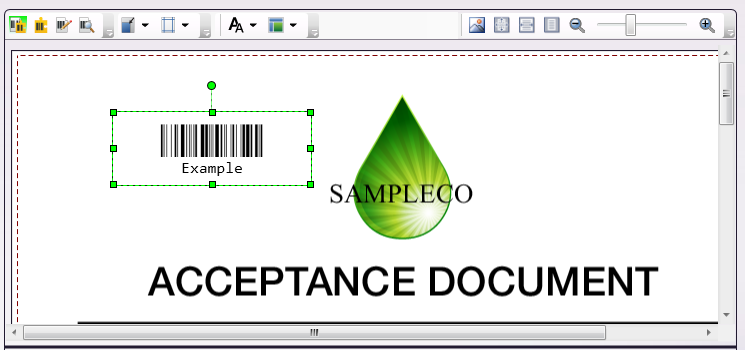
The Edit Barcodes area displays a sample document on which the defined barcodes/labels appear. On the sample document, margins are displayed in red. By default, the Barcode Writer node comes pre-populated with a defined Code 128 Barcode that has a value of “Example” and a Barcode Label that lists the sample barcode’s value, as in the following illustration:
You can do the following:
-
Resize the bounding box by selecting the bounding box in the Edit Barcodes area and dragging the appropriate handle(s) until the box is the desired size.
-
Rotate the bounding box in 90° increments by clicking on the bounding box in the Edit Barcodes area and dragging the rotation handle at the top of the box until the box is correctly angled.
-
Move the bounding box to a new location by clicking on the bounding box in the Edit Barcodes area and then dragging the box to its desired position. You can also select the barcode or barcode label and then use the arrow keys on your keyboard to move it.
-
Select multiple barcodes/labels in a rectangular area by dragging a marquee over the ones that you want to select using your mouse. Note that you must start this from either outside the sample document, or, if page content has been shifted, from any white space. Alternatively, you can select multiple barcodes/barcode labels by selecting one, holding down the Shift key, and selecting another.
-
To select all the objects in a rectangular area, use the Selection tool to drag a marquee over the objects you want to select.
-
Delete a barcode/barcode label by selecting it and pressing the Delete key on the keyboard. A confirmation message will appear.
-
Shift the sample content by selecting the sample document and dragging it with your mouse (or using the arrow keys on your keyboard to move it).
-
View your barcodes/labels on a different sample document by clicking on the Upload icon on the tool bar.
Components Area
The Components area is the section of the Barcode Writer node window where barcodes and barcode labels can be designed. All of the naming components that can be used to create a barcode or barcode label are listed as icons on the left-hand side. In addition, this area includes a Stamp Name field in which you can edit the name of the barcode or barcode label, if necessary. Drag and drop icons from the list to the main part of the Components area to design your barcode or barcode label.
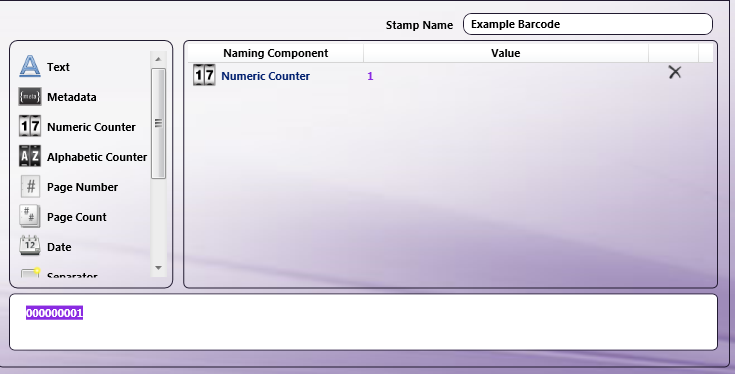
A results area, provided at the bottom of the window, allows you to see the components that you’ve already defined, as in the following illustration:

Tool Bar
The tool bar at the top of the window allows you to configure the appearance of the barcode or barcode label, the appearance of the page content, and the properties of the actual window itself. Any changes you make to the view of the window will remain in effect the next time you open this window.
When using the drop-down palettes on the tool bar, pressing the Enter key or clicking anywhere outside of the palette will save those changes in the Edit Barcodes area. Note that some of the options available on the tool bar are designed to be used with the Edit Barcodes area; the Components area will not be affected by them.
| Tool Bar Icons | Click to… |
|---|---|
 |
Show both Edit Barcodes and Component areas. This is the default setting. |
 |
Show the Component area only in the window. |
 |
Show the Edit Barcodes area only in the window. |
 |
Show Print Preview. Clicking on this icon displays what the final output of the barcode/barcode label on the sample document would look like. The content of the barcode/barcode label(s) cannot be formatted in Print Preview. |
| Shrink and shift the content of the page. | |
| Specify margins for the page. | |
| Customize the font by choosing from the Font drop-down palette. You can choose the size of the barcode or barcode label font, the justification of the barcode or barcode label within the bounding box (left, center, right), and the alignment of the barcode or barcode label within the bounding box (top center, center, bottom center). | |
Customize the layout of the bounding box by specifying various options on the Layout drop-down palette. Note that these changes can also be made manually by resizing or moving the bounding box in the Edit Barcodes area.
|
|
| Find and upload another sample document to use in the Edit Barcodes area. | |
 |
Revert the preview sample document to its original size. Keyboard shortcut: Ctrl + 1. |
| Stretch the sample document to fit the width of the Edit Barcodes area. Keyboard shortcut: Ctrl + 2. | |
| Display the sample document so that it fits completely in the Edit Barcodes area. Keyboard shortcut: Ctrl + 3. | |
| Zoom in and out (using either the magnifying glass icons or the sliding bar). Keyboard shortcuts: Press Ctrl and + to zoom in. Press Ctrl and - to zoom out. |
Using the Barcode Writer Window
On the Barcode Writer window, you can fully customize and organize barcodes and barcode labels. When setting up the node, make sure you do the following:
-
Check the Enabled box so that the node will be processed when the workflow runs. When unchecked, this process will be ignored. Documents will pass through as if the node was not present (i.e., continue along the default or ‘positive’ path). Note that a disabled node will not be checked for logic or error conditions.
-
In the Node Name field, enter a meaningful name for the Barcode Writer node.
-
In the Description field, enter a description for the Barcode Writer node. This field is not required; however, it can be useful for clarification. If the description is long, you can hover the mouse over the field to read its entire contents.
-
When you are done customizing the node, select the Save button to keep your barcode(s) and label(s). You can also select the Help button to access online help and select the Cancel button to exit the window without saving any changes.
Uploading Sample Documents
Clicking on the Upload icon on the tool bar allows you to upload your own sample document to use as a preview when configuring your barcodes and labels. The application provides you with five sample documents of various sizes (A4, Letter-Portrait, Letter-Landscape, Legal, and Tabloid) that you can also use. If you are uploading your own document, note that PDF files cannot be used as sample documents.
When you click on the Upload icon, a “Select an image” browse folder will appear from which you can choose the appropriately sized document.
Note: The sample document must be at least ½ inch by ½ inch.
Shrinking and Shifting The Content Of The Page
To make sure that the barcodes or labels do not obscure important information on the page, it may be necessary to shrink and shift the contents of the page.
-
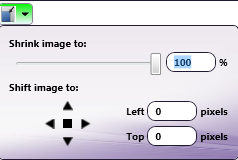
To shrink the content of the page, click on the Shrink icon on the tool bar; then use the Shrink image to sliding bar to specify the percentage that the contents should shrink to. You can also enter a percentage amount in the field to the right of the sliding bar.
-
To shift the position of the content, use the Shift image to: up, down, left, right arrows, enter an amount (in pixels) for the positions in the Left and Top fields, or select the content and drag using the mouse. To center the content on the page, click the square in the center. Shifting positions will clip the content when it goes outside the page boundaries.
-
Clicking once on an arrow moves the content one pixel at a time. However, if you’d like to move faster, you can click on an arrow and hold the left mouse button down. To increase your speed again, hold the left mouse button down after clicking on an arrow and press either the Ctrl or Shift key. The fastest way to shift content is to click on an arrow, keep the left mouse button down, and press both the Ctrl + Shift keys.
Specifying Margins
If you want to change the margins of your documents, click on the Margins icon from the tool bar to enter new values in the Top, Bottom, Left, Right fields. Note that you can position a barcode or label beyond the limits of these page margins if desired. Margins are provided for reference, and also are useful when determining the layout of your barcodes and labels. The unit of measurement for margins is inches.
Note: If an incoming document contains pages that are smaller than the specified page margins on this node, the file will go out on error if those pages are selected to be stamped with the barcode/label.
Inserting A Barcode / Barcode Label
To customize the node to insert a barcode/barcode label into a document, do the following:
-
In the Barcode Stamps area, do one of the following:
-
Select the “Example Barcode” barcode or “Example Label” label that has been pre-defined in the node, or
-
Select the Add New button.
-
-
If you select the Add New button, a drop-down palette will appear, as in the following illustration:
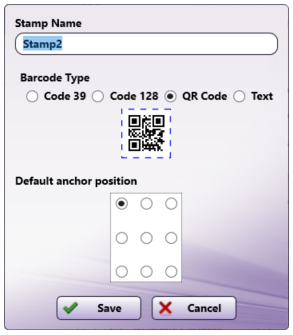
On the Add New palette, do the following:
-
In the Stamp Name field, enter a name for the barcode or barcode label (so that you can identify it in the node). Note that this name can also be edited in the Components area.
-
Using the Barcode Type radio buttons, choose the type of barcode that you want to insert (Code 3 of 9, UTF 128 B or QR Code) or choose Text to insert a barcode label.
-
Using the radio buttons underneath the Default anchor position box, choose a starting position for the barcode/label. Note that, once defined, you can modify this location by either using the Layout drop-down palette or moving the bounding box with your mouse in the Edit Barcodes area.
-
When you are done, select the Save button.
If you choose to position a new barcode or barcode label in the same location as an existing one, the new barcode/label will be placed immediately below the existing one.
-
-
Specify the pages that should be stamped with the barcode or label using the Stamp pull-down menu. Options include:
-
Every page - Insert the barcode/label on every page.
-
Every even page - Insert the barcode/label on even pages.
-
Every odd page - Insert the barcode/label on odd pages.
-
First page - Insert the barcode/label on the first page only.
-
Last page - Insert the barcode/label on the last page only.
-
Define your own page range - Define a custom page range for the barcode/label. Once you choose this option, an empty field will appear to enter the page range. Do the following:
-
Specify a page range by using commas and/or dash signs counting from the start of the document. For example, enter 1, 2, 5-7 to signify pages 1, 2, 5, 6, and 7.
-
Specify a specific stamping sequence within a range of pages by using parentheses. For example, enter 1-10(3) to insert barcodes/labels every third page from pages 1 to 10.
-
Specify the last page by using ‘end.’ For example, enter end(-5) - end to insert barcodes/labels on pages 15-20 of a 20-page document.
-
Other examples include:
To add barcodes/labels to pages 1, 2, 5,6,7, and 19 of a 20-page document, enter: 1,2,5-7, end(-1).
To add barcodes/labels to pages 10-15 of a 20-page document, enter: 10-end(-5).
To add barcodes/labels to every other page from pages 10-15 of a 20-page document, enter: 10-end(-5)(2).
To add barcodes/labels to pages 15-20 of a 25-page document, enter: end(-10)-end(-5).
To add barcodes/labels to pages 10-20 of a 20-page document, enter: end(-10)-end.
Note: If you specify a page range that does not correspond to the number of pages in the incoming document (e.g., adding barcodes/labels to pages 10-20 for a 3 page document), then the file will go out on error.
-
-
Customize the barcode or barcode label by dragging and dropping naming components into the Components main area. They can be reordered at any time by dragging-and-dropping them in this area.
Barcode Metadata
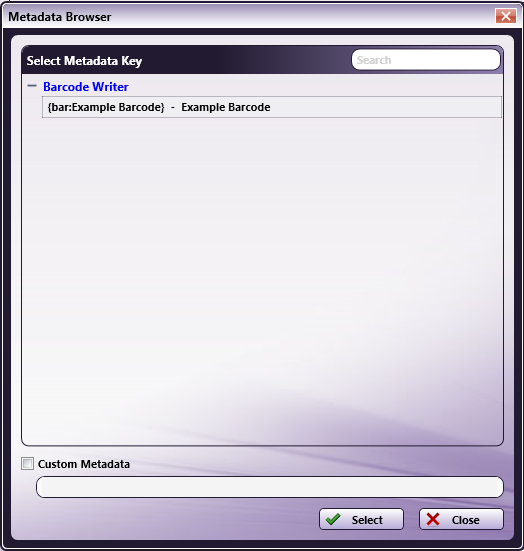
Once a barcode has been created, it can be referenced by other nodes in the workflow. The syntax for Barcode Writer referencing is {bar: name of barcode [<page>]}.
Note: Barcode label metadata is not captured.
You can also use the Metadata Browser window to choose the Barcode Writer variable, as in the following illustration:
Positioning and Sizing Barcodes For Different Document Sizes
When configuring barcodes and labels, keep in mind that the margins and font size that you specified will remain the same, regardless of the dimensions of the images that the barcodes will be applied to; however, the size and position of the barcode/label’s bounding box, which indicates the maximum area in which text can be placed, will be adjusted proportionally to the document size.
For example, a barcode with a font size of 12 pt. that is centered in a 180 x 50 pixel bounding box and positioned at the top left of an 8 ½ x 14 sample document will appear much differently when applied to a 5 x 7 document. The bounding box will shrink and the barcode/label will no longer fit completely inside the box.
On the other hand, a QR Code is not re-sized by the font. Rather, the QR Code itself is responsive. The size of a QR Code cannot be changed by increasing or decreasing the font size. The minimum size for a QR Code is 29px x 29px.
To support a wide range of different-sized documents, try the following:
-
Layout your barcodes/labels on a variety of documents by uploading other sample documents into the Edit Barcodes area. The sample image should be representative of the documents which are to be processed.
-
Adjust the layout of the bounding box’s height and width to ensure that the bounding box remains large enough to display all of the barcode/label. If you want to make sure that your text always remains visible, stretch the height of the bounding box to fit the document’s height.
Specifying Absolute Measurements For The Bounding Box
To ensure that the bounding box is the same size and position regardless of the document being processed, check the Use Absolute Measurements box on the Layout palette. Once this option is enabled, the barcode/label will not scale but will remain the same. Note that this may mean that if a document with a different layout orientation or size is processed, the barcode/label may be positioned off the page.
Barcode Naming Components
| Naming Component | Description |
|---|---|
 |
Text - Adds text to your barcode value. Once you drag-and-drop the Text icon to the Naming Components main area, double-click on the icon to enter the appropriate text.
|
 |
Metadata - Adds metadata to your barcode value from other nodes in the workflow as well as system-defined metadata such as date, file, and system variables. Once you drag-and-drop the Metadata icon to the Naming Components main area, double-click on the icon and then click on the Select Metadata Key button to access the Metadata Browser. |
 |
Numeric Counter - Adds a numeric, sequential counter to your barcode value. Once you drag-and-drop the Numeric Counter icon to the Naming Components main area, double-click on the icon to customize the counter. On the fields that appear, do the following:
|
 |
Alphabetic Counter - Adds an alphabetic counter to your barcode value. Once you drag-and-drop the Alphabetic Counter icon to the Naming Components main area, double-click on the icon to customize the counter. On the fields that appear, do the following:
|
 |
Page Number - Adds the page number to the barcode value by dragging-and-dropping the Page Number icon to the Naming Components main area. |
 |
Page Count - Adds the total number of pages to the barcode value by dragging-and-dropping the Page Count icon to the Naming Components main area. |
 |
Date - Adds the current date to the barcode value. Once you drag-and-drop the Date icon to the Naming Components main area, double-click on the icon to customize the date’s appearance.
|
 |
Time - Adds the current time to the barcode value. Please note this component is not available for Code 3 of 9 barcodes.Once you drag-and-drop the Time icon to the Naming Components main area, double-click on the icon to customize the time’s appearance.
|
 |
Separators - Adds a wide variety of separators to the barcode value. Once you drag-and-drop the Separator icon to the Naming Components main area, double-click on the icon to choose the appropriate separator from the drop-down list. Options include:
|
 |
File Name - Adds the name of the file to the barcode value by dragging-and-dropping the File Name icon to the Naming Components main area. |
 |
File Extension - Adds the extension of the file to the barcode value by dragging-and-dropping the File Extension icon to the Naming Components main area. |
 |
File Size - Adds the size of the file (in bytes) to the barcode value by dragging-and-dropping the File Size icon to the Naming Components main area. |
 |
Image Width - Adds the width of the image to the barcode value by dragging-and-dropping the Image Width icon to the Naming Components main area. |
 |
Image Height - Adds the height of the image to the barcode value by dragging-and-dropping the Image Height icon to the Naming Components main area. |
Note: QR Codes have a built in Level M error correction feature. The error correction rate for Level M is 15%.
Barcode Label Components
Text - Adds text to your barcode label. Once you drag-and-drop the Text icon to the Naming Components main area, double-click on the icon to enter the appropriate text.
 Barcode Value - Adds a barcode value to your barcode label. Once you drag-and-drop the Barcode Value icon to the Naming Components main area, double-click on the icon to select the barcode that you want to use.
Editing A Barcode/Label
Once a barcode or barcode label has been created, you can edit it by doing one of the following:
-
Select it from the Barcode List, or
-
Select the bounding box on the Edit Barcode area.