KDK Code Generator
The KDK Code Generator is an optional process that adds KDK/KDE code to incoming PDF or Postscript files to enable printing on a Kodak Digimaster. To customize this node, you must define the structure of the output file and define how the file will be processed on the Digimaster.
Note: After a PDF file is processed by this node, it becomes a PDF file with a Postscript header and will no longer be recognized as a true PDF file. The PDF file’s file extension will change from *.pdf to *.ps to signify this change in file type.
To open the KDK Code Generator Node window, add a process node for KDK Code Generator and double-click on it.
-
Check the Enabled box when there are multiple processes in a workflow. If unchecked, this process will be ignored. Documents will pass through as if the node was not present. Note that a disabled node will not check for logic or error conditions.
-
In the Node Name field, enter a meaningful name for the KDK Code Generator node.
-
In the Description field, enter a description for the KDK Code Generator node. Although this is not required, it can be helpful to distinguish multiple processes from each other. If the description is long, you can hover the mouse over the field to read its entire contents.
-
Select the Save button to keep your KDK Code Generator definition. You can also select the Help button to access online help and select the Cancel button to exit the window without saving any changes.
Defining Structure Of Output File
To define the structure of the output, do the following:
-
Specify which paper catalog to use by either selecting the Use sample catalog radio button to use the basic paper catalog that comes with the node, or selecting Upload custom catalog radio button to use another paper catalog from another Digimaster device. If you choose to upload a custom catalog, you must download the paper catalog from your Digimaster first.
-
Define the number of subsets that will be in the print file from the Setup Media drop-down list. Choices are Fixed page size sets and Tag delimited sets:
-
If you choose to define the number of pages within each subdocument, you must enter the total pages in the print file and the number of pages in the subdocuments using the Total pages in job field and Total sheets in subset field. Note that the number of pages for subdocuments must divide into the total page count evenly. For example, defining subdocuments of 100 pages in a document that has a total page count of 1000 is valid; however, a subdocument page count of 90 in a document with a total page count of 1000 would result in 11.11 sets, which is invalid.
-
To specify variable-sized subsets, you can use Tag delimited sets, defining each set based on a certain tag found in the file. Click on Tag delimited sets from the Type of subsets in the job pull-down menu; then enter the appropriate text in the Tag value field. This text string or word is case sensitive and regular expressions can be used. If you have specified a media type for a page that does not exist in the set, that media type will not be processed. For example, if the tag delimited set defines a set of 4 pages and a media type is set to occur on page 5, it will not be processed for that set. In addition, if the tag does not occur at the beginning of the document, the pages up to the tag will be routed to the default output of the Digimaster.
Note: When using Tag delimited sets, the input file must be Postscript.
-
-
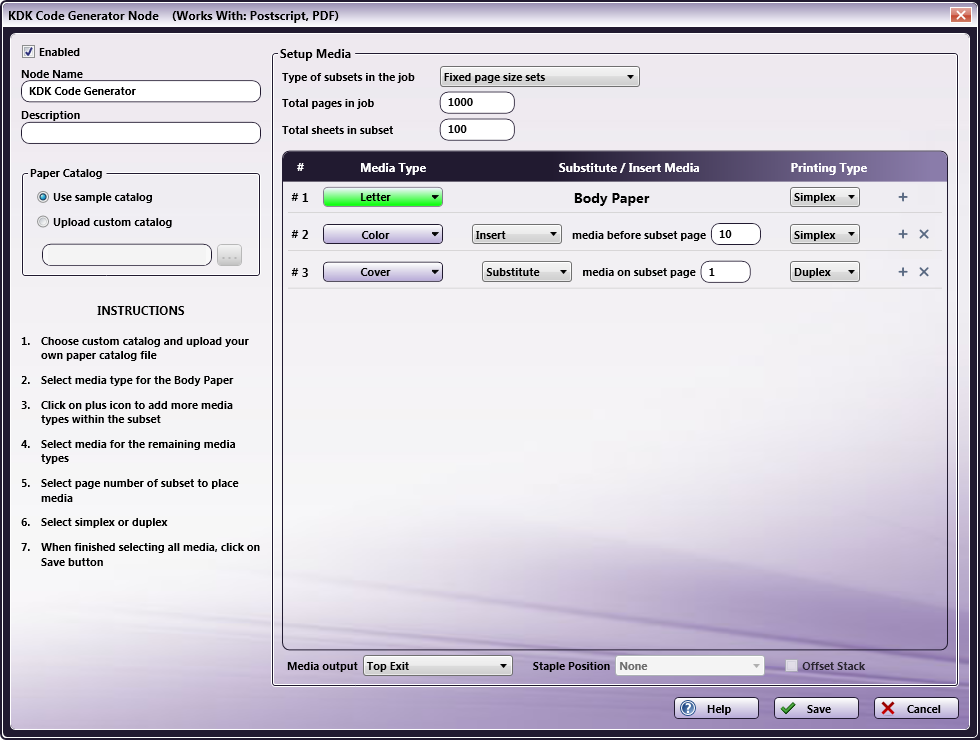
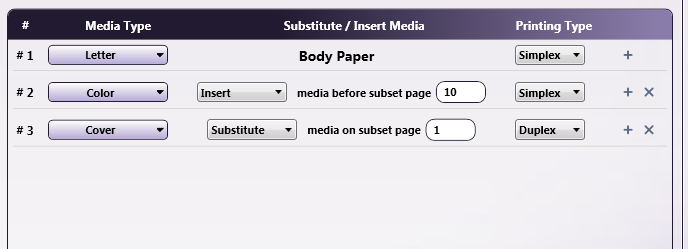
On the #1 row, choose the primary media type for the body by clicking on the Select Media button and choosing a media type from the Select Media pop-up window that appears; then choose whether or not Body Paper will be printed simplex or duplex using the Printing Type drop-down list. This will be the default for the entire print file.
-
After the default is specified, you can define up to 11 additional media types for the file by clicking the + icon at the end of the row. Different media types will either be inserted before or will replace a certain page in a subdocument.
The following illustration is an example of what the node would look like when configured to insert a Color page before page 10 of each subdocument and a Cover page replacing page 1 of each document:
Defining Output Options
After the Media Types have been selected, you can specify the media output/finishing options from the Media output drop-down list. Choices are Top Exit, Finisher, Stacker, and Booklet Maker.
-
If Finisher is selected, the user can customize the position of the staple from the Staple Position drop-down list. Choices are: None, Top, Bottom, Both.
-
If either Finisher or Stacker is selected, the user can check the Offset Stack box to enable job offset.