Parse & Distribute
The Parse & Distribute function can be used to search for a keyword or text string within a file. If the text string is found within the file, the document will be routed to the specified destination location (defined by the Yes condition in the workflow). This is similar to other Parse processes, in that it can be Distributed based on Search results, but the Parse rule is limited to searching the file name, type, and size. The Parse & Distribute rule searches from and to a designated point within the file.
Note: This process can be used with any files that have been converted to PS, PCL, or PRN file types. In addition, this process works with text files.
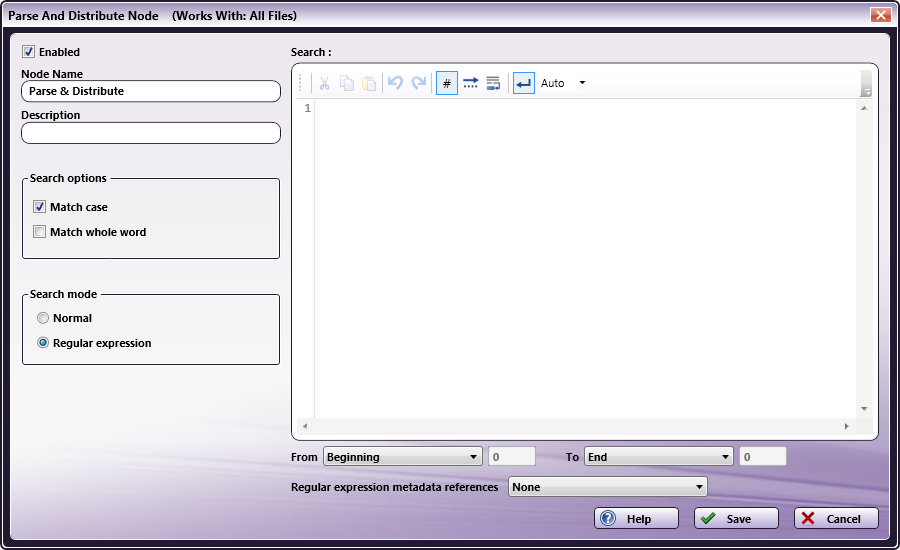
To open the Parse And Distribute Node window, add a process node for Parse & Distribute and double-click on it.
-
Check the Enabled box so that the process will be run. When unchecked, this process will be ignored. Documents will pass through as if the node was not present (i.e., continue along the default or ‘positive’ path). Note that a disabled node will not check for logic or error conditions.
-
In the Node Name field, enter a meaningful name for the Parse & Distribute node.
-
In the Description field, enter a description for the Parse & Distribute node. Although this is not required, it can be helpful to distinguish multiple processes from each other. If the description is long, you can hover the mouse over the field to read its entire contents.
-
In the Search options area, do the following:
-
Check the Match case box to include in the results file names which match the case specified.
-
Check the Match whole word box to include in the results only the whole word specified.
-
-
In the Search mode area, specify either:
-
Normal to search the file name for the exact text entered.
-
Regular expression to use regular expressions to search for a pattern, rather than just words or phrases.
-
-
In the Search for box, enter the text string or expression that you want to use as your search criteria.
-
In the From/To fields, specify your search STARTING and END points. Options include:
| From | To |
|---|---|
| Beginning | End - Search from the beginning of the file to the end of the file being parsed. |
| Line Number - Search from the beginning of the file to a specific line number; enter a line number in the blank field provided. | |
| First Occurrence - Search from the beginning of the file to the first occurrence of a match. It will always return only one match. | |
| Last Occurrence - Search from the beginning of the file to the last occurrence of a match. It will always return only one match. | |
| Occurrence Number - Search from the beginning of the file to a specific occurrence within the results. This field can accept a negative number to search up to an occurrence that is a certain number from the last occurrence. For example, if you specify -5 in this field, you will search up to the fifth occurrence from the last. It will always return only one match. | |
| Line Number | End - Search from a specific line number (entered in the blank field provided) up to the end of the file being parsed. |
| Line Number - Search from a specific line number (entered in the blank field provided) to a specific line number (entered in the blank field provided). | |
| First Occurrence - Search from a specific line number (entered in the blank field provided) to the first occurrence of a match. It will always return only one match. | |
| Last Occurrence - Search from a specific line number (entered in the blank field provided) to the last occurrence of a match. It will always return only one match. | |
| Occurrence Number - Search from a specific line number (entered in the blank field provided) to a specific occurrence within the results. This field can accept a negative number to search up to an occurrence that is a certain number from the last occurrence. For example, if you specify -5 in this field, you will search up to the fifth occurrence from the last. It will always return only one match. | |
| All Previous Occurrences* | First Occurrence - Search within all of the matching blocks of content within previous results up to the first occurrence of a match. It will always return only one match. |
| Last Occurrence - Search within all of the matching blocks of content within previous results up to the last occurrence of a match. It will always return only one match. | |
| Occurrence Number - Search within all of the matching blocks of content within previous results up to a specific occurrence within the results. This field can accept a negative number to search for an occurrence that is a certain number from the last occurrence. For example, if you specify -5 in this field, you will search to the fifth occurrence from the last. It will always return only one match. | |
| All Occurrences - Search within all of the matching blocks of content within previous results up to all occurrences of a match. | |
| * The All Previous Occurrences option only works if the previous rule was a “Search for” operation and the matching results are your Start point. |
- Select the Save button to keep the Parse & Distribute definition. You can also select the Help button to access online help and select the Cancel button to exit the window without saving any changes.
Add References as Metadata
When you use regular expressions with subgroups within your search operation, you can create metadata out of the subgroup(s) for use in other parsing nodes in the workflow.
This is useful to capture pieces of data within a file during a search operation and then using that data later in the workflow.
Using the Regular expression metadata references drop-down list, which only becomes available when you select the Regular expression radio button under Search mode, you can specify how metadata is created:
-
Choose None if you do not want referenced metadata to be available.
-
Choose the Add named references option to create metadata from subgroups with “friendly names” only.
-
Choose the Add numbered references option to create metadata from numbered subgroups only.
-
Choose the Add named and numbered references option to create metadata from both named and numbered subgroups. Note that this option may produce duplicates since named references can also be accessed by numbers.
Examples
The examples below use the following text file as the file being processed:
%!PS-Adobe-3.0
%%Driver Build: 07.01.00.0010
%%Title: (account_statement.pdf)
%%StartKPDComments
%EK-JSE-3-0-Build: 07.00.00.0000
%KDKBody: (Letter) on
%KDKPrintMethod: print
%KDKOutputMedia: stapler
%%Requirements: numcopies(2) staple(front) fold(none) duplex(on) collate jog(alternate)
%KDKRequirements: numcopies(2) staple(front) fold(none) duplex(longedge) collate jog(alternate) trim(off)
%KDKCovers: (Letter) none
%KDKRotation: 0
%KDKError: on (Letter)
%KDKPeSubset: 1 6
%KDKPeOutput: stapler 6
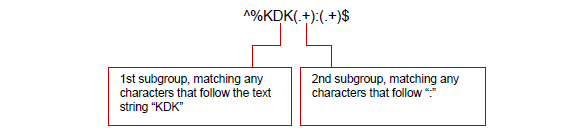
Example #1: To use the values found after all occurrences of %KDK in a file, you could do the following:
-
On the Parse and Distribute node, click the Regular Expression radio button in the Search Mode area.
-
Enter the following regular expression in the Search area:
-
Make sure that the Add numbered References option is selected from the Regular expression metadata references drop-down list.
-
In a subsequent Insert node, enter: {parse:1} to insert the value that was pulled from the first subgroup specified in the regular expression on the Parse and Distribute node. (Make sure that the Expand Dynamic Variables option is enabled on the Insert node window).
Results:
The inserted value would be: Body
(the first occurrence of the 1st reference group)
Example #2: You can also use a friendly name for your subgroup. As another example:
-
On the Parse and Distribute node, click the Regular Expression radio button in the Search Mode area.
-
Enter the following regular expressions in the Search area:
^%KDK(.+):(?<Value1>.+)$
^%KDK(.+):(?<Value2>.+)$
^%KDK(.+):(?<Value3>.+)$
where <Value1>, <Value2>, and <Value3> are friendly names for the subgroups. The friendly name must be enclosed in angle brackets “< >”
-
Make sure that the Add named and numbered references option is selected from the Regular expression metadata references drop-down list.
-
In a subsequent Insert node, enter {parse:Value3} to insert the value of the Value3 subgroup. (Make sure that the Expand Dynamic Variables option is enabled on the Insert window).
The inserted value would be: stapler
Example #3: You can also extract results of regular expressions in a separate file using the Metadata File node. For example:
-
On the Parse and Distribute node, click the Regular Expression radio button in the Search Mode area.
-
Enter the following regular expression in the Search area:
^%KDK(.+):(?<Value>.+)$
where <Value> is a friendly name for the subgroup
-
Make sure that the Add named and numbered references option is selected from the Regular expression metadata references drop-down list.
-
Add a Metadata to File node to your workflow.
-
On the Metadata to File node window, choose to extract Parse and Distribute metadata.
A new metadata file will be created, storing all the values found from the regular expression that you specified in the Parse and Distribute node window.
Using the Tool Bar
Using the tool bar, you can do the following:

-
Load Text - Loads text from another file. You will be directed to a window where you can find and select the file to be loaded. Note that the file size should not exceed 2 MB.
-
Cut - Moves text to clipboard.
-
Copy - Copies text to clipboard.
-
Paste - Pastes text from clipboard.
-
Undo - Reverses the last action performed.
-
Redo - Repeats the action that had previously been “undone.”
-
Line numbers - Displays/hides line numbers.
-
White spaces/tabs - Displays/hides white spaces and tabs.
-
Text wrap - Keeps the text in the viewable area.
-
Line ends - Displays/hides markers signifying the end of the line.
-
Custom line ends - Choose what kind of markers to use to specify line endings from now on when inputting text: Windows, Unix, or Mac.