Tabs: Merge PDFs

Note: This node works with PDF files (version 1.3 or later).
The Tabs: Merge PDFs Node is used to merge all input PDF files and insert a tab sheet before the first page of every PDF file. If three original documents are merged into a single file (e.g., 1.PDF, 2.PDF, and 3.PDF), the default name assigned to the combined PDF file is 1.PDF, the name of the first PDF file of the merge. Each PDF file name is used as the Tab’s text. The name of each pre-merged file is used as the text that appears on the Tabs, so for this example, the Tabs text will be 1.PDF, 2.PDF, and 3.PDF.
This node supports four metadata key-value pairs. These key-value pairs are set (predefined) in the PDF prior to being input to this node:
-
job:file.order (Required): The list of PDF document paths to merge.
-
job:tab.paper.w (Optional): The Paper Width of the tab sheets.
-
job:tab.paper.h (Optional): The Paper Height of the tab sheets. Paper Width and Paper Height must be set together. If they are not, the Tab Paper Size applied is based on the size of the first page size of the merged PDF file.
-
job:tab.paperweight (Optional): The Paper Weight of the tab sheets. If the Tab Paper Weight metadata is invalid then the Tabs: Merge PDFs node displays a message in the Activity Log of the workflow and moves the PDF document to the node’s Error folder.
Notes:
-
This Help file contains detailed information about supported Tab Paper Weights. Refer to Job Ticket Metadata. When launched, the Metadata Browser window displays the pre-defined Job Ticket Metadata, the system-defined variables (such as Date, File, System and User info), and the metadata values from the active node.
-
The Orientation of the Tab Sheet is based on the first page of the merged input PDF. When the first page of the merged input PDF is Portrait, the tab sheet inserted will be Portrait and the value entered in the Tab Order field is applied. When the first page of the merged input PDF is Landscape, the tab sheet inserted will be Landscape and the value entered in the Tab Order field is applied._
-
Using the Tabs: Merge PDFs Node
Add the Tabs: Merge PDFs Node to the workflow by dragging the node’s icon onto the Workflow Builder canvas, and then double-clicking on the icon to open the Tabs: Merge PDFs Node’s window:
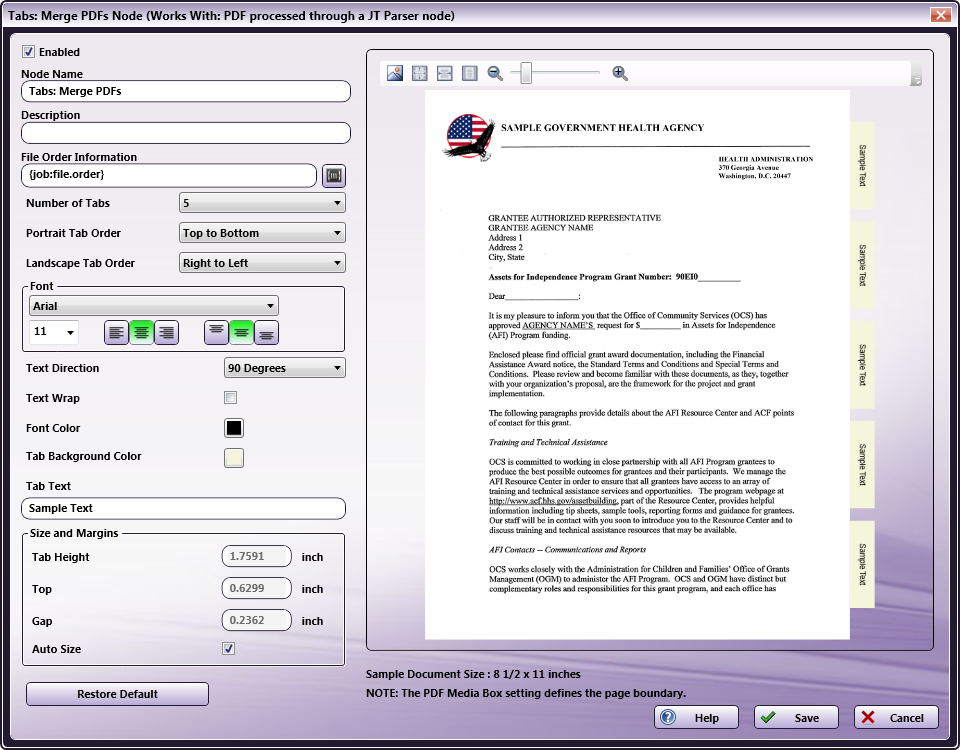
Specify the Tab and Text properties in this window. The Preview panel provides a real-time image of how the selected settings will look on the printed version of the document.
-
Select the Enabled checkbox so that the process will run. When unchecked, this process is ignored. Documents pass through as if the node were not present (i.e., continue along the default or positive path). Note that a disabled node will not check for logic or error conditions.
-
In the Node Name field, enter a meaningful name for the Tabs: Merge PDFs Node.
-
In the Description field, enter a description for the Tabs: Merge PDFs Node. This is not required, but can be helpful with multiple collection points. If the description is long, hover the mouse over the field to read its entire contents.
-
Click the Save button to save the changes. If Cancel is selected and the window is closed, the changes are not saved.
-
Click the Help button to access online help.
File Order Information
Specify the metadata input for the File Order Information.

Click the Browse for metadata button ( ), then drag-and-drop the {job:file.order} metadata key onto the File Order Information field. The metadata key can also be manually entered.
Set the Tab and its Text Properties
Set the Tab properties and its text properties in the configuration window.
Number of Tabs
Specify the number of tabs for the document from the drop-down.
Portrait Tab Order
Specify the Portrait Tab Order for Tab Sheets that have a Portrait Orientation.

- Top to Bottom: If the document’s Orientation is Portrait, Tabs are added from the top to the bottom.
- Bottom to Top: If the document’s Orientation is Portrait, Tabs are added from the bottom to the top.
Landscape Tab Order
Specify the Landscape Tab Order for Tab Sheets that have a Landscape Orientation.
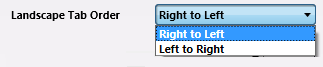
- Right to Left: If the document’s Orientation is Landscape, Tabs are added from the right to the left.
- Left to Right: If the document’s Orientation is Landscape, Tabs are added from the left to the right.
Tab Text
In the Tab Text configuration panel, specify the following:
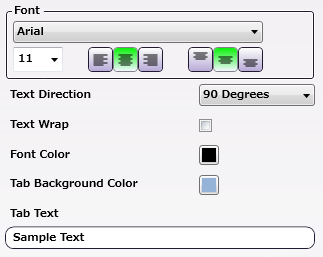
Note: When a tabbed document is printed, the text that prints in the Tab area, comes from the names in the original PDF files. If these names contain Japanese characters that the selected Font does not support, the node displays an error message in the Activity Log of the workflow and the file is moved to the Error Folder.
-
Font: Choose a font name and size from the drop-downs. Use the first set of icons to specify the justification of the tab text within the bounding box (left, center, right). Use the second set of icons to specify the alignment of the tab text within the bounding box (top center, center, bottom center).
-
Text Direction: Specify the orientation of the tab text by choosing an option from the drop-down menu.
-
Text Wrap: Select the checkbox to wrap the tab text.
-
Font Color: Click to open a color selection option, and then select a color value.
-
Tab Background Color: Click to open a color selection option then select a tab background color value.
-
Tab Text:A real-time preview of the Tabs: Merge PDFs Node’s text.
Note: The value entered in the Tab Text field displays in the Sample Preview as a visual aid but has no bearing on the output job when the job prints. The actual tab data printed comes from the file names in the input PDF files.
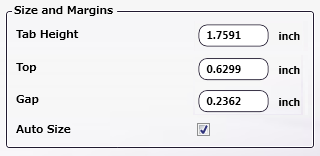
Size and Margins
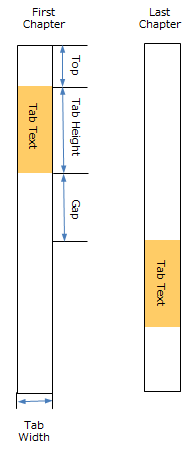
Use this section to specify the Height of the tabs and the Top and Gap margin values. The Preview updates in real-time to show how the printed document will look.
-
Tab Height: Specify the Height of the tab.
-
Top: Specify the Top margin value. This is the distance between the top of the document and the first tab.
-
Gap: Specify the Gap margin value. This is the distance between each tab.
-
Auto Size: Select to automatically update the values of Tab Height, Top and Gap when the Number of Tabs value is modified..
Note: If tab text is too long to display in the text field, the characters are cut based on the selected horizontal and vertical text alignments.
Restore Default
Use the Restore Default button to restore all the default values of the Tab: Merge PDFs Node.
Tool Bar
Use the toolbar at the top of the window to customize the Preview window.
| Tool Bar Icons | Description |
|---|---|
 |
Image icon. Click on this icon to change the sample preview image. Only PNG, JPEG and PDF formats are supported. Supported image display sizes are: A3, A4, A5, B4, B5, Half Letter, Letter, and Tabloid. |
 |
Actual Size icon. Click on this icon to revert the preview sample document to its original size. |
 |
Fit to Width icon. Click on this icon to stretch the sample document to fit the width of the Preview area. |
 |
Whole Page icon. Click on this icon and the sample document fills the Preview area. |
 |
Zoom controls. Use either the magnifying glass icons or the sliding bar to zoom in and out of the Preview area. |
Sample of a Tabs: Merge PDFs Workflow
The purpose of this workflow is to receive XML files, parse the job ticket into XML metadata, combine PDF files into a single document, and then create and add a tab at the start of each PDF file. The modi-fied file is then sent to an Output Folder.
Note: This node produces metadata output with key name as “Job”.
A detailed explanation of each node of the workflow follows:
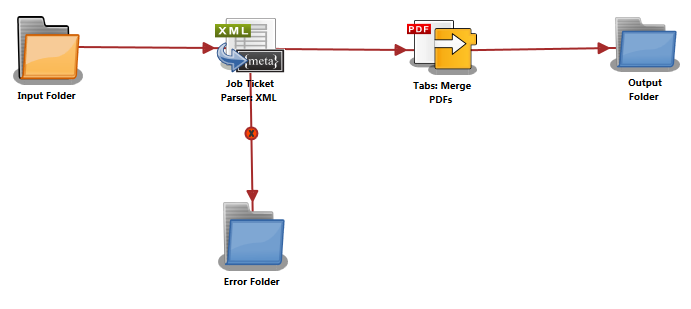
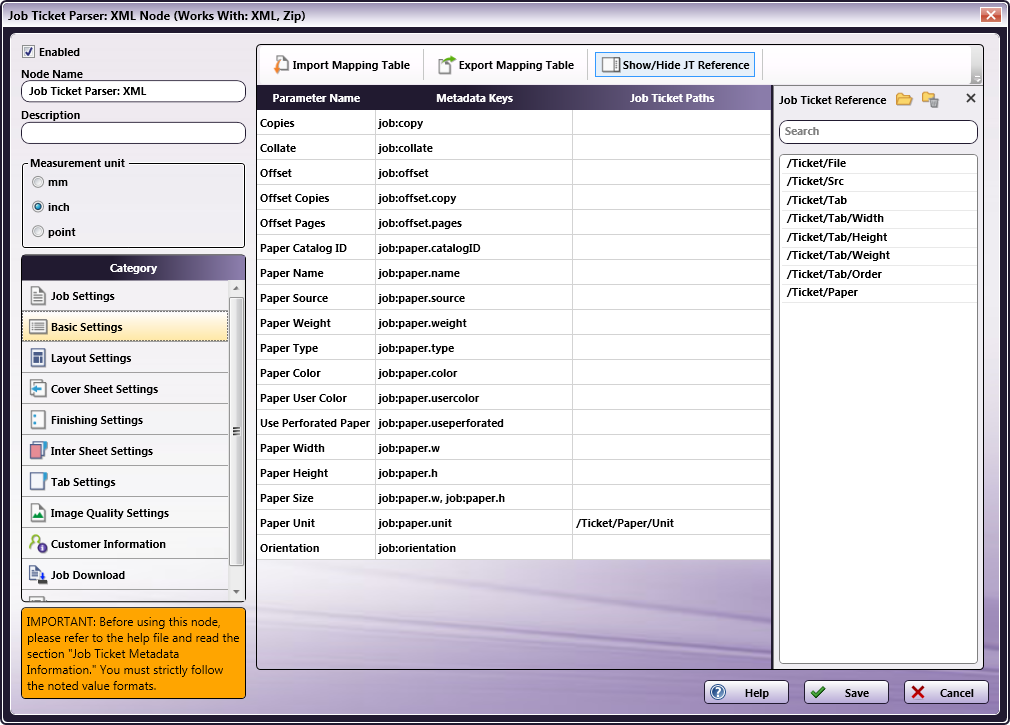
Input Folder Node: Configure the Input Folder to collect XML job tickets and forward them to the Job Ticket Parser: XML Node. The forwarded job ticket files contain the job ticket attribute information. They also contain the processing order for the submitted files. This order information is used when the files are merged in the Tabs: Merge PDFs Node. Below is a sample job ticket that contains the file order information:
<Ticket>
	<File>file</File>
	<Src>C:\\test files\\1.pdf</Src>
	<Tab>
		<Width>9</Width>
		<Height>11</Height>
		<Weight>40</Weight>
		<Order>1.pdf</Order>
		<Order>C:\\test files\\2.pdf</Order>
		<Order>C:\\test files\\3.pdf</Order>
	</Tab>
	<Paper>
		<Unit>inch</Unit>
	</Paper>
</Ticket>
Job Ticket Parser: XML Node: If the document is formatted as XML, the XML information is converted to job ticket metadata and sent forward in the workflow. If a document is not formatted as XML, that document is moved to the Error Folder.
Use this process to map an XML job ticket:
-
Open a text editor then copy the sample XML code noted is the sample job ticket above.
-
The Source Path <Src> noted in the sample job ticket needs to be changed so that the path is valid.
-
Save locally as XML_Tabs_Merge_PDFs.XML.
-
Double-click on the Job Ticket Parser: XML Node. The settings screen opens.
-
In the left panel, set the following values:
- Enabled checkbox: Select to enable the node to accept jobs
- Node Name: Assign a name value to the node in the text field
- Measurement unit: Select the radio button that corresponds to the measurement unit required for the node.
Note: The job ticket referenced above(XML_Tabs_Merge_PDFs.XML) has tab paper size in inches.
-
In the Job Ticket Reference panel (far-right), locate the Open icon:

-
Click the icon. On the screen that opens, navigate to and select the file saved in Step 3 above (XML_Tabs_Merge_PDFs.XML).
-
When the file opens, its contents (or XPaths) display in the Job Ticket Reference panel (far-right).
-
In the Category panel (far-left), click on Basic Settings. The Parameter Name, Metadata Keys, and Job Ticket Paths columns display in the main panel:
-
From the Job Ticket Reference panel, drag-and-drop /Ticket/Paper/Unit to the Job Ticket Paths cell of the Paper Unit row.
-
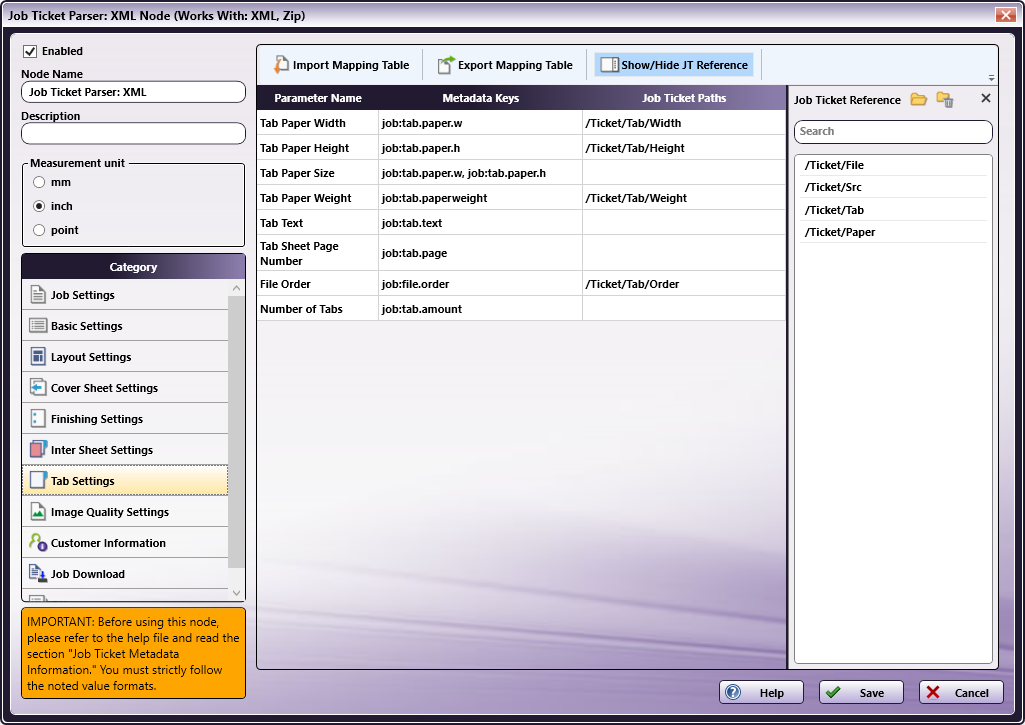
In the Category panel (far-left), click on Tab Settings. The Parameter Name, Metadata keys, and Job Ticket Paths columns display in the main panel:
-
Values from the Job Ticket Reference panel need to be moved to the Job Tickets Paths column, to the open cell that corresponds to the value’s Parameter Name.
-
Drag-and-drop /Ticket/Tab/Width to the Job Ticket Paths cell of the Tab Paper Width row.
-
Drag-and-drop /Ticket/Tab/Height to the Job Ticket Paths cell of the Tab Paper Height row.
-
Drag-and-drop /Ticket/Tab/Weight to the Job Ticket Paths cell of the Tab Paper Weight row.
-
Drag-and-drop /Ticket/Tab/Order to the Job Ticket Paths cell of the File Order row.
-
In the Category panel (far-left), click the Job Download option. The Documentation Source and Job Ticket Path: File Type fields and the Retrieve Print File Option checkboxes display in the main panel:
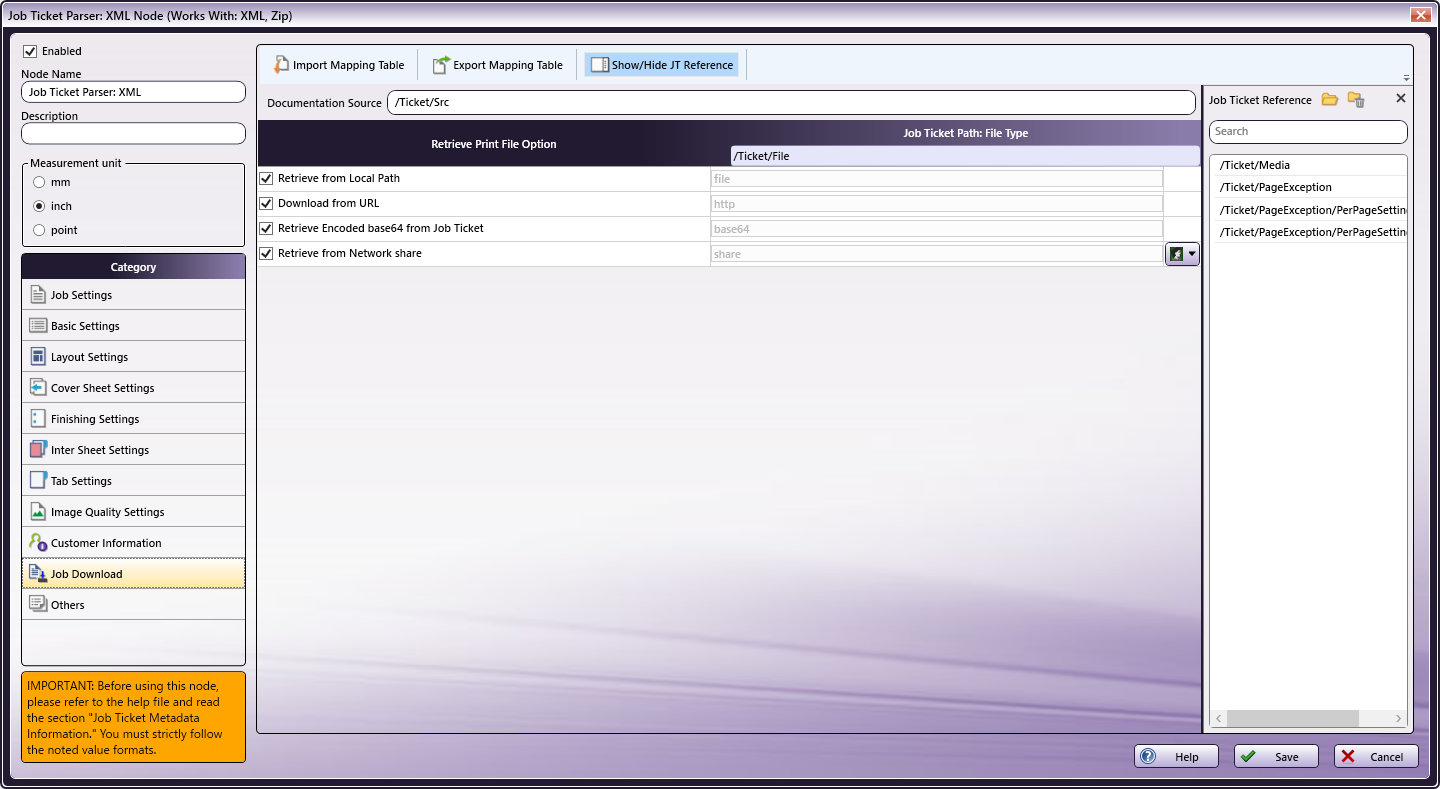
-
In the Retrieve from File Option column, select the checkboxes of all four options: Retrieve from Local Path, Download from URL, Retrieve Encoded base64 from Job Ticket, and Retrieve from Network share.
-
From the Job Ticket Reference panel, drag-and-drop /Ticket/Src to the Documentation Source field.
-
From the Job Ticket Reference panel, drag-and-drop /Ticket/File to the Job Ticket Path: File Type field.
-
Once these actions are completed, the screen will appear as shown in the image above.
-
Click Save to apply the changes to the node.
Tabs: Merge PDFs Node: The Tabs: Merge PDFs Node is used to merge all input PDF files and insert a tab sheet before the first page of every PDF file. If three original documents are merged into a single file (e.g., 1.PDF, 2.PDF, and 3.PDF), the default name assigned to the combined PDF file is 1.PDF, the name of the first PDF file of the merge. Each PDF file name is used as the Tab’s text. The name of each pre-merged file is used as the text that appears on the Tabs, so for this example, the Tabs text will be 1.PDF, 2.PDF, and 3.PDF.
Output Folder Node: The document (which includes its updated tabs) is placed into the folder path that is configured in the Output Folder Node.