Release2Me
Although the Release2Me system workflow provides basic functionality for printing jobs to a queue for future release at an MFP, you also can create workflows with additional Dispatcher Phoenix functionality that also use Release2Me capabilities. In this case, instead of using the System Workflow, you can create your own Release2Me workflow using other processing nodes with the Release2Me Node.
Release2Me also comes with advanced print reporting and print delegation features to help monitor printer usage and secure printouts.
Note: Accessing the Release2Me feature is supported only on MFPs running a Graphical User Interface (GUI).
To open the Release2Me Node window, add a process node for Release2Me and double-click on it.
-
Enabled - To enable this node in the workflow, check the box here. To ignore this node, leave the box blank. When unchecked, this process will be ignored. Documents will pass through as if the node was not present (i.e., continue along the default or ‘positive’ path). Note that a disabled node will not check for logic or error conditions.
-
Node Name - Enter a meaningful name for the Release2Me node.
-
Description - Enter a description for the Release2Me node. Although this is not required, it can be helpful to distinguish multiple processes from each other. If the description is long, you can hover the mouse over the field to read its entire contents.
Configuring the Release2Me Process Node
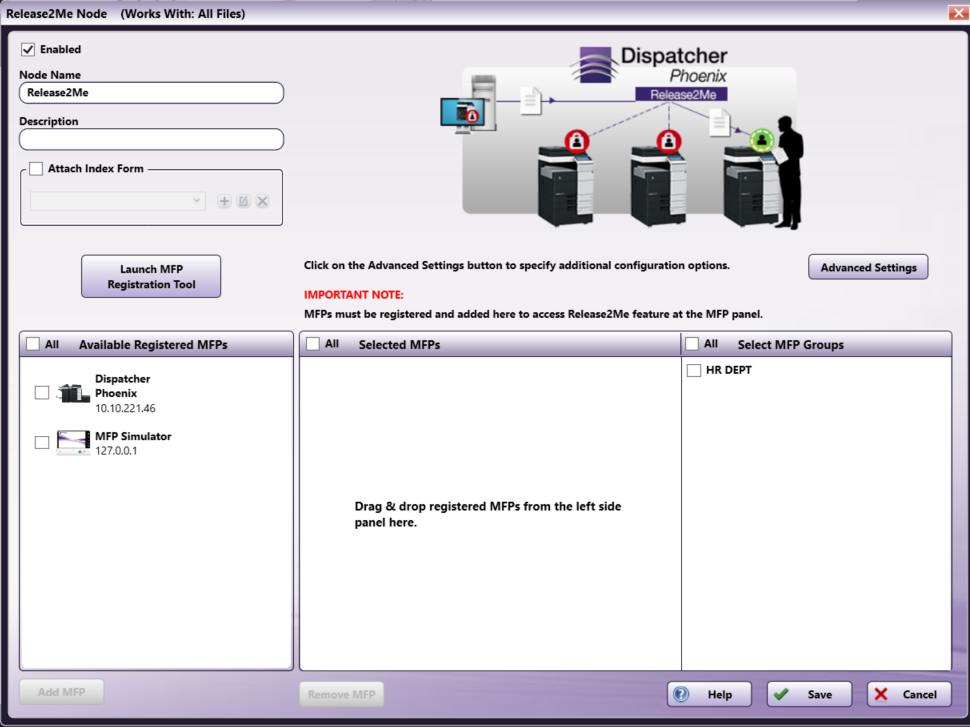
To configure the Release2Me node, you must specify which MFPs you would like to use with the Release2Me solution.
In addition, optional settings are also available. You can:
-
Configure whether or not Dispatcher Phoenix should delete unclaimed jobs in the queue automatically, and the number of days after which print jobs will be deleted from the queue.
-
Customize the Print Queue with additional information about each print job.
-
Associate an Index Form to be accessed at the panel after a print job is released.
Specifying MFPs for Release2Me
To specify the MFPs to use for the Release2Me solution, do the following:
-
Make sure your MFPs are registered using the MFP Registration Tool. You can access the MFP Registration tool directly from the Release2Me node by clicking on the Launch MFP Registration Tool button. The Available Registered MFPs area displays all of the MFP devices that have been registered for use with Release2Me and other workflows.
-
Move the MFP icon(s) from the Available Registered MFPs area to the Selected MFPs box by doing one of the following:
-
Drag-drop the MFP icons.
-
Select one or more MFP icons, then select the Add MFP button.
-
Check the All box to select all MFPs listed, then select the Add MFP button.
-
-
Select MFP Groups - Use this area to add any pre-assembled MFP group to any workflow without having to stop and edit anything.
Advanced Settings
To configure optional advanced settings for the Release2Me node, select the Advanced Settings button. The following advanced settings are available:
-
Delete Unclaimed Jobs - To automatically delete unclaimed jobs in the queue, check the box. Otherwise, leave the box blank. If you check the box, the After __ Days field activates.
- After __ Days - Specify the number of days after which print jobs will be deleted from the queue.
-
Custom Column - Use this field to display additional information about each print job in the Print Queue. By default, the Release2Me queue displays the following information for each print job:
- file name
- submitted date
- total number of pages
- file size
You can use metadata to add additional information about the print job. Do the following:
Browse for metadata - Click on this button next to the Custom Column field. The Metadata Browser window appears. Find and select the metadata that you are interested in, and then drag it over to the Custom Column field. You can add multiple metadata variables to this field.
-
Close - Click this button to keep your changes.
Associating an Index Form with Release2Me
You can also customize your workflow to allow the MFP user to access an Index Form at the panel after the print job has been released. For example, you may want to allow the MFP user to specify print settings at the panel. In this case, you would associate a PJL Print Preferences Index Form with the Release2Me node.
Do the following:
-
Check the Attach Index Form box.
-
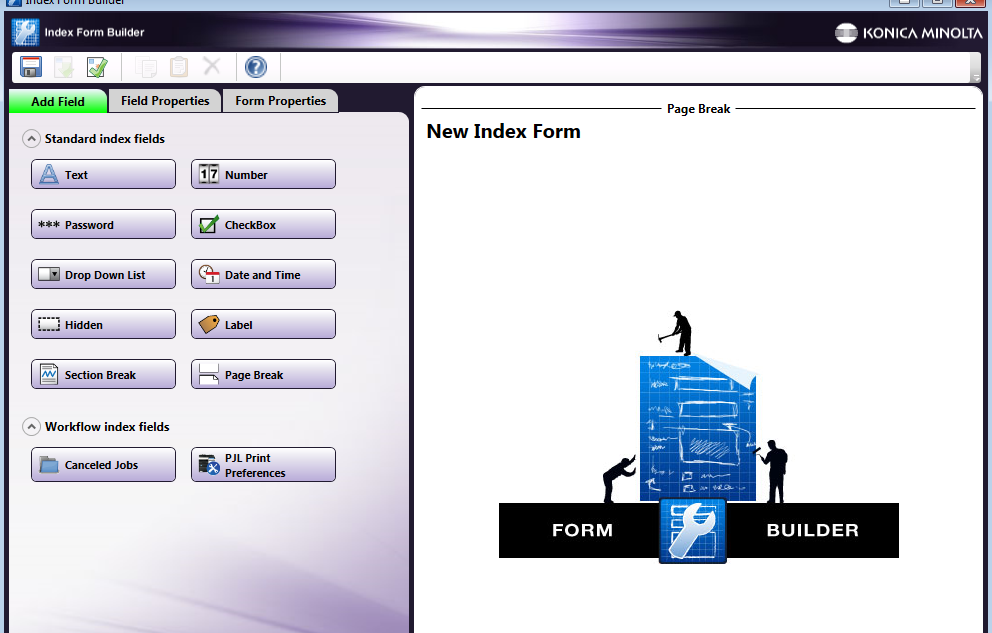
Select the (+) button (Add new index form) to launch the Index Form Builder.
-
On the Create new index form pop-up window, select the Blank Index Form button.
-
The Workflow index fields area display all nodes available to automatically build your index form. For example, if you have a PJL Print Preferences node in the workflow, an associated button will appear in this area, as in the following illustration:
-
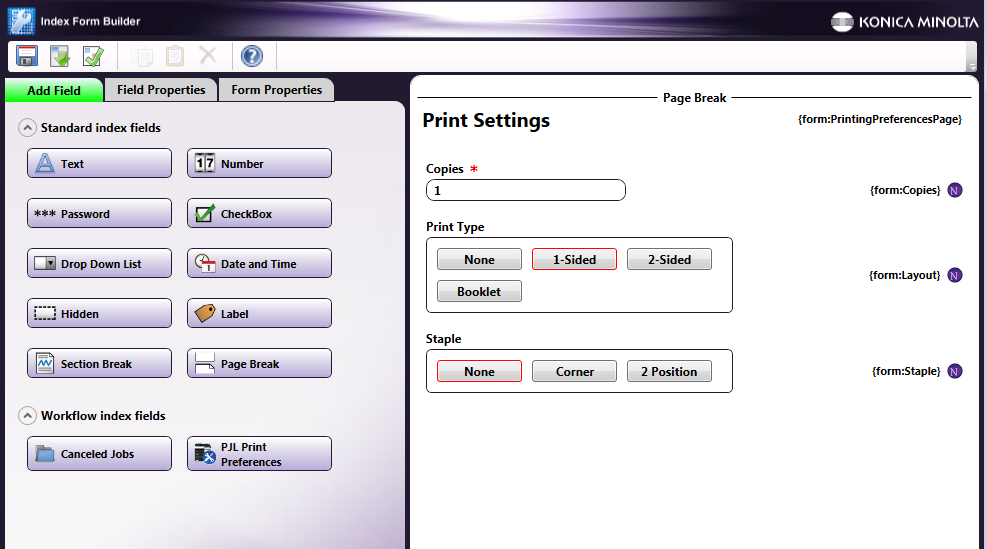
Drag-drop the PJL Print Preferences button to the canvas area of the Index Form Builder. Pre-configured fields appear, as in the following illustration:
Building A Release2Me Workflow
Along with a system-defined workflow, the Release2Me solution comes with an LPR In node, the PJL Print Preferences node, and Dispatcher Phoenix Release2Me Print Driver. Typically, a Release2Me workflow would include the following:
-
An LPR In node, which has been customized with a Queue name of DPPrintQ.
-
A Release2Me node.
-
A PJL Print Preferences node.
-
A Printer node for distribution. To ensure that files are printed out on the MFP that the user is currently using, the Printer node should be customized with the {release:to} metadata.
-
Another distribution node to collect canceled jobs.
The Release2Me process is a decision node, which means you need to set up Yes / No transitions from the Release2Me node to ensure that the documents, once released at the MFP, go to their correct destination.
-
Once released, the document will go out on a Yes transition.
-
If the user chooses to cancel the job, the document will follow the No transition.
Release2Me Activity Panel
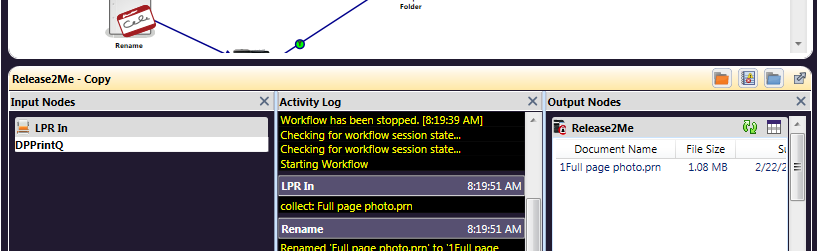
Once a workflow with Release2Me capabilities begins, the Print Queue is listed in the right-hand side of the Activity panel of the main application screen, where the rest of the Output Nodes are typically displayed, as in the following illustration:
Do the following:
-
Click on the Refresh button to update the print jobs that are listed in the Print Queue here.
-
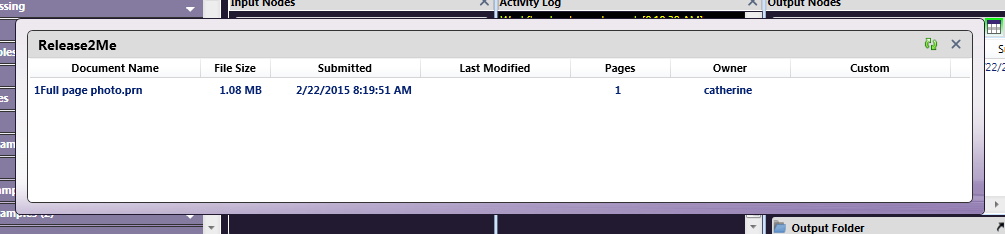
Click on the Show Detailed Print Queue button to display more information about the print jobs in a larger, detachable window, as in the following illustration:
-
To close the Detailed Print Queue view, click on the X button on the top right hand corner of the window. You can also refresh the contents by clicking on the Refresh button.
-
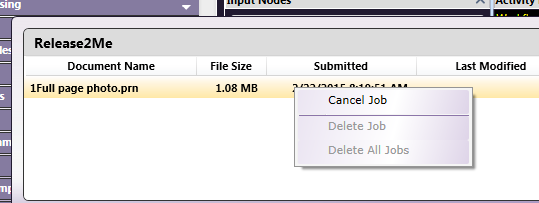
Right-click on a print job listed here to either cancel or delete that specific job from the Print Queue or delete ALL jobs from the Print Queue. See the following illustration:
-
Choose the Cancel Job option to cancel that specific print job. The file will go out on the No transition.
-
Choose the Delete Job option to permanently delete that specific print job from the Print Queue.
-
Choose the Delete All Jobs option to permanently delete all existing print jobs held in the Print Queue.
Note: Print jobs are automatically deleted from the Print Queue if the Release2Me node is deleted from the workflow, or the workflow with the Release2Me node is deleted from your system.
Release2Me at the MFP
Once your Release2Me workflow is running, you can send a print job into the workflow using the Dispatcher Phoenix Release2Me Printer. Then, at the MFP, you should see your workflow with all jobs held in queue.
Release2Me Metadata Variables
If your workflow contains a Release2Me node, you can access and use Release2Me variables in other nodes within the workflow. Release2Me variables have a group name of {release:}. The following are available via the Metadata Browser:
| Metadata Value | Description |
|---|---|
| {release:from} | The IP address of the bEST server that the print job is releasing from. |
| {release:is_production} | This value will be true if the print job is released from a production print device. |
| {release:is_simulator} | This value will be true if the print job is released using the MFP Simulator. |
| {release:mac} | The MAC address of the MFP device. |
| {release:to} | The IP address of the device that the print job is releasing to. |
| {release:user} | The name of the user who is releasing the print job. |
| {release:source} | The value is either the bEST or DPP Client based on the User Interface that is used to release/cancel the job. |
Release2Me Print Delegation
Release2Me includes a print delegation feature.