Single Sign-On Authentication
Dispatcher Phoenix offers single sign-on access to MFPs with user authentication either via the MFP’s authentication settings or an external authentication server (i.e., Active Directory).
Setting up Dispatcher Phoenix to run on an MFP with single sign-on capabilities involves these general steps:
-
Ensuring that the PC’s DNS Settings are configured correctly.
-
Connecting the PC that is running Dispatcher Phoenix to a domain.
-
Configuring the MFP to authenticate against an external server.
-
Configuring the user authentication option for single sign-on in Dispatcher Phoenix.
-
Running the workflow.
Note: PC instructions are written for Windows 10.
Configuring DNS (Domain Name Server) Settings
Make sure to change the PC’s DNS settings to point to the DNS Server on your network. Follow these steps:
-
Go to Control Panel > Network and Internet > Network and Sharing Center.
-
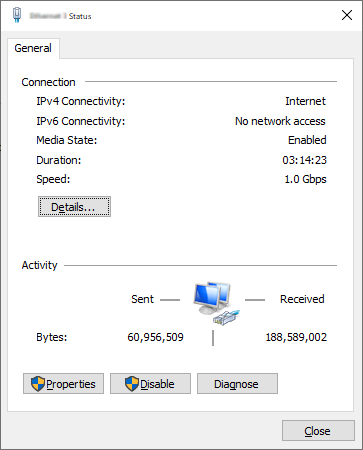
Click the Local Area Connection link next to your network. The Local Area Connection Status window will appear, as in the following illustration:
-
Click on the Properties button to bring up the Local Area Connection Properties window.
-
Select Internet Protocol Version 4 TCP IPv4; then click on the Properties button.
-
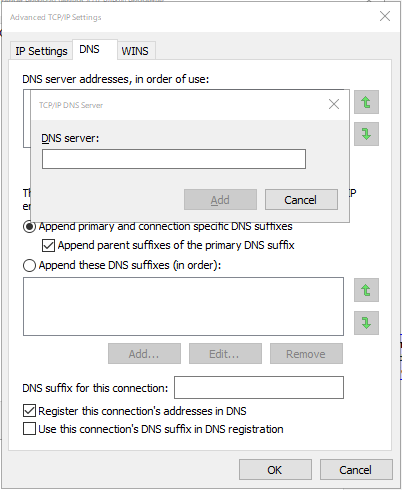
On the Internet Protocol Version 4 (TCP/IPv4) Properties window, click on the Advanced… button to view the Advanced TCP/IP Settings.
-
On the Advanced TCP/IP Settings window, choose the DNS tab to display the DNS server addresses.
-
Click the Add… button to bring up the TCP/IP DNS Server window; then enter the DNS server address.
-
When you are done, click the Add button.
Connect PC to Domain
A domain is a collection of computers on a network with common rules and procedures that are administered as a unit. Each domain has a unique name. Typically, domains are used for workplace networks. To connect your computer to a domain, you’ll need to know the name of the domain and have a valid user account on the domain.
To connect your PC to the domain, follow these steps:
-
Go to Control Panel > System and Security > System.
-
Under the Computer name, domain, and workgroup settings area, click Change settings.
-
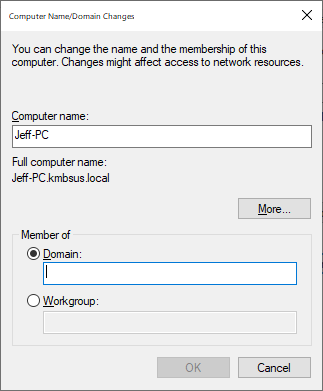
Under the Computer Name tab, click the Change button.
-
On the following window, click Domain under the Member of section.
-
Enter the domain name in the Domain field; then click the OK button. This domain name will be the domain name that is used by Dispatcher Phoenix.
-
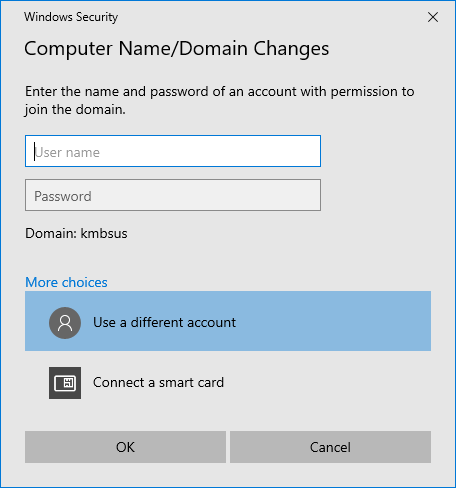
In the Windows Security pop-up window, enter the user name/domain name of the user that is authorized to use domain computers; then select the OK button.
-
If successful, a Welcome message will appear.
-
Restart your PC.
Register the External Server in the MFP
Follow these steps:
Access Administrator Settings
-
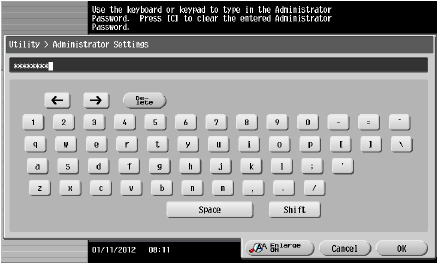
At the MFP, press the Utility key.
-
Touch Administrator Settings and enter the Administrator Password from the keyboard or keypad; then touch OK.
Specify the DNS domain name
-
Go to Network Settings > TCP/IP Settings.
-
Tap on DNS Domain to configure the DNS Domain with your desired domain.
-
Tap on the Default DNS Domain Name field to bring up keyboard and enter a domain name.
-
Tap OK when done.
Set External Server Settings
-
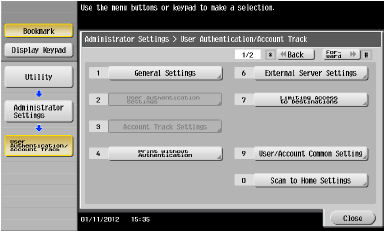
Go to Administrator Settings > User Authentication/Account Track; then click on External Server Settings.
-
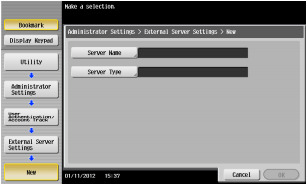
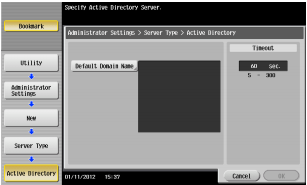
Tap the New button to define a new external server. The following screen will appear:
-
Tap on the Server Name button; then enter the literal name of the Active Directory Domain Controller.
-
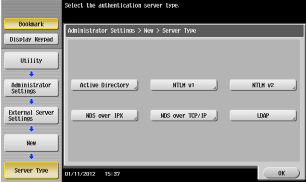
Tap the Server Type button; then choose Active Directory.
-
After choosing Active Directory, you can enter the default domain name (make sure it is the full domain name).
-
When done, tap the OK button. The new external server will now appear in the list.
-
Tap the Close button.
Enable User Authentication
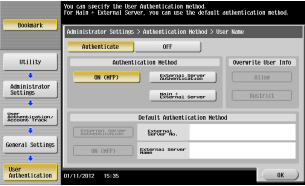
Ensure that the MFP’s User Authentication has been enabled to authenticate against Active Directory.
-
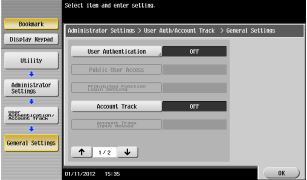
Go to General Settings > User Authentication.
-
Tap on the User Authentication button; then enable the On (External Server) option.
-
When you are done, tap the OK button.
-
When the “Are you sure you want to clear all data” message appears, tap Yes to clear Data.
-
Tap the Close button three times.
Now the Log In screen should appear on the MFP.
Configure Dispatcher Phoenix For Single Sign-On
Launch Dispatcher Phoenix and register the MFP to authenticate with Active Directory authentication. These steps assume that an MFP has already been registered. Follow these steps:
-
Launch the MFP Registration Tool (Tools > MFP Registration Tool option on main application screen).
-
On the MFP Registration Tool, edit the MFP’s authentication options by selecting the MFP in the list; then clicking the Edit button.
-
On the Edit MFP window, select the Authentication tab; then choose the Use MFP provided user name to log in button. Make sure that the correct domain name appears in the Windows Domain field.
-
Click the Save button when you are done.
Run Your Dispatcher Phoenix Workflow
Make sure that your Dispatcher Phoenix workflow is running; then, log into the MFP with your MFP user name and password. You will be able to access your Dispatcher Phoenix workflow without having to log into Dispatcher Phoenix again.
Configuring a Microsoft Login
Dispatcher Phoenix supports Microsoft login. To configure a Microsoft login with Dispatcher Phoenix, do the following:
-
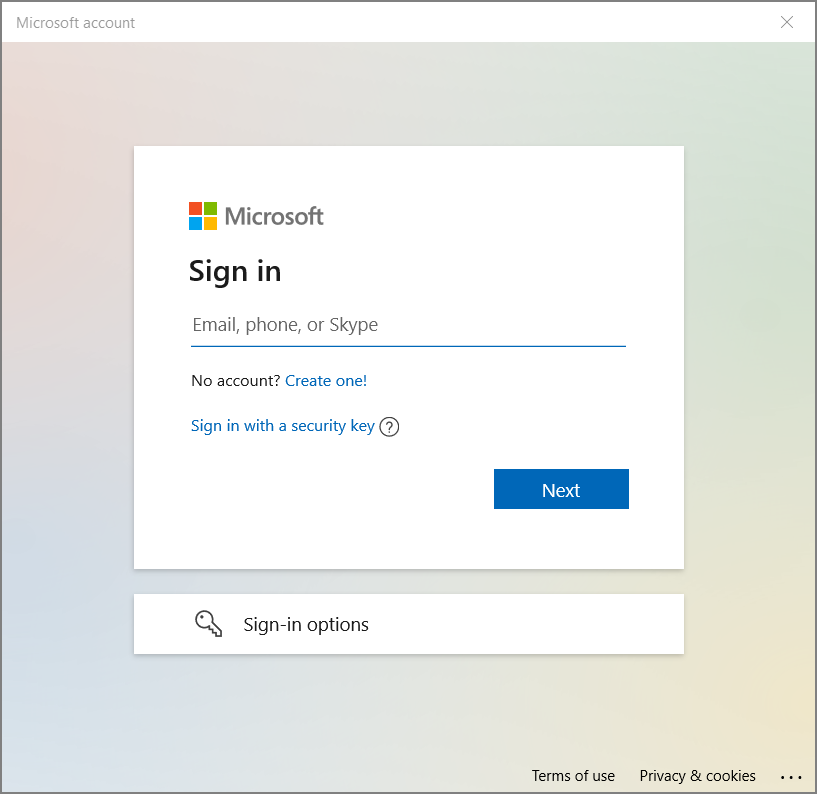
Go to Settings > Accounts. This will open the “Your info” page.
-
Select Sign in with a Microsoft account instead.
-
Enter your Username and Password, if needed.
-
Enter the sign-in code from Microsoft.
-
Enter the password for your computer.
-
Create a PIN. This will return you to the “Your info” page.
Configuring an Entra ID Login
Dispatcher Phoenix supports Microsoft Entra ID (formerly Azure AD) logins. To configure an Entra ID login with Dispatcher Phoenix, do the following:
-
Go to Settings > Accounts > Access work or school.
-
Click Connect. This will open the Microsoft Account window.
-
Click Join this device to Microsoft Entra ID at the bottom of the window.
-
Enter your Username and Password.
-
Confirm you are connecting to the correct organization. Click Join.
-
Click Done. This will return you to the “Access work or school” page.
Limitations of Using Microsoft and Entra ID
Microsoft logins are not supported by Dispatcher Phoenix for:
- Sharing workflows individually with Microsoft accounts within Dispatcher Phoenix Web
Microsoft and Entra ID logins are not supported by Dispatcher Phoenix for:
-
User group permissions within Batch Indexing
-
Workflow Cluster Service credentials