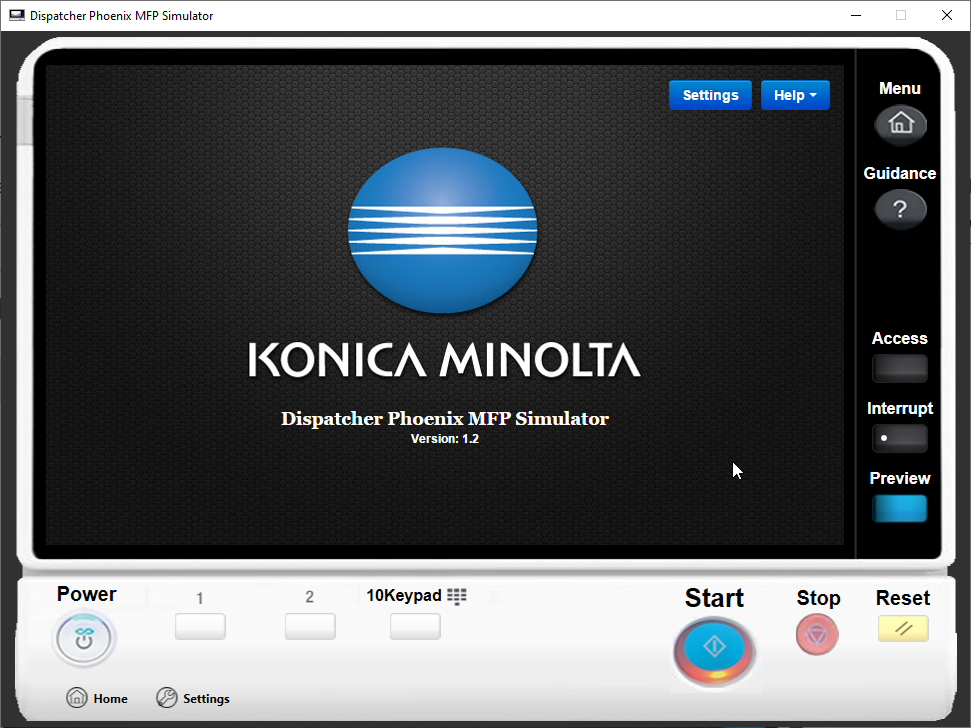
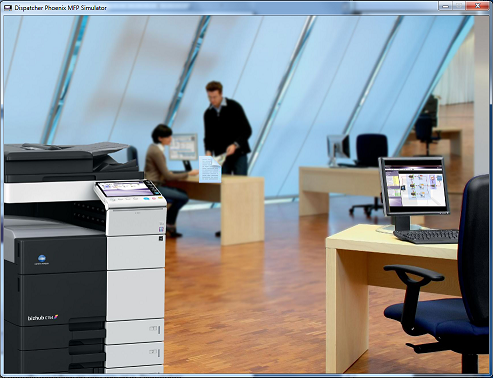
MFP Simulator
The Dispatcher Phoenix MFP Simulator tool simulates Dispatcher Phoenix workflows on the MFP without requiring a connection to a physical MFP. Designed primarily as a sales tool for Konica Minolta professionals, users can interact with the virtual MFP Simulator to easily access and run workflows on an MFP. Using the Dispatcher Phoenix MFP Simulator tool, you can:
- Log in to access your workflows using different authentication options.
- Access a list of your running workflows.
- Switch to either the Online or Stand-alone version of the MFP Simulator to demonstrate running workflows via animation. These versions do not require a connection to Dispatcher Phoenix.
- Choose a device display that most resembles the MFP you want to simulate.
- Customize your workflows, for example enter index data, customize scan settings, perform folder browsing, etc.
- Select a file to scan (if using the Integrated MFP Simulator).
- Customize the layout of the MFP Simulator (if using the Integrated MFP Simulator).
The Dispatcher Phoenix MFP Simulator is available in the following forms:
Each of the simulators has slightly different capabilities and purposes. Generally speaking, you use the Integrated MFP Simulator to access simulated versions of live Dispatcher Phoenix workflows. This version requires an active connection to Dispatcher Phoenix. You use the Online and Stand-alone simulators to access “canned” workflows for demonstration purposes. These versions do not require a connection to Dispatcher Phoenix.
In addition, each simulator can be displayed using any of the following device displays:
Set Up
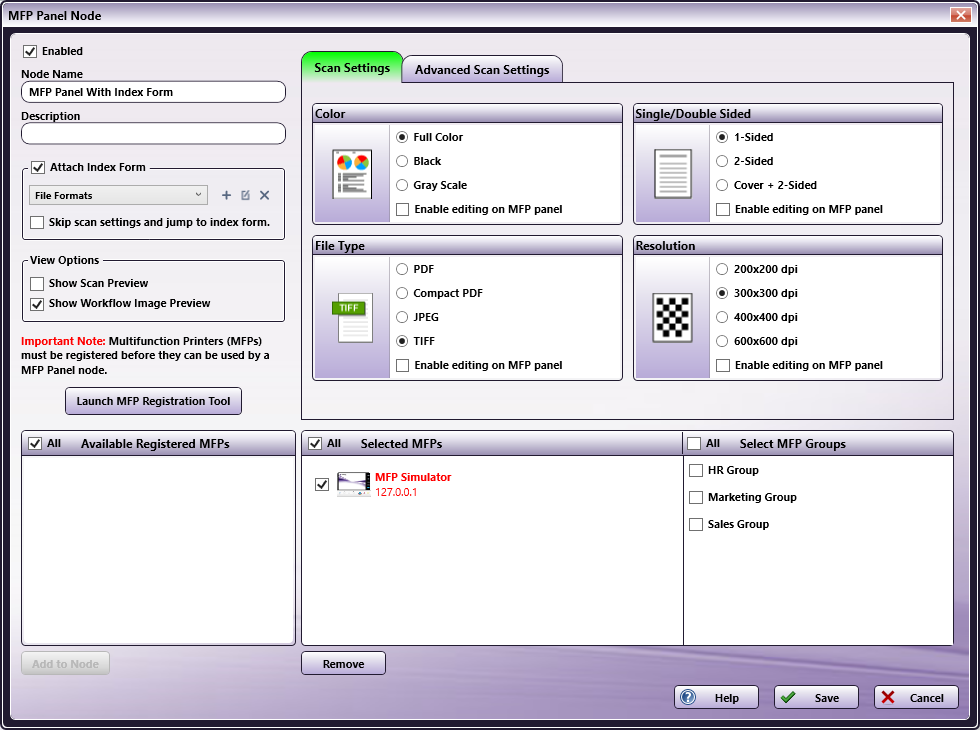
The Integrated MFP Simulator is always available within the MFP Panel node as an Available Registered MFP. To run your workflow on the Integrated MFP Simulator, add the MFP Simulator to the MFP Panel node’s list of Selected MFPs, as in the following illustration:
Authentication Tab
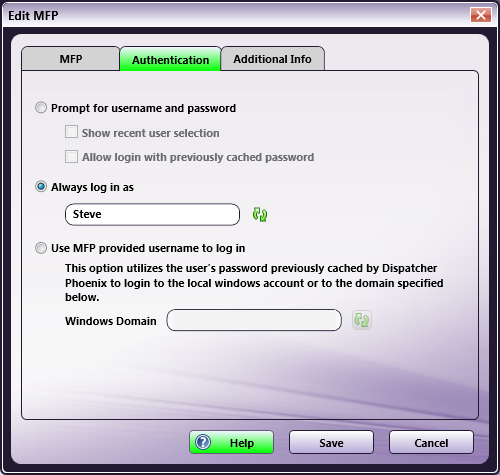
Although users cannot unregister or delete the Integrated MFP Simulator, authentication settings are configurable.
Note: Before any changes to the Authentication tab can take effect, you must first restart the Integrated MFP Simulator.
To edit the Integrated MFP Simulator’s authentication options, do the following:
-
Launch the MFP Registration Tool.
-
Select the MFP Simulator from the list, then click on the Edit MFP button.
-
The Edit MFP window appears. From this window, click on the Authentication tab to edit the MFP Simulator’s authentication options, as in the following illustration:
-
Prompt for username and password - To require users to enter a username and password on the MFP control panel screen before accessing their MFP Panel workflows, select this option. With this setting, the following options are available:
- Show recent user selection - With this option enabled, users can choose a user name from a drop-down list of the last five users who have logged in, eliminating the need to manually enter this information. However, the password will still need to be entered.
- Allow login with previously cached password - With this option enabled, users can log in without entering a password. The previously entered password will be used.
Notes:
-
If the password is changed and the MFP is restarted, the cached password will then be lost.
-
If you change your Windows user name and password, you will not be able to access your MFP Panel workflows.
-
Always log in as - To minimize set up and quickly access your MFP Panel workflows on the control panel, you can choose to use your Windows log in name every time when accessing MFP Panel workflows. This option eliminates the need to manually enter a user name and password on the MFP control panel screen. With this option enabled, only the actively running workflows for that particular user will be displayed, and jobs scanned from the panel will run as that user. This field is pre-populated with the user name and domain name (if available) of the current user.
-
Use MFP provided user name to log in - This single sign-on option is designed to work with MFP or Active Directory authentication. Optimal for shared workflows, this option will automatically log into Dispatcher Phoenix as the user logged into the MFP. With this option enabled, the Windows Domain field will be pre-populated with the current domain of the logged-in system, and must be the same as the Domain name that the MFP is configured to use.
Note: First-time use requires manually entering a password.
- Save - Select this button to preserve your settings and exit the window.
-
Additional Info Tab
To edit the Integrated MFP Simulator’s additional information, do the following. These fields are optional.
-
Launch the MFP Registration Tool.
-
Select the MFP Simulator from the list, then click on the Edit MFP button.
-
The Edit MFP window appears. From this window, you can click on the Additional Info tab to edit the MFP Simulator’s additional information, as in the following illustration:
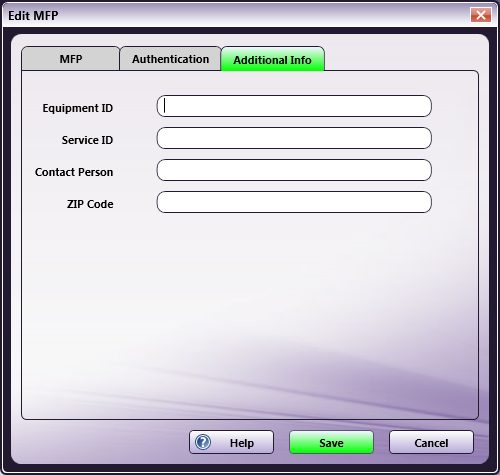
- Equipment ID - Enter identification information for the equipment.
- Service ID - Enter identification information for service.
- Contact Person - Enter information about the contact person.
- ZIP Code - Enter information about the ZIP Code.
- Save - Select this button to preserve your settings and exit the window.
Accessing the Integrated MFP Simulator
You can access the Integrated MFP Simulator by doing one of the following:
- Tool Bar - On the main application screen’s Tool Bar, click on the MFP Simulator icon.
- Tools Menu - On the main application screen, click on the Tools pull-down menu and choose the MFP Simulator option.
- Windows Start Menu - Choose Konica Minolta > Dispatcher Phoenix > MFP Simulator.
The following illustration shows the MFP Simulator icon. The Tools menu appears to the right:

Getting Started
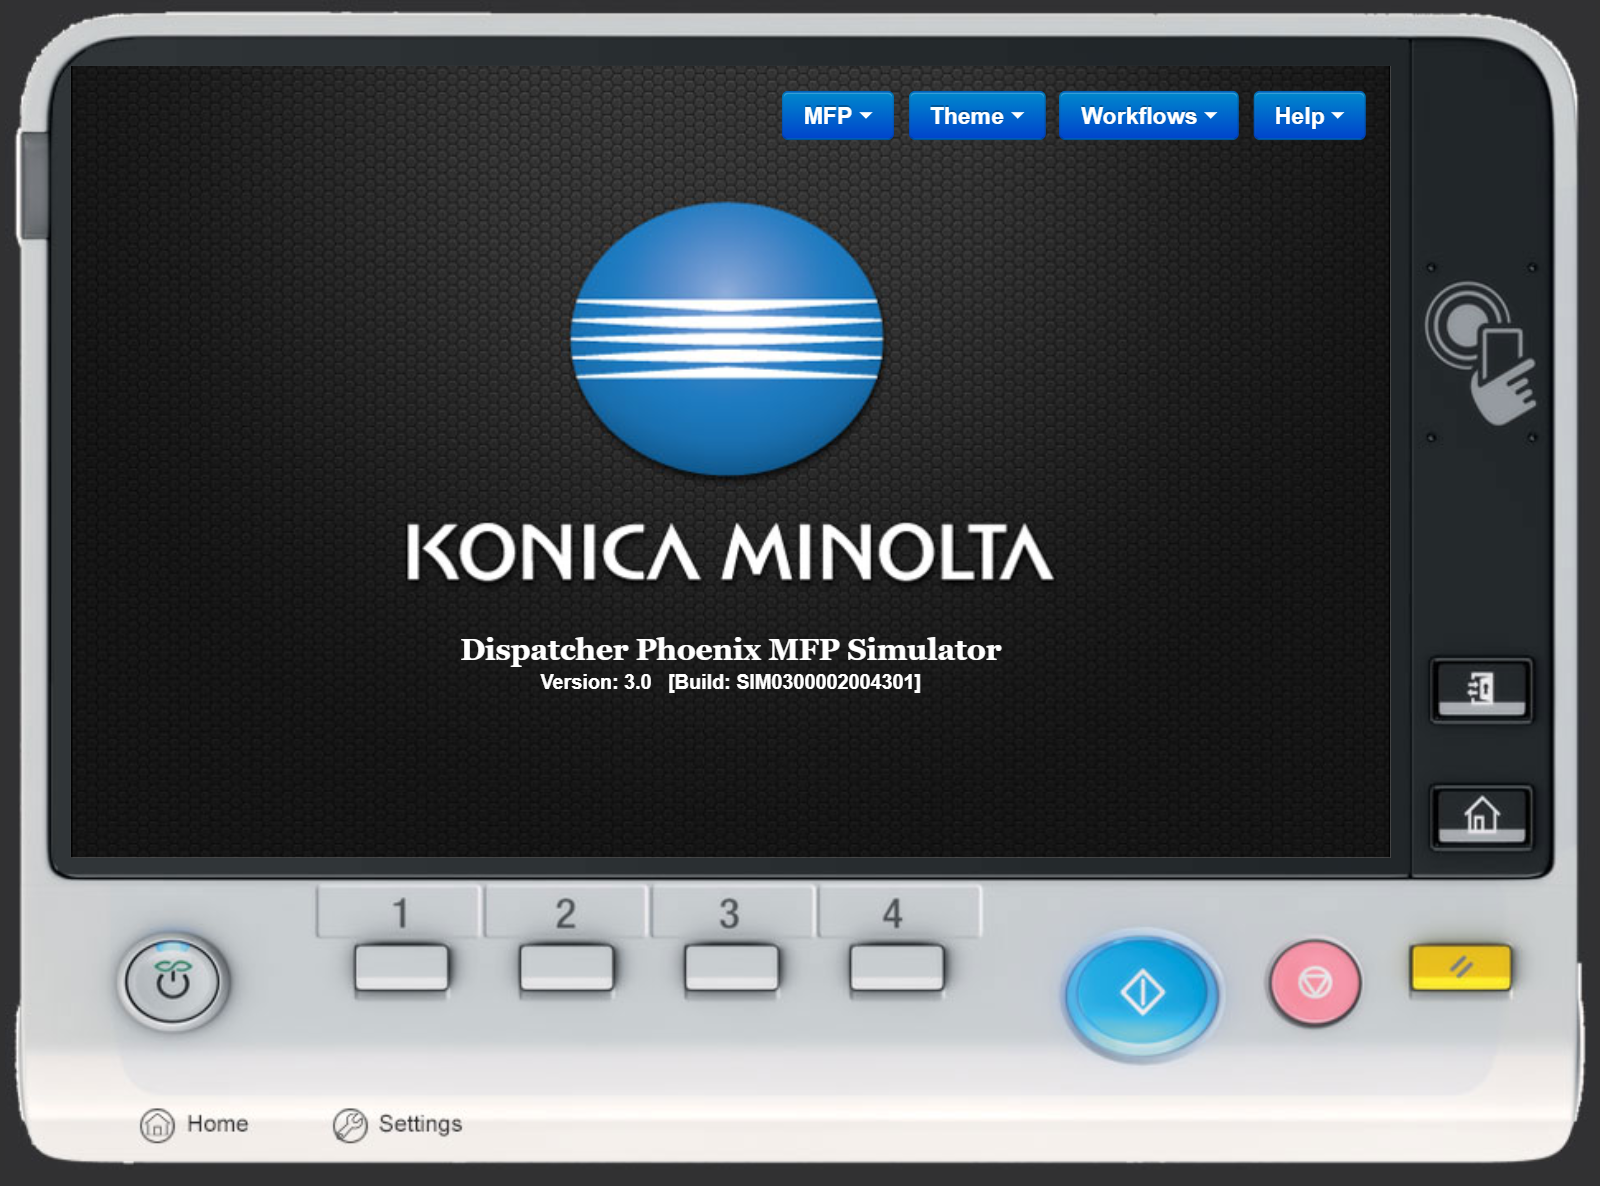
When you launch the Integrated MFP Simulator, the MFP’s home screen appears. Depending on your setup, the Home screen for one of the following device displays will appear:
Device Displays (from left to right, bizhub, i-Series, Production Print)

Notes:
- For Dispatcher Phoenix version 7.6 or later, the default device display is iSeries.
- For Dispatcher Phoenix version 7.5 or earlier, the default device display is bizhub.
- To access the Production Print device display, or to change to a different device display, use the Settings page.
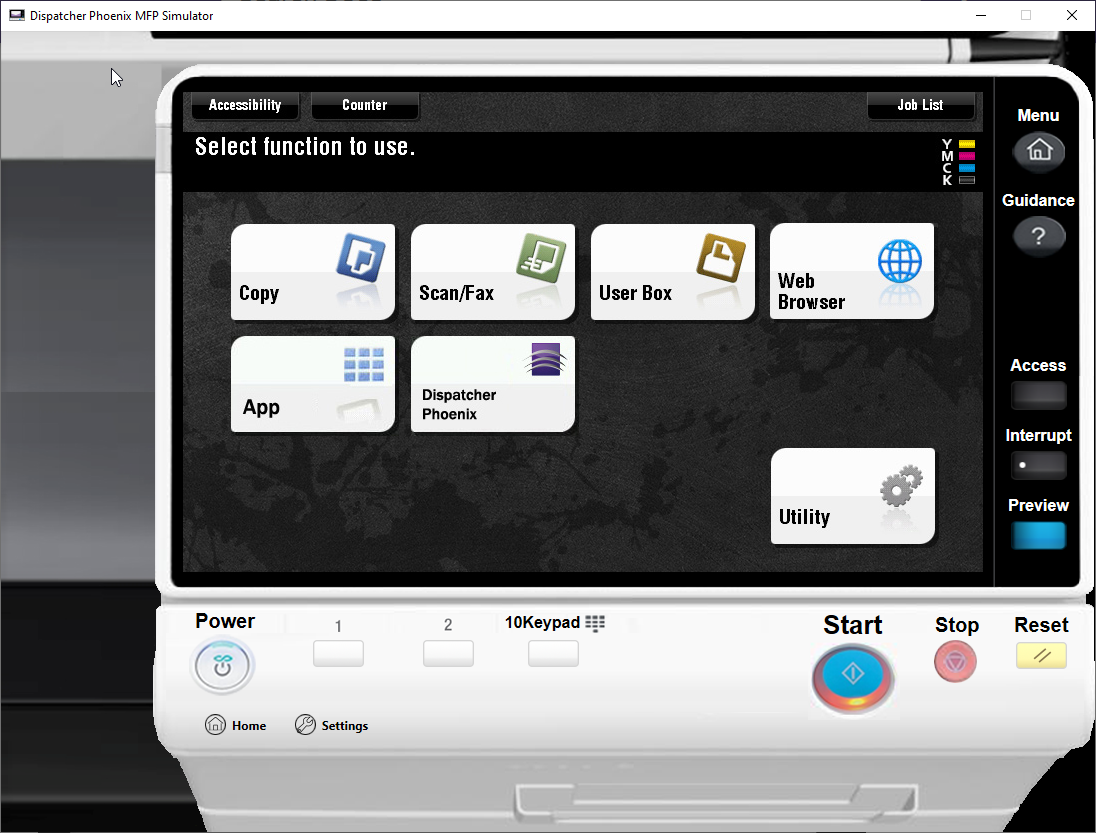
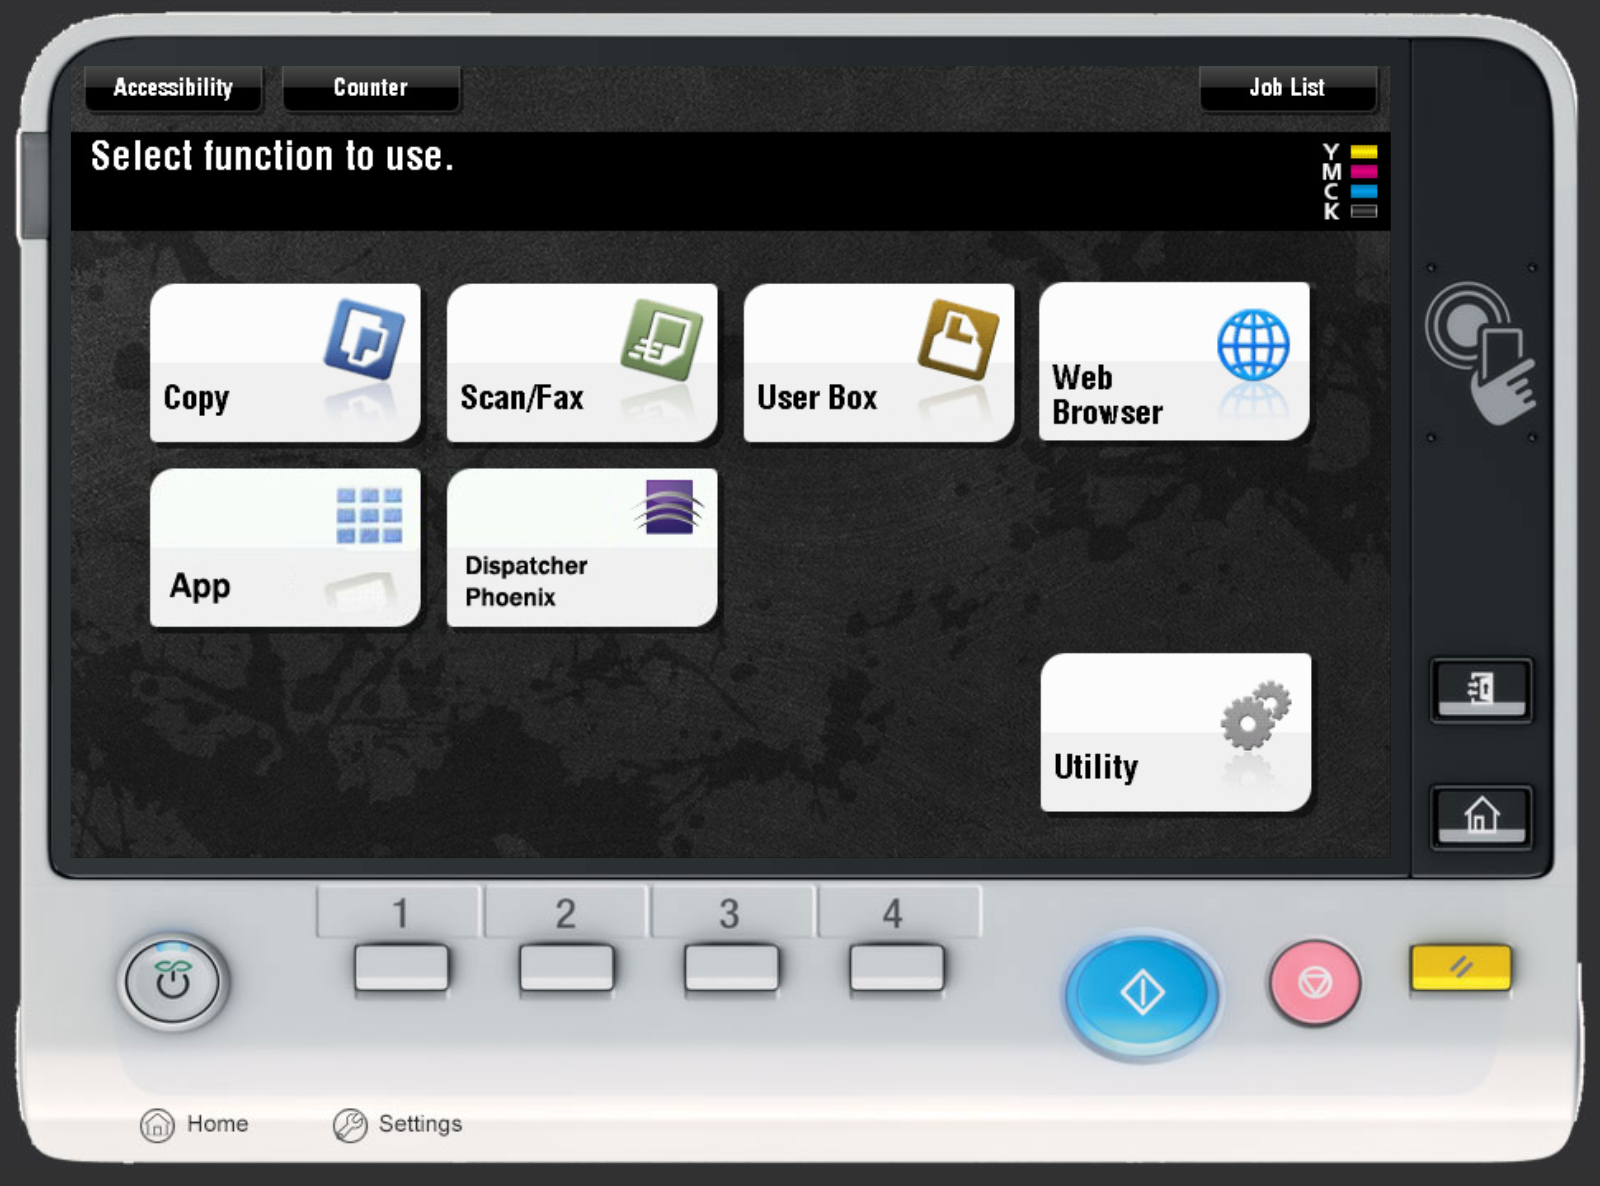
MFP Simulator Home Screens
Each MFP Simulator device display shows a unique Home screen designed to resemble the look and feel of an MFP Simulator type. Each type is described in this section:
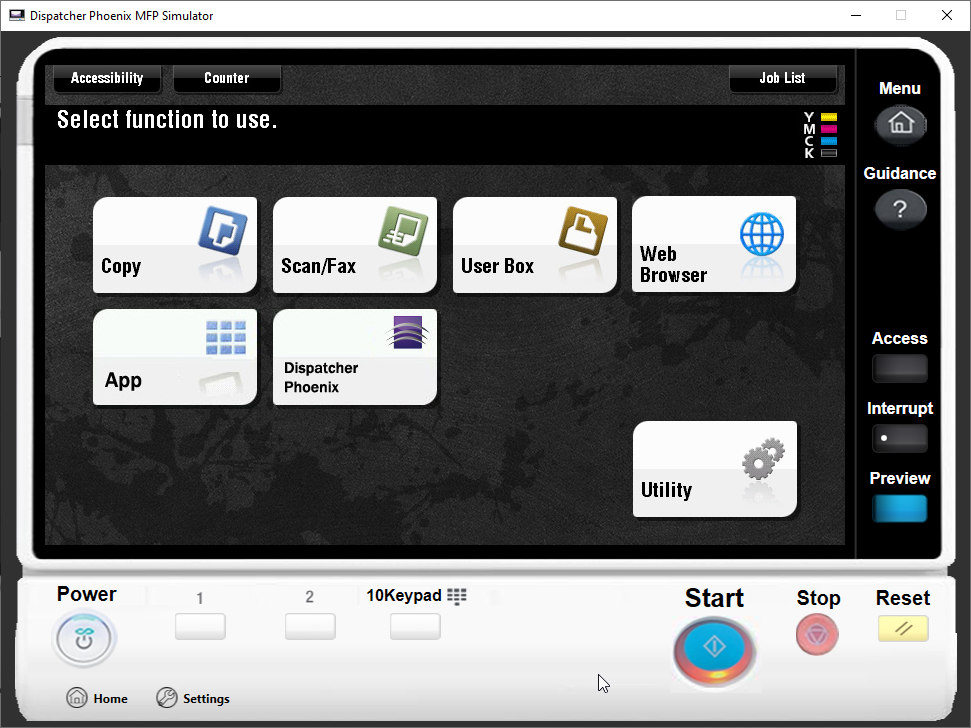
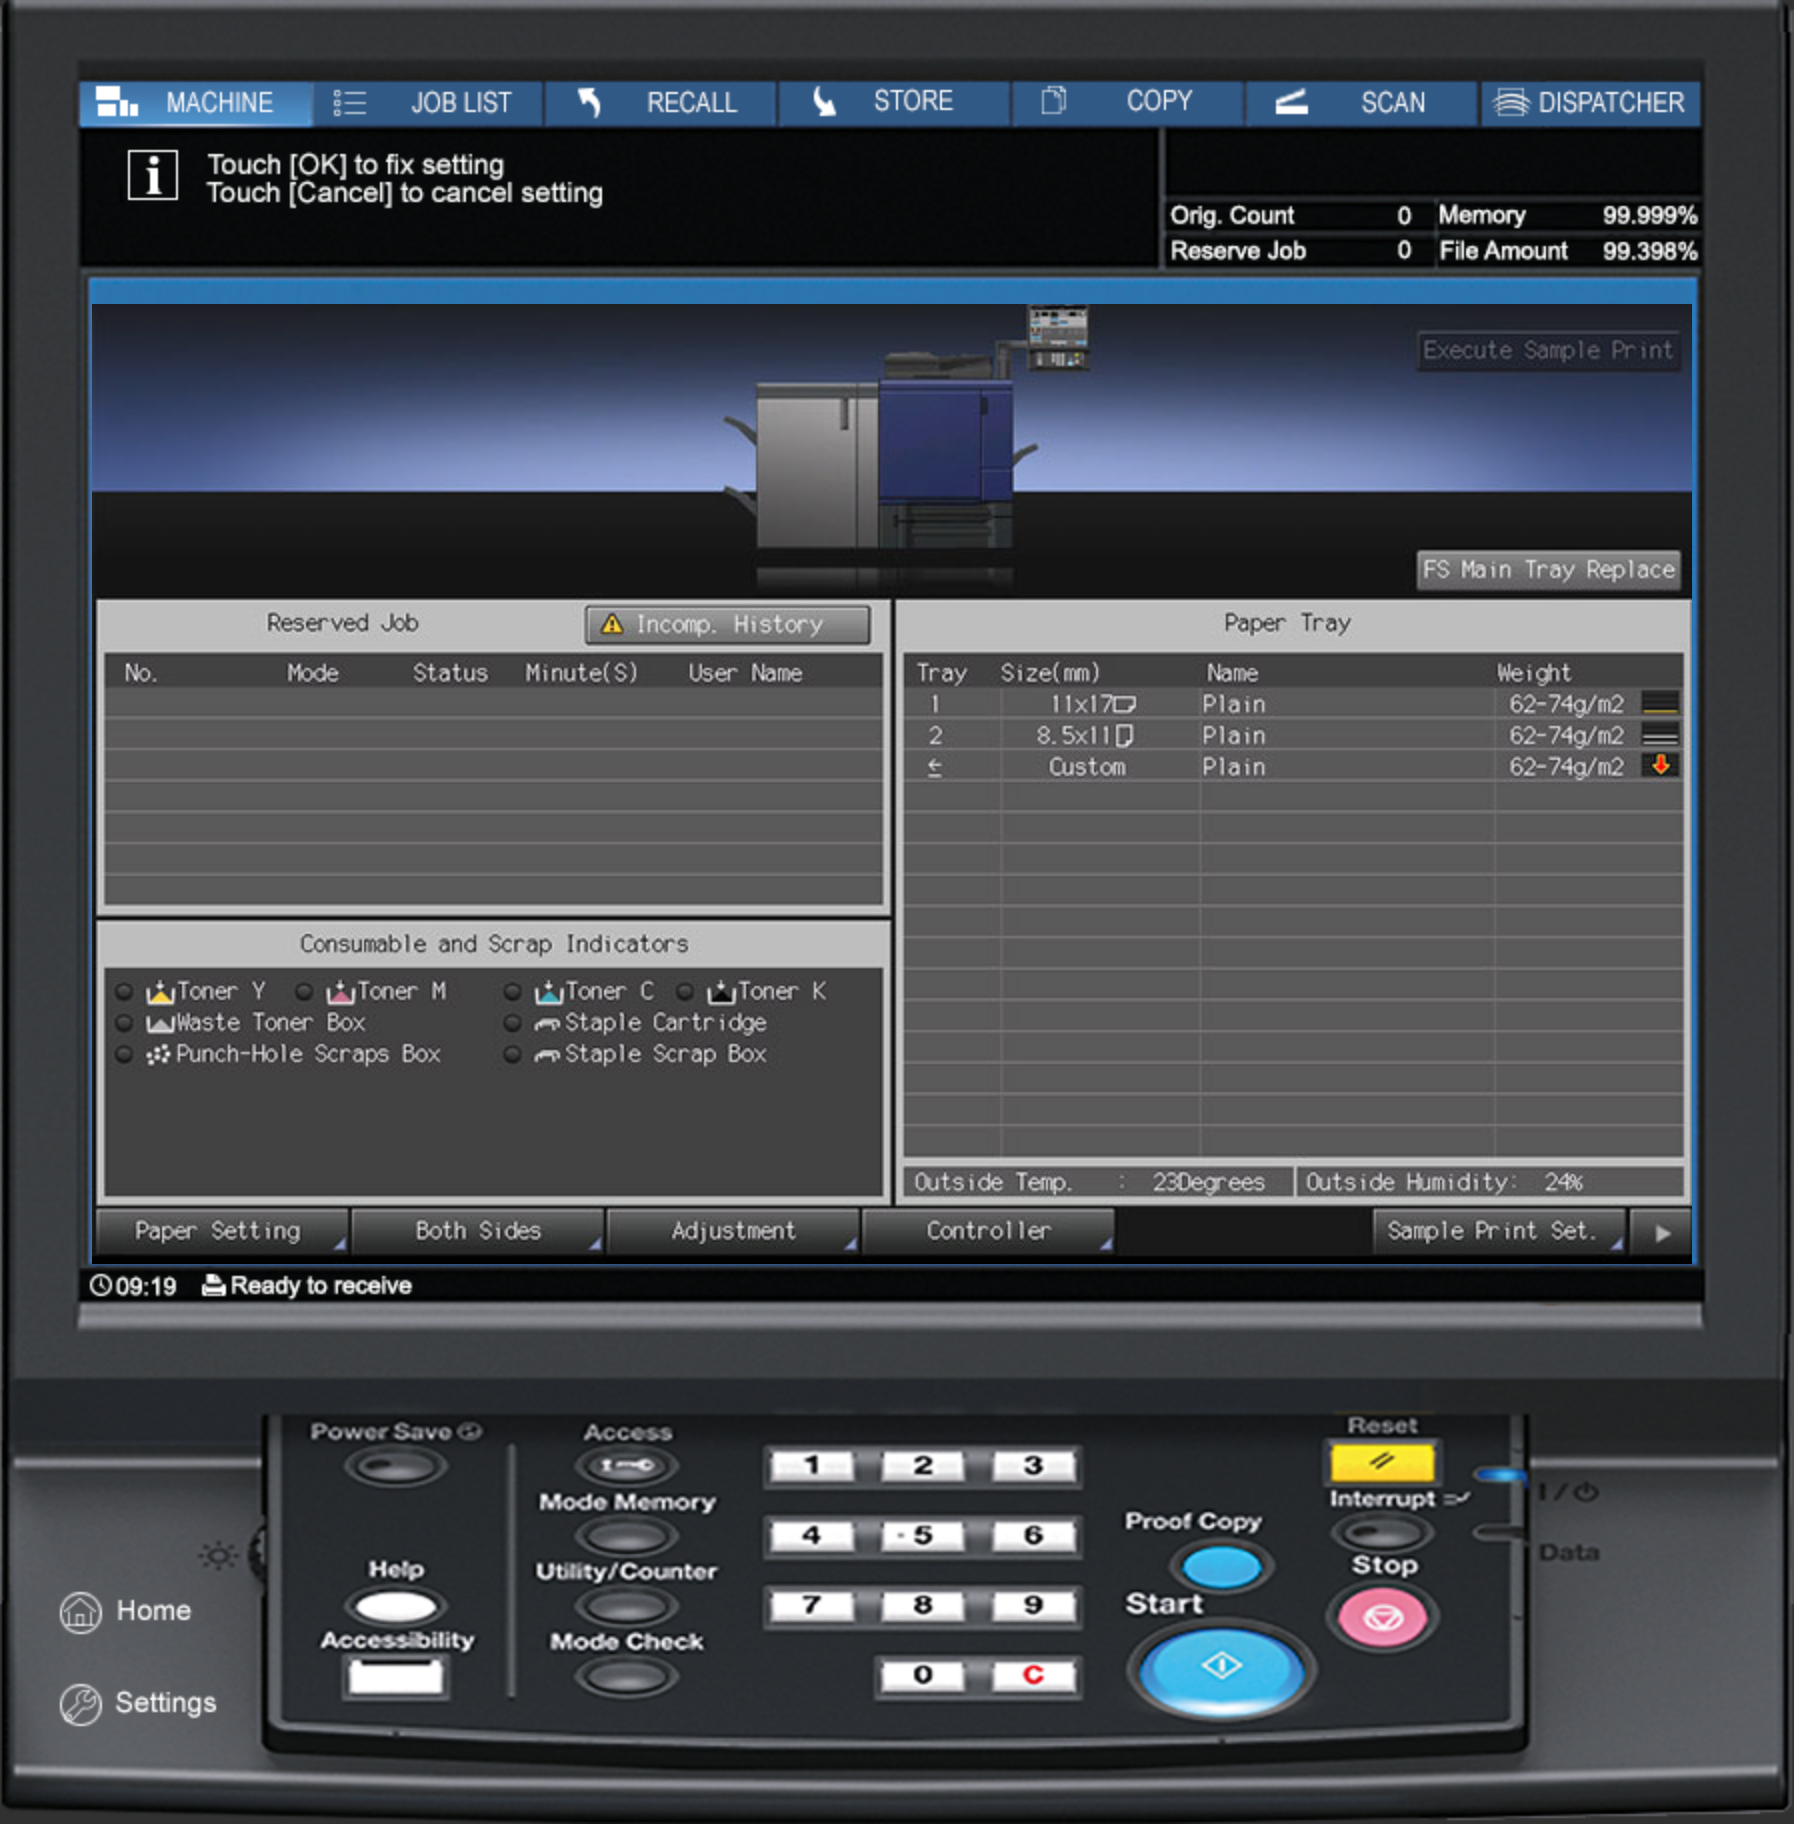
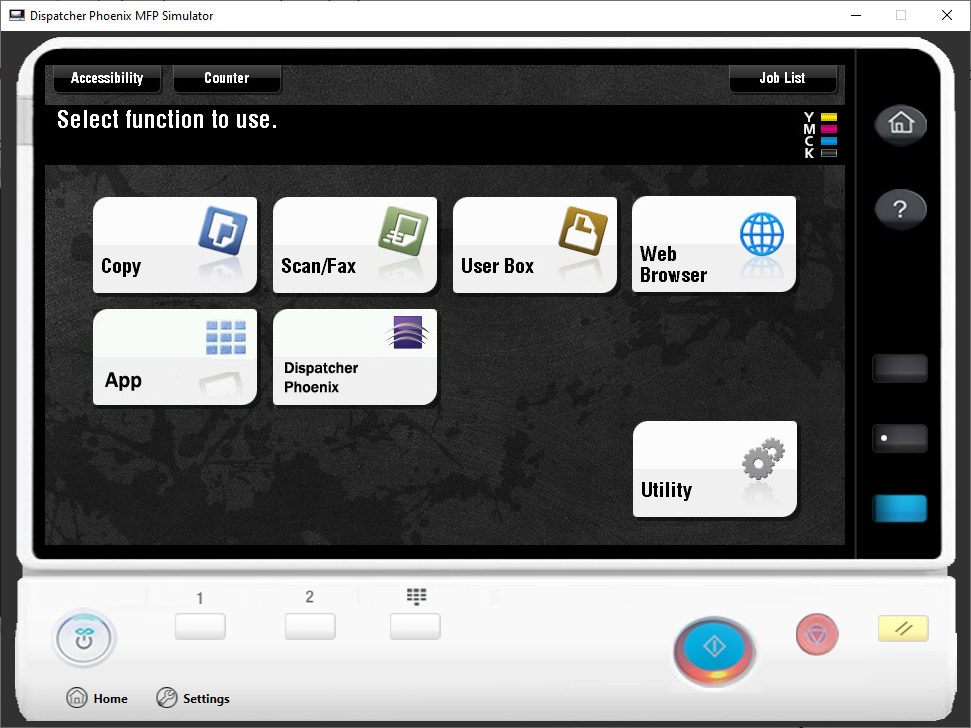
The bizhub MFP Simulator Home Screen
The following illustration shows the Home screen for the bizhub device display:
Buttons and Icons
The following buttons and icons appear on the Home screen for the bizhub device display:
- Menu - Displays the MFP Simulator’s Home screen.
- Guidance - Displays the version number of the MFP Simulator, along with the following buttons:
- Settings - Accesses the Settings screen where you can configure the MFP Simulator’s layout and appearance.
- Help - Accesses the Dispatcher Phoenix Online Help file, as well as the Reload button.
- Copy - Displays a static image of the MFP’s Copy screen.
- Scan/Fax - Displays a static image of the MFP’s Scan/Fax screen.
- User Box - Displays a static image of the MFP’s User Box screen.
- Web Browser - Opens a web browser in the MFP Simulator.
- App - Accesses the Workflow List screen where you can select from a list of Dispatcher Phoenix workflows.
- Dispatcher Phoenix - Accesses the Workflow List screen where you can select from a list of Dispatcher Phoenix workflows. Note that the Settings screen provides the option to edit the label on this button, so the name may have been edited from “Dispatcher Phoenix”.
- Utility - Displays a static image of the MFP’s Utility screen.
- Power - Closes the MFP Simulator.
- Register Key #1 - Displays the Scan/Fax screen.
- Register Key #2 - Displays the Copy screen.
- 10Keypad - Opens up a pop-up keypad (for display purposes only). To close the Keypad and return to the MFP Simulator, click the Cancel button.
- Start - Provided for display purposes only.
- Stop - Provided for display purposes only.
- Reset - Displays the Copy screen.
- Home - Accesses the Home screen.
- Settings - Accesses the Settings screen.
The i-Series MFP Simulator Home Screen
The following illustration shows the Home screen for the i-Series device display:
Buttons and Icons
The following buttons and icons appear on the Home screen for the i-Series device display:
- ID - Provided for display purposes only.
- User Name - Displays the username of the logon user.
- Power - This button on the left-middle of the screen closes the MFP Simulator.
- Copy - Displays a static image of the MFP’s Copy screen.
- Fax - Displays a static image of the MFP’s Fax screen.
- Dispatcher Phoenix - Accesses the Workflow List screen where you can select from a list of Dispatcher Phoenix workflows. Note that the Settings screen provides the option to edit the label on this button, so the name may have been edited from “Dispatcher Phoenix”.
- Web Browser - Opens a web browser in the MFP Simulator.
- Utility - Displays a static image of the MFP’s Utility screen.
- Home - Accesses the Home screen.
- Settings - Accesses the Settings screen.
The Production Print MFP Simulator Home Screen
The following illustration shows the Home screen for the Production Print device display:
Buttons and Icons
The top of the Production Print device display Home screen displays the standard Production Print status screen, including the following buttons:
- Machine - Accesses the Home screen.
- Copy - Displays the Production Print copy screen.
- Dispatcher - Accesses the Workflow List screen, displaying a list of Dispatcher Phoenix workflows.
The bottom panel incorporates a few of the hard keys into the simulator, including the following buttons:
- Power Save - Provided for display purposes only.
- Help - Displays the version number of the MFP Simulator, along with the following buttons:
- Settings - Accesses the Settings screen where you can configure the MFP Simulator’s layout and appearance.
- Help - Accesses the Dispatcher Phoenix Online Help file, as well as the Reload button.
- Accessibility - Provided for display purposes only.
- Access - Provided for display purposes only.
- Mode Memory - Provided for display purposes only.
- Utility/Counter - Displays a static image of the MFP’s Utility screen.
- Mode Check - Provided for display purposes only.
- Proof Copy - Provided for display purposes only.
- Start - Provided for display purposes only.
- Reset - Displays the Copy screen for the Production Print MFP Simulator.
- Interrupt - Provided for display purposes only.
- Stop - Provided for display purposes only.
- Home - Accesses the Home screen.
- Settings - Accesses the Settings screen.
Integrated MFP Simulator Settings Screen
Use the Settings screen to set preferences for the appearance of the Integrated MFP Simulator. To access the Settings screen, click the Guidance button on the Integrated MFP Simulator. The Guidance screen appears. Tap on the Settings button on the top-right of the Guidance screen. See the illustration below:
When you tap on the Settings button on the top-right of the Guidance screen, the Settings screen appears. The following illustration shows the Settings screen for the bizhub device display.
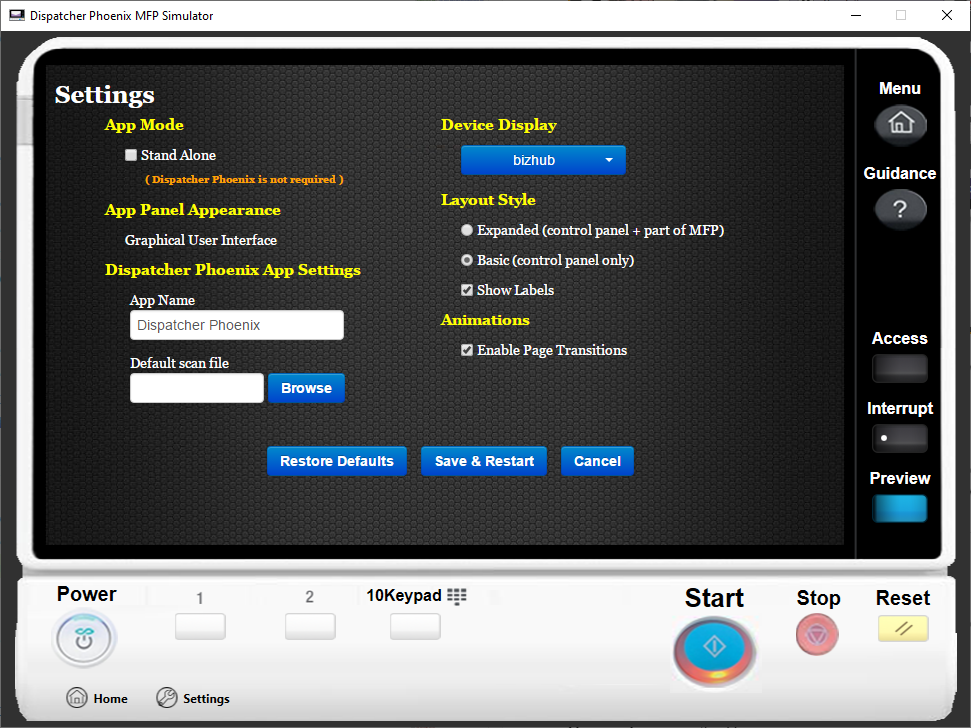
The following options are available. Note that the Device Display field indicates the current device display and determines which options appear on the Settings screen. That is, not all options are available for all device displays.
Note: Changes to the Settings screen take affect only after you tap the Save & Restart button. To abandon any changes you make to the Settings screen, tap the Cancel button. To return all settings to their default, tap the Restore Defaults button.
App Mode
- Stand Alone - To switch to the Stand-alone MFP Simulator, check this box. The following options appear:
-
Workflows - This setting appears only if you check the box at the Stand Alone field. This setting controls the demonstration workflows available in the Stand-alone MFP Simulator. The following groups of workflows are available:
- Default
- Finance
- Healthcare
-
Theme - This setting appears only if you check the box at the Stand Alone field. To change the color scheme of the MFP Simulator display, tap the drop-down. The following options are available:
- Blue
- Purple
-
App Panel Appearance
Currently, in the Integrated MFP Simulator, the only panel appearance option for workflows is the Graphical User Interface.
Dispatcher Phoenix App Settings
- App Name - To customize the name of the Dispatcher Phoenix app button that displays on the simulated panel, enter a new name here.
- Default scan file - To choose a sample input file to always submit to Dispatcher Phoenix workflows whenever a user presses the Scan button on the simulated panel, click the Browse button and browse for, then select, a file.
Device Display
The MFP Simulator provides the following simulated MFP types. Select the display that best resembles the MFP you are simulating. The following MFP types are available:
Layout Style
The following options are available to customize the layout of the MFP Simulator. See the illustrations below for examples of the settings.
- Expanded (control panel + part of MFP) - Displays the MFP control panel along with parts of the MFP.
- Basic - Displays the MFP control panel only.
- Show Labels - To display labels above the buttons on the MFP control panel, check this box.
Note: The Layout Style options are available only for the bizhub device display.
Expanded Layout Style, with “Show Labels” Enabled
Basic Layout Style, with “Show Labels” Disabled
Animations
To display animated transitions between screens in the Integrated MFP Simulator, check the Enable Page Transitions box on the Settings screen.
Note: Animations are not available for the Stand-alone MFP Simulator.
Using the Integrated MFP Simulator
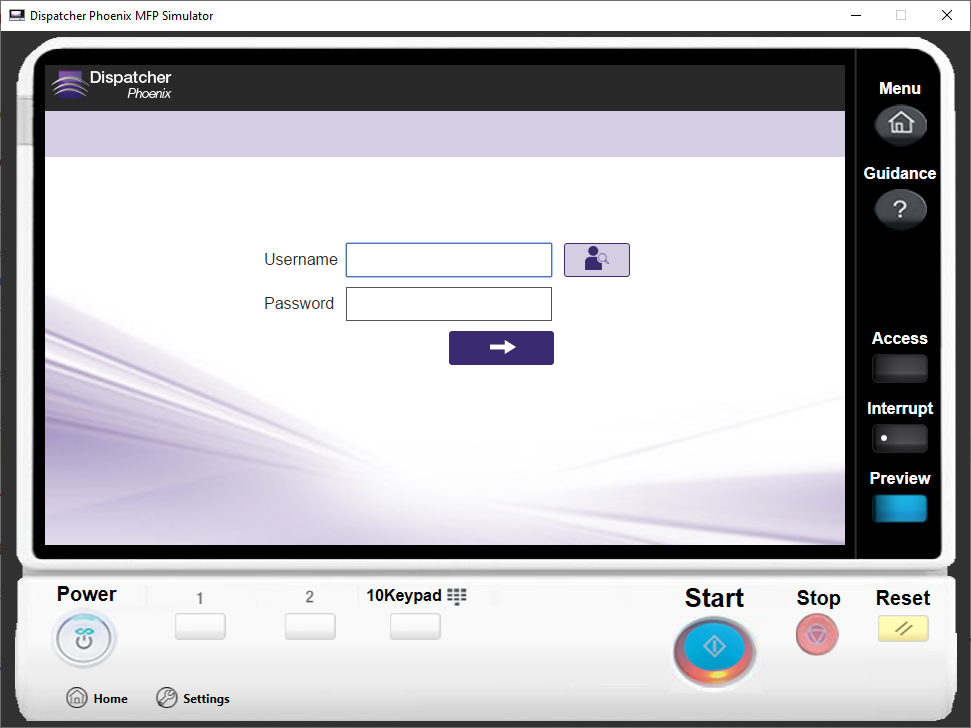
The following is an example of logging in to the Integrated MFP Simulator and accessing a Dispatcher Phoenix workflow:
-
In Dispatcher Phoenix, run the workflows you want to access on the Integrated MFP Simulator.
-
On the Integrated MFP Simulator’s home screen, click on the App button or the Dispatcher Phoenix button.
-
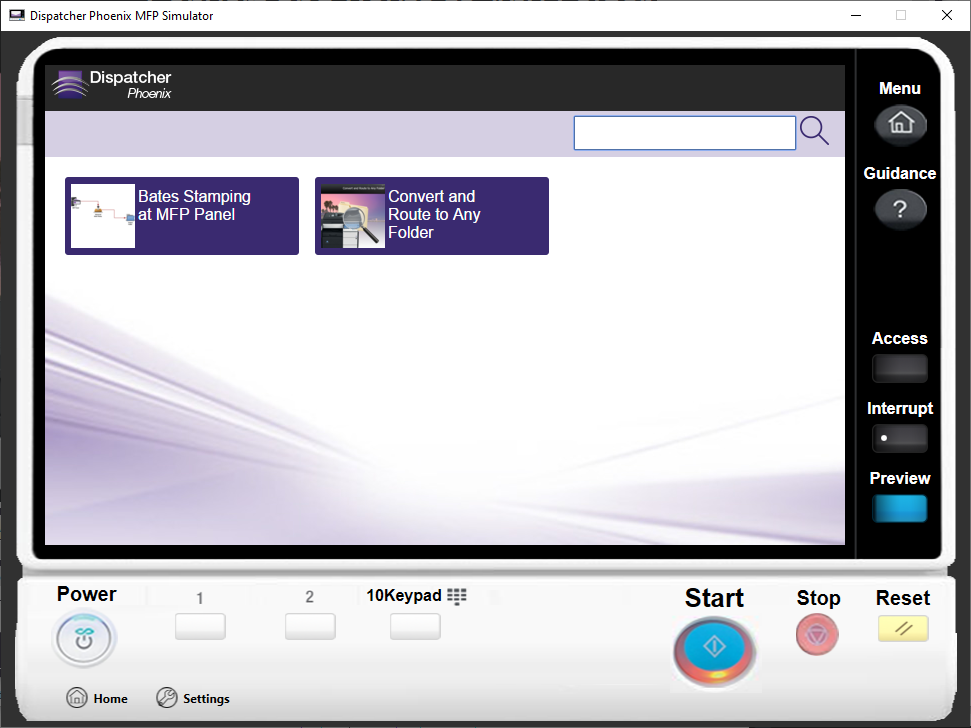
Depending on the authentication options you have specified for the MFP Simulator AND how many workflows you have currently running, one of the following will appear:
- The Log In screen
- The Workflow List screen showing a list of all running workflows
- The Workflow List screen showing a single workflow
See the following illustrations:
Log In screen showing recent user selection and “Allow login with previously cached password” enabled:
Workflow List screen:
-
On the Workflow List screen, click on the workflow you want to access. You can customize the workflow, including entering index data, browsing through folders, customizing scan settings, modifying Bates stamps, etc.
-
To scan a document into the workflow, click on the Scan button. If you have defined a “Default Scan File” to use (on the MFP Simulator’s Settings screen), that file is submitted directly into the workflow. If not, or if that file no longer exists on your system, the Select a file to submit window appears where you can select a document to run through the workflow. See the following illustration:

-
Once the virtual scan starts, a message similar to the message on a physical MFP will appear, alerting you that the document has been scanned and submitted to the Dispatcher Phoenix workflow, as in the following illustration:
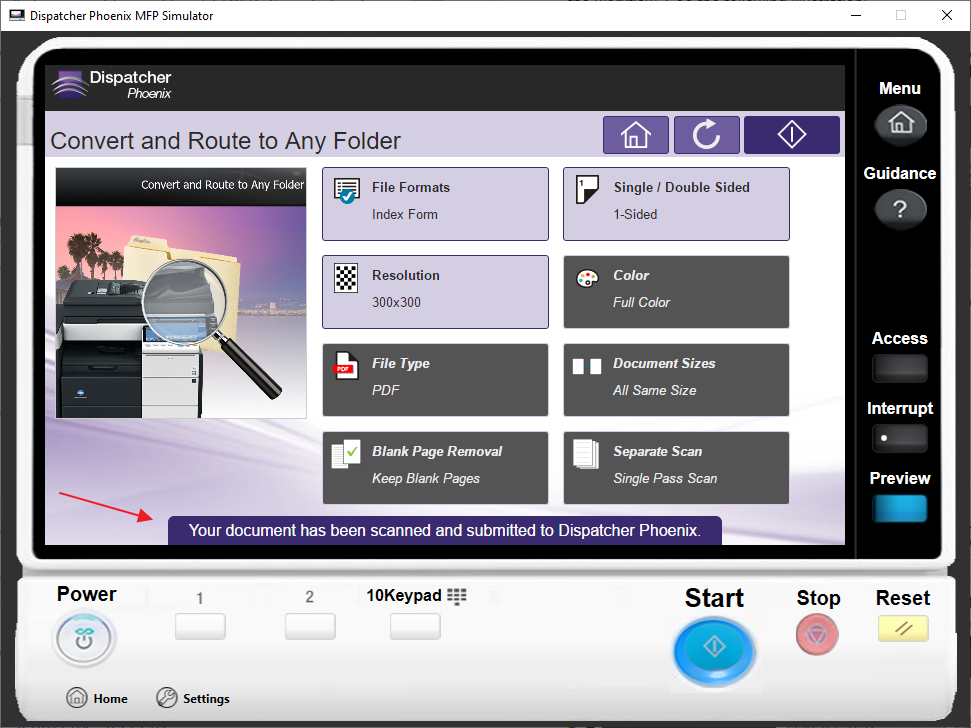
Your processed document will now appear in the output location specified in the workflow.
Using the Online MFP Simulator
The Online MFP Simulator is a version of the MFP Simulator that you access via a web page. It does not require a connection to Dispatcher Phoenix. It is similar to the Integrated MFP Simulator with the following exceptions:
- Demonstration workflows - The Online MFP Simulator provides access to many pre-defined “canned” workflows you can use to experience the power of Dispatcher Phoenix without actually connecting to the application. These workflows are not available from the Integrated MFP Simulator.
- No access to live workflows - Because the Online MFP Simulator is not connected to Dispatcher Phoenix, you cannot access live workflows as you can in the Integrated MFP Simulator.
Accessing the Online MFP Simulator
To open the Online MFP Simulator, do the following:
- Access the SEC website Home page.
- Log in to the SEC website.
- Access the Products page.
- From the Product Catalog, select Dispatcher Phoenix MFP Simulator (Online).
When the Online MFP Simulator opens, the Sign In Screen appears as in the following illustration. You must provide these credentials only once.
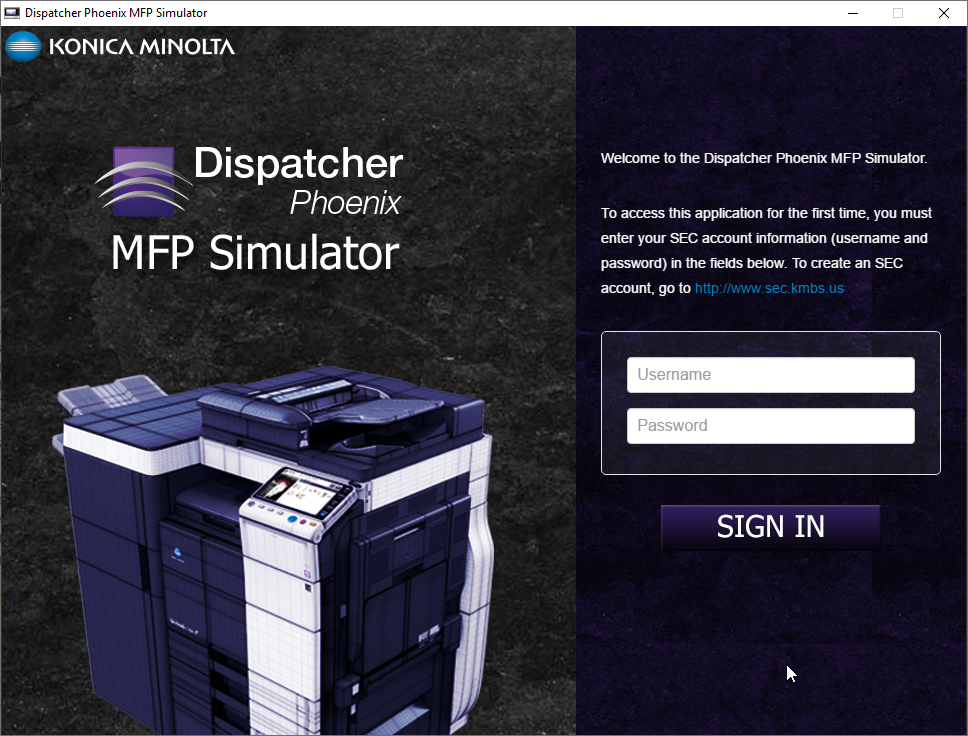
Once you enter your SEC credentials, the Start-up screen appears, as in the following illustration:
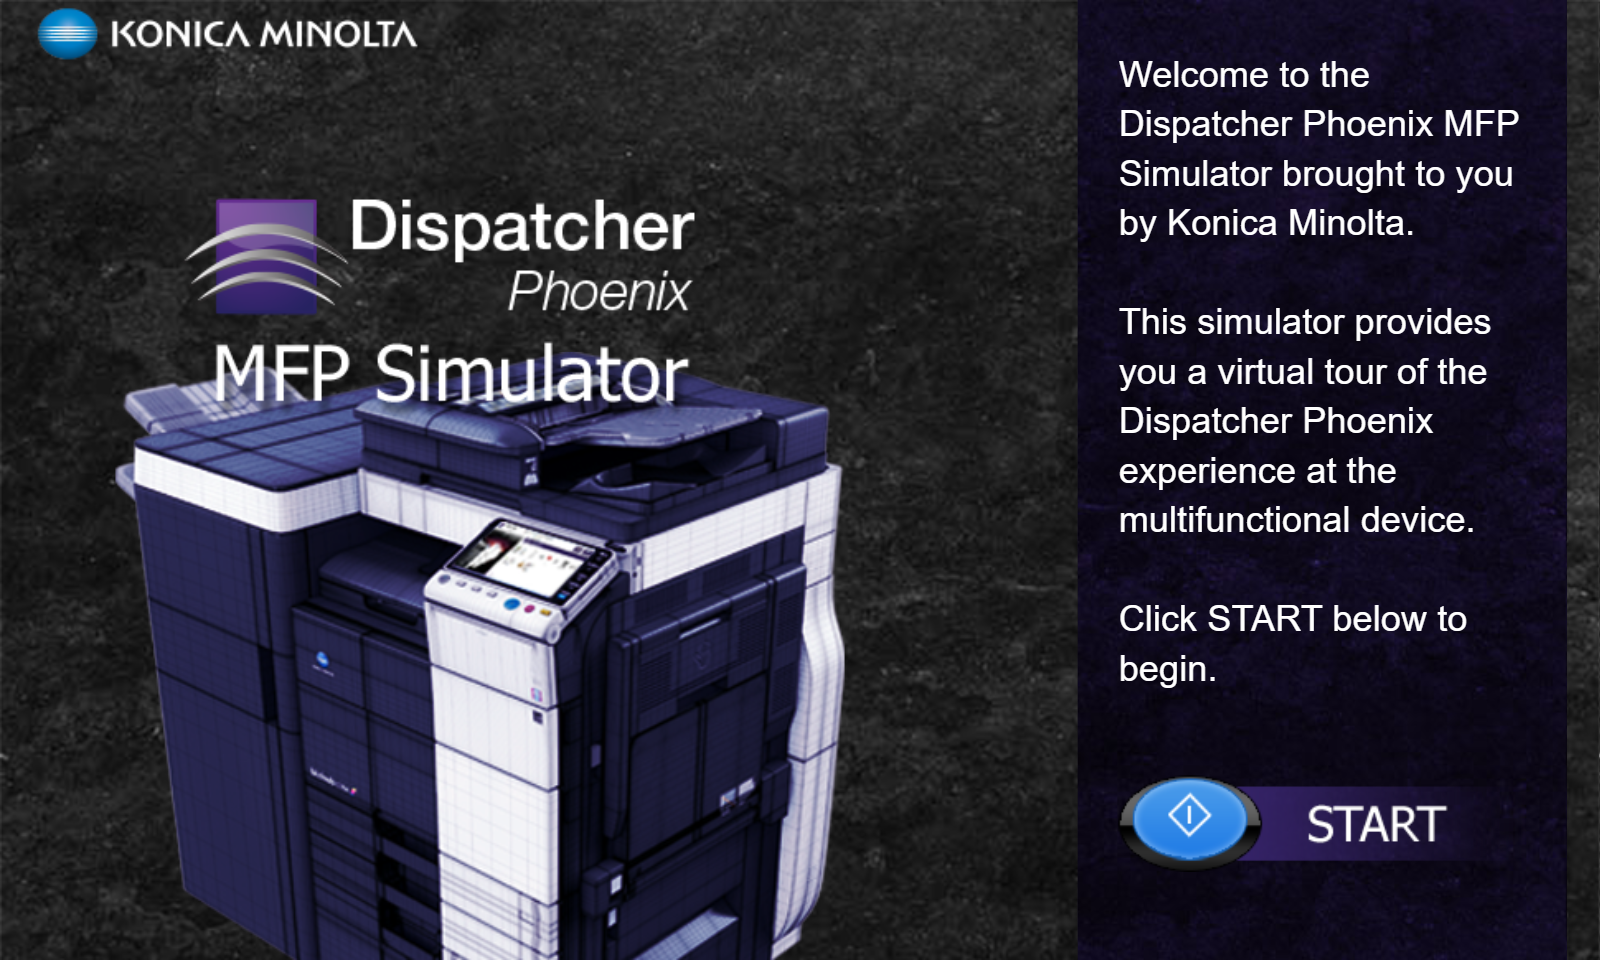
On the Start-up screen, select the Start button to access the Home screen. See the following illustration:
The Online MFP Simulator Home Screen (bizhub device display)
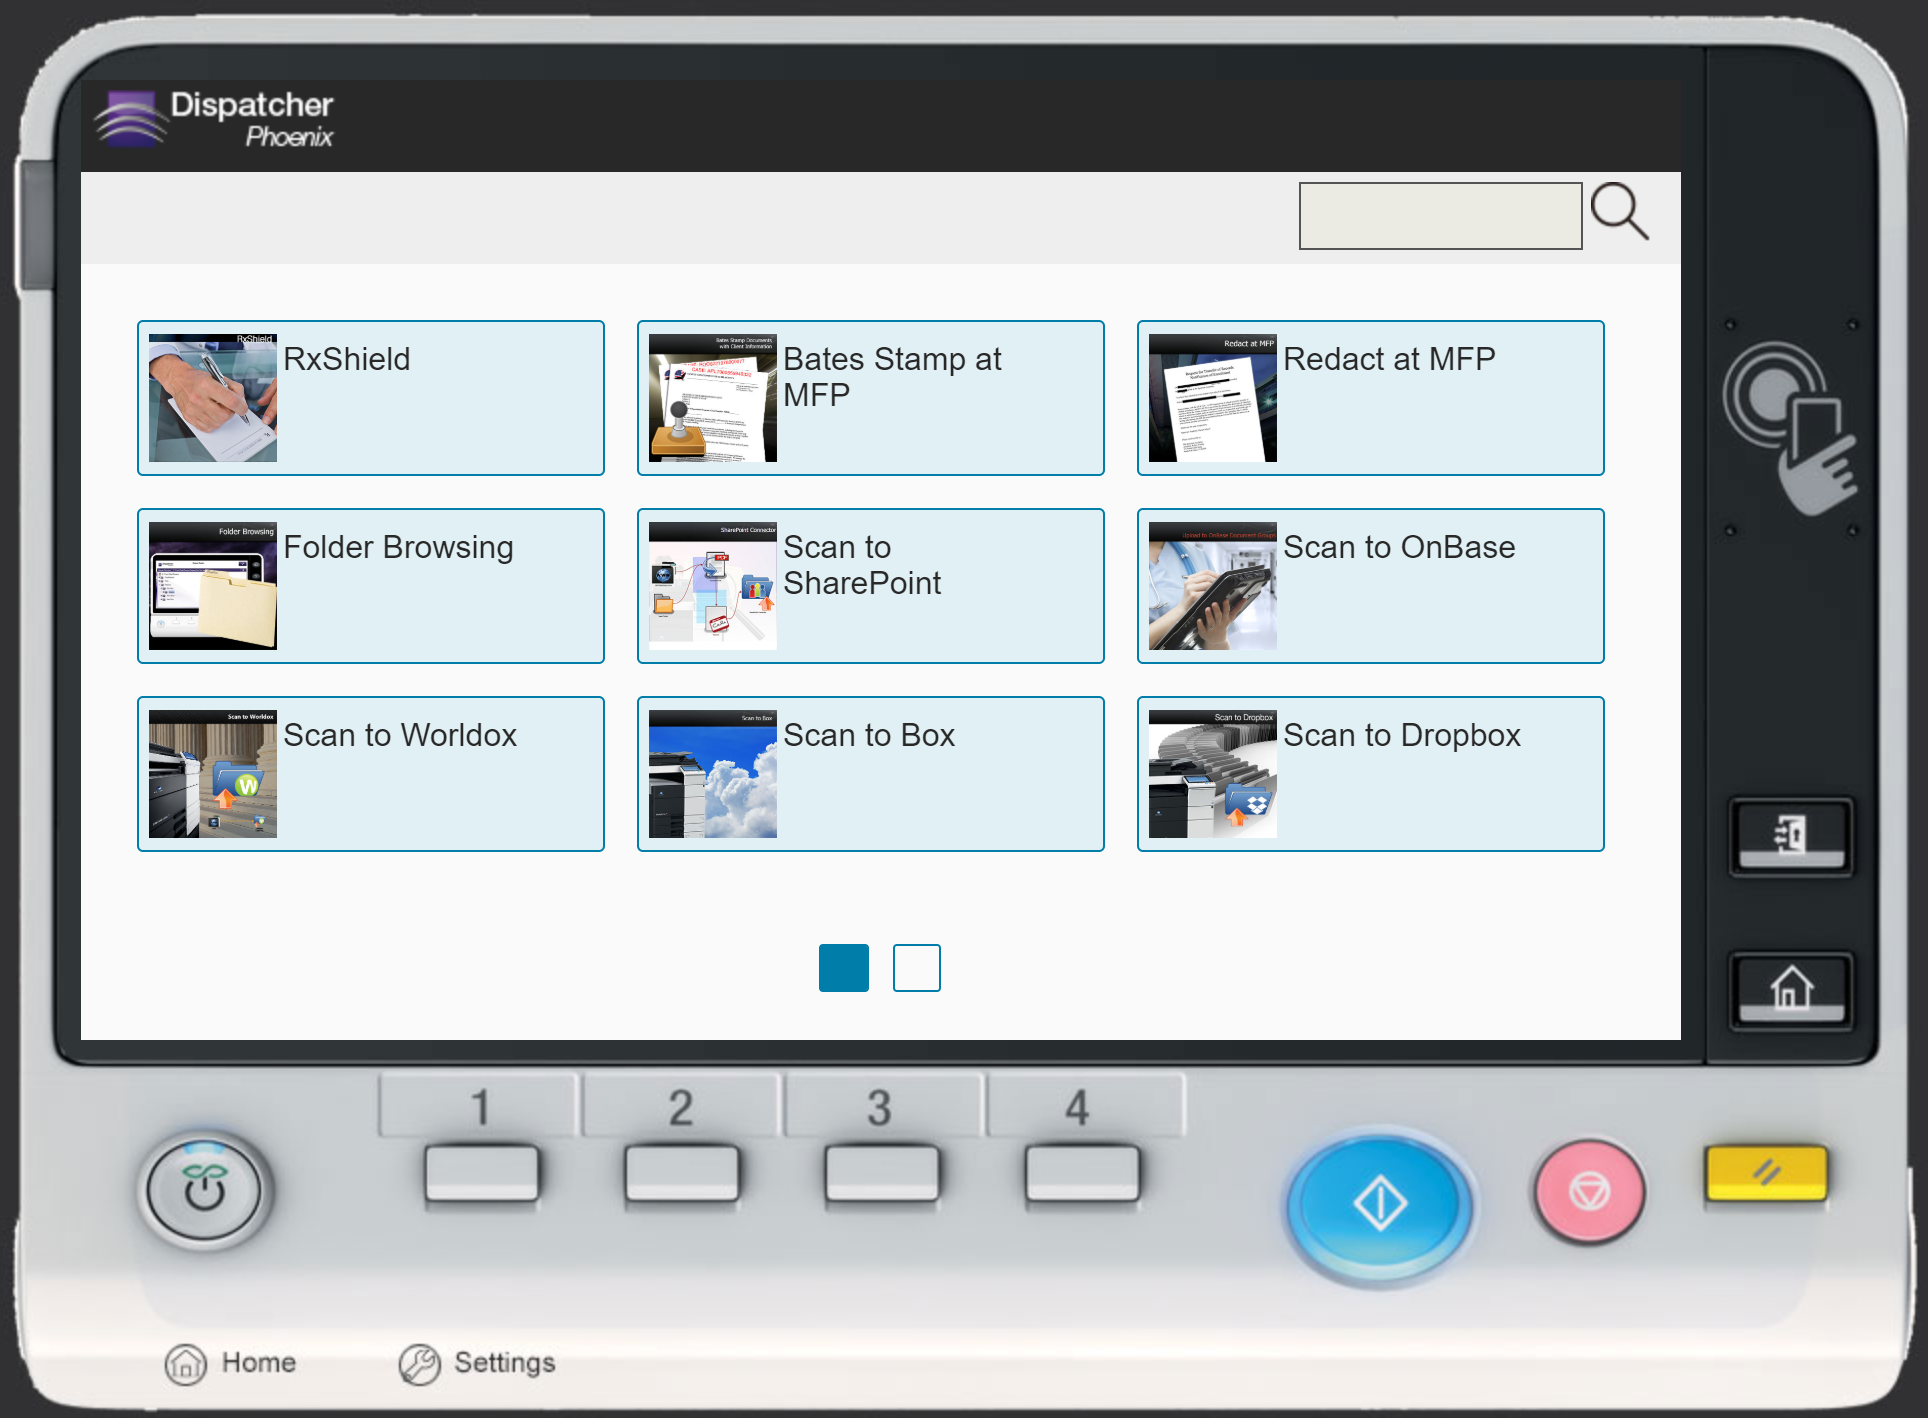
On the Home screen, to see a list of predefined, “canned” workflows, click on the either the App button or the Dispatcher Phoenix button. The Workflow List screen appears, as in the following illustration showing the bizhub workflows:
The Online MFP Simulator Workflow List Screen
On the Workflow List screen, click on a workflow. You enter that specific workflow as you would in Dispatcher Phoenix. Once you modify the workflow and click on the Start button on the MFP Simulator, an animation displays showing the document going through the workflow, as in the following illustration:
The Settings Screen in the Online MFP Simulator
To access the Settings screen in the Online MFP Simulator, tap on the Settings button. The Settings screen appears as in the following illustration:
The Settings screen includes the following drop-down menus:
- MFP - Provides access to the available simulated MFP types, including the following:
- bizhub
- i-Series (IT6)
- Production (PP)
- Theme - Changes the appearance of the selected simulator. You have the following options:
- Blue
- Purple
- Workflows - Accesses additional canned workflows. The following categories are available:
- Default
- Finance
- Healthcare
- Help - Accesses the Dispatcher Phoenix Online Help file, as well as the Reload button.
Using the Stand-alone MFP Simulator
The Stand-alone MFP Simulator is a version of the MFP Simulator. Like the Online MFP Simulator, it does not require a connection to Dispatcher Phoenix. Two forms of this version are available. You can access the forms in the following ways:
- Via the Settings page on the Integrated MFP Simulator.
- Download a true “stand-alone” version from the SEC website.
The Stand-alone MFP Simulator is similar to the Online MFP Simulator, with a few exceptions as described below.
Accessing from the Integrated MFP Simulator
-
From the Integrated MFP Simulator, select the Guidance button. The Guidance screen appears.
-
On the Guidance screen, select the Settings button.
-
On the Settings screen, under App Mode, check the Stand-Alone box. Once you check this box, the Workflows field activates and you can select a different category of workflows, if desired.
-
Still on the Settings screen, select the Save & Restart button to save your settings and view the Start-up screen, as in the following illustration:
-
On the Start-up screen, select the Start button to access the Home screen.
Downloading the Stand-alone MFP Simulator
To download a true “stand-alone” version of the Stand-alone MFP Simulator, do the following:
- Access the SEC website Home page.
- Log in to the SEC website.
- Access the Products page.
- From the Product Catalog, select Dispatcher Phoenix MFP Simulator (Standalone).
For more information on this process, see the Accessing the Online MFP Simulator section.
The Stand-alone MFP Simulator Help Menu
The Help menu in the downloaded version of the Stand-alone MFP Simulator accesses two options not available in the other MFP Simulators. The Help menu appears on the Settings screen, as in the following illustration:
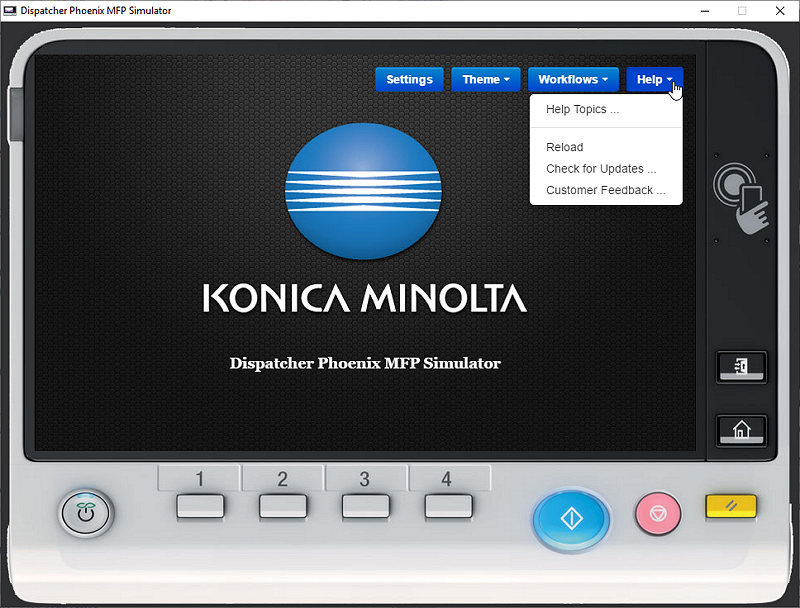
The Help menu in the downloaded version of the Stand-alone MFP Simulator includes the following options:
- Help - Accesses the following options:
- Help Topics - Click to access the Dispatcher Phoenix Online Help file.
- Reload - Click to reload the Stand-alone MFP Simulator.
- Check for Updates - Click to search for available updates to the Stand-alone MFP Simulator.
- Customer Feedback - Click to submit customer feedback.