Document description
This document describes the configuration of DNS Service discovery (DNS-SD) on Microsoft DNS servers to advertise the Dispatcher Paragon Mobile Integration Gateway service across multiple subnets. This configuration enables clients connected to different subnet from the one where the Mobile Integration Gateway is installed to discover the printing service.
Without configuring DNS-SD the printing service provided by the Mobile Integration Gateway is advertised by the mDNS (multicast traffic) which is not allowed to be transferred through the routers. (Please note that this is not entirely true, because some routers implement special proxy for specific multicast services including AirPrint.)
DNS-SD configuration uses standard (unicast) DNS protocol messages to advertise the services therefore there is no limitation connected to the multicast traffic (see the DNS-SD RFC here).
Please note that following configuration examples are performed on Windows Server 2012 R2 DNS server role and may differ on other Windows Server OS versions. Configuration for other DNS servers (e.g. BIND) is not covered by this document.
Following guide is applicable only for iOS/OS X. Discovery across multiple subnets is not possible on Android devices due to 3rd party limitations on Android side.
Configuration
General description of the solution
- Authoritative DNS server in the domain is configured to answer for DNS-SD queries from the clients.
- In the DNS answer there is a specification of the Dispatcher Paragon Mobile Integration Gateway service which from client's point of view is the IPP(S) printer.
- AirPrint clients such as iOS devices are able to query DNS server for the network services. Based on the answer the client connect to the Mobile Integration Gateway and user is able to send the print job to Dispatcher Paragon system.
- DNS search domain which is queried by the client for available services is contained in the DHCP response packet "domain" field (can be configured in Option 15 DNS Domain Name on the DHCP server).
The testing domain used in this document is called mydomain.test the FQDN of Mobile Integration Gateway server is autofsp .mydomain.test and the advertised IPPS printer is called ysqmig .
Making DNS Search domain DNS-SD ready
This setting will make the DNS search domain ready accept DNS service records and enable clients to search the domain.
- On the Windows server open Server Manager > Tools > DNS.
- In the right pane expand the domain you want to use for advertising of the AirPrint service(s) (in our case it is mydomain.test domain).
- Right click the _udp folder and in the context menu select Other new records...
- In the window select Service Location (SRV) record type and click Create record... Fill following values in the New Resource Record window:
- Protocol: _dns-sd
- Service: Fill in any string. The service will anyway be deleted in the next step. We just need to create a folder for the service definition.
- Highlight the _dns-sd folder in the left pane, right click created service in the right pane and select Delete from the context menu. Confirm the delete.
- Right click the _dns-sd folder in the left pane and form the context menu select Other New Records...
- In the window select Pointer (PTR ) record type and click Create record... Fill following values in the New Resource Record window:
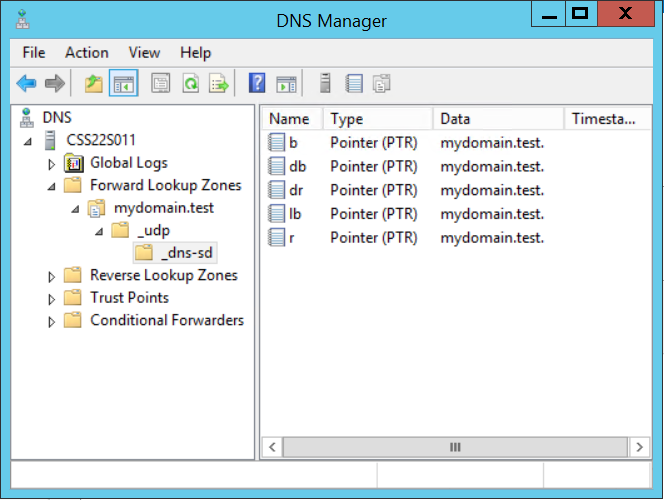
- Host IP Address: b
- Host name: mydomain.test . Adjust this based on the name of your domain.
- Click OK to crate a PTR record.
- Repeat the steps 6 to 8 with Host IP Addresses: db, dr, lb, r.
- These records tell Wide Area Bonjour clients how to browse your zone for services (‘b’ for browse, ‘lb’ for legacy browse, and ‘db’ for default browse) and register their own services (‘r’ for register and ‘dr’ for default register).
- These records tell Wide Area Bonjour clients how to browse your zone for services (‘b’ for browse, ‘lb’ for legacy browse, and ‘db’ for default browse) and register their own services (‘r’ for register and ‘dr’ for default register).
- On the screenshot below you see how the result should look like in the DNS Manager console window:
Add service(s) to be discovered
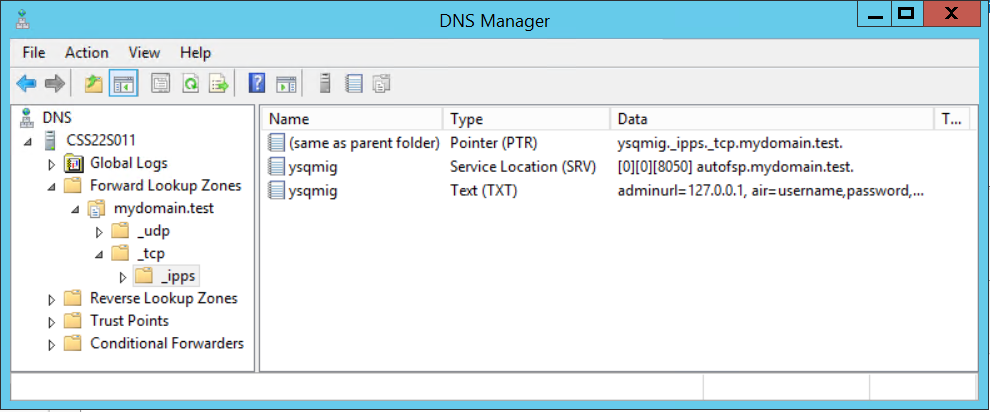
In this section, add DNS records that describe the service offered to the AirPrint clients. The result in the DNS manager after the procedure described below is finished should look like this:
Create a service folder
- On the Windows server open Server Manager > Tools > DNS.
- In the right pane expand the domain you want to use for advertising of the AirPrint service(s) (in our case it is mydomain.test domain).
- Right click the _tcp folder and in the context menu select Other new records...
- In the window select Service Location (SRV) record type and click Create record... Fill following values in the New Resource Record window:
- Protocol: _ipps
- Service: Fill in any string. The service will anyway be deleted in the next step. We just need to create a folder for the service definition.
- Highlight the _ipps folder in the left pane, right click created service in the right pane and select Delete from the context menu. Confirm the delete.
Create a service definition
In this section we will be defining the service which will be advertised by the DNS server. Each service requires set of three records PTR,SRV and TXT. The section describes creation of one service which will be advertising one instance of Dispatcher Paragon Mobile Integration Gateway. You can replicate the procedure multiple times if you need to advertise more instances of the Mobile Integration Gateway (for multiple sites).
PTR record
- Right click the _ipps folder in the left pane and form the context menu select Other New Records...
- In the window select Pointer (PTR ) record type and click Create record... Fill following values in the New Resource Record window:
- Host IP Address: leave this field blank
- Host name: ysqmig._ipps._tcp.mydomain.test. (Adjust this based on the name of your domain and desired IPPS printer name.
- Click OK to crate a PTR record.
SRV record
- Right click the _ipps folder in the left pane and form the context menu select Other New Records...
- In the window select Service Location (SRV) record type and click Create record... Fill following values in the New Resource Record window:
- Service: ysqmig (Adjust this according to desired IPPS printer name).
- Protocol: _ipps
- Port number: 8050. Port on which the Dispatcher Paragon Mobile Integration Gateway is listening.
- Host offering this service: autofsp.mydomain.test . Adjust this setting based on the FQDN of the host on which the Mobile Integration Gateway is running.
- Click OK to crate a SRV record.
TXT record
- Right click the _ipps folder in the left pane and form the context menu select Other New Records...
- In the window select Text (TXT ) record type and click Create record... Fill following values in the New Resource Record window:
- Record name: ysqmig (Adjust this according to desired IPPS printer name).
Text: (refer to the next chapter for explanation of how to create TXT record content)
adminurl=127.0.0.1
air=username,password
kind=document,photo
note=Dispatcher Paragon
pdl=application/pdf,image/jpeg,image/urf,image/pwg-raster
 product=(Dispatcher Paragon)
rp=ipp/print
Color=T
Duplex=T
Fax=F
Scan=F
Bind=F
Collate=F
Punch=0
Staple=F
PaperMax=legal-A4
TLS=1.2
ty=Dispatcher Paragon
qtotal=1
txtvers=1
URF=V1.4,W8,SRGB24,RS600,IS1-2-3-4-5-6-7,PQ1-2-3-4-5,OB1-2-3-4-5-6-7-8-9,CP1,DM1
UUID=db0def0a-40e1-11e5-a151-feff819cdc9f
print_wfds=T
- Click OK to crate a PTR record.
How to create TXT record
The TXT record contains information about advertised printer which the clients can understand. You can see that apart from other fields the TXT record contains definition of supported finishing options of the printer (Bind, Punch, Staple, ...). Explanation of meaning of the fields is out of scope of this document. Important thing to understand about TXT record advertised by the DNS-SD is that the client will offer options for the user based on information in the TXT record. Since we are advertising Dispatcher Paragon Mobile Integration Gateway the available options must cope with capabilities with the IPPS printer which Mobile Integration Gateway represents in this scenario.
Configuration of the Mobile Integration Gateway already contains field which are in the TXT record. The <SAFEQ_HOME>\MIG\bin\services\MdnsService.xml file contains xml format representation of the same field which needs to be configured in the TXT record. To create TXT record for your printer use the text defined in the previous chapter change and replace the URF and UUID values by values in the MdnsService.xml.
Add printers to be discovered by the iOS/MAC OS X devices
In the previous chapter we have defined the service which will be advertised by the DNS-SD. The service already describes the IPPS printer, however to make it all work we need to add few more records.
- On the Windows server open Server Manager > Tools > DNS.
- In the right pane expand the domain you want to use for advertising of the AirPrint service(s) (in our case it is mydomain.test domain).
- Right click the _ipps folder and in the context menu select Other new records...
- In the window select Service Location (SRV) record type and click Create record... Fill following values in the New Resource Record window:
- Protocol: _sub
- Service: Fill in any string. The service will anyway be deleted in the next step. We just need to create a folder for the service definition.
- Highlight the _sub folder in the left pane, right click created service in the right pane and select Delete from the context menu. Confirm the delete.
- Right click the _sub folder in the left pane and form the context menu select Other New Records...
- In the window select Service Location ( SRV) record type and click Create record... Fill following values in the New Resource Record window:
- Protocol: _universal
- Service: Fill in any string. The service will anyway be deleted in the next step. We just need to create a folder for the service definition.
- Highlight the _universal folder in the left pane, right click created service in the right pane and select Delete from the context menu. Confirm the delete.
- Right click the _universal folder in the left pane and form the context menu select Other New Records...
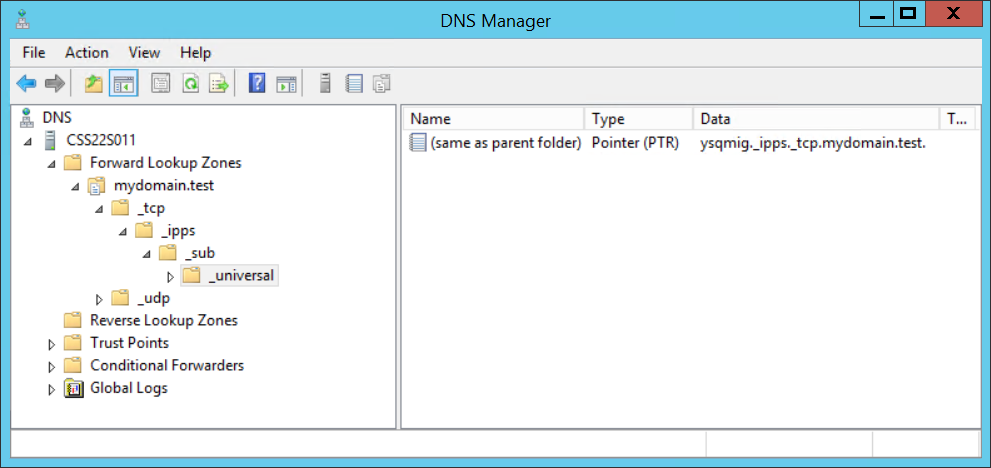
- In the window select Pointer (PTR ) record type and click Create record... Fill following values in the New Resource Record window:
- Host IP Address:leave the field blank.
- Host name: ysqmig._ipps._tcp.mydomain.test. Adjust this based on the name of your domain and printer.
- Click OK to crate a PTR record.
- On the screenshot below you see how the result should look like in the DNS Manager console window:
Configuring search domain for the iOS/MAC OS X devices
The above configuration allows DNS server to correctly answer DNS-SD queries for the AirPrint ready services. Now we need to tell the clients which domain they should search for such services. This can either be done manually or via DHCP protocol. We will not cover the manual options as they can differ based on the OS (iOS/MAC OS X) or version of the systems.
Configuring DHCP server to distribute search domain to the clients
This chapter will describe configuration of Windows DHCP server. The search domain is defined by the DHCP option 15.
- On the Windows server open Server Manager > Tools > DHCP.
- In the right pane expand the scope for which you want to configure the search domain distribution.
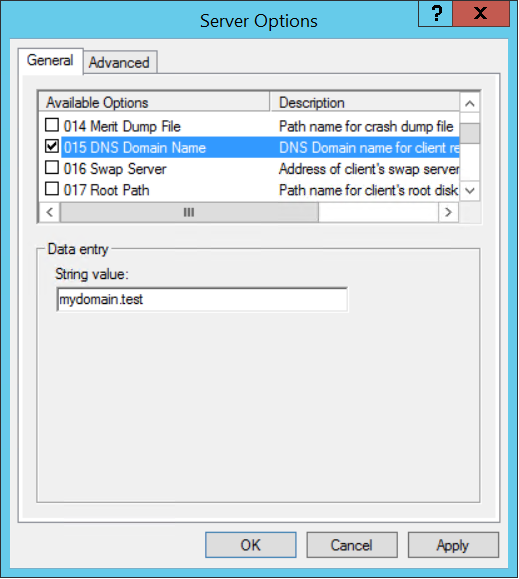
- Right-click the Scope Options and in the context menu click on Configure Options...
- In the list of options select 015 DNS Domain Name and write domain name into the String value field.
- Confirm the configuration by clicking OK button.
That is it. The iOS/MAC OS X clients which are obtaining IP addresses from this DHCP will know that they should query defined domain for the AirPrint services.
How to flush DNS on iOS device
To test the configuration it can be useful to flush cashed DNS entries from the device. To flush DNS on the iOS device it is enough to intentionally enter wrong DNS server entry, confirm it by going back to the network listing and configure correct DNS again.