Manual update from single database to multi server multi database architecture at Microsoft SQL Server
Update procedure for one tenant with examples for the first tenant. Target database architecture is multi server and multiple database, database deployment is with SQL Server authentication. You could update all tenants data analogically. Create system backup before the update.
- Backup single database.
Backup Dispatcher Paragon Management Server database (default name is SQDB6) in SQL Server Management Studio utility. Right click on database and choose Tasks > Back Up. You could also run command line command, for example:
BACKUPDATABASE[SQDB6]TODISK = N'SQDB6.bak'WITHNOFORMATSee Backup of Databases for detailed instructions.
In case of non-default database collation following query can be used to get the current collation:
SELECTcollation_nameFROMsys.databasesWHEREname='SQDB6';
- Uninstall Dispatcher Paragon Management Server completely. Uninstall Dispatcher Paragon Management Server including database.
Clean install Dispatcher Paragon Management Server. Install Dispatcher Paragon Management Server in multi server and multi database configuration.
- In case of non-default database collation create the databases manually before new installation - Installing Dispatcher Paragon Management Server on server with specific database collation for MS-SQL database
Get configuration data.
Get necessary configuration data from production database (SQDB6):
-- get tenant password and tenant schema name [@tenant_password@, @tenant_schema_name@]selectdb_pass, schema_namefromcluster_mngmt.tenants;-- get dwhtenant password and dwhtenant schema name [@dwhtenant password@, @dwhtenant_schema_name@]selectdb_pass, schema_namefromcluster_mngmt.tenant_warehouses;-- get server guid and id [@server_guid@, @server_id]selectserver_guid, idfromcluster_mngmt.cluster_server;Write it down, you will use these values later for Update configuration data in step 7.
- Stop Dispatcher Paragon services. For detailed instructions see Updating from MU/Build to Build, section Stop Dispatcher Paragon services.
Drop new production database and restore the old one.
Drop production database (SQDB6) in SQL Server Management Studio. Right click on production database and choose drop database. You could also run sql command, for example:
DROPDATABASE[SQDB6];In SQL Server Management Studio restore whole database (SQDB6) from step 1. Right click on Databases (SQDB6) and choose Restore Database. You could also run sql command, for example:
RESTOREDATABASE[SQDB6]FROMDISK = N'SQDB6.bak'WITHFILE = 1, NOUNLOAD, STATS = 5
- Update the configuration data.
Update necessary configuration data in production database (SQDB6):
-- update server guidupdatecluster_mngmt.cluster_serversetserver_guid ='@server_guid@'whereid = @server_id@;-- update tenant passwordupdatecluster_mngmt.tenantssetdb_pass ='@tenant_password@'whereschema_name ='@tenant_schema_name@';-- update dwhtenant passwordupdatecluster_mngmt.tenant_warehousessetdb_pass ='@dwhtenant password@'whereschema_name ='@dwhtenant_schema_name@';Replace placeholders by values from step number 4.
Update Server Link credentials in the data warehouse database (SQDB6_DWH):
- Log in to Microsoft SQL Server Management Studio.
- Navigate to Server Objects > Linked Servers > SQDB6_LINKED_SERVER, right-click on the Linked Server and choose Properties.
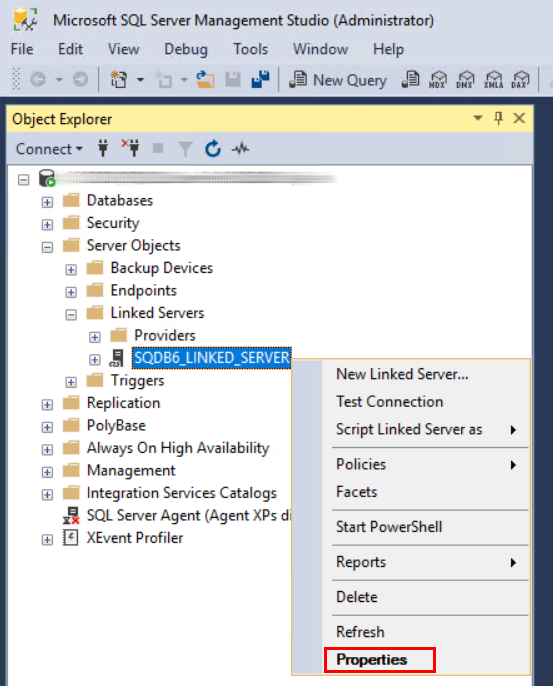
- In the Linked Server Properties window, select the Security page in the Select a page navigation.
- On the Security page, update the Remote Password field for all the tenant users (i.e. update all the login mappings with Local Login in format "dwhtenantuser_i"). Use the tenant passwords from step number 4 (the values of '@tenant_password@' placeholder).

Alter users and grant permissions.
-- Alter user with loginALTERUSERcluster_mngmtWITHLOGIN = cluster_mngmt;ALTERUSERcluster_guestWITHLOGIN = cluster_guest;ALTERUSERtenantuser_1WITHLOGIN = tenantuser_1;Drop and clean up schema.
Drop dwhtenant schema from the production database (SQDB6).
Create a procedure from the
cleanUpSchema.sqlfile into the production database (SQDB6). The file is distributed in the installation package under\Complementary Solutions\Enterprise Reporting\.Execute procedure at production database (SQDB6):
execCleanUpSchema'dwhtenant_1','w'
Go to Warehouse SQL Server engine.
- Restore the old one database and copy data into warehouse database.
On the warehouse server in SQL Server Management Studio restore whole database (SQDB6) from step 1. Right click on Databases (SQDB6) and choose Restore Database. You could also run sql command, for example:
RESTOREDATABASE[SQDB6]FROMDISK = N'SQDB6.bak'WITHFILE = 1, NOUNLOAD, STATS = 5Run queries from the select at warehouse database (default name is SQDB6_DWH):
select'insert into dwhtenant_1.'+TABLE_NAME+' ('+ (selectstuff(list,1,1,'')from(select',['+cast(c.COLUMN_NAMEasvarchar(64)) +']'as[text()]FROMINFORMATION_SCHEMA.COLUMNS cwherec.TABLE_NAME = t.TABLE_NAMEANDc.TABLE_SCHEMA = t.TABLE_SCHEMAORDERBYc.ORDINAL_POSITIONforxml path('') )asSub(list)) +') select '+ (selectstuff(list,1,1,'')from(select',['+cast(c.COLUMN_NAMEasvarchar(64)) +']'as[text()]FROMINFORMATION_SCHEMA.COLUMNS cwherec.TABLE_NAME = t.TABLE_NAMEANDc.TABLE_SCHEMA = t.TABLE_SCHEMAORDERBYc.ORDINAL_POSITIONforxml path('') )asSub(list)) +' from SQDB6.dwhtenant_1.'+TABLE_NAME+' where id not in (select id from dwhtenant_1.'+TABLE_NAME+')'fromINFORMATION_SCHEMA.TABLES twhereTABLE_SCHEMA ='dwhtenant_1'andTABLE_TYPE ='BASE TABLE'andTABLE_NAMEnotlike'smartq_jobs%'orderbycasewhenTABLE_NAMElike'%dimension'then2whenTABLE_NAMElike'%measures'then3whenTABLE_NAMElike'%junction'then4else1end,TABLE_NAMEExample of the insert returned by the query above: "insert into dwhtenant_1.color_type_accids select * from SQDB6.dwhtenant_1.color_type_accids where id not in (select id from dwhtenant_1.color_type_accids)".
Update warehouse sequences.
On the warehouse server run queries from the select at warehouse database (default name is SQDB6_DWH):
SELECT'DECLARE @x_sql'+CAST(object_idasNVARCHAR(32))+' as NVARCHAR(1024) select @x_sql'+CAST(object_idasNVARCHAR(32))+' = ''ALTER SEQUENCE ['+SCHEMA_NAME(schema_id)+'].['+name+'] RESTART WITH '' + (select CAST(coalesce((max(id)+1),1) AS NVARCHAR(32)) from ['+SCHEMA_NAME(schema_id)+'].['+SUBSTRING(name,1,(LEN(name)-7))+'] WHERE id != 0) EXECUTE(@x_sql'+CAST(object_idasNVARCHAR(32))+')'FROMsys.sequencesWHEREnamelike'%_id_seq'ANDSCHEMA_NAME(schema_id) ='dwhtenant_1'Example of the insert returned by the query above: "DECLARE @x_sql14623095 as NVARCHAR(1024) select @x_sql14623095 = 'ALTER SEQUENCE [dwhtenant_1].[dm_v2_device_dimension_id_seq] RESTART WITH ' + (select CAST(coalesce((max(id)+1),1) AS NVARCHAR(32)) from [dwhtenant_1].[dm_v2_device_dimension] WHERE id != 0) EXECUTE(@x_sql14623095)".
Drop old database (SQDB6) from warehouse server.
Drop old database (SQDB6) in SQL Server Management Studio on warehouse server. Right click on old database and choose drop database. You could also run sql command, for example:
DROPDATABASE[SQDB6];
Multitenant environment
If you have multitenant environment repeat steps 8-12 for remaining tenants.
Spooling Management
If you have spooling Management server you need to update SPOC guid according to new installation (<install_dir>\SPOC\conf\modules\guid.conf).
UPDATE tenant_1.spooler_controllers SET spooler_controller_guid = '@new_spoc_guid@' WHERE id = 1;