FCC statements
§ 15.21 Information to user
The user's manual or instruction manual for an intentional or unintentional radiator shall caution the user that changes or modifications not expressly approved by the party responsible for compliance could void the user's authority to operate the equipment. In cases where the manual is provided only in a form other than paper, such as on a computer disk or over the Internet, the information required by this section may be included in the manual in that alternative form, provided the user can reasonably be expected to have the capability to access information in that form.
§ 15.105 Information to the user
This equipment has been tested and found to comply with the limits for a Class A digital device, pursuant to part 15 of the FCC Rules. These limits are designed to provide reasonable protection against harmful interference when the equipment is operated in a commercial environment. This equipment generates, uses, and can radiate radio frequency energy and, if not installed and used in accordance with the instruction manual, may cause harmful interference to radio communications. The operation of this equipment in a residential area is likely to cause harmful interference in which case the user will be required to correct the interference at his own expense.
Complete the Before-You-Begin checklist
Before you begin installing the terminal, complete this checklist:
- If possible, register and acquire access to the Konica Minolta online help desk a day or two before you begin the installation.
- Obtain the Terminal Ultralight installation packages and a small Phillips screwdriver.
Make sure Dispatcher Paragon Server is installed and running.
Property startTerminalProfessionalLegacyServer has to be enabled.
- Write down the terminal's serial number (located on the back of the terminal).
Make sure the Smart cable is the correct cable for the MFD you are connecting the terminal to.
Refer to the MFD/cable part number compatibility list that Konica Minolta provided you or go to Hardware Compatibility List (HCL) and check the list there.
- If the cable you have is not correct, find the correct cable before you proceed. The cable may be among other Konica Minolta packages at the location where you are installing the terminal.
- Obtain the following information:
- Dispatcher Paragon Server IP address
- Does the network support DHCP?
- If it does not support DHCP, obtain this additional information:
- Terminal IP address
- Netmask address
- Gateway IP address
- DNS server IP address
- Information about the MFD or printer:
- IP address
- Serial number
- Model number
Check package contents
Check to make sure you have the following items (included in several packages):
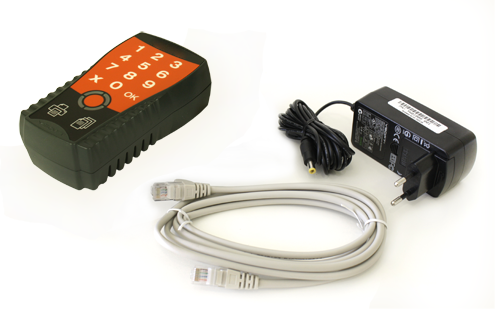
Main package:
- Terminal Ultralight
- Ethernet cable
- Power supply adapter
The package also includes clear plastic cable wrap for the Ethernet cable.
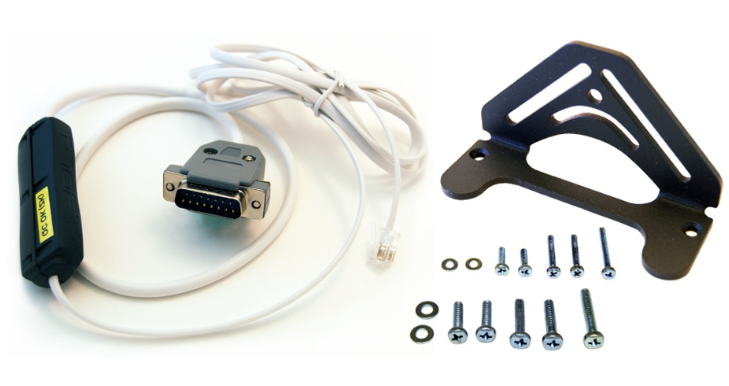
Accessory packages:
- Smart cable
- MFD Universal Mounting Kit (bracket, screws, washers)
The Smart cable for your MFD may be different from the one shown here.
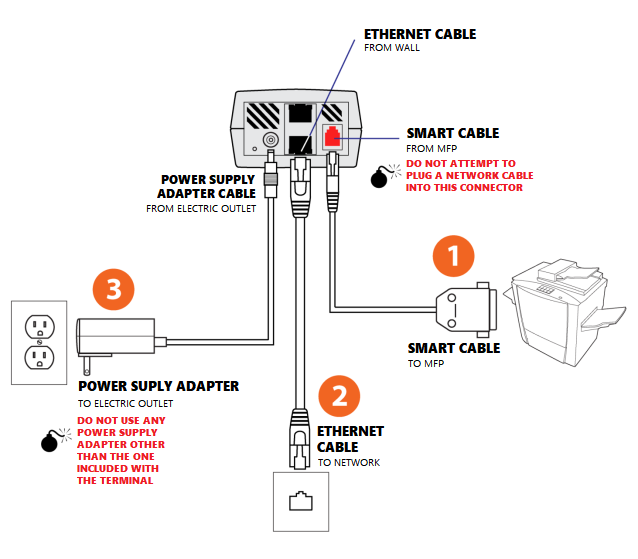
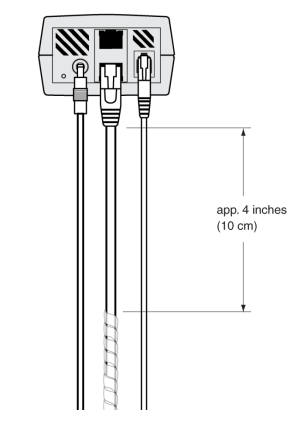
Connect the cables
Connect the cables in the order shown in this diagram.
You must connect the Smart cable before you connect the Power Supply Adapter cable.
The printer has to be connected to the network directly or by the switch in Terminal UltraLight.
Configuring the terminal
Terminal Ultralight requires a TCP/IP connection to Dispatcher Paragon Server. The terminal has its own IP and MAC address.
For the correct network configuration, you can go to Configuring YSoft SafeQ Terminal UltraLight.
Dispatcher Paragon Server configuration
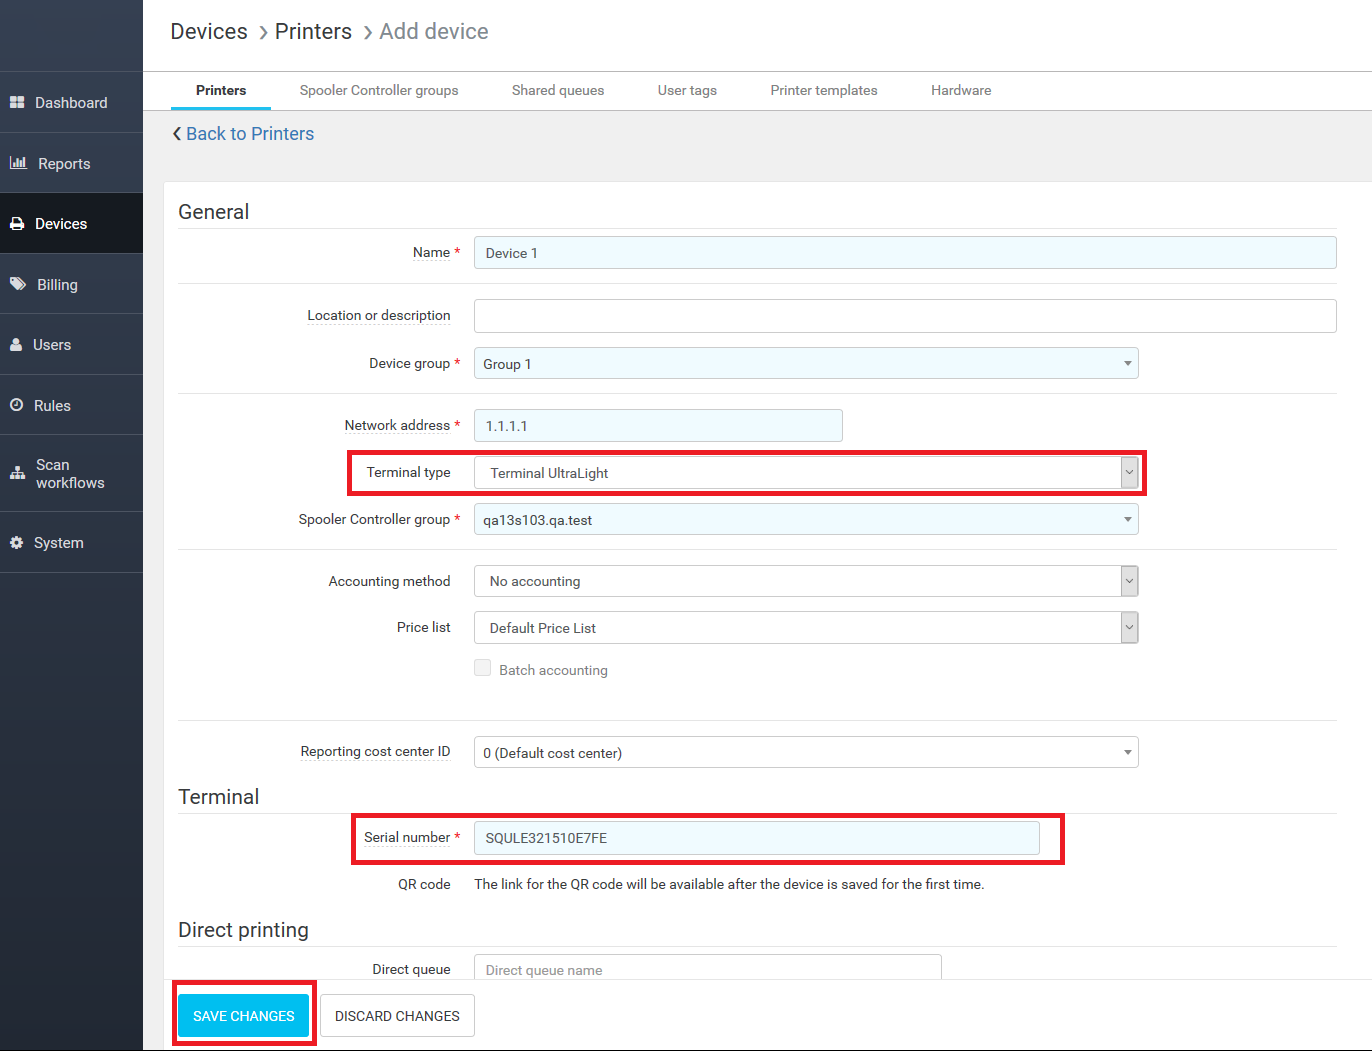
- Log into the Dispatcher Paragon web administration with sufficient rights to manage devices.
- Go to Devices > Printers and click Add Device.
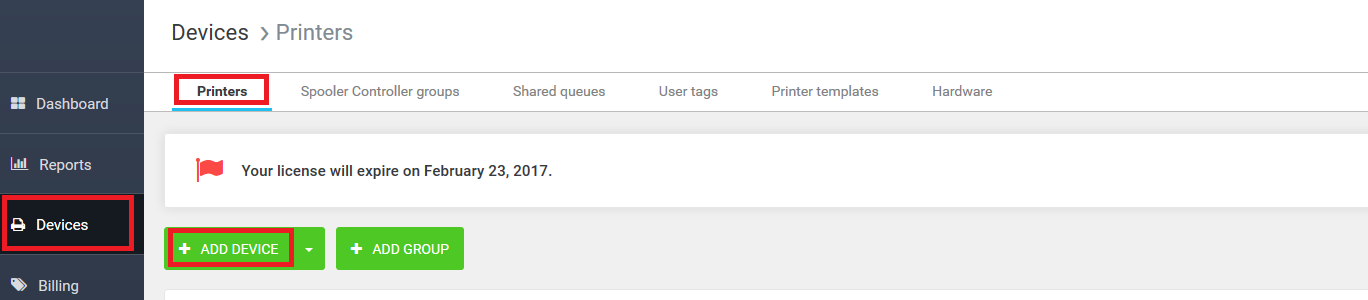
- In the General section select the Terminal type and in the Terminal section enter the Serial number of your Terminal Ultralight. This serial number must equal the serial number written in Remote configuration tool for hardware terminals. Then click Save changes.
Mounting the terminal
Depending on the type of bracket included with the terminal, mount the bracket to the MFD, to the wall, or to a nearby object such as a desk or table.
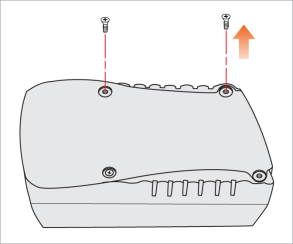
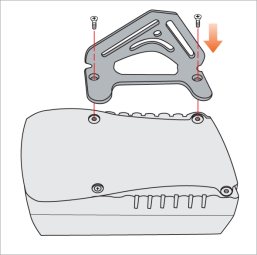
To mount the terminal onto the MFD, follow these steps:
- Remove two screws from the back of the terminal.
- Attach the mounting bracket to the terminal.
- If you have not already done so, write down the terminal's serial number (located on the back of the terminal).
- Use the screws and washers included with the mounting bracket to mount the bracket and terminal onto the MFD.
- Cover the Ethernet cable with the clear plastic wrap (included in the plastic bag with the cable). Start the wrap about 4 or 5 inches (10 – 12 cm) from the back of the terminal.
Verify installation
At the terminal, enter a PIN, then press OK.
The PIN you use must be one that you have already added in the Dispatcher Paragon system.Check to make sure the MFD panel unlocks (that is, the panel lights up and comes on).
If the MFP unlocks and the user is authenticated, installation is now complete.