This page describes how to use the interactive installer to perform a basic Dispatcher Paragon Management Server installation.
All nodes of the Dispatcher Paragon Management Server cluster have to be in the same timezone
Usage of a bundled PostgreSQL database (which is located on the first node) is not recommended for a Management Server cluster.
Please note that in case the embedded PostgreSQL database is used in a time zone other than GMT, the following workaround to the known limitation must be applied.
Configuring the PostgreSQL Time Zone for Correct Print Job and Report Data
Standard installation
Obtain and run installation file management-installer.exe. Once you have the file and the server is ready for installation, you can begin Dispatcher Paragon Management Server installation.
In order to install Dispatcher Paragon Management Server, this file is required. It contains everything necessary for installing a fully functional Dispatcher Paragon Management Server.
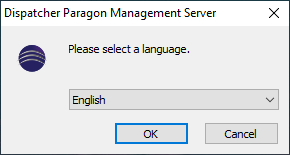
Select a language that will be used for the installation process.
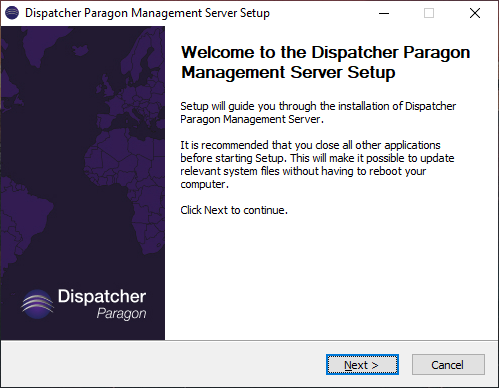
Close all other applications to avoid issues with updating the relevant system files.
- The next screen displays full license terms and conditions, which you should read and consider before moving forward. Click I Agree and install the product or Cancel to abort the installation.
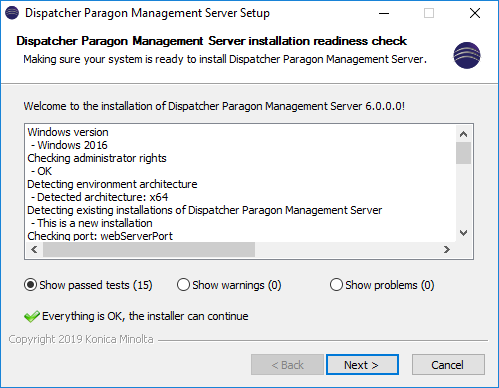
After you accept the license agreement, the installer runs a pre-installation check. This procedure checks several conditions and determines if the server meets all requirements for Dispatcher Paragon Management Server installation.
If any of these conditions are not met, they will be displayed in either the Show warnings or Show problems area, depending on their severity. If there are warnings, installation can continue. If there are problems, installation cannot continue. If any warnings or problems are indicated, review the warnings and resolve the problems, then continue.
The conditions the installer checks are:
- The correct version of Windows
- The user installing Dispatcher Paragon Management Server has administrator rights
- All required ports are open and free
- Enough available system memory
- Presence of a previous version of Dispatcher Paragon Management Server
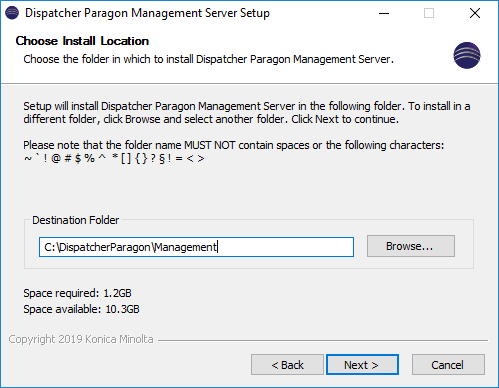
You now have the option to select your own installation location. You can install Dispatcher Paragon Management Server anywhere other than a UNC path or the root folder of the drive.
The installer now displays Dispatcher Paragon Management Server installation settings.
To use the default installation settings:- Accept the default Dispatcher Paragon Management Server installation folder, database engine, and IP address. Please see the warning about using the embedded PostgreSQL in the non-GMT time zone at the top of the page as this database engine is used as the default.
To use values other than the default ones:
- Check I want to customize my Dispatcher Paragon installation; then go to section Customized installation or adding/replacing node for more information.
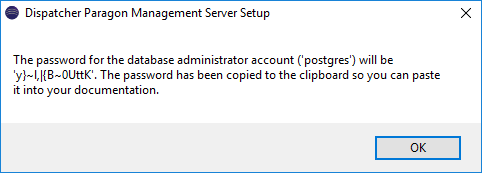
- If you chose the default installation, the installer displays the account name and password for the database. The password is automatically copied to the clipboard. Save this password to a safe place so that you can either use it when you need it or change it if you want.
Click OK.
The installer begins to copy all the files required by Dispatcher Paragon Management Server and the database system you chose to the selected destination folder on the server. In case you wish to see the detailed installation progress, press the Show details button (or D key).

The last page of the wizard informs you about the results of the installation process and gives you the option to display the Dispatcher Paragon management interface.
Click Finish when you are ready to close the installation wizard.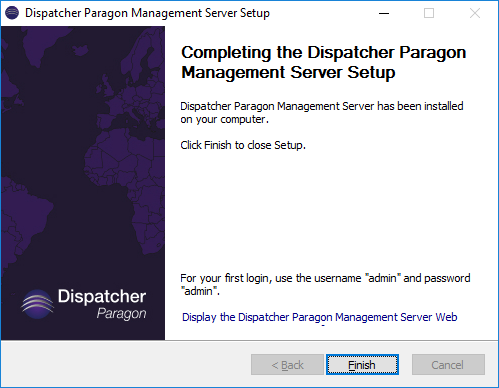
Customized installation or adding/replacing node
If you wish to use values other than the default settings, check I want to customize my Dispatcher Paragon Management Server installation.
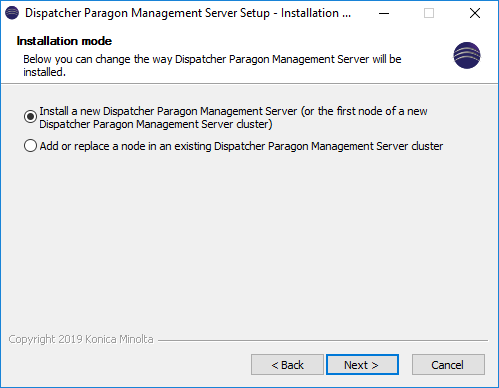
You can select which node you want to install.
If you want to install a single Dispatcher Paragon Management Server installation or the first node of a Dispatcher Paragon Management Server cluster and continue by clicking Next.
For multiple Dispatcher Paragon installations on one MSSQL server, using one MSSQL instance for each Dispatcher Paragon installation is required, as this will prevent overwriting of database users and will keep both installations separated.
If you want to add a node to an existing cluster, select Add or replace a node in an existing Dispatcher Paragon Management Server cluster, enter Cluster master node IP address, click Retrieve node list. If a successful connection is established proceed by clicking Next. The database will be shared among cluster nodes so the next page is described in step 5.
Note that it is necessary to restart other cluster nodes after the successful installation in order to refresh their cluster server list.
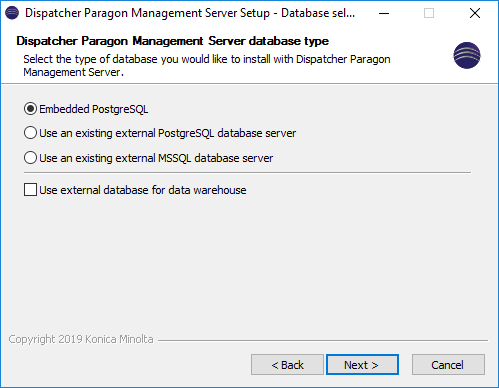
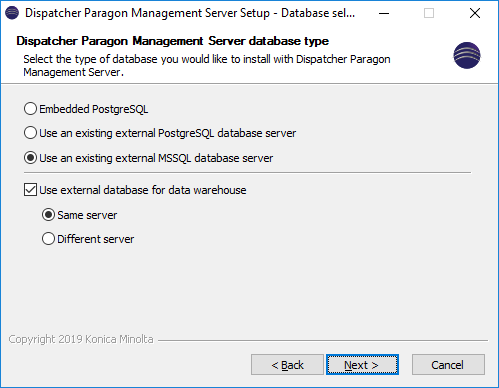
Choose the database that will be used by Dispatcher Paragon Management Server:
- Database type:
- the default Embedded PostgreSQL 11
- Use an existing external database server which you can choose if you already have MS SQL or PostgreSQL database (check supported versions) with enough capacity to hold the Dispatcher Paragon Management Server database.
- Database deployment scenario:
- the default single database for production and the warehouse
- separate database for production and the warehouse (on a single DBMS)
- standalone database for the warehouse (on a separate DBMS)
- Database type:
- Database setup
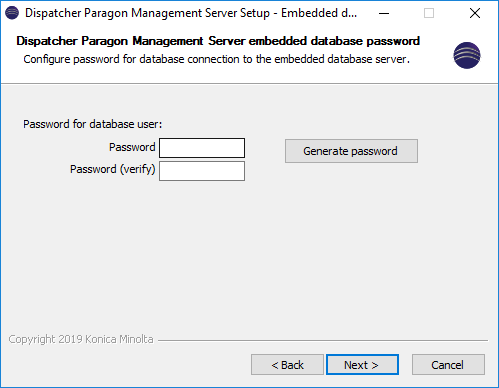
In the case of the Embedded PostgreSQL Server, you must specify a password for the database user.
Passwords must be entered twice to avoid a problem with a potential typo.
You can use Generate password button to generate the password for the database user. On button click, the password is generated and copied to the clipboard.
Please see the warning about using the embedded PostgreSQL database engine in the non-GMT time zone at the top of the page.
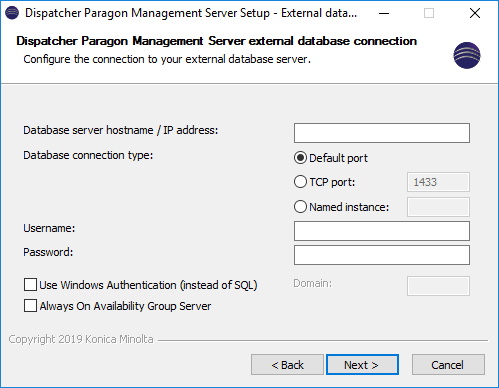
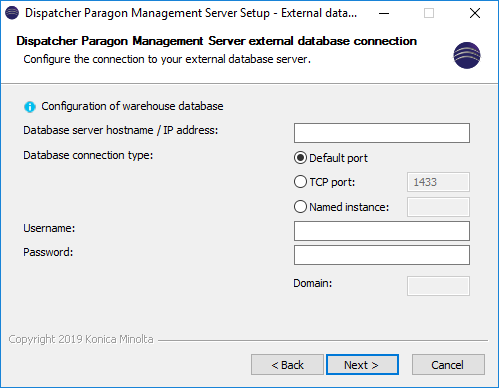
In the case of an External database you must specify information about the connection to the database.
In the case of a Single database for the production and data warehouse, you must enter the name for the Dispatcher Paragon Management Server database.
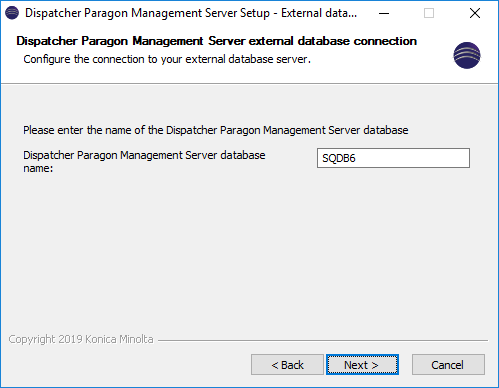
If the database does not exist, a popup will appear asking whether you want to create it. To proceed to click Yes, the installation guide uses the provided database account to automate most of the database-related installation tasks (the creation of databases, database schemes, tables, etc.)
The database name should not contain special characters or white spaces.
The database name will be used as a base for IMS database name using this format: <Dispatcher Paragon Management Server database name>_IMS
- In the case of Separate databases for the production and data warehouse (on a single database-management system).
You must enter the name for the Dispatcher Paragon Management Server production database.

The database name will be used as a base for IMS database name using this format: <Dispatcher Paragon Management Server database name>_IMS
You must enter the name for the Dispatcher Paragon Management Server data warehouse database.
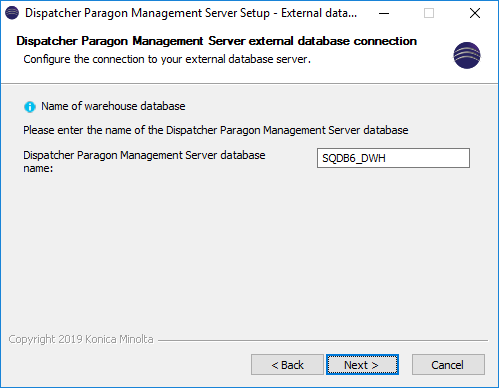
In the case of a Standalone database for the data warehouse (on a separate database-management system).
You must specify the production database connection information.

In the case of a standalone data warehouse deployment scenario, Database server hostname / IP address should not be entered as a local loopback address (i.e. localhost or 127.0.0.1). If a local loopback address is entered, the installer will automatically change the value to the IP address of the Dispatcher Paragon Management Service chosen in the previous step.
You must specify data warehouse database connection information.
You must also enter the names of the Dispatcher Paragon Management Server production and data warehouse databases.
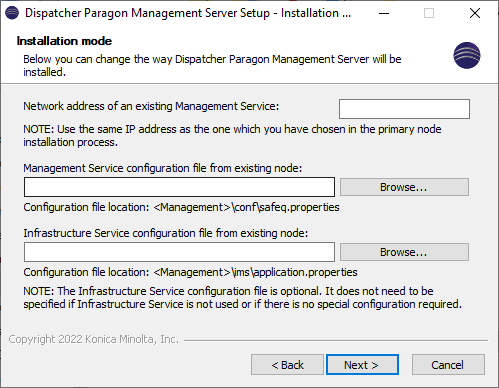
If you are installing an additional node to a Management Service cluster you have to enter the IP address of a primary node and provide a configuration file from an existing Management Service node.
When using Enhanced Password Protection
In case the Enhanced Password Protection feature is used, the encryption key must be copied from the primary node to the node where the installation is taking place and it must be placed on the same location as on the primary node (the location that is in the configuration file).
See the Using enhanced password protection with Management cluster section of the Setup and Configuration of the Enhanced Password Protection page for more details.
Infrastructure service configuration
In most cases, it is not necessary to provide the Infrastructure Service configuration file. When a specific configuration file for Infrastructure Service is not provided it will be automatically generated based on the Management Service configuration file.
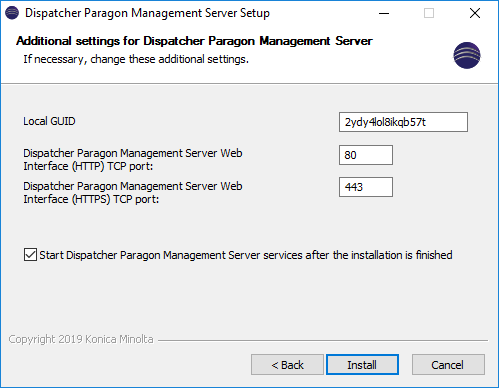
The last page of the wizard presents you with the following settings:
- Local GUID for currently installing Management server (node).
- TCP port that the Dispatcher Paragon management interface will use.
- HTTPS TCP port for Dispatcher Paragon management interface.
- Start Dispatcher Paragon services after the installation is finished: To start services after installation, check the checkbox. To not start services, leave the checkbox empty.
Silent installation
The installer (downloaded file management-installer.exe) supports the installation of Dispatcher Paragon Management Server from command line interface or through a script. Use one of the following examples with appropriately filled-in parameter values. Configuration options are divided by a space.
Configuration options that meet the condition in the Required column have to be provided.
Example installation commands as if installed on a server with IP address 10.0.11.7 (should be run from cmd from the location of the file management-installer.exe):
management-installer.exe /S /CFG:usedLocalIp=10.0.11.7 /CFG:dbClass=PGSQL /CFG:dbPassword=somePassword /CFG:embeddedDB /CFG:dbName=SQDB6 /D=C:\DispatcherParagon\Managementmanagement-installer.exe /S /CFG:usedLocalIp=10.0.11.7 /CFG:dbClass=PGSQL /CFG:dbPassword=postgres /CFG:dbUsername=postgres /CFG:dbHost=10.0.11.172 /CFG:dbPort=5432 /CFG:dbName=SQDB6 /D=C:\DispatcherParagon\ManagementAssumes installed PGSQL database system on server 10.0.11.172:5432 with existing user postgres with password postgres. Please see the warning about using the embedded PostgreSQL in non-GMT time zone at the top of the page.
management-installer.exe /S /CFG:usedLocalIp=10.0.11.7 /CFG:dbClass=MSSQL /CFG:dbPassword=sa /CFG:dbUsername=sa /CFG:dbHost=10.0.11.172 /CFG:dbPort=1433 /D=C:\DispatcherParagon\ManagementAssumes installed MSSQL database system on server 10.0.11.172:1433 with existing user sa with password sa
management-installer.exe /S /CFG:usedLocalIp=10.0.11.7 /CFG:dbClass=MSSQL /CFG:dbPassword=sa /CFG:dbUsername=sa /CFG:dbHost=10.0.11.172 /CFG:dbInstance=INSTANCE1 /D=C:\DispatcherParagon\ManagementAssumes installed MSSQL database system on server 10.0.11.172 with existing instance INSTANCE1 with existing user sa with password sa
management-installer.exe /S /CFG:usedLocalIp=10.0.11.7 /CFG:dbClass=MSSQL /CFG:dbPassword=Administrator /CFG:dbUsername=admin /CFG:dbHost=10.0.11.172 /CFG:dbPort=1433 /CFG:dbDomain=EXAMPLE /CFG:alwaysOnMssql /D=C:\DispatcherParagon\ManagementAssumes installed MSSQL database system on server 10.0.11.172 with existing domain EXAMPLE with existing domain user Administrator with password admin
management-installer.exe /S /CFG:usedLocalIp=10.0.11.7 /CFG:clusterMasterIP=10.0.11.107 /CFG:propertiesPath=C:\temp\safeq.properties /D=C:\DispatcherParagon\ManagementWarehouse
management-installer.exe /S /CFG:usedLocalIp=10.0.5.174 /CFG:dbClass=PGSQL /CFG:dbUsername=postgres /CFG:dbPassword=somePassword /CFG:dbHost=10.0.13.151 /CFG:dbPort=5432 /CFG:dbName=SQDB6 /D=C:\DispatcherParagon\ManagementAssumes installed PGSQL database system on server 10.0.13.151:5432 with existing user postgres with password somePassword. Please see the warning about using the embedded PostgreSQL in non GMT time zone at the top of the page.
management-installer.exe /S /CFG:usedLocalIp=10.0.5.174 /CFG:dbClass=MSSQL /CFG:dbUsername=sa /CFG:dbPassword=somePassword /CFG:dbHost=10.0.13.81 /CFG:dbPort=1433 /CFG:dbName=SQDB6 /CFG:DWdbName=SQDB6_DWH /D=C:\DispatcherParagon\ManagementAssumes installed MSSQL database system with existing user sa with password somePassword with production database (SQDB6) and warehouse database (SQDB6_DWH) on the same server 10.0.13.81:1433
management-installer.exe /S /CFG:usedLocalIp=10.0.5.174 /CFG:dbClass=PGSQL /CFG:dbUsername=postgres /CFG:dbPassword=somePassword /CFG:dbHost=10.0.13.151 /CFG:dbPort=5432 /CFG:dbName=SQDB6 /CFG:DWdbUsername=postgres /CFG:DWdbPassword=someDwPassword /CFG:DWdbHost=10.0.13.98 /CFG:DWdbName=SQDB6_DWH /D=C:\DispatcherParagon\ManagementAssumes installed PGSQL database system:
Production database on server 10.0.13.151:5432 with existing user postgres with password somePassword.
Warehouse database on server 10.0.13.98:5432 with existing user postgres with pasword someDwPassword.
Please see the warning about using the embedded PostgreSQL in non-GMT time zone at the top of the page.
Configuration Parameters
Name | Value | Description | Example | Required |
|---|---|---|---|---|
/S | has no value | Silent flag - signifies that the installation should run silently - if not provided the installer graphic user interface will appear | always | |
/CFG:usedLocalIp= | IPv4 address Do not use localhost or 127.0.0.1 it has to be a local IP address as it can be seen from other servers in the preferred network | Local IP address of the actual server on which you are installing the Dispatcher Paragon Management Server as is represented in the network you want to use for communication with other Dispatcher Paragon products | If you are installing Dispatcher Paragon Management Server on a computer with IP address (in the network you want to use) 10.0.11.7 then fill in 10.0.11.7 do not use localhost or 127.0.0.1 /CFG:usedLocalIp=10.0.11.7 | always |
/CFG:clusterMasterIP= | IPv4 address | The IP address of another cluster node that is already installed | If you previously installed Dispatcher Paragon Management Server on a computer with IP address (in the network I want to use) 10.0.11.107 then fill in 10.0.11.107 /CFG:clusterMasterIP=10.0.11.107 | only for the installation of a second or further node in a cluster |
/CFG:propertiesPath= | file location | Location of Management Service configuration file from existing Management Server node. Configuration file location: <install_dir>\Management\conf\safeq.properties | /CFG:propertiesPath=C:\temp\safeq.properties | only for the installation of a second or further node in a cluster |
/CFG:imsPropertiesPath= | file location | Location of Infrastructure Service configuration file from existing Management Server node. Configuration file location: <install_dir>\Management\ims\application.properties | /CFG:imsPropertiesPath=C:\temp\application.properties | NO, used only when installing a second or further node in a cluster |
/CFG:dbClass= | PGSQL or MSSQL | For external or embedded Postgres database system provide PGSQL, for external Microsoft SQL Server provides MSSQL. Please see the warning about using the embedded PostgreSQL in the non-GMT time zone at the top of the page. | /CFG:dbClass=PGSQL or /CFG:dbClass=MSSQL | only for non-cluster installation or for the first node in the cluster |
/CFG:dbPassword= | recommended at least 7 characters long, with a combination of letters, capital letters, and numbers, can't contain these characters: ;$"<>:@%&\' | Password for an existing user in the external database system or for the non-existing user in the to be installed embedded PGSQL. | /CFG:dbPassword=s10o9m8e7P6a5s4s3w2o1r0d | only for non-cluster installation or for the first node in the cluster |
/CFG:embeddedDB | has no value | A flag that signifies that embedded database should be installed, only PGSQL is supported. Please see the warning about using the embedded PostgreSQL in the non-GMT time zone at the top of the page. | /CFG:embeddedDB | only for the installation of embedded PGSQL for non-cluster installation or for the first node in the cluster |
/CFG:dbUsername= | not empty - /CFG:dbDomain= without specifying value is invalid default for PGSQL is postgres default for MSSQL is sa not overwritable default for embedded PGSQL is postgres | Database system username with database owner rights for the given database (the non-existing database will be created by the installer with this user) | /CFG:dbUsername=postgres | NO, if defaults are valid for your external database system |
/CFG:dbHost= | not empty - /CFG:dbHost= without specifying value is invalid | IP address of a server with external database system | /CFG:dbHost=10.0.11.217 | only with external database of non-cluster installation or installation of the first node in cluster |
/CFG:dbPort= | numeric value default for PGSQL is 5432 default for MSSQL is 1433 | External database system port | /CFG:dbPort=5432 | only with external database of non-cluster installation or installation of the first node in cluster |
/CFG:dbInstance= | not empty - /CFG:dbInstance= without specifying value is invalid | MSSQL database system instance name | /CFG:dbInstance=INSTANCE1 | only for non-cluster installation or installation of the first node in cluster with external MSSQL database with existing named instance |
/CFG:dbDomain= | not empty - /CFG:dbDomain= without specifying value is invalid | Domain for domain user authentication in MSSQL database system | /CFG:dbDomain= EXAMPLE | only for non-cluster installation or installation of the first node in cluster with external MSSQL with domain user authentication |
/CFG:alwaysOnMssql | has no value | A flag which tells the installer to turn on Always On Availability Group support | /CFG:alwaysOnMssql | only for domain authentication |
/CFG:dbName= | the name can't contain a space or any character from these: ~`!@#$$%^&*\|/()[]{}?§!= | Name of database to be used by Dispatcher Paragon Management Server for the production database, it will be created if it doesn't exist. This name will be used as a base for the IMS database name in the format: <Dispatcher Paragon Management Server database name>_IMS | You may provide this configuration option and thus override the default which is SQDB6 /CFG:dbName=SQDB6 | NO |
/D= | location on an existing disc with enough space on (recommended is to have space from 2 GB for Dispatcher Paragon Management Server alone and way more for installation with embedded PGSQL) | A location where Dispatcher Paragon Management Server should be installed | You may provide this configuration option and thus override the default which is <install_dir>\Management /D=C:\DispatcherParagon\Management Must be provided as the last parameter otherwise parameters provided behind it could be ignored. | NO |
/CFG:httpPort= | the numeric value of not already used port | HTTP port on which Dispatcher Paragon management interface should run | You may provide this configuration option and thus override the default which is 80 /CFG:httpPort=80 | NO |
/CFG:httpsPort= | the numeric value of not already used port | Https port on which Dispatcher Paragon management interface should run | You may provide this configuration option and thus override the default which is 443 /CFG:httpsPort=443 | NO |
/CFG:localGUID= | not empty - /CFG:localGUID= without specifying value is invalid | GUID by which this Dispatcher Paragon Management Server will identify itself | You may provide this configuration option otherwise it will be generated automatically, you will find the generated value in the Dispatcher Paragon management interface /CFG:localGUID=shrdqjjvnlsaq | NO |
/CFG:noStartSvcs | has no value | A flag which tells the installer to NOT start services after successful installation, if not provided the services will be started | /CFG:noStartSvcs | NO |
/CFG:DWdbUserName= | /CFG:DWdbDomain= without specifying value is invalid | Database system username with database owner rights for the given warehouse database (the non-existing database will be created by the installer with this user) | /CFG:DWdbUsername=postgres | NO Required for standalone warehouse database installation. |
/CFG:DWdbPassword= | recommended at least 7 characters long, with a combination of letters, capital letters, and numbers, can't contain these characters: ;$"<>:@%&\' | Password for an existing user in the external warehouse database system or for the non-existing user in the to be installed embedded PGSQL. | /CFG:DWdbPassword=a10l9e8n7P6a5s4k3u2r1l0o | NO Required for standalone warehouse database installation. |
/CFG:DWdbPort= | numeric value | External warehouse database system port | /CFG:DWdbPort=5432 | NO |
/CFG:DWdbInstance= | /CFG:DWdbInstance= without specifying value is invalid | MSSQL database system instance name for warehouse database | /CFG:DWdbInstance=INSTANCE2 | NO |
/CFG:DWdbHost= | /CFG:DWdbHost= without specifying value is invalid | IP address of a server with external warehouse database system | /CFG:DWdbHost=10.0.13.169 | NO Required for standalone warehouse database installation. |
/CFG:DWdbName= | the name can't contain a space or any character from these: ~`!@#$$%^&*\|/()[]{}?§!= | Name of database to be used by Dispatcher Paragon Management Server for warehouse database, it will be created if it doesn't exist. | /CFG:DWdbName=SQDB6_DWH | NO Required for deployments with separate warehouse database. |
/CFG:DWdbDomain= | /CFG:DWdbDomain= without specifying value is invalid | Domain for domain user authentication in MSSQL warehouse database system | /CFG:DWdbDomain=EXAMPLE | NO |
/CFG:enableSSL= | true/false | PostgresSQL will be installed using the secured connection to the database. | /CFG:enableSSL=true | NO |
Troubleshooting the installation process
If an error occurred during the installation process, please check the following log files that were created during the process. All the installation log files are located in the Dispatcher Paragon Management Server installation folder.
- pginstall.log - contains information about PostgreSQL installation (if you selected PostgreSQL as the database to install).
- cml-install.log - contains information about the entire Dispatcher Paragon Management Server installation process.
If the installer has failed before the installation began check cml-install.log located in AppData\local\Temp\1\ folder of the currently logged user account.