This guide will help you to set up and install YSoft SafeQ Terminal Pro 4 from the Dispatcher Paragon user interface.
Disclaimer
Users that make changes or modifications not expressly approved by the party responsible for compliance (Konica Minolta, Inc.) could void the user’s authority to operate the equipment.
- Hereby, Konica Minolta, Inc. declares that the radio equipment type Multifunctional Terminal Appliance – YSoft SafeQ Terminal Pro 4, model number MT00001 is in compliance with Directive 2014/30/EU .The full text of the EU declaration of conformity is available at the following Internet address https://www.ysoft.com/en/legal/european-union-declaration-of-conformity.
- This device complies with Part 15 of the FCC Rules. Its operation is subject to the following two conditions: (1) this device may not cause harmful interference, and (2) this device must accept any interference received, including interference that may cause undesired operation.
![]() The product is in conformity with Directive 2002/96/EC of the European Parliament and of the Council of January 27, 2003, on waste electrical and electronic equipment (WEEE) and Directive 2003/108/EC of the European Parliament and of the Council of December 8, 2003, amending Directive 2002/96/EC on waste electrical and electronic equipment (WEEE).
The product is in conformity with Directive 2002/96/EC of the European Parliament and of the Council of January 27, 2003, on waste electrical and electronic equipment (WEEE) and Directive 2003/108/EC of the European Parliament and of the Council of December 8, 2003, amending Directive 2002/96/EC on waste electrical and electronic equipment (WEEE).
![]() Only for indoor use
Only for indoor use
Prerequisites
Check that Dispatcher Paragon Server is correctly installed and configured. For more information, please see the article Installing Dispatcher Paragon Server.
Initial Configuration
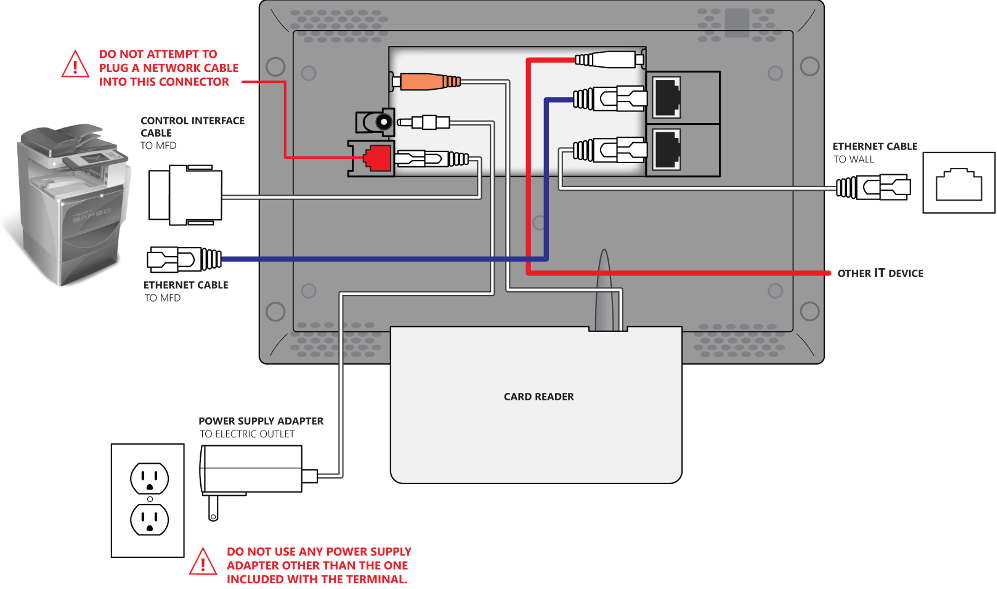
Once you have unpacked YSoft SafeQ Terminal Pro 4, plug in the power cord and the network cable accordingly.
- After the initial boot, the YSoft SafeQ Terminal Pro 4 Service Menu displays.
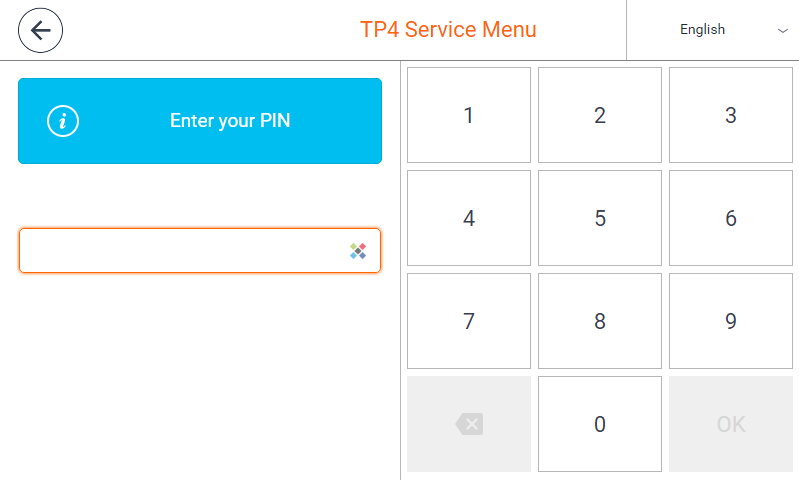
Picture: Service Menu authentication screen. - Enter the Administrator PIN and press OK. By default, the PIN is set to 7777.
- Select Network in Service Menu.

Picture: Service Menu with Network section highlighted. - Check the IP address of YSoft SafeQ Terminal Pro 4.
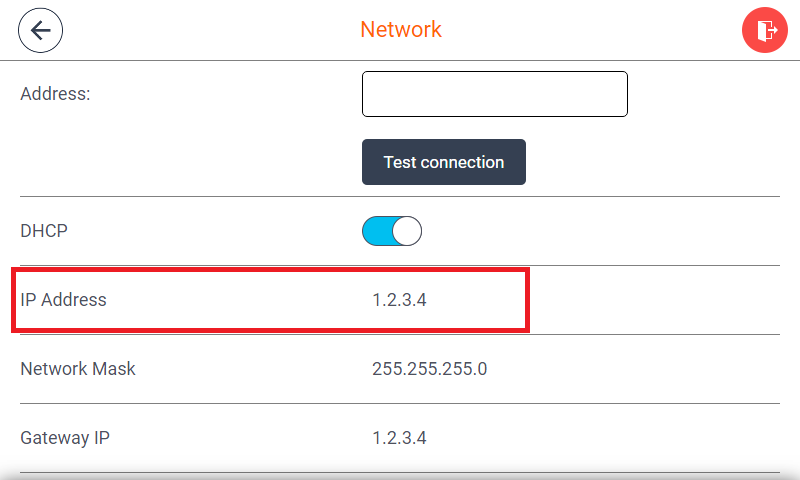
Picture: Network Settings with the IP Address configuration highlighted. - If necessary, set up network settings accordingly, as described in the Configuring YSoft SafeQ Terminal Pro 4 section.
Installing YSoft SafeQ Terminal Pro 4 from Dispatcher Paragon
Follow the procedure below to connect YSoft Terminal Pro 4 to a multi-function device and Dispatcher Paragon.
- Make sure that the Infrastructure Service is running. Since build 59, this service is installed with Manual start mode and thus may need to be started. It is recommended to stop the service again after all the installations have finished. Note that if the Infrastructure Service is not running then the Dispatcher Paragon user interface will display the following message when accessing the Devices > Hardware page:

- Log into the web administration, use an account authorized to manage the system.
- Open Devices > Printers from the menu. Click the ADD DEVICE button.

Picture: Button ADD DEVICE to add a new device to Dispatcher Paragon. - Enter the necessary details to identify a multi-function device: the Name, Device group, Network address of the device (the printer's IP address), and Spooler Controller group. Note that Name and Network address must be unique.
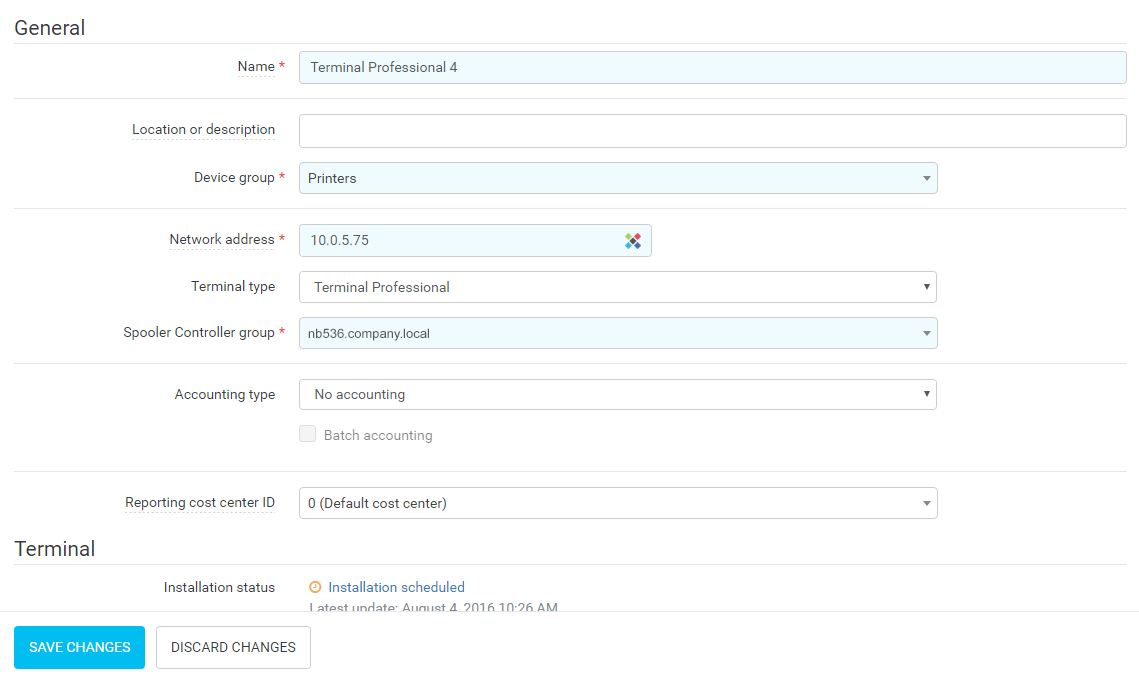
Picture: Filling in all required fields to add a new device. - Open the Terminal type selector and select YSoft SafeQ Terminal Professional.
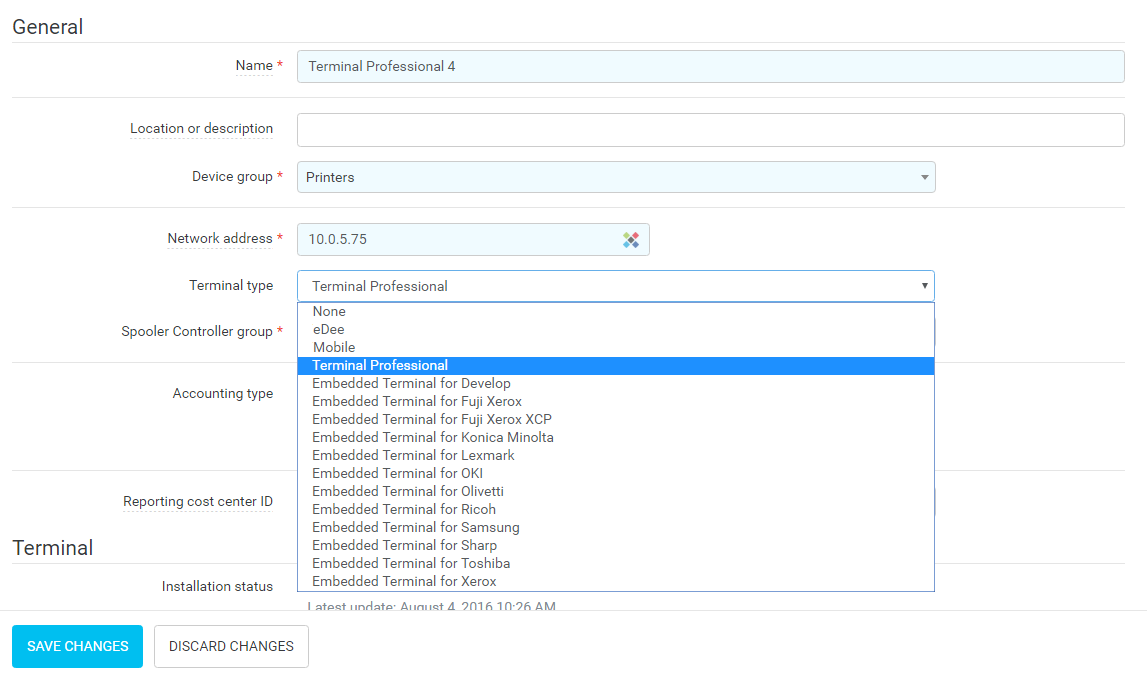
Picture: Selecting the YSoft SafeQ Terminal Pro 4 terminal type. - Enter Terminal network address to identify YSoft SafeQ Terminal Pro 4, and select the required Authentication method. Note that Terminal network address is required and must be unique.

Picture: Filling in all required fields to configure YSoft SafeQ Terminal Pro 4 - Enter non-mandatory options if needed.
- General section
- Location or description – you can specify further details to recognize the device in the system and to describe the exact placement of the device.
- Accounting type – configuration defines the type of accounting to be used.
- No accounting – jobs performed on the terminal will not be accounted. Jobs will be visible in Job list on Dispatcher Paragon Management Server.
- Offline Accounting – print jobs will be accounted based on the output from the job parser. Copy and scan jobs will not be accounted.
- Online Accounting – jobs will be accounted based on the difference of the device's counters.
- Price list – configured prices are used for accounting print, copy, and scan jobs performed at the device. Prices are defined in the assigned price list.
- Reporting cost center ID – device may belong to a particular cost center. Choose from the existing cost centers.
- Online accounting (Available only when Accounting type is Online accounting) – select which type of jobs are accounted by online accounting
- Use Online accounting for printing and copying – all jobs (prints, copies, scans) are accounted by Online accounting.
- Use Offline accounting for printing and online for copying – prints are accounted based on the output from the parser and copies and scans are accounted by online accounting.
Note: To scan a document, the device's native scan application must be used.
- Accounting driver (Available only when Accounting type is Online accounting) – select accounting driver exactly based on your device model.
- Terminal section
- (Advanced only) Admin username – if you want to use a different administrator name instead of the global administrator login to access the terminal, enter it here.
- (Advanced only) Admin password – if you want to use a different password instead of the global password to access the terminal, enter it here.
- (Advanced only) Scan feature – enable this option if you want to enable Dispatcher Paragon scanning features. Note that only the device's native scan application can be used.
- (Advanced only) Printing application layout – select the layout of the print application and folders displayed to the user.
- Direct Printing section
This part allows you to specify the direct queue(s) that enable the device to receive jobs without the need for a user to authenticate at the terminal (note: the print job is still authorized in Dispatcher Paragon).
 Direct print together with Online accounting is not supported yet.
 Tags section
- The Tags tab enables different print languages or user tags for the device. All print languages are enabled by default. This configuration must match tags for each job and also the supported options on the device.
- SNMP section (Advanced)
This part allows the configuration of SNMP v2 and SNMP v3 used with the device.
- SNMP read-only community for remotely accessing the device states.
- SNMP read-write community for remotely reading and writing to the device properties. Require terminal reinstallation
- Backend section (Advanced)
This part refers to the network protocol used for communication with the device and for printing at the device.
- Backend – network protocol used for communication. The following network protocols are available:
- IPP – provides a standard network protocol for remote printing as well as for managing print jobs, media size, resolution, etc.
- IPPSSL – a basic IPP with job encryption over SSL.
- LPR – a general TCP/IP utility that is used to send print jobs from clients to print servers.
- LPR (PJL Copies) – a basic LPR extended with the PJL method for switching printer languages at the job level.
- TCP/IP Raw – a TCP/IP with a raw socket that allows access to the underlying transport provider.
- TCP/IP Raw NoMap – same as TCP/IP Raw, but with a NoMap function.
- Network port – the port number that a device uses for communication. This option depends on the selected print backend.
- Queue name – the queue name used for communication with the device.
- Job encoding – the encoding type used by the device. Encoding is defined by the print driver used by the users at the time of creating a print job.
- Backend – network protocol used for communication. The following network protocols are available:
- Miscellaneous (Advanced)
- Delete jobs after print – all jobs (except favorite jobs) printed on the device will be deleted after they are printed.
- Advanced Accounting section (Advanced)
Here, it is possible to select to enable a particular accounting method (this is an optional configuration and is available only when the Accounting type is Offline accounting or Online accounting with offline accounting for printing).
- Coverage accounting – black and white prints will be accounted based on the coverage. Coverage is calculated by the job parser.
- Coverage accounting – color prints will be accounted based on the coverage. Coverage is calculated by the job parser.
Some options are available for editing only in the Advanced view. You can choose between Basic and Advanced in the top right-hand corner.
- General section
- Press the SAVE CHANGES button. The installation progress bar will display.
- The device with YSoft SafeQ Terminal Pro 4 is now installed.
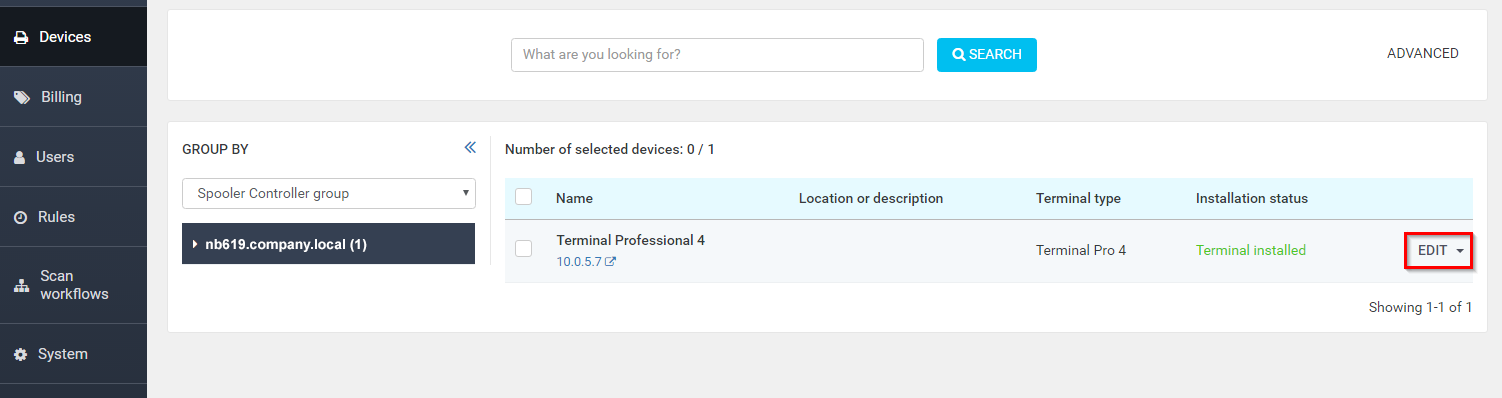
Picture: An administrator can see the terminal ID of any terminal by pressing the EDIT button. - The YSoft SafeQ Terminal Pro 4 will be automatically connected to Dispatcher Paragon Server and configured.

Picture: The User authentication screen is displayed. - You can check that the correct IP address has been set up in the YSoft SafeQ Terminal Pro 4 Network Settings menu as described in the Configuring YSoft SafeQ Terminal Pro 4 section.
Picture: Network Settings menu with Dispatcher Paragon network address highlighted.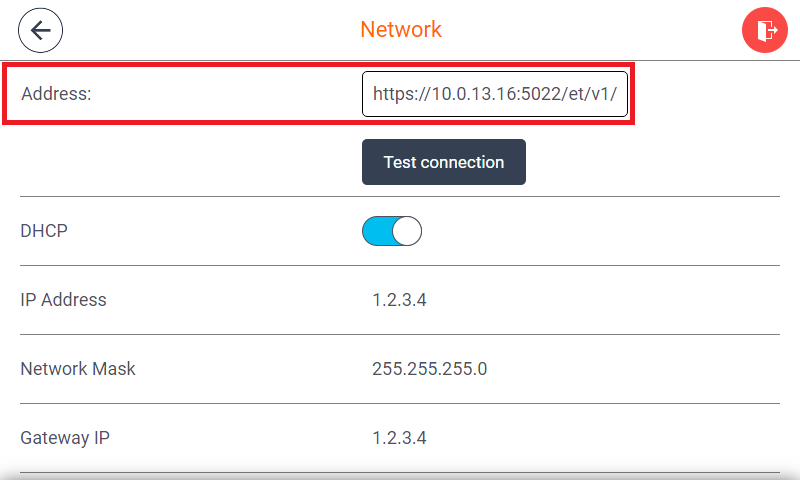
Manufacturer