USB Card reader v2/v3 can be configured only with software utility called "usbrdrtool". The software runs in a system console. It is not a gui application, it is an application running in text mode.
The usbrdrtool configuration tool is designed for USB readers v2/v3 only!
The usbrdrtool prerequisites:
- Windows 2000 and higher
- Linux kernel 2.4 or higher with glibc 2.3.2 or higher
- Root access on Linux or possibility of sudo
- usbfs support for libusb-0.12 library on Linux
- usbrdrtool.exe (WIN32) or usbrdtool (Linux) exacutable binaries
Note: The program requires "root" privileges under Linux, therefore it must be run as user root or sudo must be used.
The purpose of the usbrdrtool is:
- Show information about connected USB readers.
- Set basic parameters of each reader such as USB reader class type, reader protocol, debug mode etc.
- Card testing for verifying correct reader functionality and reading distance.
- Display of card type during testing (with readers where applicable)
- Update of USB reader normal firmware.
- Update of USB reader service firmware.
- Download log from USB reader for debugging purposes.
Configuration of the USB reader by usbrdrtool
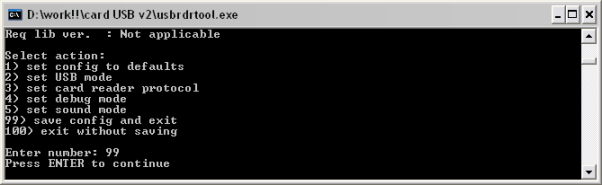
Start the usbrdrtool under your operation system. When the program is run without any command line parameter the following screen is shown. The main menu should appear with the selection you want to do. 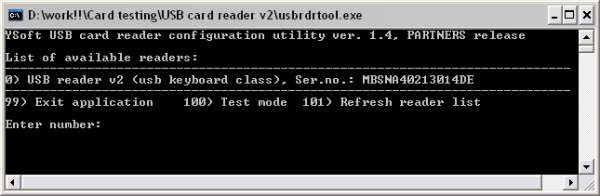
Picture 6 – Main menu
Here can user select the following numbers depends on the intervention administrator wants to do.
Card reader configuration screen
When administrator selects the number of the reader from the reader list, the reader configuration screens will be shown with general information about reader and following steps for next administration: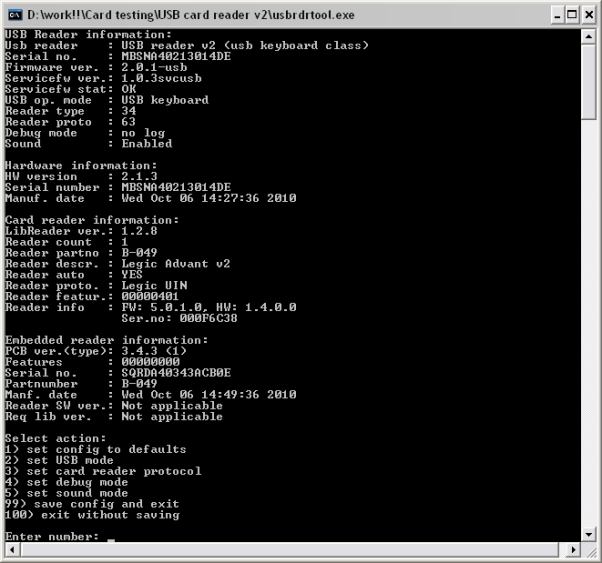
Picture 7 - Reader configuration screen
- Action 1 sets the USB reader configuration to defaults. This includes USB mode, reader protocol, debug mode and other parameters. This option does not format data that are stored on USB reader internal file system.
- Action 2 sets USB mode. This option is available only for specific OEM USB reader type. Available usb modes are described in chapters 4.2.1 and 4.2.2.
- Action 3 sets card reader protocol. For some card readers it is necessary to enable support for another card types. Default card reader protocol is 0 which means that the reader default protocol will be used. If invalid card reader protocol is selected then the default protocol will be used.
Note: Please see Konica Minolta Card Readers Protocols.pdf for more details about card reader protocols. This*. pdf file is always attached to the zip file with released FW of the USB reader.
- Action 4 enables debugging in case something goes wrong with the reader (for example hang-up or reboot or anything similar). Please note that debugging enabled causes wear-out of the internal flash so enable it only in cases when it is necessary!
- Action 5 enables or disables sound on the USB reader. Please note that there is no visual identification of successful card reading so users in some cases cannot guess what may be wrong if the card reader makes no sound
- Action 99 returns user to the previous menu. If any changes are made, the card reader is rebooted and the changes are applied.
- Action 100 returns user to the previous menu. If any changes in settings are made they are discarded and original settings remain.
USB keyboard
USB keyboard – Optional mode
In this mode the USB reader works as a standard USB keyboard and can be switched to mode 3 only.
NOTE:
Typing of the keys is emulated as numeric keypad for 0-9 and A-F keys on standard EN/US keyboard layout. If the card number contains any other characters, they are ignored. Caps-lock and Num-lock are enabled and disabled if necessary and returned back to previous state after the card number is read.
The "Shift", "Ctrl", "Alt" keys must not be held during card placing or it will collide with caps-lock and num-lock setting and incorrect card number will be read
If a national keyboard layout is used (such as French, Russian, Chinese or other) a wrong card number will be entered. In such cases a switch to US/EN keyboard layout is necessary before placing the card.
USB serial
USB serial – Optional mode
This mode emulates operation of COM port and can be switched to mode 1 only.
On Windows platform the installation of the USB reader in this mode requires usb2-reader.inf file. This file is distributed along with the usbrdrtool application and should be selected in the "new hardware" wizard after the USB reader plugging/reconfiguration.
On Linux platform the driver for the serial port is installed automatically.
Card testing in usbrdrtool application will work in this mod
Action 3 - Setting card reader protocol
When you are on the main page select appropriate number of the reader. If you want to change card reader protocol for specified reader type (selected number), then you need to open the value 3 "Set card reader protocol"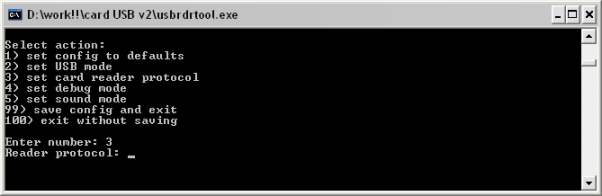
Picture 8 - Selecting of card reader
To choose appropriate reading protocol, please see Konica Minolta Card Readers Protocols.pdf for more details about card reader protocols. This*. pdf file is always attached to the zip file with released FW of the USB reader.
Select the number and confirm by "enter" confirmation.
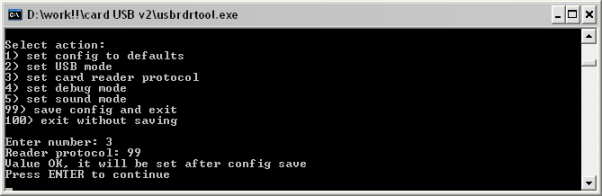
Picture 9 - Reader protocol confirmation
After selecting the appropriate number of protocol, you will be navigated to submenu page, when you need to save currently changed settings. Select "99" to save settings for changed reading protocol and confirm.
Picture 10 - Saving of changes after protocol change
Card reader testing screen
Card testing screen menu can be started by number 100 from the main menu. See Picture 6 – Main menu.
When testing window will appear you can test the reader by placing a card above the reader.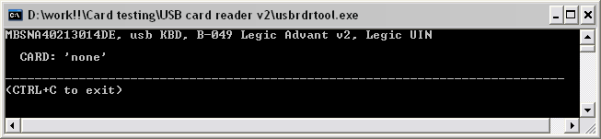
Picture 11 - Test card window 1
Reader should display result from reading inside this window like example on the Picture 12 - Card testing result.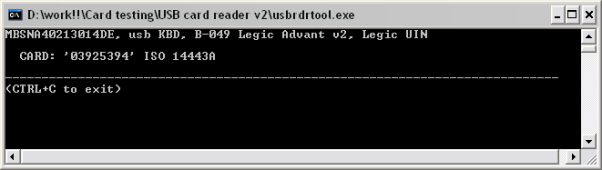
Picture 12 - Card testing result
Multiple card readers can be tested at once. The screen automatically recognizes disconnected and newly connected readers so it may be used for mass-production card reader testing.
If the connected reader supports card presence detection then the card number and type is visible only when the card is placed at the card reader.
If the connected reader does not support card presence detection, a "tmout" is displayed.
The card number will be automatically erased after a couple of seconds of inactivity. This feature is intended to make sure that the reader works properly and card numbers are read correctly every time a card is placed.
Please note that displaying the correct card type depends on card reader used and card reader protocol set.
Before using usbrdrtool as a tool for customer card testing please consult USB card reader testing guidelines.
It is also possible to start the card testing screen directly by specifying -t command line option to the usbrdrtool application.
Card reader Update firmware
Update of firmware for USB card reader can be done by issuing the following command in the Windows command like (CMD) or on Linux OS:
Windows:
usbrdrtool.exe -u -i usb2-2.0.1.fw --k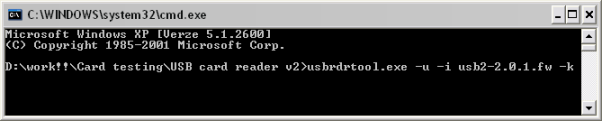
Picture 13 - FW update example
Linux:
sudo ./usbrdrtool -u -i usb2-2.0.1.fw -k
'-k' option will cause the new firmware to be booted after successful update.
Note: This command can be run form CMD windows or Linux, this is not a command inside the usbrdrtool.
Card reader Update Service firmware
Update of service firmware for USB card reader can be done by issuing the following command in the Windows command like (CMD) or on Linux OS:
Windows:
usbrdrtool.exe -w -i usb2_service-1.0.1.fw -k
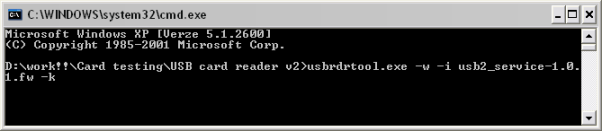
Picture 14 - Example of the service firmware update
Linux:
sudo ./usbrdrtool -w -i usb2_service-1.0.1.fw --k
'-k' option will cause the new firmware to be booted after successful update.
Note: This command can be run form CMD windows or Linux, this is not a command inside the usbrdrtool.
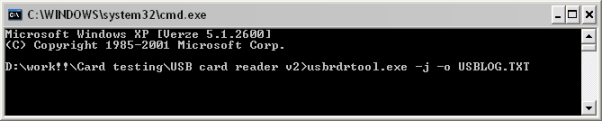
Card reader settings for downloadeing the log files
For the configuration of USB card reader to downloading log files from the reader is possible to run following command in the Windows command like (CMD) or on Linux OS:
Windows:
usbrdrtool.exe -j -o USBLOG.TXT
Picture 15 - Get log enabling
Linux:
sudo ./usbrdrtool -j -o USBLOG.TXT
Note: Please note that logging must be enabled before using this function
Card reader USBRDRTOOL starting with predefined commands
Administrator can start the USB card reader configuration with predefined usage. The pre-configuration list is listed bellow as command lines parameters. For example write in cmd windows command line:
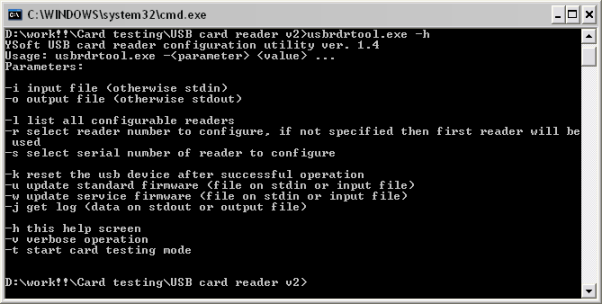
Picture 16 -Command line starting with pre-configuration
In the Linux OS the usage is similar with command:
Usage: ./usbrdrtool -<parameter> <value> ...
Parameters:
- -i input file (otherwise stdin)
- -ooutput file (otherwise stdout)
- -l list all configurable readers
- -r select reader number to configure, if not specified then first reader will be used
- -sselect serial number of reader to configure
- -k reset the usb device after successful operation
- -u update standard firmware (file on stdin or input file)
- -w update service firmware (file on stdin or input file)
- -j get log (data on stdout or output file)
- -h this help screen
- -v verbose operation
- -t start card testing mode
Information beep codes
Here is the list of beep codes, which give the result on the behavior of USB reader v2/v3.
Legend:
- Long beep sound
. Short beep sound
Sound | Behavior |
|---|---|
- | Card read error. Please try placing the card again or use the different card. |
...- | Hardware configuration damaged cannot continue in booting |
.-.- | Update of firmware failed. |
--.- | Software configuration cannot be saved. Probably faulty onboard eeprom. |
..-- | Software configuration damaged, loading defaults. |
.--- | Firmware damaged. |
-... | No reader connected and reader required for correct functionality. |
-.-. | Service firmware damaged, restore required otherwise correct functionality is not guaranteed. |
.--. | Error in reader power-up sequence. |
---. | Firmware incompatible with reader module. Please use the latest tools and re-run the normal firmware update. |
.-..- | Service firmware is not compatible with hardware. Please update to compatible version. |
--..- | Error in communication with MFD. |
..-.- | Reader module firmware update required. Please use the latest tools and re-run the normal firmware update. |
Note: This option is available only if sound is enabled.