Service menu overview
YSoft SafeQube 2 Service menu is designed for first turn-on and for basic network setup. More complex operations (apps installation, configuration, ...) are intended to be done through IMS, Management Console or Management Web.
Capabilities of YSoft SafeQube 2 Service menu are:
- Setting DHCP on/off
- Setting IP address, network mask, gateway and DNS
- Setting address of IMS
- Setting PIN
Menu is displayed on OLED panel on the front side of SafeQube 2. It is controlled by 12 buttons touch keyboard with sound feedback placed near it.
Display overview

This is example of default status screen, there you can see:
- Status bar at bottom of screen (is displayed on each screen):
- IP address and network mask (in format IP/number mask) in bottom left corner
- Current local time of SafeQube 2 in bottom right corner
- Navigation help - symbol > means, that pressing the > key brings you to other screen on perform some action
- Screen content - an Konica Minolta logo in that case
Keyboard usage
There are keys 0-9 used for entering numbers and keys < and > used for navigation. There are three main operation modes:
- Menu navigation: Keys < and > are used as up and down arrows, (0) is used for selecting menu item. Alternatively (2) may be used as up arrow, (8) as down arrow and (5) for selecting item.
- Number input: Used for IP addresses and for PIN. In that mode < is used as "Cancel" and > is used as "Confirm", numbers are used for input.
- Text input: Numbered keys may be also used for entering text, in that mode repeatedly pressing one number cycles through given set of letters - set of letters for each key is printed below it on keyboard and special characters are located under key 0 (
.,:_-@/
Key < acts like "Backspace" and > is used for ending input (displaying "Save or discard" message).
Display dimming, auto logout and auto sleep
There are several timeout based on inactivity (no key pressed):
- After 15 seconds of inactivity: The display starts to dimming. Pressing any key will bring it to full brightness (key press acts normally, e.g. writing number, ...)
- After 1 minute of inactivity: Auto logout, the screen is reset to default status screen
- After 5 minutes of inactivity: The display is turned off into sleep mode (the SafeQube 2 continues to run normally). Pressing any key will turn it on (key press is dismissed).
Service menu usage
Logging into service menu
Starting on status screen. To get on Service menu login screen you may:
- Repeatedly pressing > to cycle through status screens
- Press any number
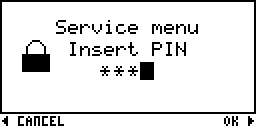
On Service menu login screen enter device PIN and press > to enter the menu, or press < to return on status screen.
When PIN is wrong, error message appears, otherwise main menu is displayed.
Default PIN on newly installed devices is 0000, PIN can be changed in service menu.
Main menu and network menu
Navigation in main menu or network menu is similar. Selected item is highlighted, pressing (0) or (5) activates this item.
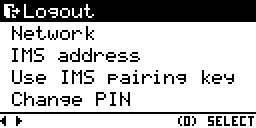
From main menu you can:
- Logout
- Enter the network menu
- Change IMS server address
- Enter into time settings to setup NTP servers
- Change PIN
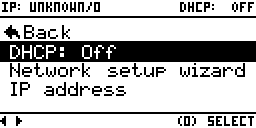
From network menu you can:
- Go back to main menu
- Set DHCP on/off
- (DHCP off only) Enter network setup wizard - changes are saved at once after finishing whole wizard
- (DHCP off only) Set IP/network mask/gateway/DNS addresses individually
Network Setup
Network can be configured in network menu. By default, the DHCP is enabled and other network config is hidden from menu.
After disabling DHCP, menu runs through network setup wizard to set up all network parameters (if DHCP was previously enabled, defaults are taken from it) and everything is saved at once after the last step.
After disabling DHCP, you can change network setting by:
- Individual setup screens for each network parameter - quicker, but network configuration must be valid after each step (for example IP and gateway must be in the same subnetwork, if you want to change both of them, you cannot do it this way)
- Network setup wizard which runs through all network parameters and saves them at once at the end. Intended for bigger network changes.
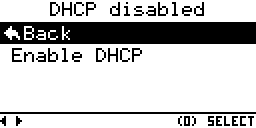
DHCP setup screen allow you to change DHCP setting. It acts like menu (navigation with < and >, confirmation by (0)) and current state of DHCP is shown at the top of screen.
You can:
- Go back with no change
- Select "Enable DHCP" (when DHCP previously disabled) - it returns to the network menu and turns on DHCP
- Select "Disable DHCP" (when DHCP previously enabled) - it runs network setup wizard
Setup screens for network parameters are all similar. You can navigate through the following screens:
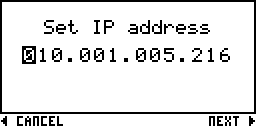
- Set IP address screen
- Set network mask screen
- Set gateway screen
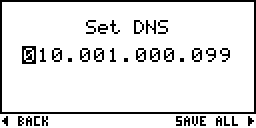
- Set DNS screen
On each screen there is predefined mask to enter IPv4 address. Highlighted position is cursor - when you press some number, it is written to this position and cursor moves one position ahead. Cursor is cyclic - after the last position it moves to the first position.
Address must be entered with leading zeroes (for example when entering number 42 on some position, you need to press (0) (4) (2)).
Control differ if the screen was entered individually or as part of network setup wizard:
- Entered individually (top image): Key < cancels changes, key > saves them.
- Part of network setup wizard (bottom image): Key < moves back (on first screen it changes to "Cancel"), key > moves ahead (on last screen it changes to "Save all")
Setting IMS address
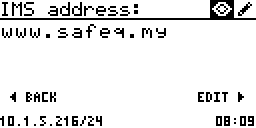
To set IMS address choose IMS address item from main menu. This brings you to the overview screen (highlighted symbol of eye), from which you can go back by pressing < key, or start edit mode by pressing > key.
In Edit mode (highlighted symbol of pen) you can modify the server address. Some basics:
- Pressing numbered keys writes letters (as old mobile keyboard, see Keyboard usage section above)
- Server address is entered without "http://" prefix
- < key is used as backspace, you can hold it to delete more letters
- > key is used to stop input and bring you to the Discard/save screen
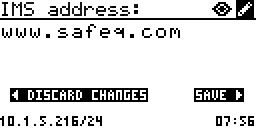
On Discard/save screen you may choose to discard changes or to save them by pressing < or > key.
Time settings - NTP servers
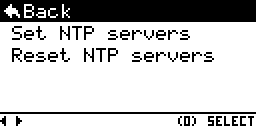
To set time settings choose Time settings item from main menu. This brings you to the time settings menu (first image).
It is normal menu screen, where you can:
- Set NTP servers – similar edit screen as IMS server address edit screen - please refer to Setting IMS server address part of documentation. NTP servers are separated by , (comma).
- Reset default NTP servers – after confirmation resets NTP servers to the defaults.
Change PIN
To change PIN, select Change PIN from main menu. Firstly you must enter current PIN (acts in same way, as login screen).
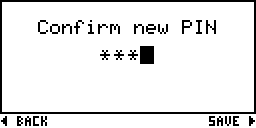
After that, you may enter new PIN. PIN can be any number (with at least one digit) and you must enter it twice to confirm. When both PINs matches, PIN is changed immediately and saved to UAM.
Error screen
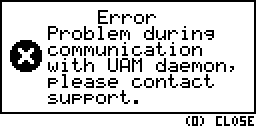
In the event of an error, similar screen will appear. Please contact support.