Please make sure that Konica Minolta certificates are installed in a Windows environment. Especially before using a silent installation. See Installing Security Certificates for details.
Installation
The Dispatcher Paragon client installer installs the Dispatcher Paragon client components: FlexiSpooler, Universal Print Driver, and Desktop Interface. It is distributed as a single executable file which runs the installation process.
- Language selection – Select your language for the installation. The language selected is valid only during the installation. After the installation, the client components applications use the language of your environment.
- Introduction – Click Next to continue.
- License Agreement – Read and click I Agree to continue.
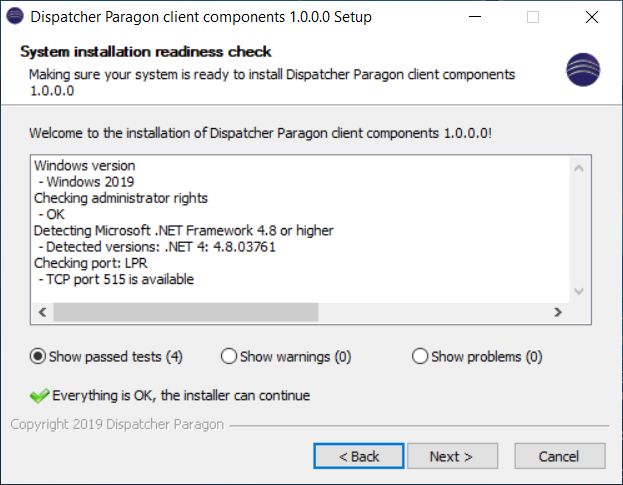
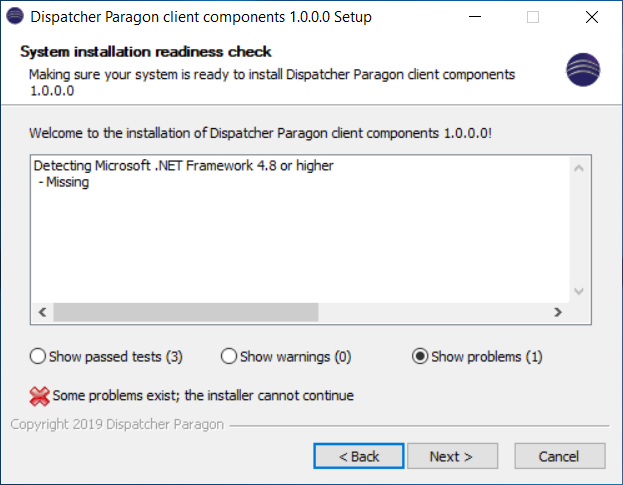
- Depending on the result of the preinstallation check, you will see one of these:
Installation readiness – Click Next to continue with the installation process.
Requirements not fulfilled – In case of temporary issues (e.g., port blocked), it is possible to continue with the installation. In case of a blocking one (e.g., .NET framework not installed), it is necessary to remove the obstacles before continuing the installation.
- Choose install location – Select the destination folder, and click Next to continue.
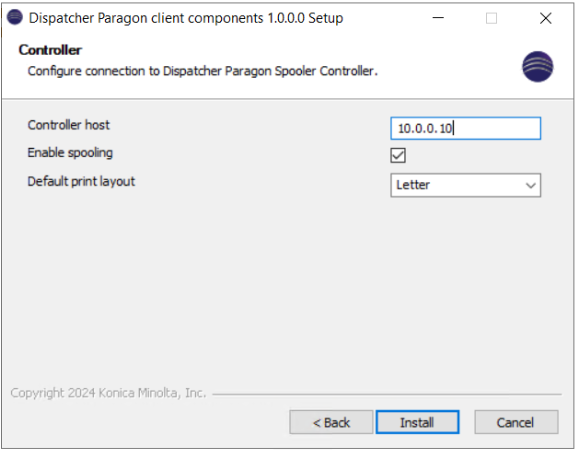
Controller and printer setup – Enter the data (all fields are required), and click Install to install the Dispatcher Paragon client.
Controller host: The IP or FQDN of the server where Dispatcher Paragon Spooler Controller is installed.
- Enable spooling: When enabled, print jobs are stored locally on the machine, otherwise, the jobs are forwarded to the server.
- Client: Flexispooler will accept print jobs only locally.
- Server: Flexispooler will accept print jobs locally and trough a specified network interface.
Default print layout: The default printer layout selection used by the Dispatcher Paragon universal driver. The available options are A4 and Letter. If the customer uses Letter size paper rather than A4 paper, set Default print layout configuration variable to 'Letter'.
- Installing – Please wait until the installation is complete. You can display the details by clicking the Show details button.
Confirmation – Click Finish to finish the installation.
After installation
- The secure print queue Ysoft SafeQ is created (for more information, see section About drivers).
The installation log files are located in the Dispatcher Paragon client components installation folder.
- spooler-install.log – contains information about the Dispatcher Paragon client components installation process.
FlexiSpooler connects to Dispatcher Paragon Spooler Controller and downloads the configuration.
- If the parameter deviceUpdate is enabled in the management interface, FlexiSpooler regularly checks direct queue settings in the management interface according to the parameter deviceUpdateIntervalMinutes and installs or updates direct queues. The names of the direct queues consist of names set in the devices module of the management interface: Device name(Direct_queue).
- As it starts, FlexiSpooler service (whether after restart, during installation or update) attempts to launch Desktop Interfaces for all the logged in users, see section Automatic launching of Desktop Interfaces from FlexiSpooler service at start.


Uninstallation
- Language selection – Select your language for the uninstallation.
- Confirmation – The screen shows the application path from where it will be uninstalled. Click Uninstall to continue.
- Uninstalling – Please wait until the uninstallation is complete. You can display the details by clicking the Show details button.
- Finish – In the case of the need of a restart, the options Restart now and Restart later are provided. Otherwise, click Finish to quit the installation application.
Silent uninstallation
c:\DispatcherParagon\FSP\uninstall.exe /SUpdate
The update can be performed using the new version of the Dispatcher Paragon client installer. You can use either the GUI wizard or a silent (unattended) installation.
The minimum version to the upgrade is defined by each new version (e.g., in version 6.0.0.1, upgrading from version 5.8.x.x is not supported, the minimum version is "6.0.0.1"). The FlexiSpooler version must be the same version as Spooler Controller version.
Performing a GUI Wizard Update
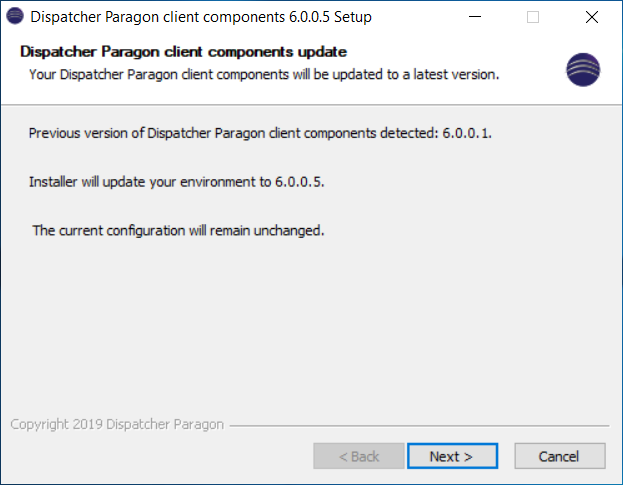
When running the installer, it will detect the last installed version during the preinstallation check. You can continue the update using the latest version installer. All configurations stay the same and will not be changed by the update. The update will not affect print jobs that have already been sent.
Performing a Silent (Unattended) Update
Please make sure that the current valid certificates are installed in the Windows environment before performing a silent installation/update.
- VeriSign Universal Root Certification Authority(vsign-universal-root.cer) and Thawte Primary Root CA (thawte-root.cer) for troubleshooting trust errors (for more information see Installing Security Certificates section Troubleshooting trust errors).
- Thawte SHA256 Code Signing CA (thawte-codesigningCA.cer)
- Konica Minolta, Inc. codesigning CA (ysoft-codesigning.cer) for automated (silent) installation (for more information see Installing Security Certificates section Automated (Silent) Installation).
To run a silent installation of the client installer, run this command. Run it in the folder where you have downloaded ysq-client-install.exe
ysq-client-install.exe /S
After Updating
Installation log files are located in the Dispatcher Paragon client components installation folder.
- spooler-install.log – contains information about the Dispatcher Paragon client components installation process.
As it starts, FlexiSpooler service (whether after restart, during installation or update) attempts to launch Desktop Interfaces for all the logged in users, see Dispatcher Paragon FlexiSpooler Installation, section Automatic launching of Desktop Interfaces from FlexiSpooler service at start.
Silent Installation
The installer (downloaded file ysq-client-install.exe) supports the installation of a client installer from the command line interface or through a script. For running a silent installation, run this command with the filled in values of the parameters. Run it in the folder where you have downloaded ysq-client-install.exe
Examples:
ysq-client-install.exe /S /CFG:controllerHost=<controller IP or hostname> /CFG:defaultPrintLayout=A4ysq-client-install.exe /S /CFG:controllerHost=<controller IP or hostname> /CFG:defaultPrintLayout=A4 /CFG:noServerDiscoveryysq-client-install.exe /S /CFG:controllerHost=<FSP server IP or hostname> /CFG:noSpooling /CFG:defaultPrintLayout=A4For a full list of possible silent installation parameters, see Silent Flexispooler installation parameters.
Automatic launching of Desktop Interfaces from FlexiSpooler service at start
As it starts, FlexiSpooler service (whether after restart, during installation or update) attempts to launch Desktop Interfaces for all the logged in users (once for each interactive session, i.e. logged in user).
- This feature can be configured via two options (configurable from Management Service and locally overridable):
uiLaunchAttemptTimeoutSeconds
uiLaunchAttempts
- The FlexiSpooler service detects logged in users by obtaining list of interactive sessions by enumerating all running
explorer.exeprocesses (there is at least one running for each interactive session) For each session (from which there is no Desktop Interface connected to FlexiSpooler) it conducts number of attempts to start Desktop Interface (in parallel per user), specified by
uiLaunchAttempts:- If the Desktop Interface process is not running it launches it
Either way the FSP waits for a connection from Desktop Interface for the session (identified by
domain\username) until timeout specified inuiLaunchAttemptTimeoutSecondsis reached
These attempts to launch Desktop Interfaces are only conducted as the service is starting (result of the whole endeavour is logged)
Impact on installation/update of FlexiSpooler
- There is no need to restart the target workstation after FlexiSpooler is installed to start desktop interface for all users of the workstation
- Users that log in after FlexiSpooler service is started have their Desktop Interface started based on the appropriate entry in Windows Registry
Desktop Interface can run only once per logged in user on one workstation
- One user cannot have multiple instances of Desktop Interface running at the same time on single workstation (the second instance will shutdown as soon as it detects the previously started one).
- This is achieved by using lock file located at
<USER_PROFILE>\.safeq6\YSoftSafeQDesktopInterface.lock, which only one instance per user can acquire - This lock file is automatically deleted by OS after the original Desktop Interface process is terminated, a special system flag is used when this file is created to achieve this
- This is achieved by using lock file located at
Troubleshooting the Installation Process
If an error occurs during the installation process, please check the following log files that were created during the process. All the installation log files are located in the Dispatcher Paragon client components installation folder.
- spooler-install.log – contains information about the Dispatcher Paragon client components installation process.
- spooler.log – contains information about the entire service running.
- desktopinterface.log – contains information about the entire "Desktop interface" running. (e.g., billing codes window, authentication window, etc.)
If the installer failed before the installation began, check sqci-install.log located in AppData\local\Temp\ of the currently logged user.


