Configure the properties specific to each connector type.
File System
Use the file system type connector to access either the local file system or a network shared folder.

- Base location
Defines a starting path for all workflows using this connector. It can be:
- the path to a local file system on a server running the Dispatcher Paragon Workflow Processing System, e.g., 'C:\scans\'
- a UNC path to a network shared folder, e.g., '\\server_hostname\scans\'
The base path can contain capture variables, e.g. '%userHome%' variable.
If the base path of the file system type connector contains a variable %userHome%, then the scanning workflows utilizing this connector will not be displayed to users who don't have the %userHome% variable defined.
Scanning to the home directory of the user is possible only in case users have their home directory defined.
The home directory of the user can be defined during editing of the user in the "Home directory" field.
- Authentication
Determines which credentials Dispatcher Paragon will use to access the folder. Choose from the below options:
- Use default service credentials – the same account under which the Dispatcher Paragon Workflow Processing System service is running will be used (most suitable for a local filesystem path or in a Workgroup).
Use custom service account – manually set account credentials (usable only in a Domain environment, suitable for a shared network folder)

- Username – an account name in the format 'domain\username'. UPN format (user@domain.com) is not supported.
- Password – the account password
"Use custom service account" cannot be used in a Workgroup environment. It also cannot be used in the environment where the Workflow Processing System server is in a different domain as a target file server and there is no trust between domains.
In a Workgroup environment it is recommended to:
- Create a local account on a server with Workflow Processing System and give it admin rights.
- Configure Workflow Processing System service run as that user.
- Restart Workflow Processing System service
- Set Connector in the web interface to "Use default service credentials" and set the path to your network location.
- Create on the remote file server another local account with the same username and password. Grant user file and share permissions to the destination path.
- Impersonate terminal user
When this option is enabled, Dispatcher Paragon will access the file system location as it would be accessed by the user logged in at a Dispatcher Paragon terminal. Dispatcher Paragon will verify whether the impersonated user has enough permission to write to the folder or to browse it. The file/directory owner will be changed appropriately. Enabling terminal user impersonation is helpful to restrict access to certain folders in a shared folder and to keep track of who created files. Impersonate terminal user is not supported for workgroup environment.
To allow Dispatcher Paragon to impersonate a terminal user, additional configuration is needed:
- usernames in Dispatcher Paragon must be in UPN format (username@domain), e.g. user@example.local – this username will then be seen as the file owner
- WPS service must have read and write access to the shared folder and all its contents
- use a custom service account that has the required permissions
- WPS service must have the Restore files and directories privilege on the machine that hosts the shared folder in order to change the file/directory owners. Accomplish this in several ways:
- The Workflow Processing System runs under a Local System account by default. Add all the computers running the service in the Local Security Policy console (secpol.msc) to the 'Restore files and directories' policy located in the Local Policies, User Rights Assignment folder
- Or add all computers that host the Workflow Processing System into the Backup Operators group (which has the required privileges as default) in your domain
- Or change the account under which the Workflow Processing System services are running in the Services console to the one which has required permissions.
For proper delivery of scans into a distributed file system (DFS), please make sure that the "Network access: Do not allow storage of passwords and credentials for network authentication“ global policy is set to "Disabled" or not set at all on every server running the "WPS" service.
Email (SMTP)
Use the Email (SMTP) type connector to deliver scanned files over email using an SMTP server. You can configure the SMTP server using the system settings in Management or through Microsoft 365 OAuth 2.0.
System settings
There are no editable configuration options for this connector; only the global mail server configuration is displayed. You can configure your SMTP mail server in System/Configuration. If mail server settings are not configured correctly, it is still possible to create an Email (SMTP) connector; however, workflows that use the connector will fail when delivering scanned files. If this occurs, the Workflow Processing System logs an error in the wps.log file.
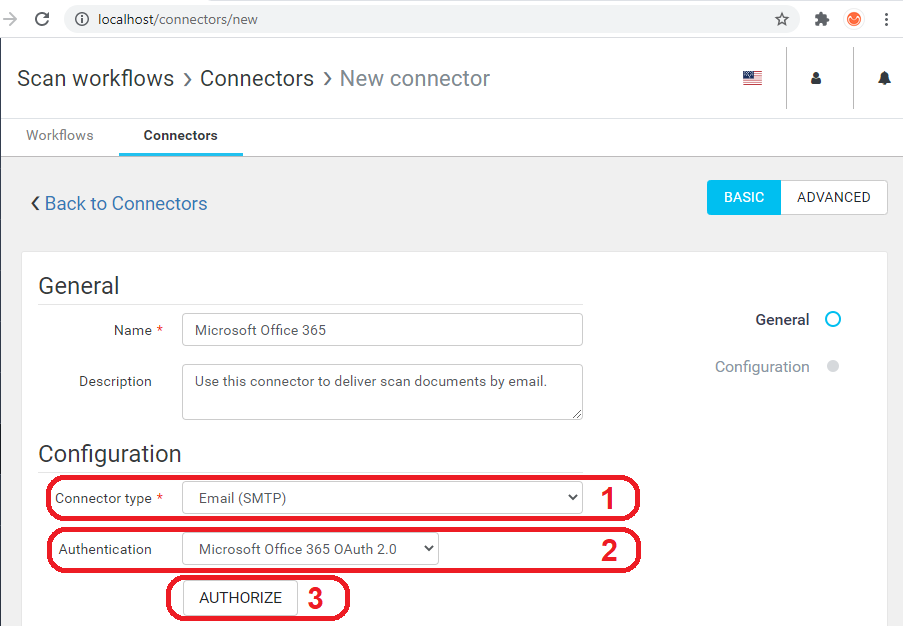
- Connector type – select Email (SMTP) from the connector type list.
- Authentication - select System settings from the authentication list.
- Primary mail server – the SMTP server host address set on the System > Configuration page or the Dashboard > Welcome widget.
Mail server account – the SMTP username set on the System > Configuration page or the Dashboard > Welcome widget.
Microsoft 365 OAuth 2.0
For on-premise installations only.
Prerequisites
First, you need to create a custom Microsoft Azure App registration, you can follow the guide on How to register a new app in Microsoft Azure for instructions. The application must be registered using the redirect URI set as "https://management/oauth2/client/smtpMicrosoft/authorize-callback" (where https://management is a URI of Dispatcher Paragon Management.) It is required to be able to do a successful authorization, if the redirect URI is not set or it's wrongly configured, then you will see an error "The reply URL specified in the request does not match the reply URLs configured for the application". The application must be registered with following scopes:
- https://outlook.office.com/SMTP.Send - required, to be able to send emails
- openid and profile - optional, to prefill the username field (this requires you to also add "upn" optional claim into ID token in the application token configuration page)
- offline_access - required, to allow the authorization last for extended time
Once the application is registered, you need to store the Client ID and Client Secret in the system configuration properties microsoftEmailClientId and microsoftEmailClientSecret .
In addition, the machine where the Management interface is installed must have access to the URLs that Microsoft uses the authorization refresh of the tokens, which are the following:
https://login.microsoftonline.com/common/oauth2/v2.0/authorize
- https://login.microsoftonline.com/common/oauth2/v2.0/token
Limitations
- When updating from older MUs to MU65 and higher, or when importing a Microsoft 365 OAuth 2.0 connector, reauthorization of the user configured in the Microsoft 365 OAuth 2.0 connector is needed!
- Personal accounts are not supported.
Troubleshooting
If the error is shown in the authorization pop-up window saying "The reply URL specified in the request does not match the reply URLs configured for the application" and you updated from older MUs to MU71 and higher, reconfiguration of the Microsoft Azure registered application is needed. You need to change the redirect URIs according to the prerequisites steps.
For additional troubleshooting issues, you can check the guide in Troubleshooting Microsoft Azure Authorization.
Connector configuration
Log out from all Microsoft accounts linked with your default web browser manually or use this link https://login.microsoftonline.com/logout.srf.
- Connector type – select Email (SMTP) from the connector type list.
- Authentication - select Microsoft 365 OAuth 2.0 from the authentication list.
- Click on the Authorize button
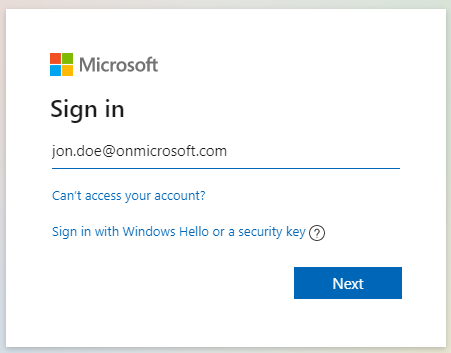
- A new window will open fill in the Email address of the account that will be used for delivery of the scanned documents. Click on the Next button.
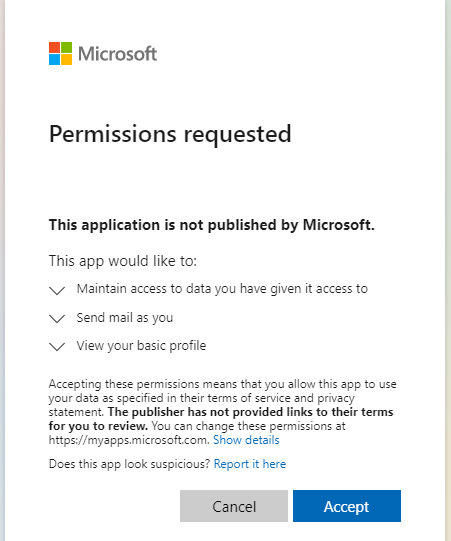
- Grant application permission for sending the email.
- If the Username was not prefilled, fill in the account used for the Authorization. Username has to be in UPN (User Principal Name) format.
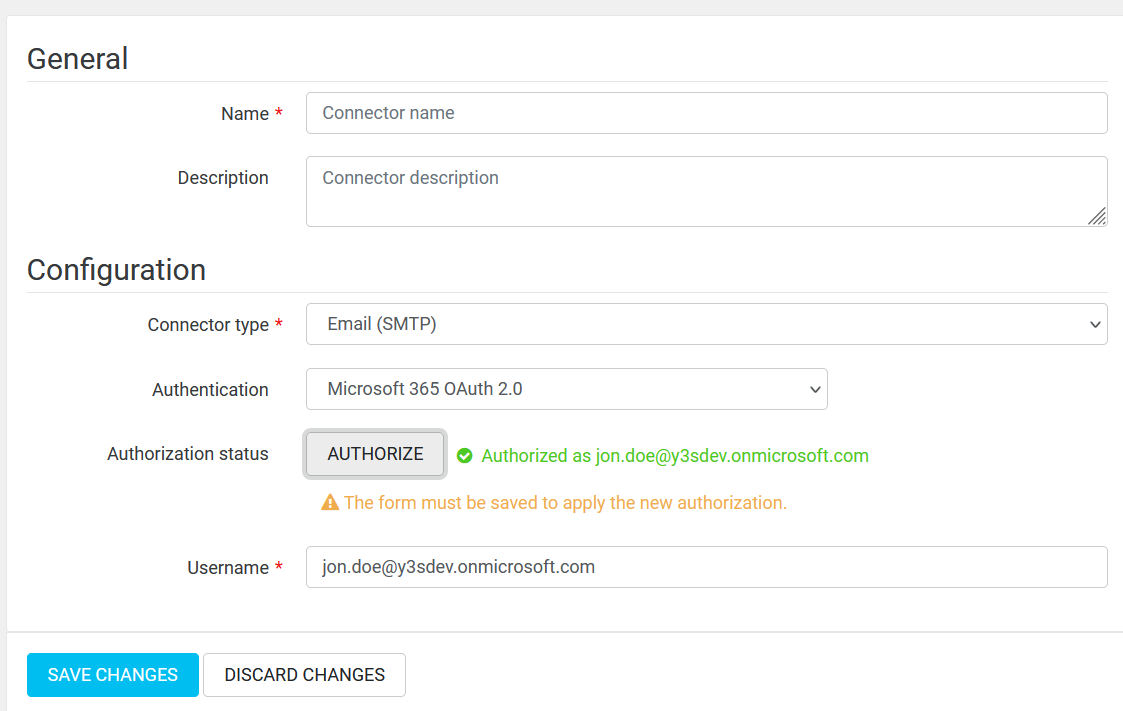
- Save the changes.
- When validation fails the authorization is cleared because of security reasons and needs to be repeated.
Microsoft Exchange
Use the Microsoft Exchange type connector to deliver scanned files over email using a Microsoft Exchange Server with basic authentication or through Microsoft 365 OAuth 2.0. This connector functions similarly to the Email (SMTP) type connector, however, Microsoft Exchange enables additional capabilities including terminal user impersonation.
Impersonation
When Terminal User Impersonation is enabled, the connector operates on behalf of the mailbox owner. In this scenario, it is essential that the email address of the Dispatcher Paragon user currently logged into the terminal also exists in Microsoft Exchange. You can configure a user's email address in the Users tab of the Dispatcher Paragon management interface.
Emails sent using a Microsoft Exchange type connector with user impersonation enabled will be stored in the user's Sent Items folder. It's important to ensure that the service account has the ApplicationImpersonation role within MS Exchange when employing terminal user impersonation.
Basic Authentication
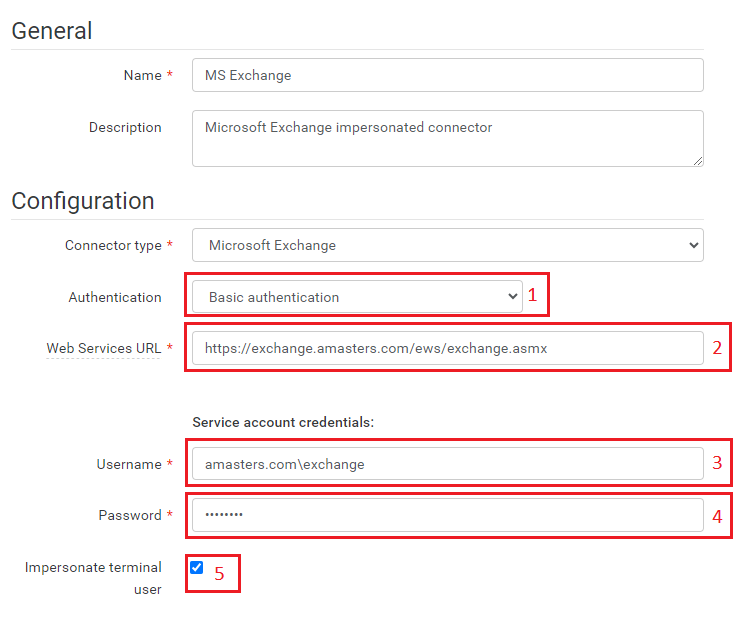
- Authentication: Select "Basic authentication" from the authentication options.
- Web Services URL: Enter the Web Services URL for Microsoft Exchange 2010 or Microsoft Exchange 2013 (typically in the format https://<mail.server>/EWS/Exchange.asmx).
- Username: Provide the domain and username associated with the Microsoft Exchange account used for authentication. If the domain is not specified, the local host (.\username) will be used.
- Password: Enter the password for the Microsoft Exchange account used for authentication.
- Impersonation of Terminal User (Optional)
Microsoft 365 OAuth 2.0
Prerequisites
First, you need to create a custom Microsoft Azure App registration, you can follow the guide on How to register a new app in Microsoft Azure for instructions. The application must be registered using the redirect URI set as "https://management/oauth2/client/exchangeMicrosoft/authorize-callback" (where https://management is a URI of Dispatcher Paragon Management.) It is required to be able to do a successful authorization, if the redirect URI is not set or it's wrongly configured, then you will see an error "The reply URL specified in the request does not match the reply URLs configured for the application". The application must be registered with the following scopes:
- EWS.AccessAsUser.All (https://graph.microsoft.com/EWS.AccessAsUser.All) - required, to access mailboxes as the signed-in user via Exchange Web Services
- offline_access - required, to allow the authorization to last for an extended time
Once the application is registered, you need to store the Client ID and Client Secret in the system configuration properties exchangeOAuth2ClientId and exchangeOAuth2ClientSecret.
In addition, the machine where the Management interface is installed must have access to the URLs that Microsoft uses for the authorization refresh of the tokens, which are the following:
https://login.microsoftonline.com/common/oauth2/v2.0/authorize
- https://login.microsoftonline.com/common/oauth2/v2.0/token
Connector configuration
Log out from all Microsoft accounts linked with your default web browser manually or use this link https://login.microsoftonline.com/logout.srf.
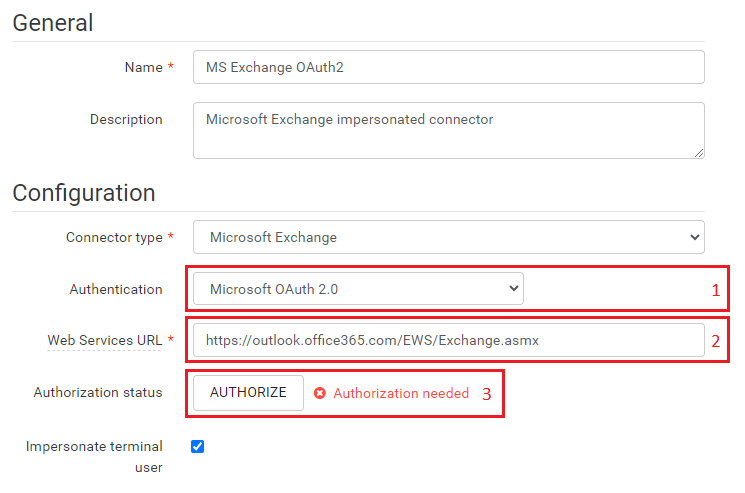
- Authentication: Select "Microsoft 365 OAuth 2.0" from the authentication options.
- Web Services URL: Choose the appropriate Web Services URL based on your configuration:
For Microsoft Online: https://outlook.office365.com/EWS/Exchange.asmx.
For Microsoft Exchange 2010 or Microsoft Exchange 2013: typically, it's https://<mail.server>/EWS/Exchange.asmx. - Press the "Authorize" button to proceed.
When a new window opens, please enter the email address associated with the account intended for the delivery of scanned documents. Then, click the 'Next' button to proceed with the wizard.

Upon successful completion of the wizard, the connector will be authorized.

Save the connector.
Extension
Extension connector set up
Use the Extension connector to deliver scanned files to the specific HTTP endpoint. This allows custom post-processing and delivery of the scanned files. The endpoint should handle the predefined request format.
It is strongly recommended to use HTTPS only since the data (scanned document or extension properties) might contain sensitive information.
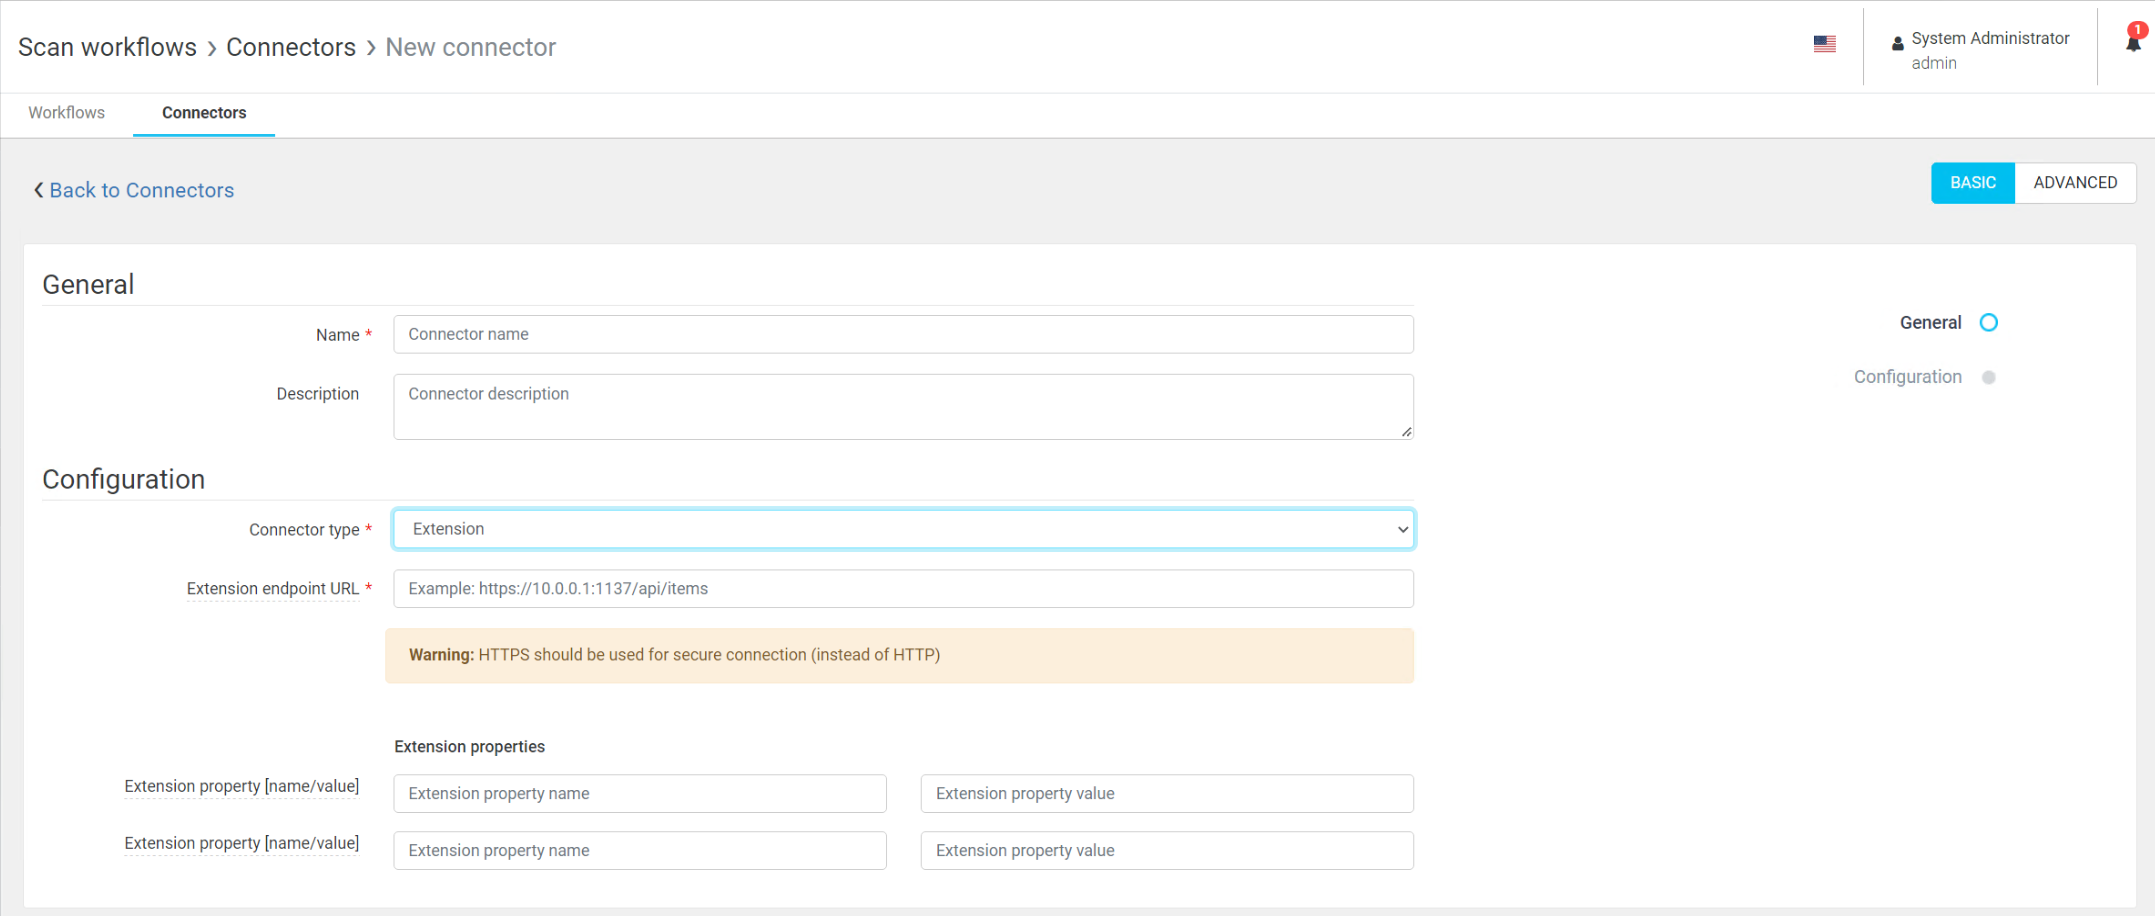
1. Extension endpoint URL – URL of the endpoint where the scanned documents should be sent (for example azure function URL )
2. Extension properties (optional) – properties in the name-value pair propagated to the extension endpoint URL. These properties are optional and up to two name-value pairs can be used.
(These extension properties have automatically added 'custom_' prefix to prevent collision and override from already existing properties e.g. property name set to "MyProperty" in the Management interface will be delivered as "custom_MyProperty" to the extension endpoint URL.
Adding an Extension connector for Cloud Fax
Unable to render include or excerpt-include. Could not retrieve page.
Request
The scanned job files are sent all together in a single multipart/form-data request. The request also includes all scan parameters which are added dynamically.
API documentation that the extension should implement
openapi: 3.0.0info:description: This is an API for uploading scan jobsversion: "1.0.0"title: API scan connectorpaths:/api/scan:post:summary: Uploads and process scan jobdescription: |Upload scan job (both data and metadata),responses:'200':description: scan job processed successfully'400':description: 'error'requestBody:content:multipart/form-data:schema:type: objectproperties:username:type: string# all other connector-specified and user-defined variables goes here# in the same way as username# e.g:# mailTo:# type: string# mailFrom:# type: stringfilename:# default is application/octet-stream, need to declare the type# e.g. application/pdf or image/jpgtype: arrayitems:type: stringformat: binaryencoding:filename:contentType: image/jpeg, image/tiff, applicaton/pdfstyle: formexplode: trueExample of request
This example shows requests with one variable userEmail and one document. The real request will contain all the scan metadata and user inputs that are available and all files. The boundary is randomly generated with each request.
POST / HTTP/1.1Connection: keep-aliveContent-Type: multipart/form-data; boundary=---------------------------123456789Content-Length: 554-----------------------------123456789Content-Disposition: form-data; name="userEmail"john.doe@company.com-----------------------------123456789Content-Disposition: form-data; name="file1"; filename="document.pdf"Content-Type: text/plainContent of document.pdf.-----------------------------123456789Example parameters that are added to the multipart/form-data request
billingCode: ,userEmail: ,deviceCostCenterID: 1694,deviceGroupName: ExampleDeviceGroup,scanDate: 2021-02-17,userCostCenterName: Default cost center,safeqHome: /opt,deviceEquipmentID: ,pdfComplianceLevelFYkBZw7CcS9zKp: None,deviceGroupIP: tenant.dev.ysoft-dev.net,workflowName: Scan to fax,userFirstName: l,scanTime: 12-00-03-518,userCostCenterID: 0,userUsername: ls,userSurname: s,deviceLocation: ,deviceID: 265,custom_MyPropertyName: MyPropertyValue,deviceServiceAgreementID: ,scanJobID: 4e19a6a0-d580-457f-ad59-fcb08584c5ba,deviceIP: ,deviceCostCenterName: Default cost center,deviceName: iws,userHome: ,deviceContactPerson: ,workflowID: 151,fileTypeFYkBZw7CcS9zKp: PDF,deviceGroupID: 179Other than this, also all custom input variables defined in management for example %faxNumber% will be sent in the request.