Overview
The Dispatcher Paragon PSES Migration Tool (PSES-MT) is a supporting tool useful when migration from KONICA MINOLTA Page Scope Enterprise Suite (PSES) to Dispatcher Paragon is required.
The distributed package contains two separate tools that will export data from PSES and import them to Dispatcher Paragon database.
With the PSES-MT the configuration of a new Dispatcher Paragon installation can become more efficient, with less manual effort.
Prerequisites
- PSES 3.2 with administrator access to the database. Migration is possible only from PSES version 3.2.
- A clean installation of Dispatcher Paragon free of devices, price lists or users in the database.
Limitations
The migration tool supports only PSES version 3.2 and Dispatcher Paragon with version MU26 and onwards.
- This tool supports all character sets in UTF-8.
- This tool supports the migration of all users, price lists, devices, user groups, device groups and accounts. It does not support the migration of the other data, e.g., reports, print jobs, LDAP settings, email settings etc.
- The migration of user password is not supported, and all users have their password set to the default value which is "password".
- No billing code is assigned to any user, cost center or role.
Multi-tenancy is not supported.
- This tool supports all fonts in UTF-8.
Migration procedure
The PSES-MT is a set of commands that administrators call up from the command prompt window. The migration process has four steps:
- Export data from PSES database into the CSV files.
- Revise the CSV files and transport them to a newly installed Dispatcher Paragon server.
- Import data from CSV files to the Dispatcher Paragon database.
- Post-migration procedures.
Data export from PSES Database
- Move the folder PsesExport to the server where the PSES database is installed.
- The folder contains the following files:
- 'sql_files' folder - this contains SQL query files. Do not modify it or make any changes. Such actions would probably lead to the malfunction of the entire migration tool.
- 'config.ini' file - this file contains the export tool configuration, such as database connections and administrators credentials.
- 'export.bat' - the batch file for export execution.
- 'read.me' - this file contains basic information about the package and the tool's limitations.
- The folder contains the following files:
- Configure the config.ini file before exporting any data. PSES default database configuration file location is
C:\Inetpub\wwwroot\PageScope Enterprise Suite\App\Core\Data\DBInfo.xml.- DB_server - A value for database host which contains the name of the server. It does not have to refer to a database installed on the same device. However, running it locally is a more stable and suggested alternative. If connection is not possible, try running it locally.
- AccDB - the name of the database containing access data. Its default value is 'PSESAccDB', therefore, this value probably does not need to be changed.
- CoreDB - Is name of database with core PSES data. Its default value is 'PSESCoreDB' so probably this values does not needs to be changed.
- DirDB - Its default value is 'PSESDirDB' therefore this value probably does not need to be changed.
- username - The value for the administrators username.
- password - A administrator password.
- After configuring the config.ini file, run the export.bat by double clicking the file.
The batch file will execute a series of SQL commands that will export the database to the CSV file.
- Firstly, it checks the connection to the database. Should there be a problem with incorrect configuration, the export will not start, and a message will be displayed to that effect.
- Next, the PSES version is checked. Should it not be version 3.2, migration is terminated.
- If the checks are completed successfully and free of any issue, the script will begin to export all related data.
- After successful export, all CSV files will be stored in folder /pses_csv.
- The entire data export is now complete, and the CSV files are ready to be imported to the Dispatcher Paragon database.
Revision of the CSV files
Items in PSES | Items in Dispatcher Paragon | CSV File |
Device | Device | device_Device |
Device Group | Device Group | device_DeviceGroup, device_DirDevice |
User | User | user_ESUser, user_DirUser, user_DirERPAccount, user_AuthServer |
User Group | Cost Center | user_UserGroup |
Account | Billing Code | user_Project, user_ProjectGroup, |
Price List | Price List | price_list, price_list_items, price_list_assignments_device, price_list_assignments_user, price_list_assignments_cost_center, price_list_DeviceGroup, price_list_AccDeviceGroup |
- Optionally, check the content of the CSV files
- If a device is not to be migrated, it can be deleted from the appropriate CSV file before import to Dispatcher Paragon
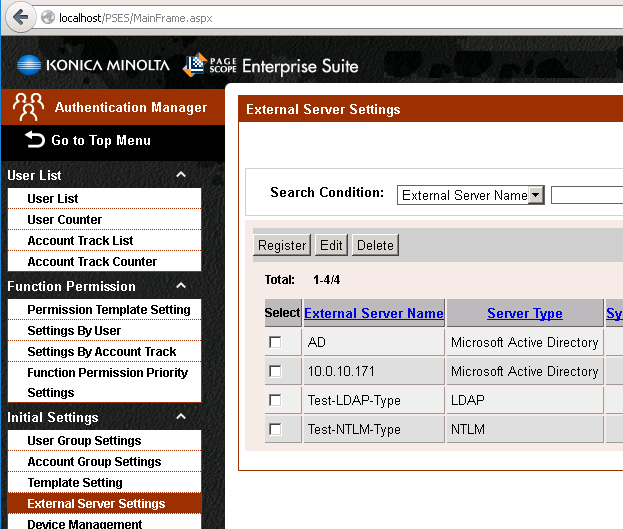
- Tip: When PSES users are replicated from an external directory, similar settings can be provided in the Dispatcher Paragon Management Interface and no migration of physical user accounts is required. In the PSES web interface go to the Authentication Manager / Initial Settings / External Server Settings to find out about the possible replication settings.
In case users can be replicated from an external directory, do not migrate physical users and manually setup replication in the Dispatcher Paragon Management Interface. Delete the appropriate data in the CSV files to suppress user accounts and Cost Centers migration.
- Copy the CSV files to the server with the newly installed Dispatcher Paragon.
Import of the data to a Dispatcher Paragon database
- Move the folder PsesMigration to the server where the Dispatcher Paragon is installed.
- Configure the PSES Migration Tool by editing the PsesMigrationTool.exe.config file. You may wish to customize the predefined values of one or more of the following entries:
- DispatcherParagon – Path to existing installation of Dispatcher Paragon.
- PasswordForAllUsers – The password which will be set for each imported user (except for the administrator account). It may be necessary to obligate users to change their passwords following migration.
- TerminalAdminUsername – the username which will be set as the administrator username in the Dispatcher Paragon system for all imported devices. This username will subsequently be used during Terminal installation to login to the MFD.
- TerminalAdminPassword – The plain text password which will be set as the administrator username in Dispatcher Paragon system for all imported devices (it will be encrypted). This username will subsequently be used during Terminal installation to login to the MFD.
- ReadOnlyCommunity – SNMPv2 Read-only community.
- ReadWriteCommunity – SNMPv2 Read-write community.
- AuthenticationPassword – SNMPv3 Authentication password.
- PrivacyPassword – SNMPv3 Authentication password.
- From the command line run the PsesMigrationTool.exe file with the absolute path to the CSV folder as an argument (e.g., PsesMigrationTool.exe "c:\pses_csv")
The PSES Migration Tool performs the following operations:
- It reads the input CSV files (exported data from PSES).
- It imports or updates users.
- It imports devices. If a device already exists, that device is skipped.
- It imports price lists. If a price list already exists, that price list is skipped. The default price list is not changed.
- All changes can be committed or discarded. This is the last import step.
Post-migration procedures
Several steps must be adhered to following successful migration prior to being able to use the Dispatcher Paragon system..
- Restart the Dispatcher Paragon Management Service and Dispatcher Paragon Spooler Controller.
Reactivate the Dispatcher Paragon license (described in chapter "License reactivation" which can be found in the Dispatcher Paragon documentation).
- Before the Embedded Terminal reinstallation of a device from the Dispatcher Paragon Management Interface the appropriate device must be set to the unmanaged state in PSES. Use the “Do not manage” operation in the PSES Authentication Manager / Device Management window and ensure that the Manage column shows “OFF”.
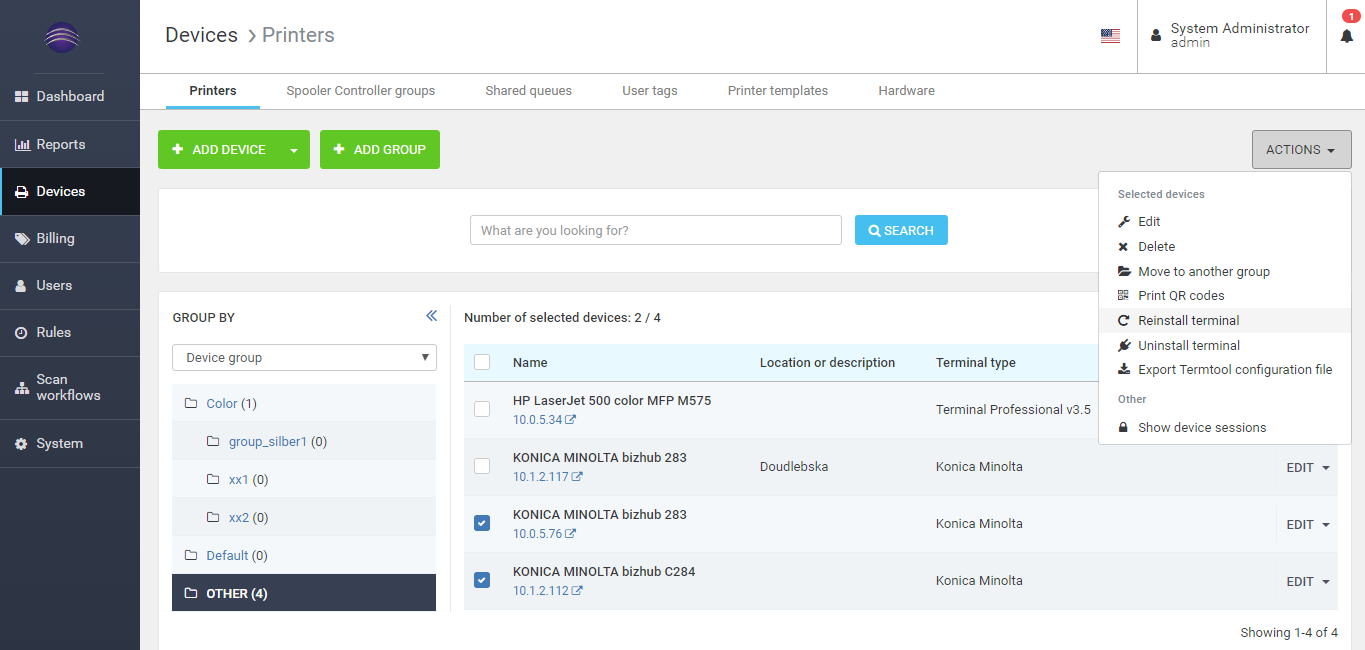
Unmanaged devices in PSES - Manually reinstall all devices since migration allows only data transfer, not installation. In the device panel there is an option to reinstall devices. Since all device data have been migrated, reinstallation can be initiated without any other configuration.
- Installation with enabled integrated with Dispatcher Phoenix must register the device explicitly in Dispatcher Phoenix MFD Registration Tool.
- Since all users have their passwords reset to the default value, it is necessary to make their accounts secure and change them in line with company policy.
- If you have LDAP integration make sure you do perform full LDAP replication.
In the following four chapters you can find an overview on the migration of:
- Devices
- Users, User Groups (Cost Centers)
- Accounts (Billing Codes)
- Price Lists
Devices
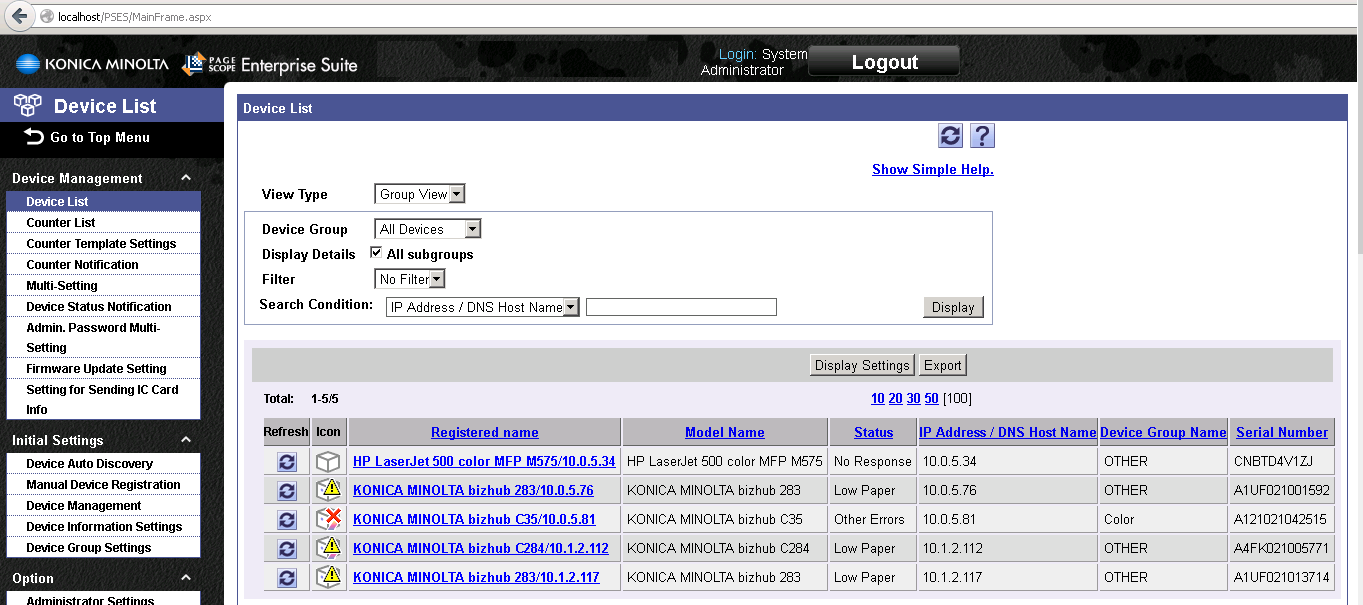
The export part of PSES-MT writes all devices listed in the PSES Device List to the CSV files.
PSES Device
The import of devices in Dispatcher Paragon assigns an appropriate Embedded Terminal or external terminal to the device definition. Following a quick check of migrated settings, administrators can start the terminal reinstallation.
List of imported devices in Dispatcher Paragon
Users, User Groups
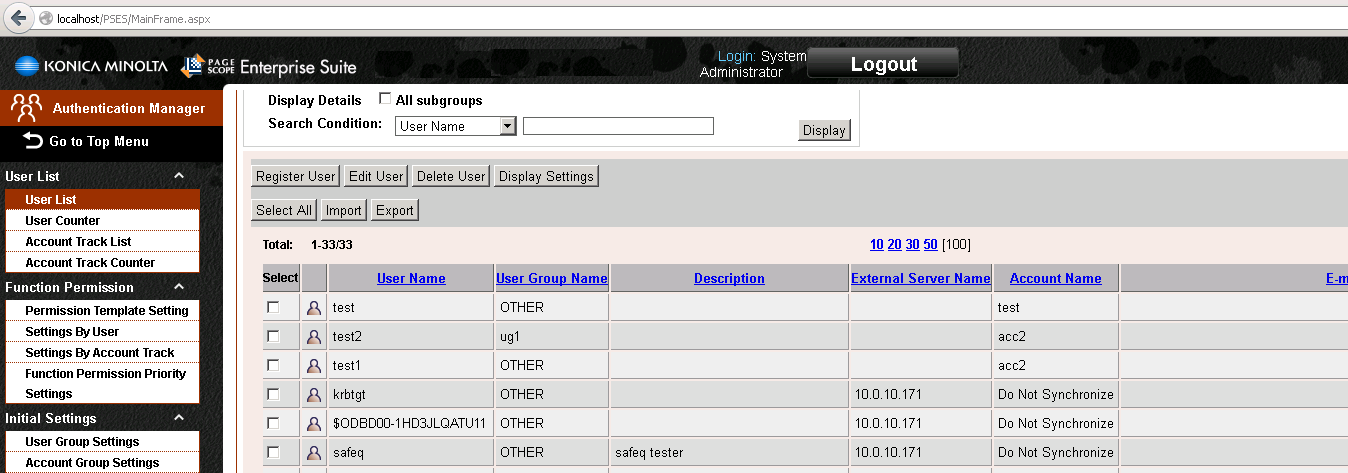
The export part of PSES-MT writes all users listed in the PSES Authentication Manager / User List as well as all User Groups, to the CSV files.
PSES user list
When a user is imported to Dispatcher Paragon, the majority of the credentials are migrated:
- Username, name, surname
- Email address
- PIN number and card number
- Assignment to cost center (User group)
- Password is set to “password” to all users or to a password set in PsesMigrationTool.exe.config file
List of imported users in Dispatcher Paragon
User migration for Dispatcher Suite
The user migrated to the Dispatcher Paragon with Dispatcher Phoenix integration is not supported for single sign-on to Dispatcher Phoenix MFD application. To use single sign-on with Dispatcher Phoenix you need to migrate the user to Active Directory.
Active Directory users
It is possible to migrate also users which were originally from AD/LDAP. This use case is supported because not all data attached to user entity are available in AD/LDAP. Examples could be PIN codes and cards which were added manually or were imported from external system. In such cases is important to realize where are priorities of import procedure. Those are defined in following order 1] AD/LDAP 2] manual users.
The logic is as follows:
- if imported user is originated from PSES AD/LDAP, but it is not found in Dispatcher Paragon database during import → skip this user (because is expected the user would be synchronized from AD/LDAP)
- if imported user is originated from PSES AD/LDAP, but it is found in Dispatcher Paragon database during import → update only AD/LDAP configuration source data for the existing Dispatcher Paragon AD/LDAP user
- if imported user is NOT originated from PSES AD/LDAP, but it is not found in Dispatcher Paragon database during import → create new Dispatcher Paragon manual user
- if imported user is NOT originated from PSES AD/LDAP, but it is found in Dispatcher Paragon database during import → update existing Dispatcher Paragon manual user
Users are mapped on manual users via UserName field.
Before the import, it is better to verify both system configuration of LDAP integration. In Dispatcher Paragon management interface go to System / LDAP integration / Advanced settings and focus on mainly on fields matching PSES Account Manager / External Server Settings. Later you can adjust configuration to a different settings.
Dispatcher Paragon | Page Scope Enterprise Suite |
|---|---|
Attribute containing username | User Name |
Attribute containing user email | E-mail Address |
Attribute containing home directory | Home |
Attributes containing aliases | Active Directory Attribute for Alias |
Attributes containing cards/PINs | IC card information attribute name |
Accounts
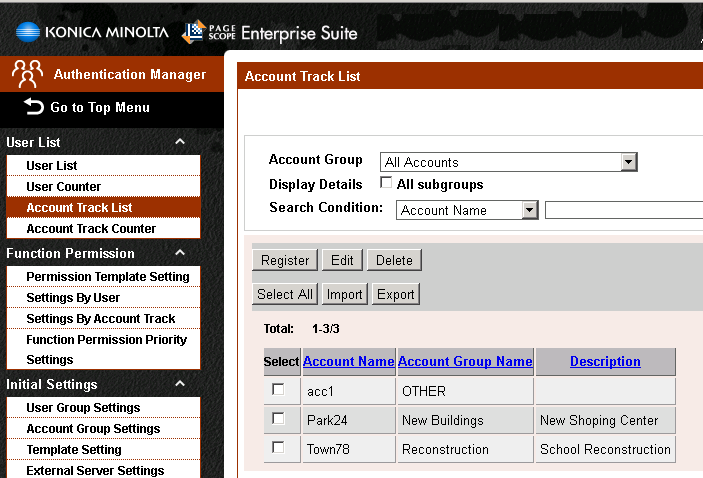
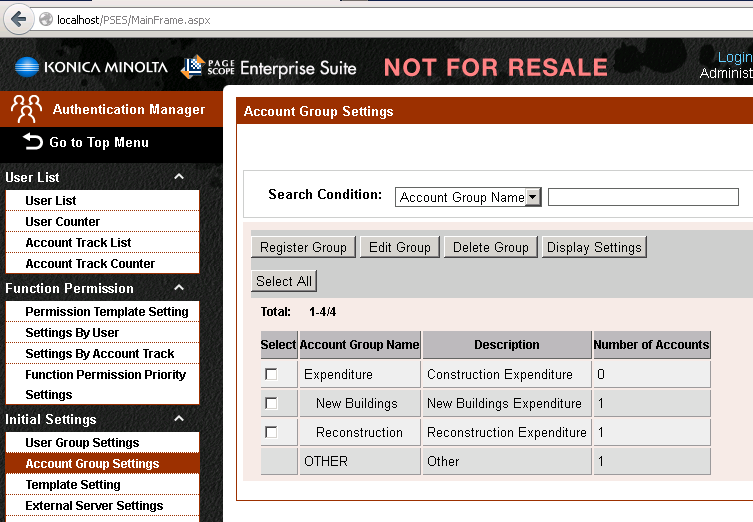
The export part of PSES-MT writes all Accounts listed in the PSES Authentication Manager / Account Track List and Account Group Settings to the CSV files.
PSES accounts definition
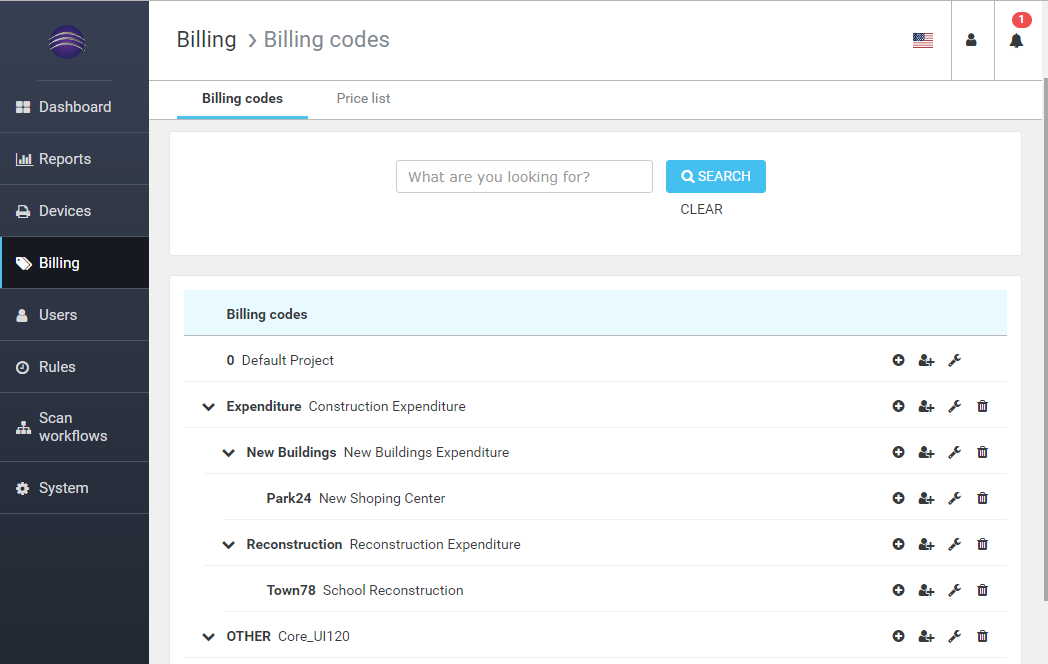
The import part of PSES-MT creates appropriate structure of billing codes in the Dispatcher Paragon Management Interface.
No billing code is assigned to any user, cost center or role.
List of migrated billing codes in Dispatcher Paragon
Price lists
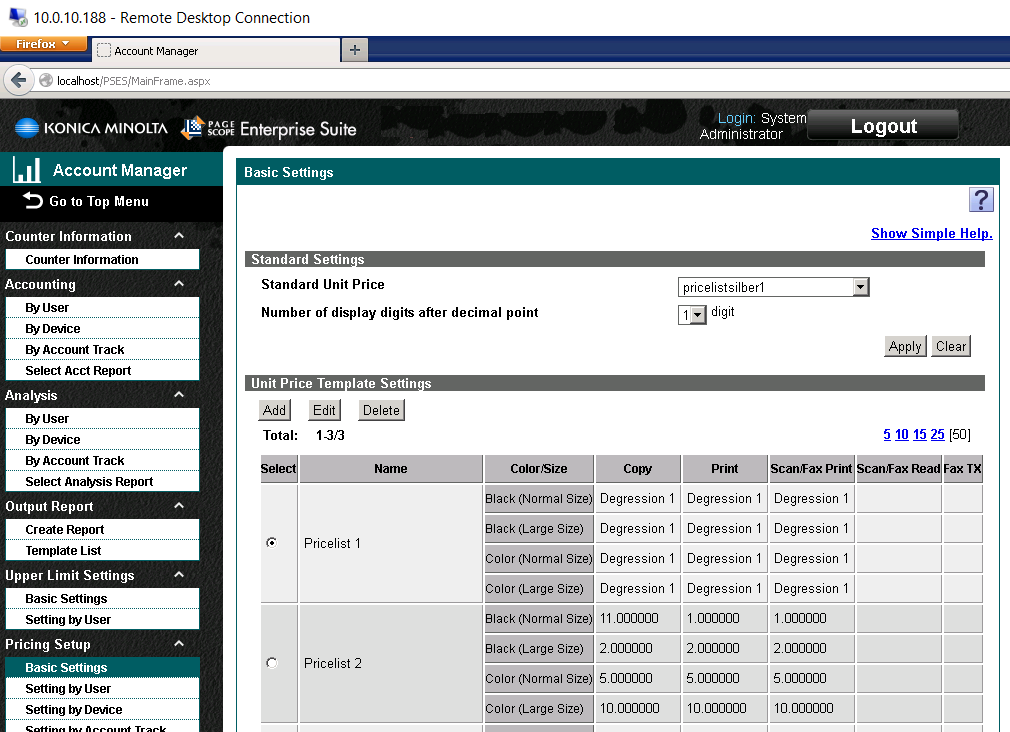
The export part of PSES-MT writes all Unit Price Templates listed in the PSES Account Manager / Pricing Setup / Basic Settings to the CSV files.
PSES list of Pricelist
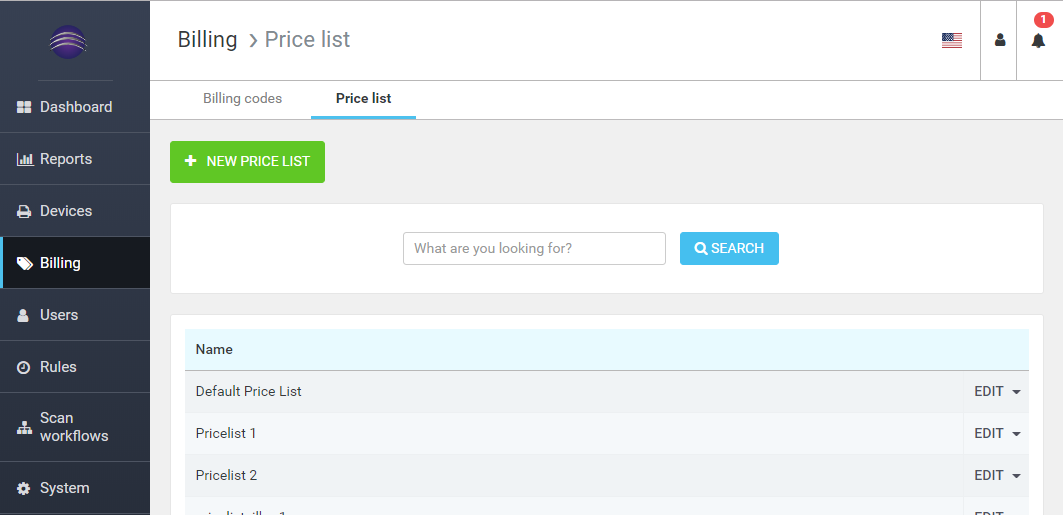
The import part of PSES-MT creates price lists with the same name in Dispatcher Paragon and assigns them to Users, Devices and Cost Centers in accordance with the original PSES relations.
Imported price lists in Dispatcher Paragon
The degressions feature of the PSES is not supported by the Dispatcher Paragon. Therefore, only the base unit price is used in the price lists of the Dispatcher Paragon.
Dispatcher Paragon does not differentiate small and large papers for scanning. The Scan/Fax Read for black normal size paper is used as the price of scans in the Dispatcher Paragon.
Troubleshooting
The PSES-MT contains folder logs which are created after the first run. It contains two types of log.
- PsesMigrationTool.log – this contains information on the PsesMigrationTool.
- PsesMigrationToolDb.log – this contains information on raw SQL queries.
