Overview
The Cash Desk web interface is for cash desk operators, such as front desk agents that manipulate cash, and provides basic operations with customer accounts (cash deposits or withdrawal, transaction refunds, voucher redemption, increasing or decreasing virtual balance, etc.) and cash desk (opening and closing cash desks, money deposits or withdrawal, financial closures, etc).
The Cash Desk application is installed as part of the Dispatcher Paragon Payment System.
To change the language, click the flag icon in the right corner of the top menu and select one of the available languages.
Types of Cash Desks
The Cash Desk can be configured in administration to be General or Merchant.
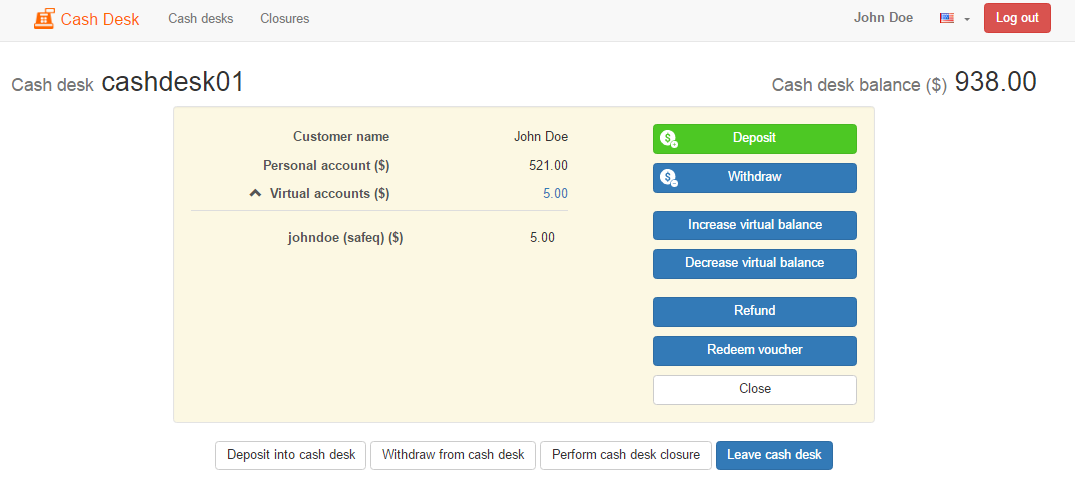
An operator operating a General Cash Desk can see a customers' personal account and all virtual accounts. The operator can perform deposit and withdrawal operations on personal accounts and increase or decrease the balance on virtual accounts.
An operator operating a Merchant Cash Desk can only see the total account balance as a sum of a personal account balance and a virtual account balance. The operator can only do refunds or redeem vouchers.
Logging In/Logging Out
Before logging into the Cash Desk web interface, the following prerequisites must be met:
The Dispatcher Paragon Payment System is connected to a Dispatcher Paragon server.
A user with the role cash desk operators is available in Dispatcher Paragon.
The Dispatcher Paragon Payment System and Dispatcher Paragon are running.
Logging In
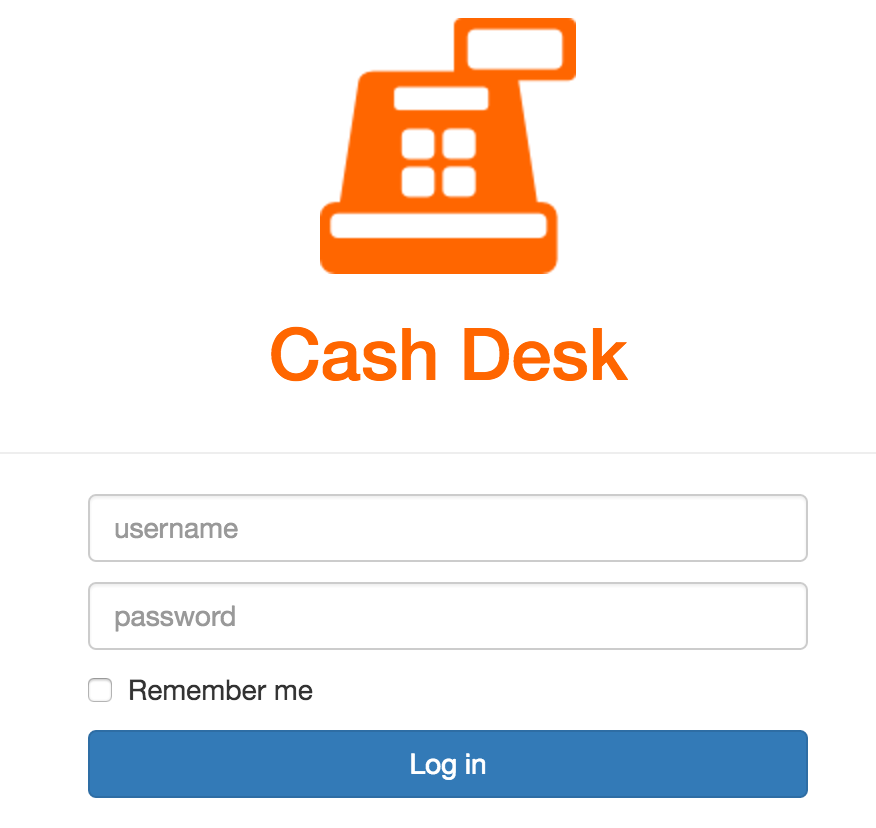
Open an Internet browser and go to the URL https://<server-ip-address>:8443/payment-system/cash-desk or click the shortcut created on the desktop of the computer where the Dispatcher Paragon Payment System is installed.
Enter the credentials of the user with a cash desk operator role.
Click Log In.

Logging In with Remember Me
'Remember me' allows a user to stay logged in without needing to fill in a login form. After logging in with a check in the 'Remember me' checkbox, a user does not need to log in again for the next 30 days (by default). This functionality can be cancelled by logging out. The 'Remember me' feature has to be configured. For more information, see Advanced Configuration of Dispatcher Paragon Payment System.
- Open an Internet browser and go to the URL https://<server-ip-address>:8443/payment-system/cash-desk or click the shortcut created on the desktop of the computer where the Dispatcher Paragon Payment System is installed.
- Enter the credentials of the user with a cash desk operator role.
- Check the 'Remember me' checkbox.
- Click Log in.
All unsaved information will be lost for inactive users.
Logging In as a Current Windows User
'Log in as current Windows user' allows a user to log in using Windows user credentials. For more information about the configuration of Single Sign-on, see Configuring Single Sign-on for Dispatcher Paragon Payment System.
- Open an Internet browser and go to the URL https://<server-ip-address>:8443/payment-system/cash-desk or click the shortcut created on the desktop of the computer where Dispatcher Paragon Payment System is installed.
- Enter the credentials of the user with a cash desk operator role.
- Click Log in as current Windows user (see picture above).
Logging Out
Logging out from the Cash Desk web interface is performed by clicking the Log out button in the top right corner. Or a user can be logged out automatically when they have been inactive for a specified period.

Operating Cash Desks
This section describes all possible operations with assigned cash desks in the Cash Desk web interface.
List of Cash Desks
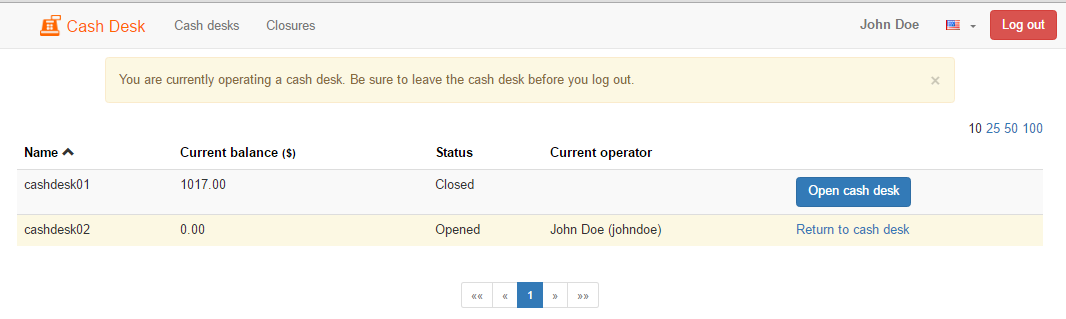
After logging in, a cash desk operator can see a list of assigned cash desks that are not disabled. Cash desks can be assigned to operators – see YSoft Payment System Administration web interface section Cash desks.
In the list, you can see basic information for each cash desk:
- Name – the name defined for the cash desk
- Current balance – the balance of the cash desk should reflect the amount of physical money in the cash desk
- Status
- Opened – the operator that opened the cash desk and has not closed it yet
- Closed – nobody is operating the cash desk, it can be opened and used
- Current operator – the name of the operator that is operating the cash desk and has not closed it yet
All cash desks can be forcibly closed – see YSoft Payment System Administration web interface section Cash desks.
Opening and Closing a Cash Desk, Cash Desk Details
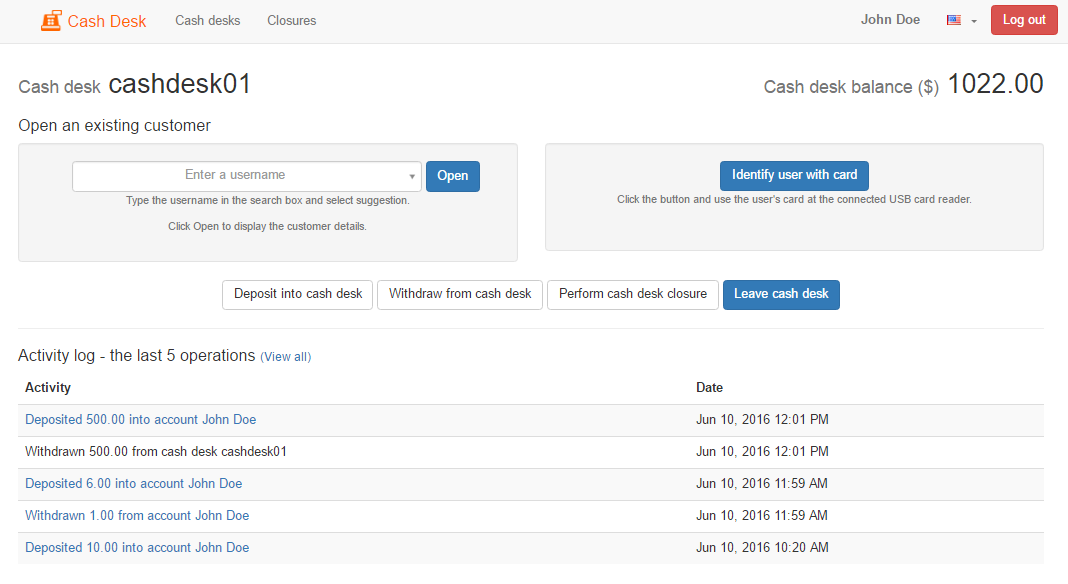
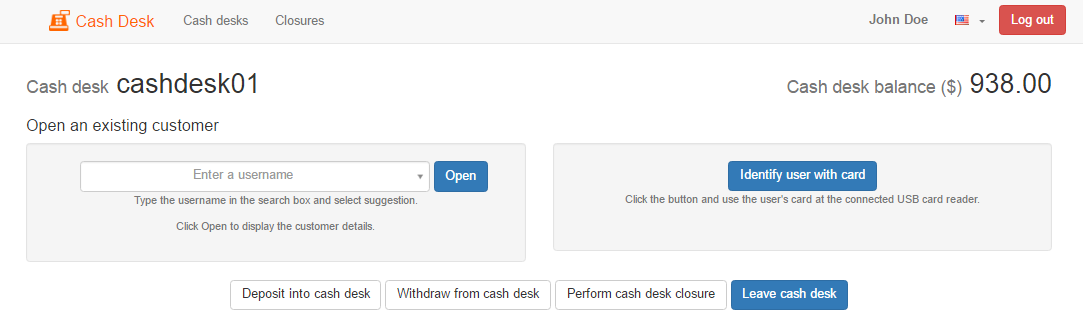
To use any of the available cash desks, click Open cash desk. If the cash desk has already been opened, click on the Return to cash desk button.
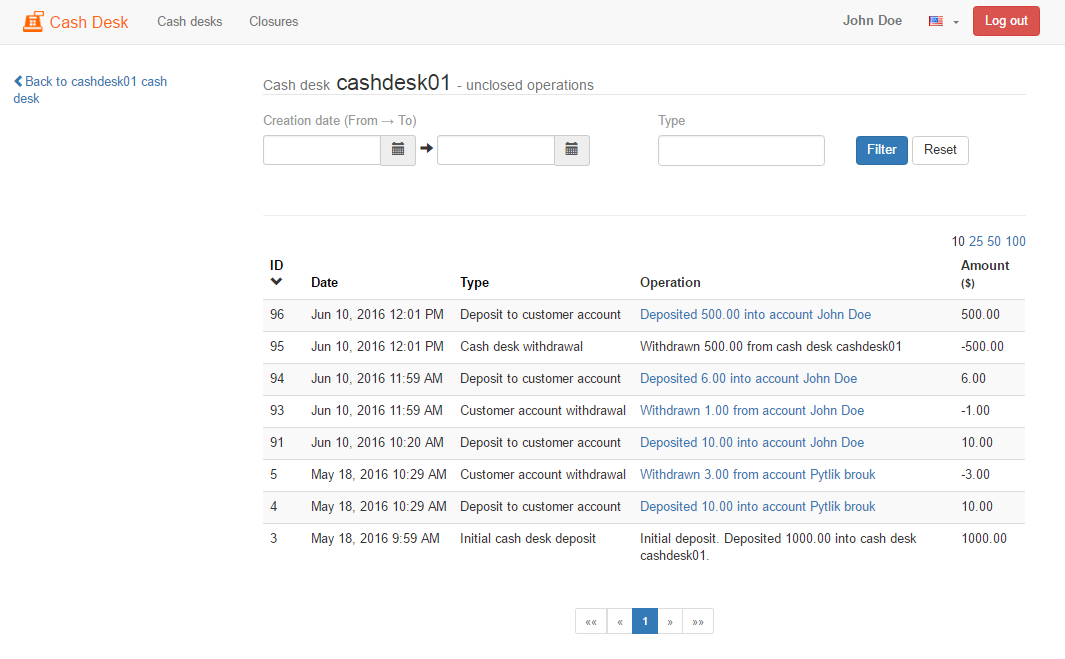
In the top right corner, the cash desk's balance is displayed. To check the last activity in the cash desk, see the Activity log at the bottom of the screen—the last five activities are displayed ordered by date and time.
When finished with the currently opened cash desk, click Leave cash desk. The cash desk will be properly closed, and the operator is redirected to the list of cash desks.
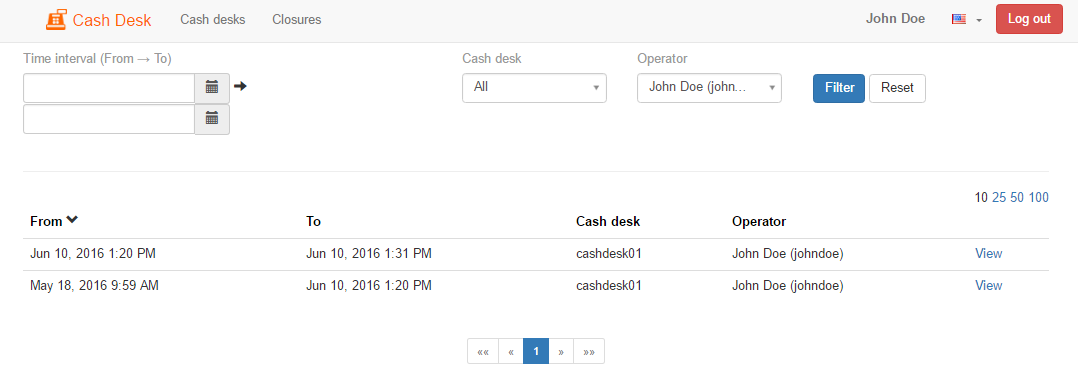
A list of all activities can be displayed by clicking View all.
Activities on a cash desk are sorted by ID. Optionally, filter them by date and type, sort by columns, or list through pages. The number of lines displayed on the page can be changed.
Return back by clicking Back to <cash desk name> cash desk.
Money Deposits and Withdrawals into/from a Cash Desk
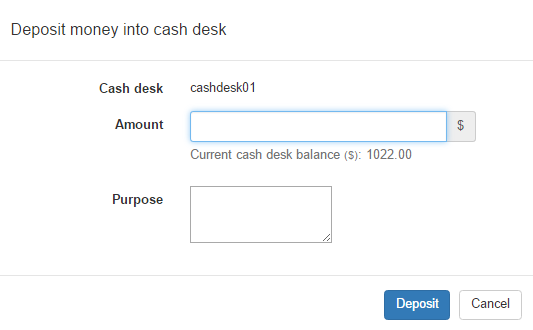
To deposit money to a cash desk, follow these steps:
- Click the Deposit into cash desk button, the "Deposit money into cash desk" window appears.
- Fill in the amount (mandatory) and the purpose (optional).
- Click Deposit and the transaction is saved.
After a successful deposit, the cash desk balance increases and the transaction appears in the Activity log.
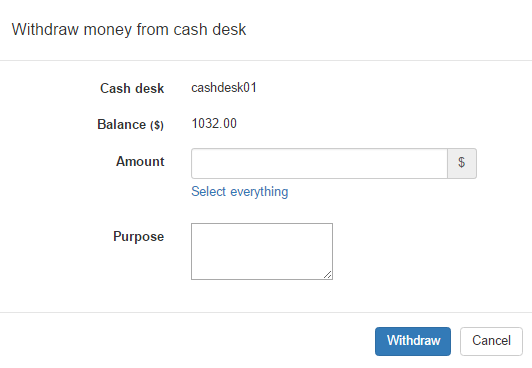
To withdraw money from a cash desk, follow these steps:
- Click the Withdraw from cash desk button, the "Withdraw money from cash desk" window appears.
- Fill in the amount (mandatory) and the purpose (optional), alternatively, use the Select everything button.
- Click Withdraw, and the transaction is saved.
After a successful withdrawal, the cash desk balance decreases and the transaction appears in the Activity log.
When using the Dispatcher Paragon Payment System with Dispatcher Paragon, it might not be possible to withdraw all money visible on a customer's account. This is caused by a very small value missing on the customer's account.
This behavior is caused by a limitation of Dispatcher Paragon from incorrect rounding of credit.
Cash Desk Closures
Cash desk closure is used for financial closure (e.g. at the end of the day). It can be performed by following these steps:
- Click the Perform cash desk closure button on the opened cash desk screen.
- In the following screen, click the Perform closure button to proceed with closure.
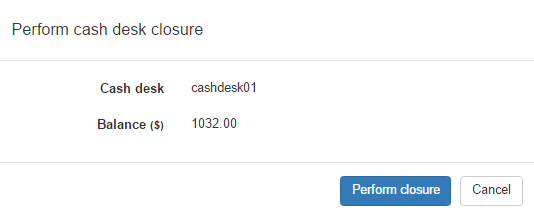
When cash desk closure is performed, a closure report appears with the list of operations on the cash desk since last closure. Here receipts can be viewed or reprinted for operations performed on customer accounts. Also, the entire report can be printed by clicking the Print closure button.

A list of all closures performed by the currently logged-in operator for all assigned cash desks can be viewed by clicking Closures in the top page menu.
Optionally, filter closures by date and time, by cash desk, or operator, and sort or list pages with closures. To see the details of a certain closure, click View on the right side of the selected line.
Operating Customer Accounts
This section describes all possible operations with money accounts in the Cash Desk web interface. Before operating customer accounts, first open a cash desk.
Opening a Money Account
Open a customer account by:
- Entering username – enter a user’s name into the field and click the Open button. Entering the first character, the cash desk will display a list of users that match that written string.
- Identify user with card – identify a user by their card (if a card has been assigned to them) by following these steps:
- Click Identify user with card, the "Enter card number" window appears.
- Swipe the user's card using the card reader attached to the computer, or
- Enter the user's card number and click Open.
When the user has been successfully identified, the customer account screen is displayed.
After opening a customer's account, the account details are displayed and the operator can perform the various actions that are described below. The list of action buttons depends on the cash desk type – General or Merchant.
Clicking Close customer account, you will be redirected to cash desks.

Money Deposits and Withdrawal into/from a Customer Account
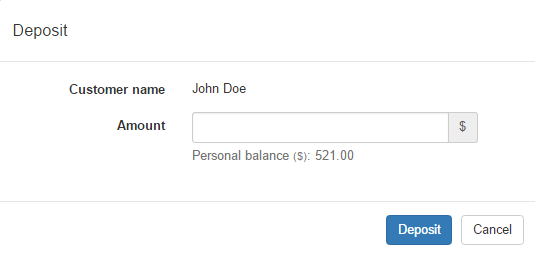
To deposit money into a customer account, follow these steps:
- Click the Deposit button, the "Deposit money" window appears.
- Fill in the amount to be added to a customer's personal balance.
- Click Deposit and the transaction is saved.
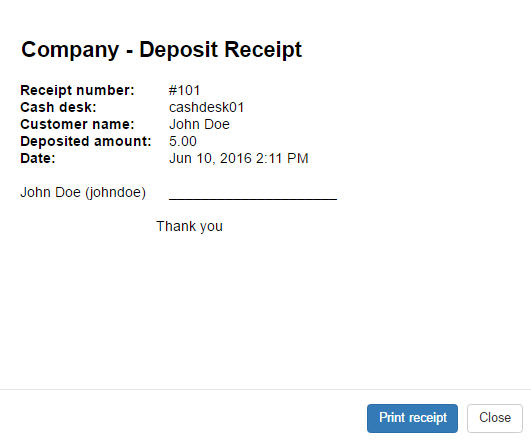
- When the deposit has been processed, a deposit receipt is displayed with the receipt number, cash desk name, customer name, deposit amount, and date. Print the receipt by clicking the Print receipt button or close without printing by clicking the Close button.
After a successful deposit, the account balance and cash desk balance increase and the transaction appears in the Activity log.
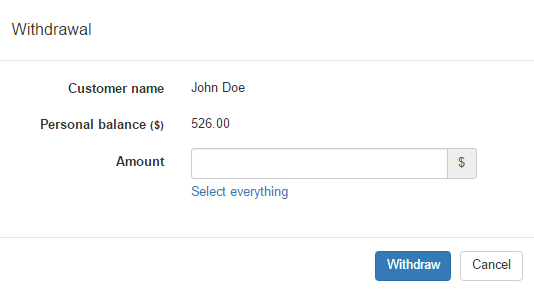
To withdraw money from a customer account, follow these steps:
- Click Withdraw, the "Withdrawal money" window appears.
- Fill in the amount to be withdrawn from the customer's account. Alternatively, use the Select everything button.
- Click Withdraw and the transaction is saved.
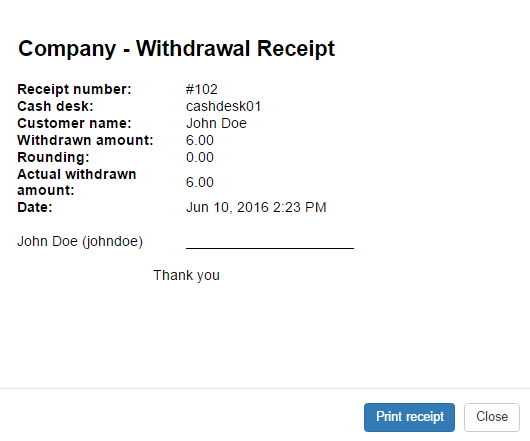
- When a withdrawal has been processed, the deposit receipt is displayed with the receipt number, cash desk name, customer name, deposit amount, and date. Print the receipt by clicking the Print receipt button or close without printing by clicking the Close button.
After a successful withdrawal, the account balance and cash desk balance decrease and the transaction appears in the Activity log.
The possible amount of a withdrawal can be limited by the cash desk balance or the smallest amount used for withdrawal, configured in the Payment System Administration interface.
Increasing and Decreasing a Virtual Balance
To increase the balance of a customer's virtual account, follow these steps:
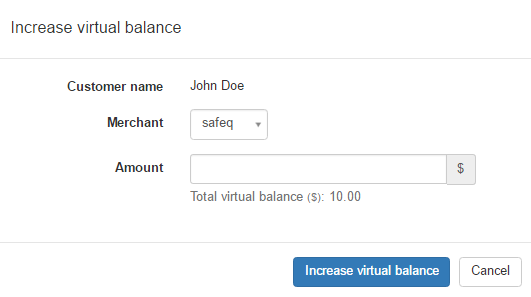
- Click Increase virtual balance, the "Increase virtual balance" window appears.
- Select the merchant of the virtual account.
- Enter the amount.
- Click Increase virtual balance, the virtual balance increases.
After a successful increase, the virtual balance of the appropriate merchant increases, the cash desk balance does not change and the increase is not displayed in the Activity log.
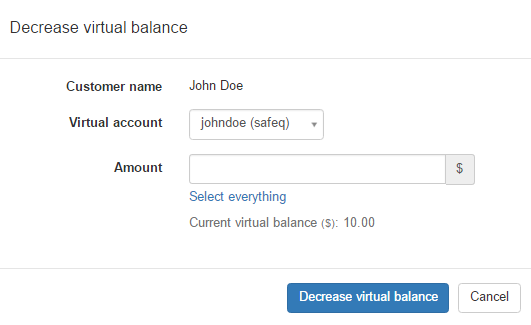
To decrease the balance of a customer's virtual account, follow these steps:
- Click Decrease virtual balance, the "Decrease virtual balance" window appears.
- Select the merchant of the virtual account.
- Enter the amount.
- Click Decrease virtual balance, virtual balance decreases.
After a successful decrease, the virtual balance of the appropriate merchant decreases, the cash desk balance does not change and the decrease is not displayed in the Activity log.
Refunding a Transaction
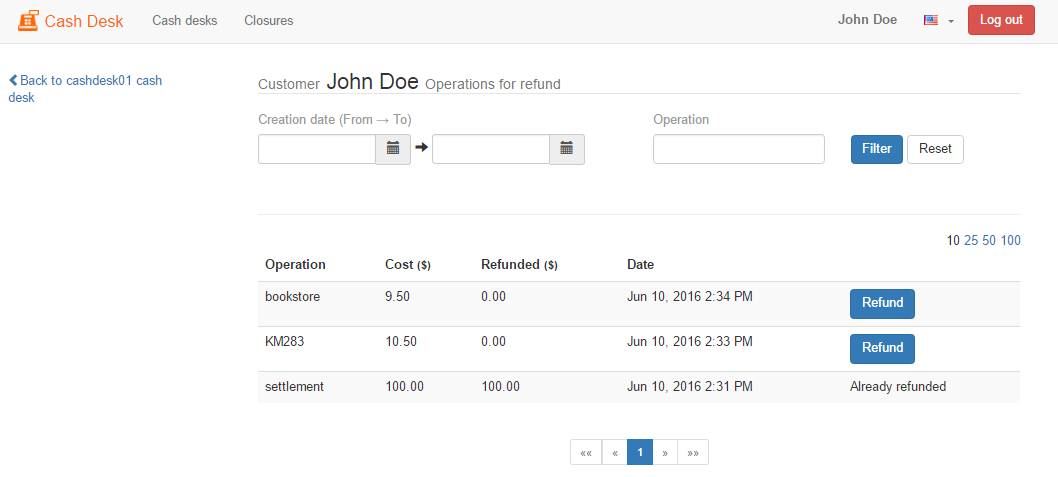
A cash desk operator can refund all charged transactions on a customer account if refunding is allowed in the YSoft Payment System Administration web interface.
To refund a transaction, follow these steps:
- Click Refund to display the operations for refunding. The operator can filter the list of displayed operations.
- Select the operation for refunding by clicking the Refund button. The refund operation details are displayed.
- Enter the amount for refunding. Optionally, use the Select everything button, enter the reason, and click the Refund button. If an operation has already been partially refunded, the rest can be refunded or a part of it up to the remaining amount can be refunded.
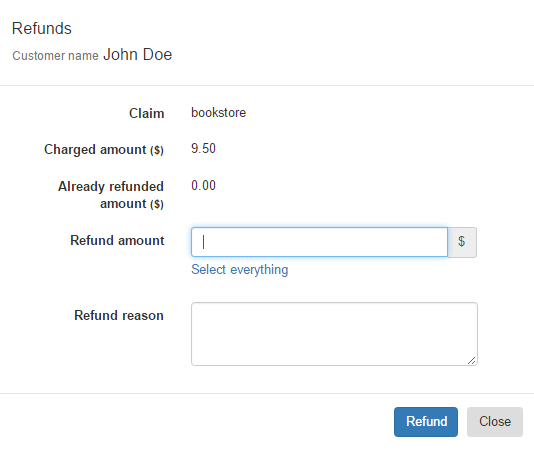
- When the refund has been processed, a Refund receipt is displayed with the receipt number, cash desk name, customer name, claimed for, reason, refunded amount, and date. Print the receipt by clicking the Print receipt button or close without printing by clicking the Close button.
After a successful refund, the account balance increases, the cash desk balance does not change, and the transaction is not displayed in the Activity log.
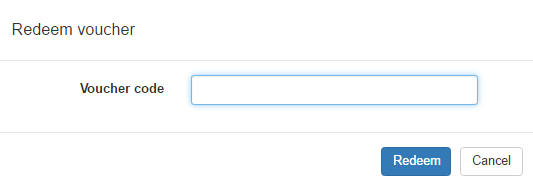
Redeeming a Voucher
To redeem a Voucher, follow these steps:
- Click the Redeem voucher button, the "Redeem voucher" window appears.
- Enter the voucher code and click the Redeem button.
After a successful redemption, the personal balance increases, the voucher code is deactivated and the transaction is not in the cash desk Activity log.
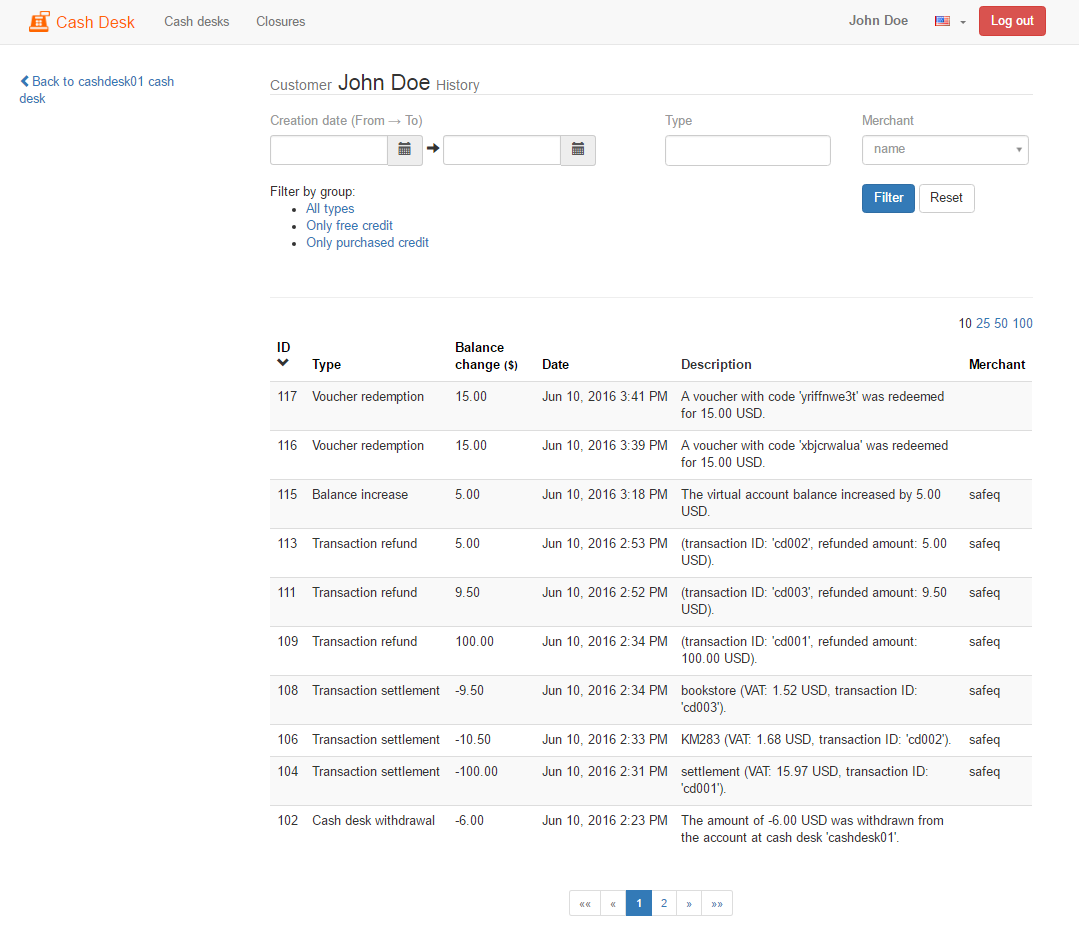
Transaction History
A cash desk operator can also see a transaction history for the opened customer account if this feature is enabled for the particular cash desk.
Click the Customer history button and a list of all transactions performed for this account appears.
Optionally, filter, sort, or list pages with transactions.