Requirements
Auto-installation of Dispatcher Paragon Embedded Terminal requires an MFD firmware version supporting SDK 2.4 or higher.
Other limitations can be found on page Requirements and Known Limitations of Dispatcher Paragon Embedded Terminal for OKI and OKI sXP2.
Authentication
Enabling property internalLdapAllowNonsecureProtocol allows sending user credentials (entered on Oki device) unencrypted which could be misused by an attacker for unauthorized access. Use it only when there is no other option.
Certificates
After the first installation of Dispatcher Paragon Terminal Embedded, it is necessary to upload a CA certificate to the device to make sure that communication with Terminal Server is trusted.
If you do not mind security issues you can use SafeQTerminalServer.crt certificate from the Certificates folder in the installation directory of the Terminal Server.
In the case of updating from MU38 or lower, it is necessary to upload the safeqds.cer certificate from the product installation package.
How to with certificates
How to generate new specific certificate - System communication hardening
How to select a certificate on Terminal Server - Configuring secured connection between terminals and Terminal Server
How to convert from Personal Information Exchange to the common PEM files - Conversions between different keystores and certificate types
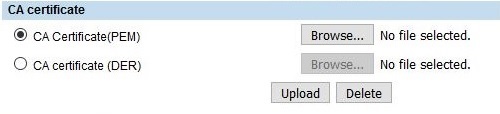
Uploading the CA certificate
- Go to Administration > Security > Certificate Management.
- In the section CA certificate, select the CA certificate (PEM) radio button.
- Click Browse..., and choose the correct certificate file in PEM format.
- Press Upload.
Oki made the security more stricker and generic certificates might not work. For devices based on new architecture, generation of IP-specific certificate is necessary to supress SSL/TLS warnings.
Allowing Direct Printing
If you want to use direct printing, it is necessary to allow printing for unauthenticated jobs. Navigate to Administration > Security > Authentication. You need to configure the section User Authentication Setting.
Configure the option Authentication failed print job/Raw Print Job to Print.
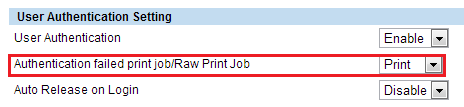
As a consequence, any print performed directly to the printer would be printed with this setting. To prevent unwanted prints, set up IP filtering (Administration > Setup > Network > Filtering).
Allowing Card Readers
If you do not see the configuration for card authentication, turn off the device and follow these steps:
- Connect the USB card reader.
- Enter the service menu.
- On the next screen, enter 3500 and press the green start button.
- Now enter 90001 and press OK.
- Now enter 9398 and press the green start button again.
- Enter eBMUserCard and restart the printer.
- The LDAP server will be automatically configured with the next installation of Dispatcher Paragon Embedded Terminal for OKI.
Configuring Time Settings
Time settings have to be configured for the proper accounting of jobs and the assignment of billing codes to these jobs.
Go to Administration > General and configure Daylight Saving Time Settings to comply with the configuration of your server where Terminal Server is running.

Daylight Saving Time does not work correctly on devices with older versions of the firmware (older than O290HD0W21xx). This can cause problems with the assignment of billing codes and the time of the performed jobs. To check the version of your firmware, go to Administration > General > Version.
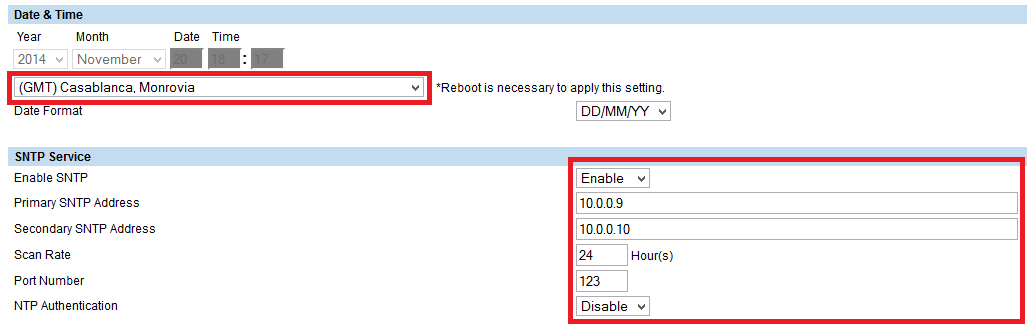
If you plan on using the SNTP server, it is recommended to disable the Daylight Saving Time feature.
Next, there are two options possible, based on the availability of an SNTP (time) server in your network:
- If an SNTP server is available, set all the necessary details in the section SNTP Service, and set your timezone
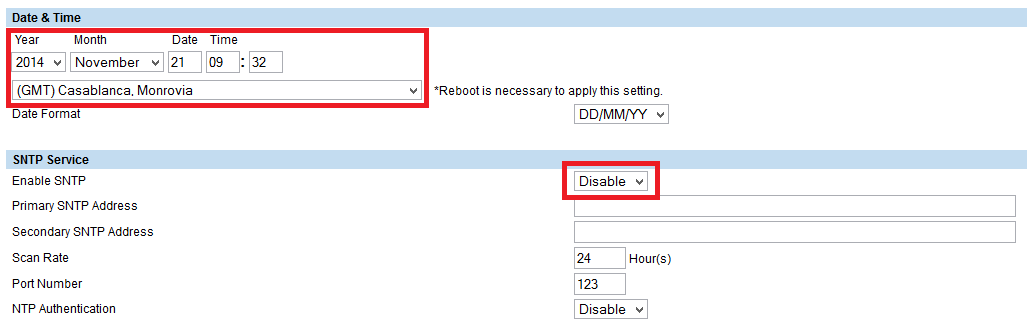
If an SNTP server is not available, in the section Date & Time, set the timezone, date, and time to the time of the Terminal Server. Also, disable the SNTP server.
WARNING: Be sure to set the time as precisely as possible (in means of seconds) to avoid errors in assigning billing codes to scan jobs and copy jobs. It is better for the MFD to have the clock set slightly ahead, than behind.
Displaying the Dispatcher Paragon application Screen after a Successful login
To improve the experience with Dispatcher Paragon Embedded application in OKI, we recommend doing the following steps to display the Dispatcher Paragon application as the initial screen after a successful login.
- Enter the service menu.
- Press 9955 to change the Extension label to Dispatcher Paragon, and click OK to save.
- Press 9132 and enter the value 99.
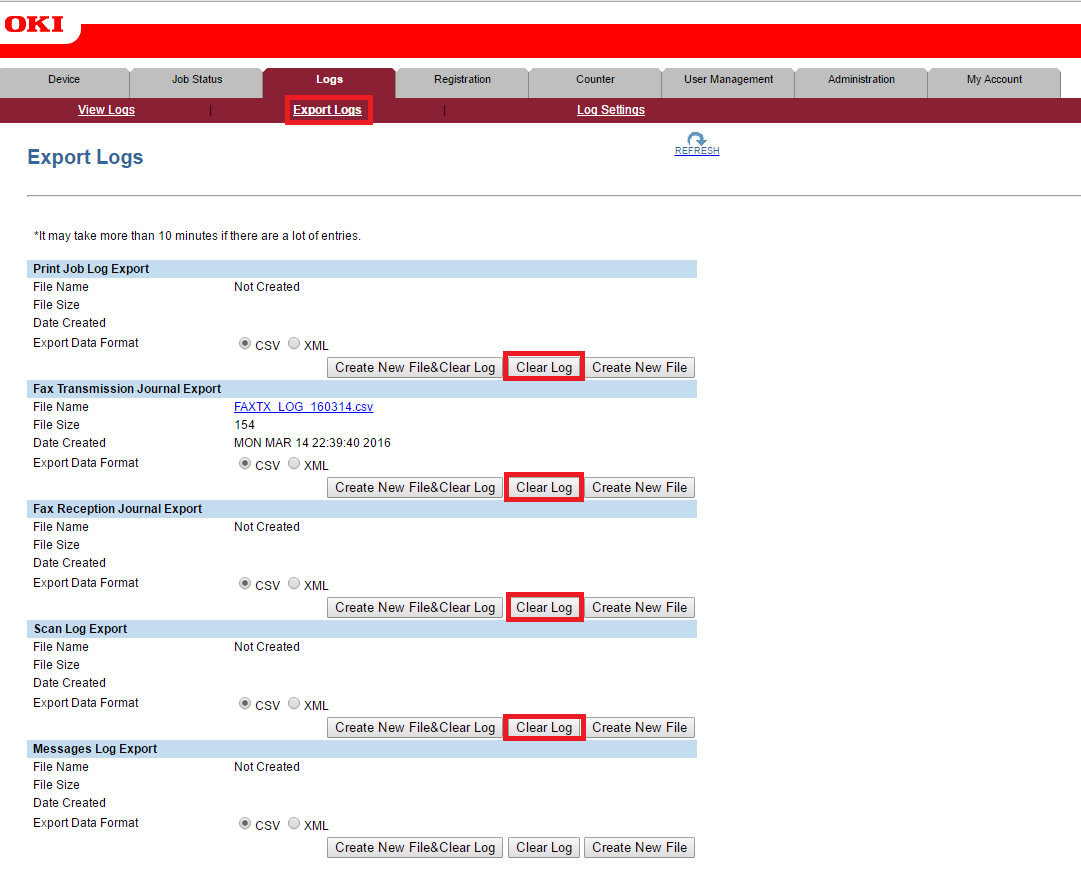
Configuring Accounting
If you are planning to install the accounting feature, you need to delete old job logs before installing the embedded terminal.
Go to Administration > Logs > Export Logs and click on all the buttons that are highlighted below. Optionally, the logs can be exported using the Create New File buttons.
C onfiguring the HTTP and HTTPS Ports
The MFP uses port numbers 40629 and 40630 for HTTP and HTTPS communication.
If you are planning to use different port numbers, you have to change the values of the configuration properties openPlatformHttpPort and openPlatformHttpsPort and change the port numbers on the MFD web interface.
- Set the property openPlatformHttpPort (expert view) for HTTP communication .
- Set the property openPlatformHttpsPort (expert view) for HTTPS communication .
- Go to Administration > Setup> ODCA and change the values of the ports. Then click the Save button.
