After selecting a destination connector, configure properties specific to individual connector types.
File System
Selecting a file system type connector as a workflow destination stores scanned files to a local or network file system either in a subdirectory of a connector's base location or directly in the base location. The connector can be configured to enable users to interactively browse the structure of a selected target directory and optionally select one of its subdirectories as the target.
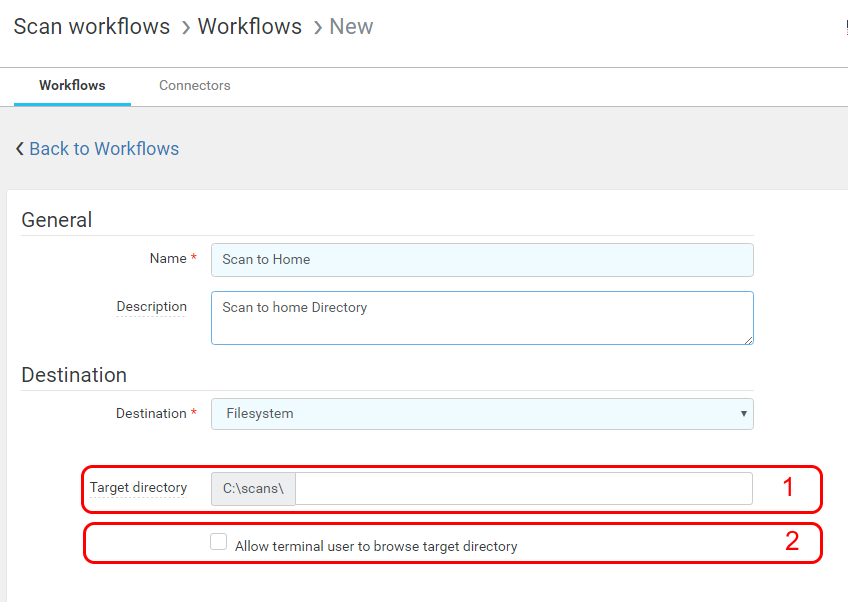
- Target directory (optional) – The directory where the workflow delivers scanned files, relative to the connector's base location. Captured variables may be used. Process and user input variables are supported only if browsing is disabled (a path that is defined by user input cannot be browsed). Please keep in mind the limitation of characters that are allowed to be in paths.
- Allow terminal user to browse target directory – If checked, the target directory is not the final destination. A new user input field is automatically added, which allows a terminal user to browse and select a subdirectory of the target directory as a destination. When this option is checked, an edit button appears to edit the title of this parameter. The user input is also visible in the "User input fields" section, so it can be arranged. For more information see section User Input Fields.
To allow users to browse target directories, the service account under which the Workflow Processing System runs must have read access to the target directory and all subdirectories that can be used as the scan destination.
Email (SMTP)
Selecting an Email (SMTP) type connector as a workflow destination delivers scanned files by email to one or more email addresses.
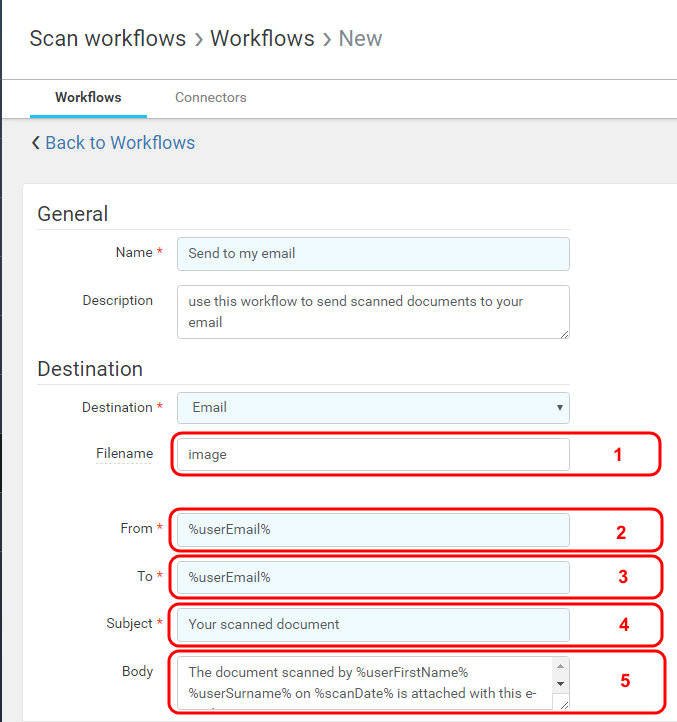
Filename (optional) – The name of the resulting scanned file (without an extension). Process, capture, and user input variables may be used. If scan workflow produces multiple files, the filename is appended with a numeric sequence in the "####" format, e.g., "0001", "0002", etc.
If the filename field is left blank, the filename generated by the device where the scan was made is used.
- From – The email address from which the email is sent. Process, capture, and user input variables may be used.
To – Recipient email address. Process, capture, and user input variables may be used.
Multiple email addresses can be separated by a comma "," or semicolon ";".
- Subject – The email subject. Process, capture, and user input variables may be used.
- Body (optional) – The email body. Process, capture, and user input variables may be used. HTML tags may be used to format the body.
Microsoft Exchange
Selecting a Microsoft Exchange connector type as a workflow destination delivers scanned files by email to one or more email addresses. Microsoft Exchange is widely used in companies and the connector allows more precise configuration than the Email (SMTP) connector.
Basic settings
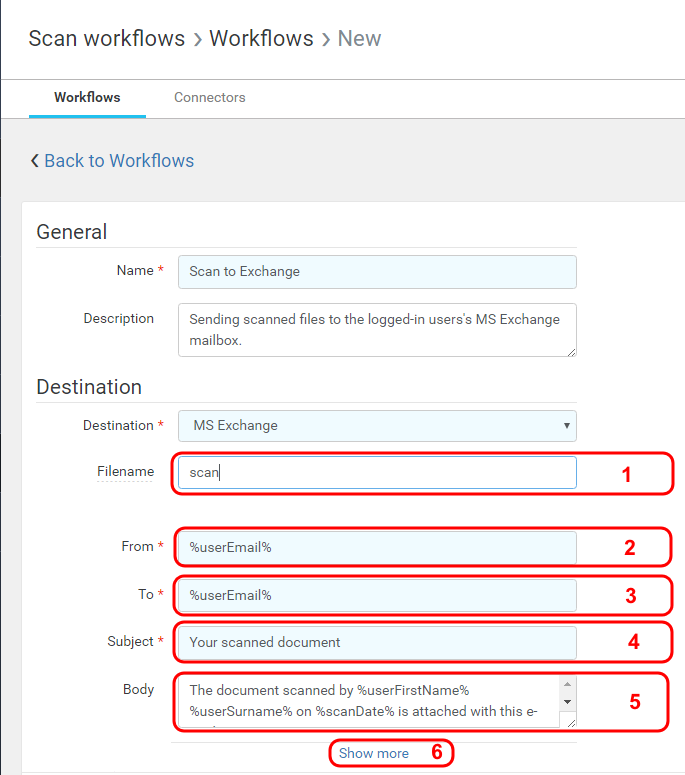
Filename (optional) – The name of the resulting scanned file (without an extension). Process, capture, and user input variables may be used. If scan workflow produces multiple files, the filename is appended with a numeric sequence in the "####" format, e.g., "0001", "0002", etc.
If the filename field is left blank, the filename generated by the device where the scan was made is used.
From – The email address from which the email is sent. Process, capture, and user input variables may be used.
This field can be used only when the connector is configured without impersonation in the connector configuration. For more information see Edit Connector section Microsoft Exchange.
To – The recipient email address. Process, capture, and user input variables may be used.
Multiple email addresses can be separated by a comma "," or semicolon ";".
Subject – The email subject. Process, capture, and user input variables may be used.
Body (optional) – The email body. Process, capture, and user input variables may be used.
Show more – Click the link to configure additional settings (below) for the workflow with a Microsoft Exchange destination. For more information see section Additional Microsoft Exchange workflow settings below.
Additional Microsoft Exchange workflow settings
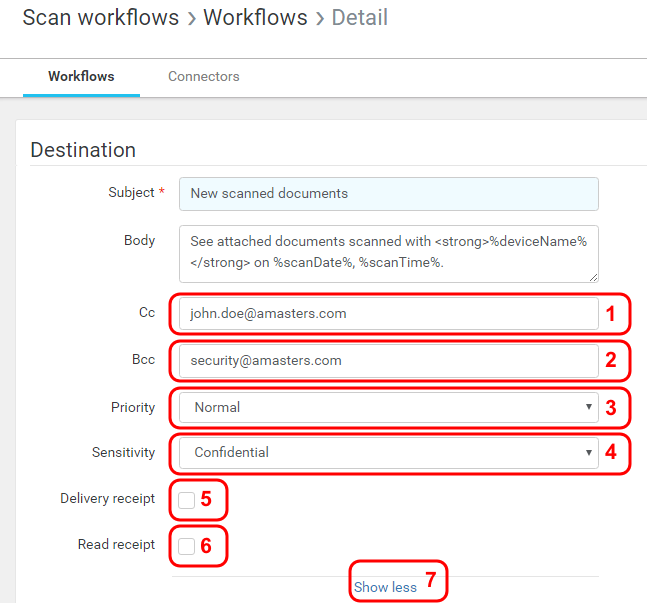
Cc (optional) – A carbon copy recipient email address. Process, capture, and user input variables may be used.
Multiple Email addresses can be separated by a comma "," or semicolon ";".
Bcc (optional) – The blind carbon copy recipient email address. Process, capture, and user input variables may be used.
Multiple Email addresses can be separated by a comma "," or semicolon ";".
- Priority – Email priority.
- Sensitivity – Email sensitivity.
- Delivery receipt – If enabled, a delivery receipt email will be sent to the sender when the email with the scanned files is delivered to each recipient.
- Read receipt – If enabled, the read receipt flag will be set in the email. If the recipient confirms read receipt, a confirmation email is sent to the sender.
- Show less – The show less link hides additional Microsoft Exchange settings.
Impersonation
When impersonation is enabled in the Microsoft Exchange destination connector (for more information see Edit Connector section Microsoft Exchange), it is not possible to change the value of the From field.
When impersonation is disabled in the Microsoft Exchange destination connector, it is also possible to set the user logged in at the Dispatcher Paragon terminal as the sender using the %userEmail% variable in the From field and assigning Send as permission to the service account Microsoft Exchange. However, in this case, the sent email will be in the service account's Microsoft Exchange Sent Items folder.