Enroll in Microsoft Universal Print
To be able to use Microsoft Universal Print with Dispatcher Paragon, the customer must be enrolled in Microsoft Universal Print.
Refer to Microsoft Universal Print documentation: https://docs.microsoft.com/en-us/universal-print/fundamentals/universal-print-getting-started
Register with Y Soft
In this first iteration and to increase security of the solution, Y Soft Corporation, a.s. requires all accounts which will be used to register the connector whitelisted.
The account used to register connector needs to remain enabled, as it is currently used for securing and authenticating communication between the UP Connector and YSoft OMNI API.
- If the account used to register connector becomes disabled, one has to re-authorize each connector using Device code found in service logs (see Troubleshooting section for more information) using another working account with the right role.
- Consider using virtual account instead of a physical user's account for connector registration.
![]() Contact safequp@ysoft.com to ensure the admin account used in step "Install the UP Connector" is enabled. Without this step the print queue will not be created. Please provide the following in your email to safequp@ysoft.com:
Contact safequp@ysoft.com to ensure the admin account used in step "Install the UP Connector" is enabled. Without this step the print queue will not be created. Please provide the following in your email to safequp@ysoft.com:
Company Name:
Dispatcher Paragon Support ID: MA#
Microsoft 365 Subscription Level (e.g. E5/A5, E3/A3, etc.):
Contact Name:
Contact Email:
Contact Phone:
Azure AD account UPN (with "Printer Administrator" role):
Additional admin accounts
You can add additional admin accounts in your customer Azure AD without going thru the whitelisting process again. This is an optional step that you can do anytime you need to enable additional admins.
- Prerequisites:
- You have one admin account already whitelisted
- That whitelisted admin installed at least one connector
- Log in to the Azure portal with your Microsoft Azure Active Directory administrator account.
- Go to your Azure Active Directory settings page.
- Click Enterprise Applications in the left navigation pane, and search for "OmniBridge App".
- Click OmniBridge App and navigate to Permissions.
- Click Grant admin consent.
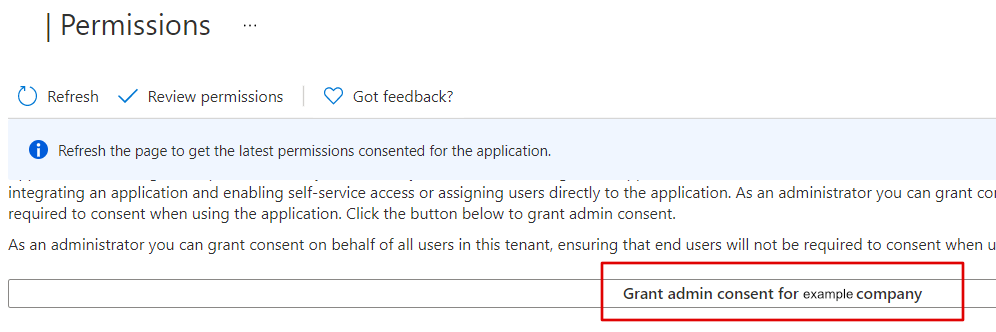
- Select your Microsoft account and grant admin consent. For more information on admin consent, see Microsoft documentation.
- Navigate to Users and Groups.
- Click Add user/group.
- Select the users or groups that should have the Administrator role and click Assign. For more information on assigning users or groups to an app, see Microsoft documentation.
Download Installation Package
Download the latest installation package from the Dispatcher Paragon Portal.
- Unzip the package to a location of your choosing.
Dispatcher Paragon Environment Prerequisites
The UP Connector delivers the print job using secure IPP protocol, there are those options for how to accept this print job in Dispatcher Paragon:
- Mobile Integration Gateway (MIG)
UP Connector with Mobile Integration Gateway
All Dispatcher Paragon servers which will be running the connector need to have:
- You can install .NET Runtime 6.0 - https://dotnet.microsoft.com/en-us/download/dotnet/6.0, but it is not necessary because the runtime is included in the installation package.
- Deploy MIG on the server following - Mobile Integration Gateway deployment
- Please make set the configuration option allow-public-user to true (default is false) in
<MIG_install_dir>\bin\MigService.exe.config<add key="allow-public-user" value="T"/>
- Please make set the configuration option allow-public-user to true (default is false) in
The MIG certificate needs to be trusted by OS running the UP connector. Either configure MIG to use your own trusted certificate or ensure the trust of the default self-signed.
The default deployment script of the UP Connector expects the IPP spooler to be on port 631
Install the UP Connector
Deploy with Default Settings
Please, avoid running the PowerShell from the Total Commander when running installation scripts, as there is a bug with the symlinks and your system32 folder might be wrongly redirected to the SysWOW64 folder!
The account used to register the connector needs to remain enabled, as it is currently used for securing and authenticating communication between the connector and YSoft OMNI Portal.
- If the account used to register the connector becomes disabled, one has to re-authorize each connector using Device code found in service logs (see Troubleshooting section for more information) using another working account with the right role.
- Consider using a virtual account instead of a physical user's account for connector registration.
- You can install .NET Runtime 6.0 - https://dotnet.microsoft.com/en-us/download/dotnet/6.0, but it is not necessary because the runtime is included in the installation package.
- Copy the installation package of the UP Connector onto the server.
Install the UP Connector by running the following command in the console window as administrator
(this will install the UP Connector with the default settings, see the advanced installation below):.\install-win-service.cmdUse the device code and URL displayed in the console window to register the connector in case this step is required and confirm it
(the code and the URL can be found in the installation logs as well).USER ACTION REQUIRED:To sign in, use a web browser to open the page https://microsoft.com/devicelogin and enter the code <XXXXXXXXX> to authenticate.- Navigate to the URL for the Microsoft OAuth page: https://microsoft.com/devicelogin and paste there the code from the log above.
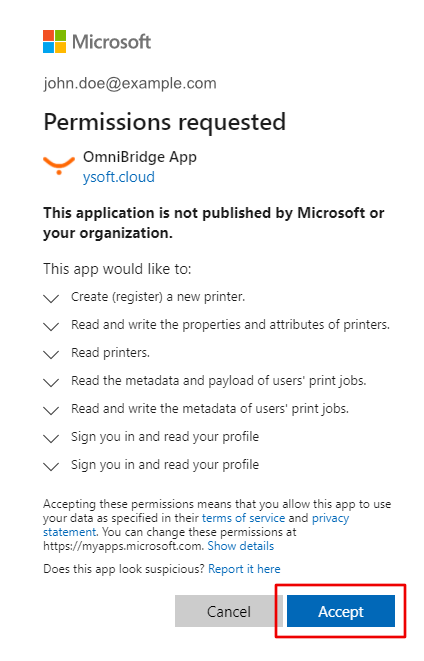
- Then you need to log in as a user with "Application Administrator" or higher. You can see more permissions in prerequisites section.
- You need to approve all listed consents. They should be as follows:
Advanced Installation with Custom Settings
Follow the steps from the standard installation above but exchange step #3 with the following instructions:
Alternatively, the UP Connector can be installed using the following command in the PowerShell console window allowing to customize some settings
(if the script is run without any additional parameters it will again result in the default settings being used):.\install-win-service.ps1The following parameters can be customized:
- InstallPath (the default is "C:\DispatcherParagon\UPConnector")
- UPConnectorZipFile (the default is "DiPa.UPConnector.zip")
- JobServiceIppsHostname (the default is "localhost")
- PrinterDeviceName (the default is "DiPa")
- RegistrationId (the default is generated by the script)
for example:
.\install-win-service.ps1-InstallPath'C:\custom\location\UPConnector'-PrinterDeviceName'My Example Printer Name'
Deployment of multiple UP Connectors in the High Availability mode
The first UP Connector is installed in the same way as described above. During the installation process, you will see the following message:
Did you know that UP Connector can be installed in high availability mode? You can attach another UP Connector to the same printer queue.If you want to do that, start the installation process of the new UP Connector with following parameters:install-win-service.cmd -RegistrationId <REGISTRAION_ID_GUID>The message is also logged in the installation log. The location of the installation log is described in the Configuration and logs section.
<Date> <Time> | DBG | Printing the high availability command: install-win-service.cmd -RegistrationId "<REGISTRAION_ID_GUID>"For every other UP Connector, which will use the same printer queue, replace step #3 with the command generated by the installer of the first one. You can of course use any other parameter described in the Advanced Installation procedure described above.
Deployment with conditional access policy
We have a solution for customers that have a very strict security policy of user token expiration. This customization ensures that UP Connector will keep running even after the initial device authentication will expire due to the customer's policy.
- You can install .NET Runtime 6.0 - https://dotnet.microsoft.com/en-us/download/dotnet/6.0, but it is not necessary because the runtime is included in the installation package.
- Copy the installation package of the UP Connector onto the server.
Install the UP Connector by running the following command in the console window as an administrator.
(this will install the UP Connector with the default settings, see the advanced installation below):.\install-win-service.cmdRespond to console instruction with "No". You can safely close the console now.
Open file <instal_dir>\UPConnector\configuration\local.json. Add the following configuration:
"UseFunctionsKey": trueThe final local.json should look like this:
{"ConnectorHubOptions": {"ConnectorHubUri": "https://api.up365.ysoft.cloud","TenantId": "organizations","ClientId": "e5eedc46-ba66-44f3-9144-060c86eb5c5e","Scopes": ["e5eedc46-ba66-44f3-9144-060c86eb5c5e/.default"],"UseFunctionsKey": true},"JobDeliveryOptions": {"ForcePrintJobOperation": false}}Save changes and close the file.
Restart SafeQ Universal Print Connector service.
- Open log file<instal_dir>\UPConnector\logs\upconnector.log.
Find and use the device code and URL displayed in the log file to register the connector in case this step is required and confirm it.
USER ACTION REQUIRED:To sign in, use a web browser to open the page https://microsoft.com/devicelogin and enter the code <XXXXXXXXX> to authenticate.- Navigate to the URL for the Microsoft OAuth page: https://microsoft.com/devicelogin and paste there the code from the log above.
- Then you need to log in as a user with "Application Administrator" or higher. You can see more permissions in prerequisites section.
- You need to approve all listed consents. They should be as follows:
Deploy User Print Queues
- Once installed, there will be a new print queue into your Universal Print management console on Azure Portal. Administrators can now share it with people from their organization. Refer to Microsoft Universal Print documentation: https://docs.microsoft.com/en-us/universal-print/fundamentals/universal-print-printer-permissions
- When the printer queue is shared, users can add it following this guide https://docs.microsoft.com/en-us/universal-print/fundamentals/universal-print-getting-started#step-4-add-a-universal-print-printer-to-a-windows-device
- All print jobs can now be released on any print device enabled with Dispatcher Paragon.
Uninstallation of UP Connector
Go to the installation folder of the UP Connector. Usually, it is
<install_dir>\UPConnector.Uninstall the UP Connector by running the following command in the console window:
.\uninstall-win-service.cmd- Confirm that you really wish to proceed with the uninstallation process.
Force clean the Universal Print connector profile
To fully clean data from MS Universal Print that are used by Dispatcher Paragon Universal Print Connector service, uninstall the service by uninstallation script and remove the folder:C:\Windows\System32\config\systemprofile\.universal-print with all the content.
Silent Uninstallation of UP Connector
Alternatively, you can uninstall the UP Connector silently by running the following command in the PowerShell console window:
.\uninstall-win-service.ps1-ForceIf you omit the -Force argument, the user will be prompted for the confirmation before uninstalling (and the uninstallation will no longer be silent).