This document describes how to change the IP address of one Dispatcher Paragon Management Server that is a standalone server or a member of a cluster. These guidelines are typically used in the environment where Dispatcher Paragon Management Server runs on the same server as other components (such as Dispatcher Paragon Spooler Controller, Dispatcher Paragon Payment System, ...).
Verification of the IP Address
This section describes the way to find the IP address of the current server.
Log into the server where the IP address is changed.
Open command prompt (e.g., Start => Run => cmd).
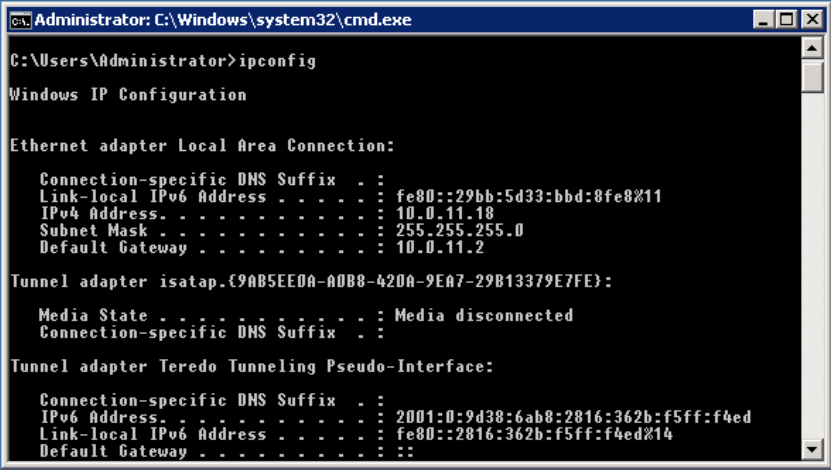
- Enter the ipconfig command in the command prompt and press Enter.
- Check IPv4 Address from the command output.
Reconfiguration of Management Server
An Environment with a Single Management Server
Enable license reactivation if you plan to move Dispatcher Paragon Management Server to a different server with a new IP address.
This scenario assumes that you have a Backup of Databases and a Backing Up Configuration and Binary Files available.
- If you have only one standalone Dispatcher Paragon Management Server, uninstall it.
- Prepare a server (or virtual machine) with the new IP address.
- If you are using an external database (on another server), check its state.
- If the external database is damaged, perform a Recovering Databases but skip the Finalization part for now.
- Check the backup of the configuration files and note the following:
- Which optional features were installed:
- Mobile Print Server – the MPS folder is available in the backup files.
- Payment System – the YPS folder is available in the backup files.
A Management Server GUID. It is noted in the safeq.properties file as the value of the parameter communicator.cml.guid. For example:
backup\Management\conf\safeq.properties# COMMUNICATORcommunicator.cml.guid=MGMT1A SPOC GUID. It is noted in the guid.conf file as the value of the LocalGUID option. For example:
backup\SPOC\conf\modules\guid.conflocalGUID=ectp5o8ep0op3hzi
- Which optional features were installed:
Reinstall Management Server using the same build version of the installation package as you were using before.
Enable optional features if they were used before (see step 4.a.)
Provide the wizard with the same Management Server GUID that was used before (see step 4.b.)
Finish the installation.
See First server installation for a detailed procedure.
Stop almost all Dispatcher Paragon services after installation has finished.
- Leave only this YSoft service running:
- YSoft Bundled PostgresSQL 9.4 (available if embedded PostgresSQL DB is used)
You can use the following PowerShell script to perform the task
Get-Service*YSoft* |Where-Object{$_.Name-notmatch'YSoftPGSQL'} |Stop-Service
- Leave only this YSoft service running:
If you are using an embedded PostgreSQL database, perform a Recovering Databases but skip the Finalization part for now (as new empty databases were created during installation).
- Update the IP addresses in the database.
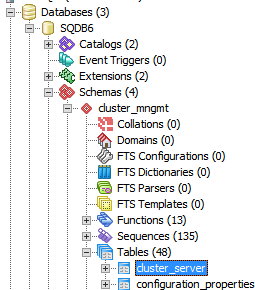
- Connect to the SQDB6 database, the cluster_mngmt schema, and check the contents of the cluster_server table:
- If there is only one record with the server_guid of the reinstalled node, then update the ip_address value to match the new node.
- If there are two records with the same server_guid but different ip_address, then delete the record that contains the IP address of the old server.
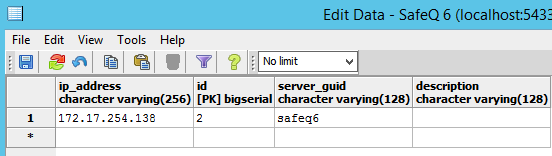
- Connect to the SQDB6 database, tenant_1 schema (or the schema to which your server with the replaced IP address belonged, tenant_1 is default), and check the contents of spooler_controllers table:
- Find the record where spooler_controller_guid equals the GUID of your replaced SPOC (see step 4.c), then update the network_address value to match the new IP.
- Connect to the SQDB6 database, the cluster_mngmt schema, and check the contents of the cluster_server table:
Edit <instal_dir>\SPOC\conf\modules\guid.conf (e.g. c:\DispatcherParagon\SPOC\conf\modules\guid.conf) and rewrite the localGUID to the value that was used before (see step 4.c.).
- Delete the SPOC cache by deleting the whole folder <install_dir>\SPOC\SpoolCache
Start Dispatcher Paragon services with an Automatic startup type again.
Do not start the Dispatcher Paragon Spooler Controller Group Service service. It will be started by the Dispatcher Paragon Spooler Controller service when the proper configuration is ready.
You can use the following PowerShell script to perform the task:
Get-Service*YSoft* |Where-Object{$_.Name-ne'YSoftSQ-SPOCGS'} |Start-Service
Re-activate your Dispatcher Paragon license using your preferred method (online/offline). See Management Interface - License Activation for detailed instructions.
If Dispatcher Paragon Payment System is installed on this server, update paymentSystemApiUrl.
- In Dispatcher Paragon Print Management web, system update paymentSystemApiUrl to reflect the new IP address.
Restore customized configuration:
- If you had services running under a specific domain account, set it up again.
If you used customized scripts on the server (e.g., for batch files launched by Rule-Based Engine or customized batch files used by Workflow Processing System), restore those scripts from the backup.
- If you used a customized configuration (such as your own certificates for the web services), locate the relevant documentation and set the configuration again.
- Check that Spooler Controller is correctly connected on the management web.
An Environment with Two Management Servers in the Cluster
This procedure is valid only for installations where an external database located on another server is being used.
If the affected node is the one on which the Dispatcher Paragon license was activated, enable license reactivation before transferring the license to a new server.
- Make sure both existing servers (including the one that should be replaced by the other one with a new IP address) are functional.
- If you have two node cluster, add a third node that is using the new IP address.
- Then uninstall the node that is being replaced.
- Edit <install_dir>\SPOC\conf\modules\spoc.conf on both remaining Management Servers
- Make sure the details about and correct IPs for both remaining nodes are stored in the properties: serverGUID1, serverPORT1, serverIP1, serverGUID2, serverPORT2, serverIP2
- Should details about any node (except the one which is going to be removed) be missing, add them.
- Remove IP address of the uninstalled node from the database
- Connect to the SQDB6 database, cluster_mngmt schema and check the contents of the cluster_server table.
- Delete the record that contains ip_address and server_guid of the server that was uninstalled.
- Restart the Dispatcher Paragon Management Service service on both Management Servers in the cluster.
- If the reinstalled node was the one on which the Dispatcher Paragon license was activated, re-activate Dispatcher Paragon license using your preferred method (online/offline). See Management Interface - License Activation for detailed instructions.
If the reinstalled node also contained a SPOC:
move the MFDs managed by the uninstalled SPOC to the SPOC with a new IP address (Dispatcher Paragon management interface -> Devices).
delete the uninstalled SPOC from Dispatcher Paragon (Dispatcher Paragon management interface -> Devices -> Spoler Controller groups).
- if the old SPOC was member of a SPOC group, move the newly installed server to a SPOC group (Dispatcher Paragon management interface -> Devices -> Spooler Controller groups).
- other necessary steps to fully initialize a SPOC group are described later in this guide.
An Environment with Three or More Management Servers in the Cluster
This procedure is valid only for installations where an external database located on another server is being used.
- Stop all Dispatcher Paragon services on the affected server.
You can use the following PowerShell script to perform the task
Get-Service*YSoft* |Stop-Service
Update the IP address in the database
Replace the old IP address with the new one in the SQDB6 database, the cluster_mngmt schema, the cluster_server table, the ip_address column. Be sure to replace the IP address only for the line where the old one is present:
Update management
- Edit <install_dir>\Management\conf\safeq.properties – set the new IP address in the entry "safeq.network.address".
- Edit <install_dir>\Management\tomcat\conf \server.xml – replace all occurrences of the old IP address with the new IP address (use the search and replace function in your text editor)
Start some Dispatcher Paragon services again
- Start the following Dispatcher Paragon services again:
- The Dispatcher Paragon Management Service service
- The Dispatcher Paragon LDAP Replicator service
You can use the following PowerShell script to perform the task
Start-ServiceYSoftSQ-Management;Start-ServiceYSoftSQ-LDAP
- The Dispatcher Paragon Management Service service
Update the configuration of the remaining services
Configure Spooler Controller to use the new IP address.
Change the IP address of the Site Server in the operating system.
Replace the IP address in the spoc.conf file.
- Edit <install_dir>\SPOC\conf\modules\spoc.conf and set the new IP address in the property:
- smartQ-server-ip= %NEW_IP_ADDRESS%
If Dispatcher Paragon Management Server's IP address was changed too, then also configure the parameter serverIP1=%NEW_MS_IP% at the end of the file. If there are more Dispatcher Paragon Management Servers, then change all serverIP properties on all servers accordingly.
Replace the IP address in the TerminalServer.exe.config file
- Edit <install_dir>\SPOC\terminalserver\TerminalServer.exe.config and set the new IP address in the properties:
- <add key="networkAddress" value="%NEW_IP_ADDRESS%" />
- <add key="imsProxyAddress" value="%NEW_IP_ADDRESS%:7348" />
imsProxyAddress also contains the port number. If the port was changed too, replace the default 7348 port accordingly.
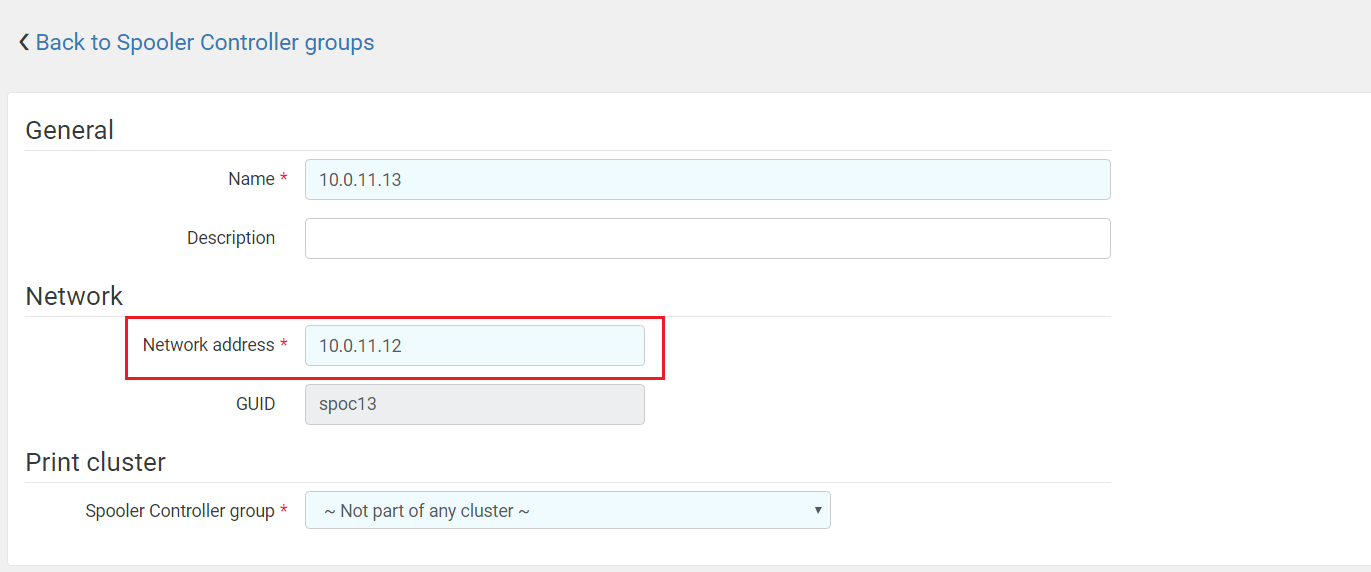
Open the web interface of Dispatcher Paragon Management Server (use the first node in the case of the Management Server cluster) and go to Devices => Spooler Controller groups
- Locate the SPOC where the IP address was changed, and click Edit.
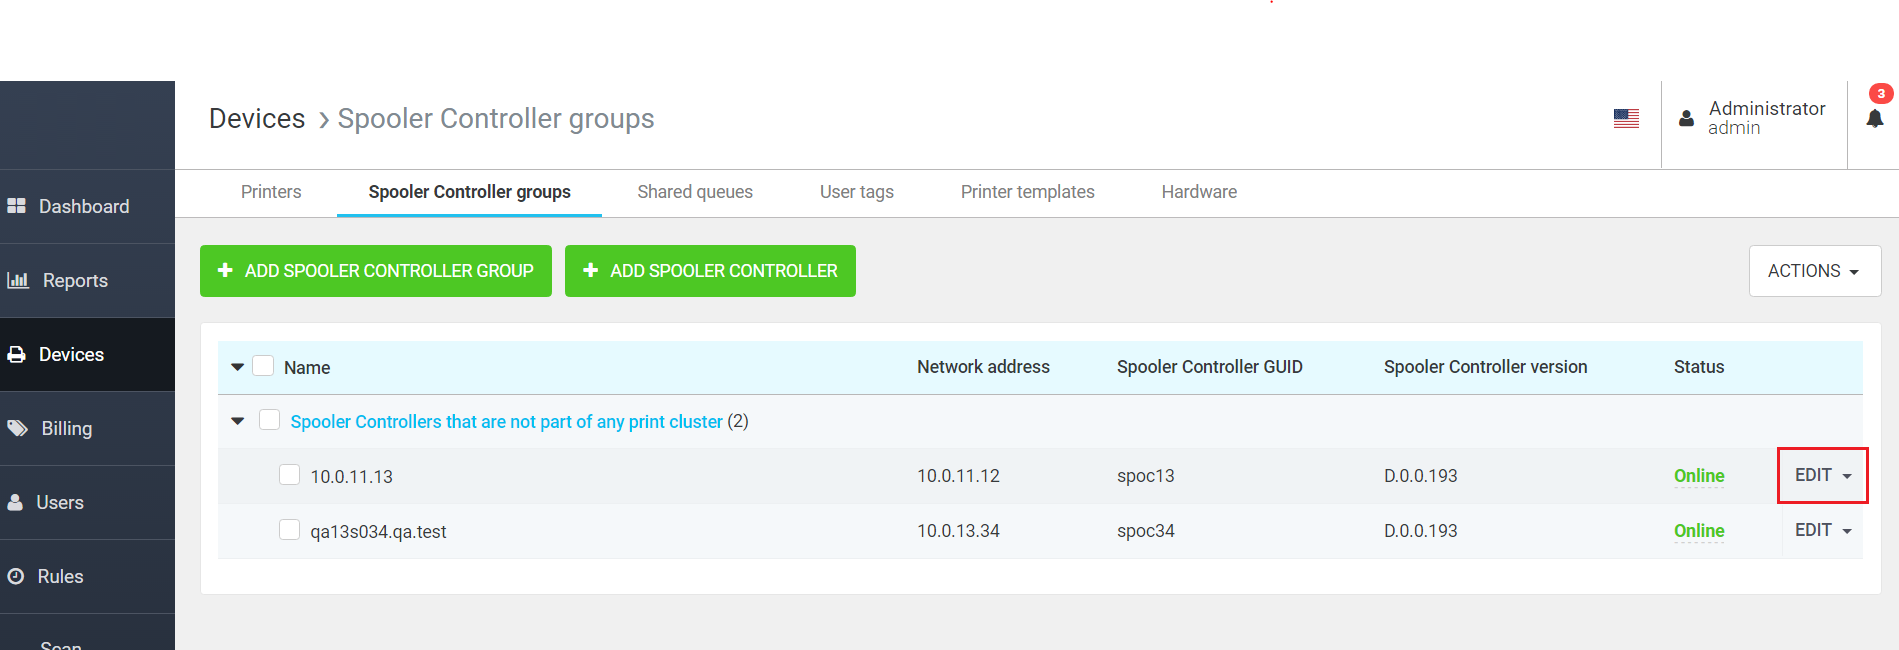
Replace the Network address with the new one.
Delete the SPOC's cache by deleting the folder <install_dir>\SPOC\SpoolCache
If Dispatcher Paragon Payment System is installed on this server, update paymentSystemApiUrl
- In the Dispatcher Paragon Print Management interface, system update paymentSystemApiUrl to reflect the new IP address.
Update FlexiSpooler
- No update required.
Update Workflow Processing System
- No update required.
Update Mobile Print
- In <install_dir>\MPS\Service\conf, update the file controlerIPs.config. Update the single entry to reflect the new IP address.
Apply changes
It is recommended to reboot the server with the changed configuration (make sure the new IP address is active).
If a reboot is not possible, you will need to follow these steps:
- Stop all Dispatcher Paragon services if they are not stopped already.
You can use the following PowerShell script to perform the task:
Get-Service*YSoft* |Stop-Service
Start Dispatcher Paragon services with the Automatic startup type again.
Do not start the Dispatcher Paragon Spooler Controller Group Service service. It will be started by the Dispatcher Paragon Spooler Controller service when the proper configuration is ready.
You can use the following PowerShell script to perform the task:
Get-Service*YSoft* |Where-Object{$_.Name-ne'YSoftSQ-SPOCGS'} |Start-Service
Verify the SPOC has the correct functionality according to the article Dispatcher Paragon SPOC Health Check
Reconfiguration of the Site Servers – Connection to the New IP Address of the Management Server
- Edit <install_dir>\SPOC\conf\modules\spoc.conf
- Replace the IP address of the affected Management Server in the corresponding serverIP parameter at the end of the file.
- If you had a two-nodes Management Server cluster before you started with the procedure, also replace ServerGUID for the replaced server with the new IP address. The correct ServerGUID can be obtained from the web interface of the node with the new IP address.
Also reconfigure the Dispatcher Paragon Infrastructure Service Proxy service settings.
Dispatcher Paragon Infrastructure Service Proxy service is available only on Site Servers. If you are changing settings on a Management Server, skip this section and continue with step 3.
stop the Dispatcher Paragon Infrastructure Service Proxy service.
- move to the <install_dir>\SPOC\ims\ directory and edit the application.properties file.
- replace the old IP address of Management Server with the new IP address of the server and save changes.
- start the Dispatcher Paragon Infrastructure Service Proxy service again.
- Reinitialize the connection from the Site Servers to the Management Servers.
- If you did not recover the database from the backup in the previous steps, then a restart of the Spooler Controller service is sufficient for re-initialization:
- Standalone Site Servers:
- restart the Spooler Controller service
- Site Servers that are part of a SPOC group:
- perform a restart of the Spooler Controller service only on one server at a time – once the service has restarted and the SPOC comes online on the Management Server (Dispatcher Paragon management interface > Devices > Spooler Controller Groups), wait approximately 5-10 minutes, and then you can proceed with restarting the Spooler Controller service on the next server in the same SPOC group.
- Standalone Site Servers:
- If you did recover the database from the backup in previous steps, a cache deletion and a restart of all services is necessary:
- Standalone Site Servers:
- Site Servers that are part of a SPOC group
- see How and When to Restart a Standalone SPOC and SPOC Group, section "How to safely restart SPOC group with cache deletion"
- Standalone Site Servers:
- If you did not recover the database from the backup in the previous steps, then a restart of the Spooler Controller service is sufficient for re-initialization:
Other Required Configuration
If a SPOC on the server with the new IP address is part of a Spooler controller group, then the SPOC cache must be deleted and the whole SPOC group must be restarted.
The other members of the SPOC group must learn about the new IP address. They learn it only during their startup.
Follow the section "How to safely restart SPOC group with cache deletion" from the chapter How and When to Restart a Standalone SPOC and SPOC Group
- If a SPOC on the server with the new IP address is part of a Spooler Controller group and the parameter enableEtcd is enabled, then the etcd cluster in Terminal Server must also be reconfigured.
Reinstall all Embedded and hardware Terminals that connect to the server with the new IP address.
Reconfigure all print drivers (or Dispatcher Paragon FlexiSpoolers) to connect to the new IP address.
All print drivers and Dispatcher Paragon FlexiSpoolers that were connected to the SPOC server with the old IP address must be re-connected to the new IP address
Troubleshooting
If a Terminal Server, Mobile Print, and FlexiSpooler are not running correctly, check the logs. You might see that they are either still listening on the old IP (Terminal Server) or trying to connect to the old IP address (FlexiSpooler and Mobile Print). To fix this, do the following only on the affected server:
- Stop all SPOC services, FlexiSpooler, TerminalServer service and Mobile Print services.
- Delete the SPOC's cache by deleting the folder <install_dir>\SPOC\SpoolCache
- Edit <install_dir>\FSP\Service/locations.config. Replace the old IP address with the new IP address.
- after the first startup, it should update to 127.0.0.1
- Edit <install_dir>\MPS\Service\conf\controllerIPs.config. Replace the old IP address with the new IP address.
- Start the SPOC services and then the remaining services. Everything should work normally now.