Dropbox In

Use the Dropbox In collection node to connect to a Dropbox account, including a Dropbox Business Standard or Advanced account, to monitor the configured folder for new files at regular intervals. Dropbox is a file hosting service that offers Cloud storage and file synchronization.
Dropbox In supports Personal, Team, and Shared folders, and can filter files by name, size, or modified date prior to passing documents along a workflow for processing and routing.
Note: To use the Dropbox In node, you must first set up your Dropbox Account in Dispatcher Phoenix Web.
Configuring the Dropbox In Node
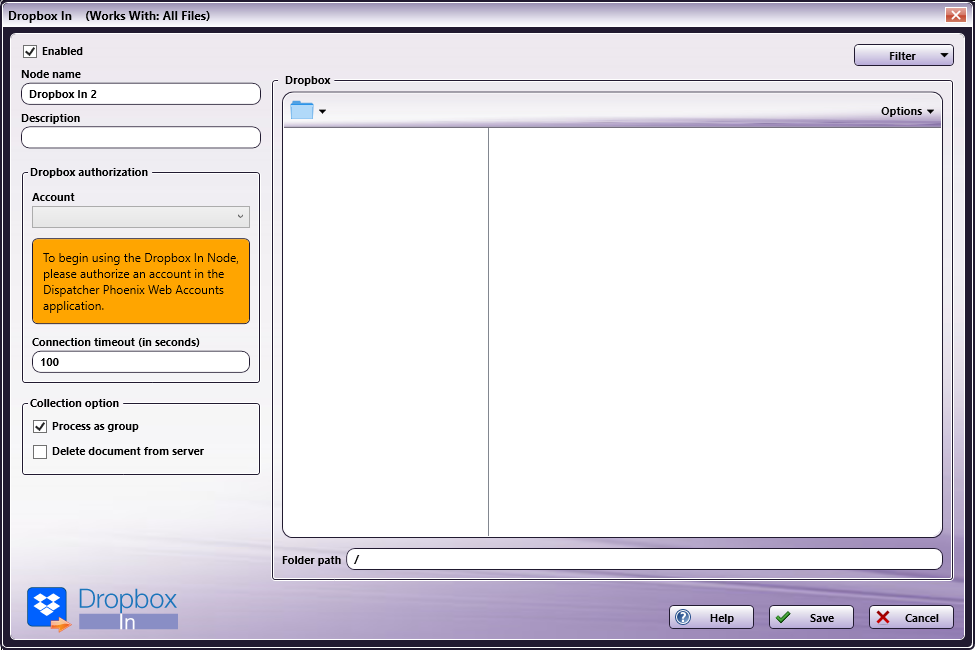
To open the Dropbox In node, drag-drop a Dropbox In node from the Collect panel to the workflow and then double-click on it. The Dropbox In Properties window opens.

The following options are available:
-
Enabled - To enable this node in the current workflow, check the box at this field. If you leave the box blank, the workflow ignores the node and documents pass through as if the node was not present. Note that a disabled node does not check for logic or error conditions.
-
Node Name - The node name defaults into this field. This name appears in the workflow under the node icon. Use this field to specify a meaningful name for the node that indicates its use in the workflow.
-
Node Description - Enter an optional description for this node. A description can help you remember the purpose of the node in the workflow or distinguish nodes from each other. If the description is long, you can hover the mouse over the field to read its entire contents.
Buttons
- Help - To access Dispatcher Phoenix Online Help, click this button.
- Save - To preserve your node definition and exit the window, click this button.
- Cancel - To exit the window without saving any changes, click this button.
Dropbox Authorization
In the Dropbox authorization area:
- Account - Click the drop-down to see a list of authorized Dropbox accounts. Select the Dropbox account containing the documents or folders you want the workflow to collect. If no accounts appear, be sure the Dispatcher Phoenix Web logon user account used to authorize the Dropbox account is the same as the current Dispatcher Phoenix logon user account. The logon user accounts must match for any Dropbox accounts to appear in Dispatcher Phoenix.
- Connection timeout (in seconds) - Specify the number of seconds you want to elapse before a network connection times out (i.e., for login or logout operations).
Collection Option
In the Collection option section, you have the following options:
- Process as group - To process files from the selected folder as a group, check this box. To process files individually, leave the box blank.
- Delete document from server - To delete files from the Dropbox server on collection, check this box. Otherwise, leave the box blank.
Dropbox Explorer Area
Once the connection with Dropbox has been established, the Dropbox Explorer area populates with the folder structure of the selected Dropbox account. Select the Dropbox folder you want Dispatcher Phoenix to monitor.
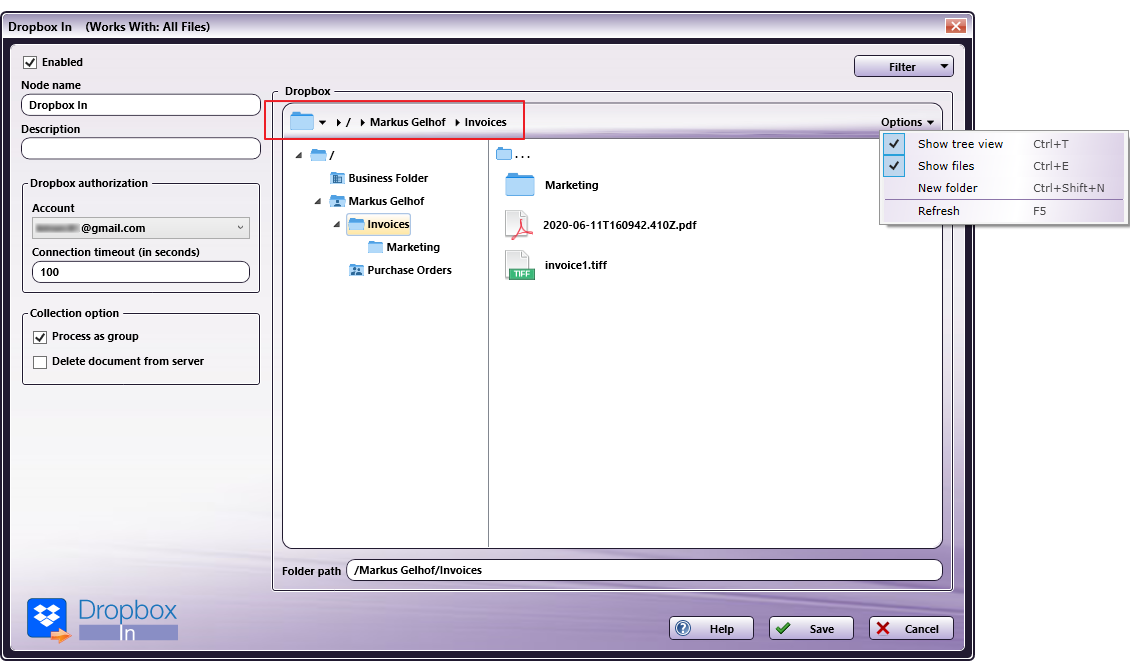
The current folder path displays next to the folder icon at the top of the Dropbox area  . You can use this folder path to navigate back through your folder structure. The Folder Path field below the explorer area also displays the current path.
In the following illustration, the folder path displays and the Dropbox area shows the Tree view as well as the files in the selected folder, as per the current selections from the Options menu:

Folder Types
The following folder types may appear in the Dropbox Explorer area, depending on your Dropbox version:
![]() Dropbox Personal folder
Dropbox Personal folder
![]() Dropbox Team folder
Dropbox Team folder
![]() Dropbox Team Member folder
Dropbox Team Member folder
![]() Dropbox Shared folder
Dropbox Shared folder
Filter
Use the Filter drop-down in the upper-right corner of the Properties window to specify the conditions, if any, for collecting files. For any filters you apply, the workflow collects only files from Dropbox that meet the specified criteria.
-
Filter file name - To filter files based on a specified file name, check the box. The following fields activate:
-
File name - Enter the complete file name, including the file extension, that you want Dispatcher Phoenix to collect from Dropbox. You can use wildcards in the name you enter. For example entering *.jpg will return all files with an extension of “jpg”.
- Regular expression - To dynamically filter files using a pattern describing a certain amount of text, check this box. Note that if you select this option, the Match case checkbox inactivates.
- Match case - If your search is case-sensitive, check this box. Note that if you select this option, the Regular Expression checkbox inactivates.
-
-
Filter file size - To filter files based on file size, check this box. If you check the box at this field, the following options activate:
-
File size - Filter files relative to the size specified below. Select one of the following conditions:
- Greater than
- Less than
- Equal
- Greater than or equal
- Less than or equal
- in between (specify the low and high values in the range)
Specify a file size, and then specify the file size measurement unit. You have the following options:
- Bytes
- KB
- MB
- GB
- TB
-
-
Filter file modified date - To filter files based on the modified date, check the box at this field. The following fields activate:
-
File Date - Filter files relative to the date specified below. Select one of the following conditions:
-
newer than
-
older than
-
in between (specify the low and high dates in the range)
-
equal
-
Select a date - To specify a date, click the Calendar and select a date. You can also enter a date directly using one of the following formats:
- MM/DD/YY
- MM/DD/YYYY
- MONTH DD, YYYY
-
-
-
Filter criteria
- Match any one filter criteria - If any one of the filter criteria is met, the file will be collected from Dropbox.
- Match all filter criteria - If all of the filter criteria are met, the file will be collected from Dropbox. If any one of the filter criteria is not met, the file will not be collected from Dropbox.
Options
Use the Options button in the upper-right corner of the Dropbox Explorer area to configure the folder view or add a new folder. The drop-down menu includes a shortcut key for each option:
- Show tree view - To view the complete folder structure in a tree view, select this option.
- Show files - To show files within the folder browsing view, select this option.
- New folder - To create a new folder in the currently selected folder path on Dropbox, select this option. The Create New Folder window appears.
- Refresh - To refresh the folder browser view (Show tree view or Show files) in Dropbox Explorer, select this option.
Folder Path
The Folder path field below the folder tree auto-populates when you make your folder selection in the Dropbox Explorer. If you do not want to navigate the file explorer, you can manually enter the folder path in this field.
Metadata
The following metadata is created in the Dropbox In node:
| Metadata Value | Description |
|---|---|
| {dropboxin:count} | The number of collected files per folder. |
| {dropboxin:date} | The last modified date of the file collected from Dropbox. |
| {dropboxin:file} | The name of the file collected. |
| {dropboxin:filesize} | The size of the file collected. |
| {dropboxin:folder} | The name of the folder the file was collected from. |
| {dropboxin:fullpath} | The full file path including file name. |

