Advanced Bates Stamp
The Advanced Bates Stamp node is used to create one or more customized stamps and position them on scanned image files. These stamps can include combinations of a wide variety of naming components, such as sequential numbers, text, dates, time, metadata, etc.
With this node, stamps can be positioned vertically or horizontally anywhere on the page. Other advanced positioning and formatting options are also available, including shrinking the size of the page content and shifting the content’s position on the page to make room for stamps. This node works with TIFF, JPG, GIF, PNG, BMP, and PDF files.
Note: This node does not support AES (Advanced Encryption Standard) PDFs.
To open the Advanced Bates Stamp Node properties window, add a process node for Advanced Bates Stamp onto the Workflow Builder canvas and double-click on it. The Advanced Bates Stamp node window resembles the following illustration:
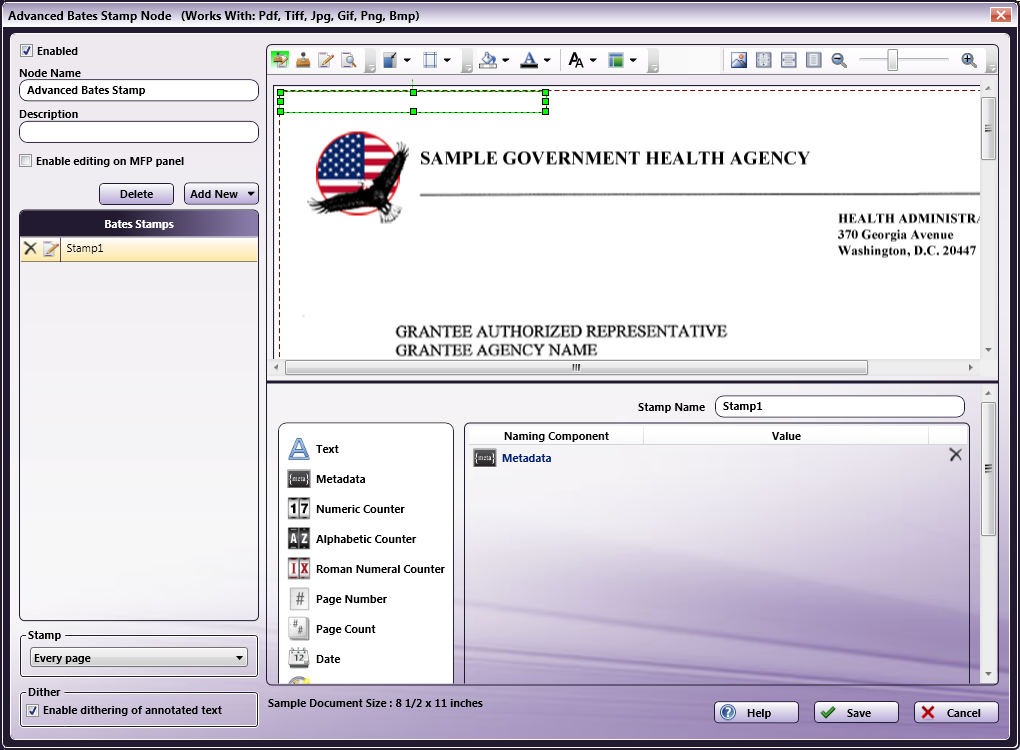
Click for more information on…
Bates Stamp List
In the Bates Stamp list area, you can do the following:
-
Arrange the order of the stamps. When working with multiple stamps that overlap each other on the page, you can reorder the stamps by dragging-and-dropping the stamps listed.
-
Edit the name of a stamp. To change the name of a stamp, either click on the Edit icon next to the stamp’s name, or double-click on the name.
-
Delete the defined stamp. To delete the stamp, either click on the Delete icon next to the stamp’s name, or select the stamp in the Bates Stamp List and press the Delete key on your keyboard. A confirmation message will appear to ensure that you really want to delete the stamp.

Edit Stamps Area
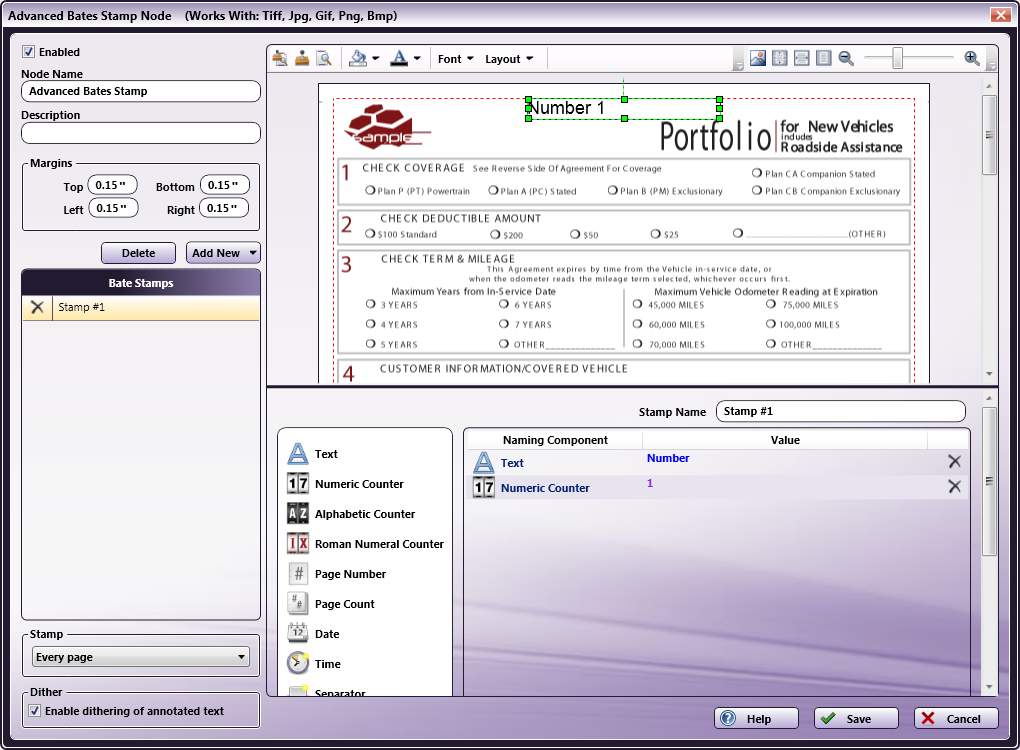
The Edit Stamps area displays a sample document on which the defined Bates Stamps appear. On the sample document, margins are displayed in red and the page borders are displayed in blue. The icons on the top left hand side of the tool bar can be used to customize stamps. You can also do the following:
-
Resize a stamp’s bounding box by selecting the bounding box in the Edit Stamps area and dragging the appropriate handle(s) until the box is the desired size.
-
Rotate a stamp’s bounding box by clicking on the bounding box in the Edit Stamps area and dragging the rotation handle at the top of the box until the box is correctly angled.
-
Move a stamp’s bounding box to a new location by clicking on the bounding box in the Edit Stamps area and then dragging the box to its desired position. You can also select the stamp and then use the arrow keys on your keyboard to move it.
-
Select multiple stamps in a rectangular area by dragging a marquee over the stamps that you want to select using your mouse. Note that you must start this from either outside the sample document, or, if page content has been shifted, from any white space. Alternatively, you can select multiple stamps by selecting one stamp, holding down the Shift key, and selecting another.
-
To select all the objects in a rectangular area, use the Selection tool to drag a marquee over the objects you want to select.
-
Delete a stamp by selecting it and pressing the Delete key on the keyboard. A confirmation message will appear.
-
Shift the sample content by selecting the sample document and dragging it with your mouse (or using the arrow keys on your keyboard to move it).
-
View your stamps on a different sample document by clicking on the Upload icon on the tool bar.
Note: All images in this area are displayed at 96 dpi. If a high-resolution image is uploaded as a sample document, you might notice a difference in the quality of the document when previewing it in this window.
Components Area

The Components area is the section of the Advanced Bates Stamp node window where Bates Stamps can be designed. All of the naming components that can be used to create a Bates Stamp are listed as icons on the left-hand side. Drag and drop these icons from the list to the main part of the Components area to design your stamp. In addition, this area includes a Stamp Name field in which you can edit the name of the stamp if necessary.
A results area, provided at the bottom of the window, allows you to see the components that you’ve already defined, as in the following illustration:

Note: Roman Numeral counters are displayed as numeric values in the results area; however, converted Roman Numeral numbers are displayed correctly in the Edit Stamps area.
Tool Bar
The tool bar at the top of the window allows you to configure the appearance of the stamp, the appearance of the page content, and the properties of the actual window itself. Any changes you make to the view of the window will remain in effect the next time you open this window.
When using the drop-down palettes on the tool bar, pressing the Enter key or clicking anywhere outside of the palette will save those changes in the Edit Stamps area. Note that some of the options available on the tool bar are designed to be used with the Edit Stamps area; the Components area will not be affected by them.
| Icons | Descriptions |
|---|---|
 |
Show both Edit Stamps and Component areas. This is the default setting. |
| Show the Component area only in the window. | |
| Show the Edit Stamps area only in the window. | |
| Show Print Preview. Clicking on this icon displays what the final output of the stamp on the sample document would look like. The content of the stamp cannot be formatted in Print Preview. | |
| Shrink and shift the content of the page. | |
| Specify margins for the page. | |
| Choose a color for the background of the stamp by choosing from the drop-down color palette or entering a hexadecimal color code in the blank field provided. In addition, you can use the Opacity sliding bar to specify the transparency of the background color. | |
| Choose a color for the text by choosing on the drop-down color palette or entering a hexadecimal color code in the blank field provided. In addition, you can use the Opacity sliding bar to modify the transparency of the text. A fully transparent (invisible) text color is useful if you want to add an incremental counter without modifying the actual document. | |
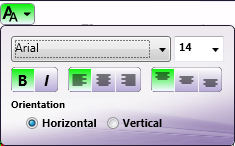 |
Customize the text by choosing various options on the Font drop-down palette. You can choose font type, font size, whether the font is bold and/or italicized, the justification of the text within the bounding box (left, center, right), and the alignment of the text within the bounding box (top center, center, bottom center). In addition, you can specify the orientation of the text by choosing either the Horizontal or Vertical radio button. |
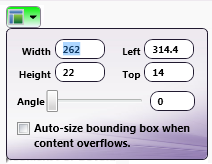 |
Customize the layout of the bounding box by specifying various options on the Layout drop-down palette. Note that these changes can also be made manually by resizing or moving the bounding box in the Edit Stamps area. To specify the width of the bounding box, enter the correct value in pixels in the Width field. To specify the height of the bounding box, enter the correct value in pixels in the Height field. To specify the placement of the bounding box from the left and/or top of the document, enter the correct values in pixels in the Left and/or Top fields. To specify the angle for the bounding box, use the Angle sliding bar or enter the correct value in the blank field provided. |
| Find and upload another sample document to use in the Edit Stamps area. | |
| Revert the preview sample document to its original size. Keyboard shortcut: Ctrl + 1. | |
| Stretch the sample document to fit the width of the Edit Stamps area. Keyboard shortcut: Ctrl + 2. | |
| Display the sample document so that it fits completely in the Edit Stamps area. Keyboard shortcut: Ctrl + 3. | |
| Zoom in and out (using either the magnifying glass icons or the sliding bar). Keyboard shortcuts: Press Ctrl and + to zoom in. Press Ctrl and - to zoom out. |
Note: If a stamp containing either a colored background or colored text is applied to a black and white document, the color will be converted to black and white on output (even though the color will appear in the Edit Stamps area).
Using the Advanced Bates Stamp Window
On the Advanced Bates Stamp window, you can fully customize and organize Bates Stamps. When setting up the Bates Stamps, make sure you do the following:
-
Check the Enabled box so that the node will be processed when the workflow runs. When unchecked, this process will be ignored. Documents will pass through as if the node was not present (i.e., continue along the default or ‘positive’ path). Note that a disabled node will not be checked for logic or error conditions.
-
In the Node Name field, enter a meaningful name for the Advanced Bates Stamp node.
-
In the Description field, enter a description for the Advanced Bates Stamp node. This field is not required; however, it can be useful for clarification. If the description is long, you can hover the mouse over the field to read its entire contents.
-
Check the Enable editing on MFP panel box to allow users to customize the Bates Stamp at the MFP Panel.
-
When you are done defining or modifying the Bates Stamp, select the Save button to keep your Bates Stamp definition. You can also select the Help button to access online help and select the Cancel button to exit the window without saving any changes.
Uploading Sample Documents
Clicking on the Upload icon on the tool bar allows you to upload your own sample document to use as a preview when configuring your stamps. The application provides you with five sample documents of various sizes (A4, Letter-Portrait, Letter-Landscape, Legal, and Tabloid) that you can also use. If you are uploading your own document, note that PDF files cannot be used as sample documents.
When you click on the Upload icon, a “Select an image” browse folder will appear from which you can choose the appropriately sized document.
Note: The sample document must be at least ½ inch by ½ inch.
Shrinking and Shifting the Content of the Page
To make sure that the Bates Stamps do not obscure important information on the page, it may be necessary to shrink and shift the contents of the page when customizing your stamps.
-
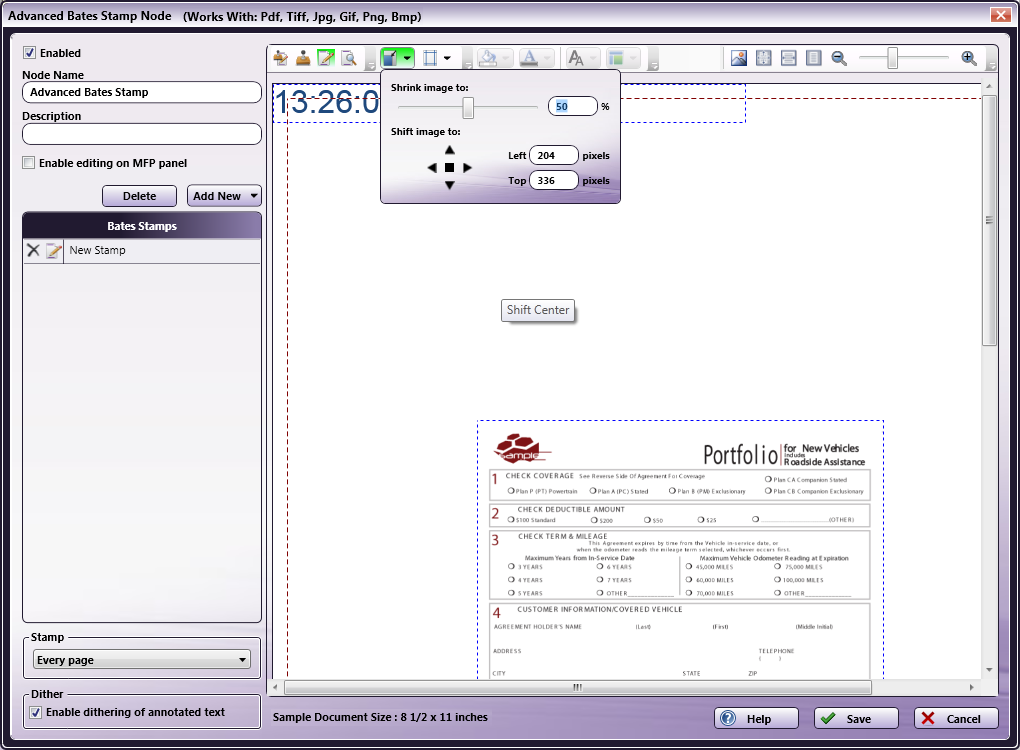
To shrink the content of the page, click on the Shrink icon on the tool bar; then use the Shrink image to sliding bar to specify the percentage that the contents should shrink to. You can also enter a percentage amount in the field to the right of the sliding bar.
-
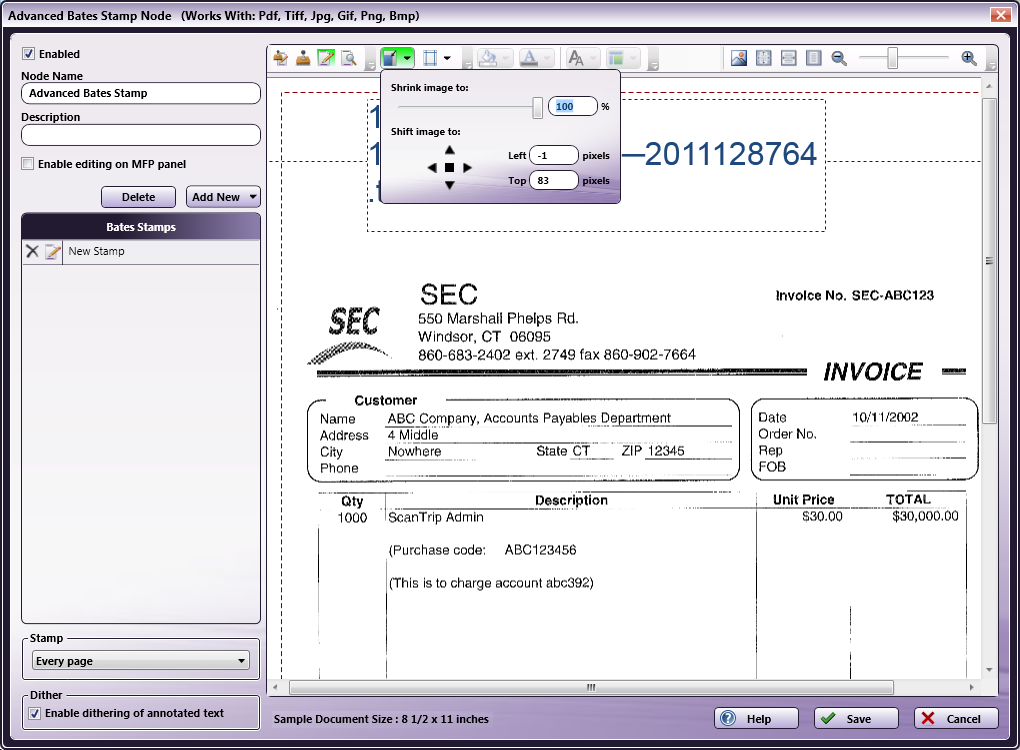
To shift the position of the content, use the Shift image to: up, down, left, right arrows, enter an amount (in pixels) for the positions in the Left and Top fields, or select the content and drag using the mouse. To center the content on the page, click the square in the center. Shifting positions will clip the content when it goes outside the page boundaries.
-
Clicking once on an arrow moves the content one pixel at a time. However, if you’d like to move faster, you can click on an arrow and hold the left mouse button down. To increase your speed again, hold the left mouse button down after clicking on an arrow and press either the Ctrl or Shift key. The fastest way to shift content is to click on an arrow, keep the left mouse button down, and press both the Ctrl + Shift keys.
In the following illustration, the page content is at 50% of its original size:
In the next illustration, the content was shifted down:
Specifying Margins
If you want to change the margins of your documents, click on the Margins icon from the tool bar to enter new values in the Top, Bottom, Left, Right fields. Note that you can position a stamp beyond the limits of these page margins if desired. Margins are provided for reference, and also are useful when determining the layout of your stamp(s). The unit of measurement for margins is inches.
Note: If an incoming document contains pages that are smaller than the specified page margins on this node, the file will go out on error if those pages are selected to be stamped.
Creating a Bates Stamp
To create a Bates Stamp, do the following:
-
Select the Add New button. A drop-down palette will appear, on which you should do the following:
-
Enter a name for the stamp in the Stamp Name field. Note that this name can also be edited in the Components area.
-
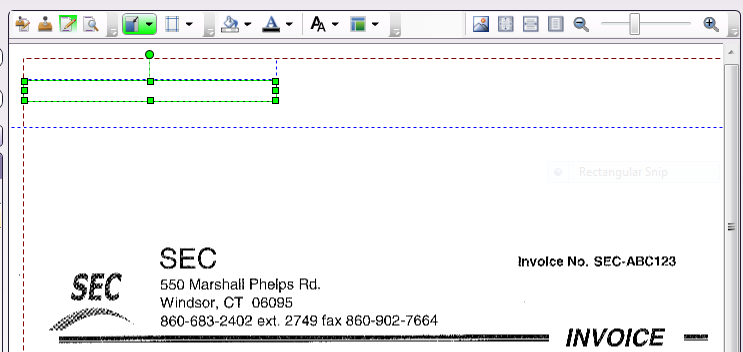
Select a starting position for the stamp by choosing one of the nine predefined locations under Default anchor position. Note that, once defined, you can modify this location by either using the Layout drop-down palette or moving the bounding box with your mouse in the Edit Stamps area.
If you choose to position a new stamp in the same location as an existing stamp, the new stamp will be placed immediately below the existing one, as in the following illustration:
-
Select either the Horizontal or Vertical radio button to specify the orientation of the stamp’s bounding box.
-
Select the Save button when you are done. The newly created Bates Stamp will now appear in the Bates Stamp List.
-
Select the Cancel button to exit the drop-down palette without saving any changes.
-
-
Specify the pages that should be stamped using the Stamp pull-down menu. Options include:
-
Every page - Stamp on every page.
-
Every even page - Stamp on even pages.
-
Every odd page - Stamp on odd pages.
-
First page - Stamp on the first page only.
-
Last page - Stamp on the last page only.
-
Define your own page range - Define a custom page range for the stamps. Once you choose this option, an empty field will appear to enter the page range. Do the following:
-
Specify a page range by using commas and/or dash signs counting from the start of the document. For example, enter 1, 2, 5-7 to stamp pages 1, 2, 5, 6, and 7.
-
Specify a specific stamping sequence within a range of pages by using parentheses. For example, enter 1-10(3) to stamp every third page from pages 1 to 10.
-
Specify the last page by using ‘end.’ For example, enter end(-5) - end to stamp pages 15-20 of a 20-page document.
-
Other examples include:
To stamp pages 1, 2, 5,6,7, and 19 of a 20-page document, enter: 1,2,5-7, end(-1).
To stamp pages 10-15 of a 20-page document, enter: 10-end(-5).
To stamp every other page from pages 10-15 of a 20-page document, enter: 10-end(-5)(2).
To stamp pages 15-20 of a 25-page document, enter: end(-10)-end(-5).
To stamp pages 10-20 of a 20-page document, enter: end(-10)-end.
Note: If you specify a page range that does not correspond to the number of pages in the incoming document (e.g., stamping pages 10-20 for a 3 page document), then the file will go out on error.
-
-
Check the Enable dithering of annotated text box to improve the clarity of text, if necessary.
-
Customize the stamp by dragging and dropping naming components into the Components main area. They can be reordered at any time by dragging-and-dropping them in this area.
Bates Stamp Metadata
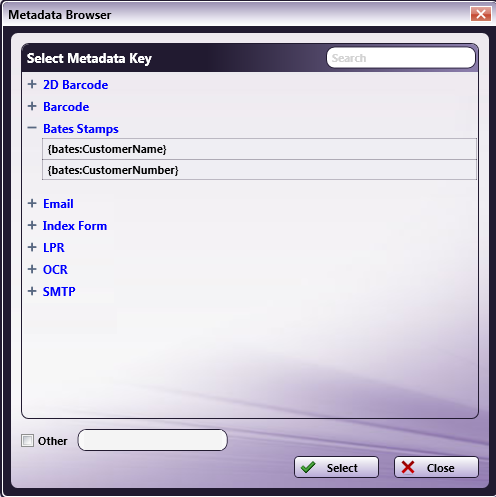
Once a Bates stamp has been created, it can be referenced by other nodes in the workflow. The syntax for Bates stamp referencing is {bates: name of stamp [<page>]}. You can also use the Metadata Browser window to choose the Bates stamp variable, as in the following illustration:
Positioning and Sizing Bates Stamps for Different Document Sizes
When configuring Bates Stamps, keep in mind that the margins and font size that you specified will remain the same, regardless of the dimensions of the images that the stamps will be applied to; however, the size and position of the stamp’s bounding box, which indicates the maximum area in which text can be placed, will be adjusted proportionally to the document size.
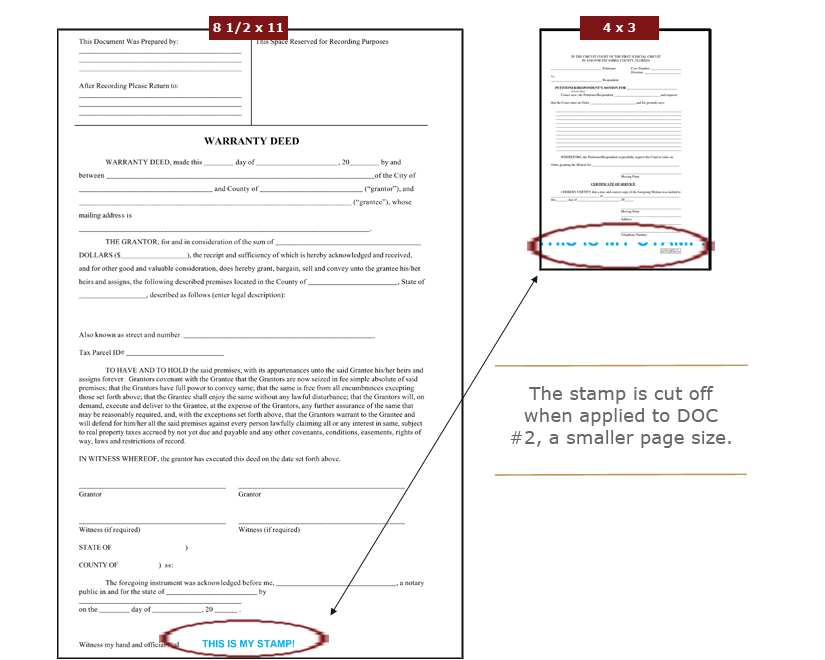
For example, a stamp with a font size of 12 pt that is centered in a 180 x 50 pixel bounding box and positioned at the top left of an 8 ½ x 14 sample document will appear much differently when applied to a 5 x 7 document. The stamp’s bounding box will shrink and the text will no longer fit completely inside the box.
In the following illustration, a stamp’s bounding box was originally configured for an 8 ½ x 11 document; once a much smaller document was processed through the Advanced Bates Stamp node, much of the stamp was lost:
To support a wide range of different-sized documents, try the following:
-
Layout your stamps on a variety of documents by uploading other sample documents into the Edit Stamps area. The sample image should be representative of the documents which are to be processed.
-
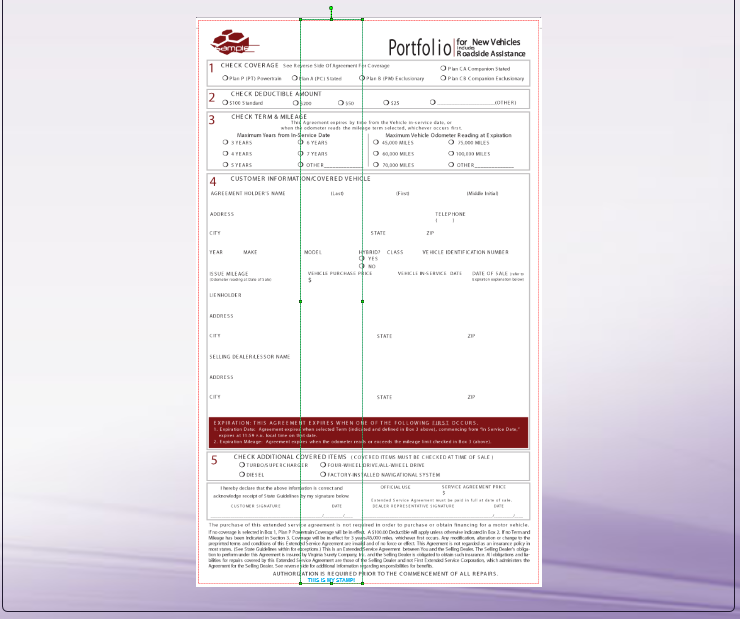
Adjust the layout of the bounding box’s height and width to ensure that the bounding box remains large enough to display all of the stamp’s text. If you want to make sure that your text always remains visible, stretch the height of the bounding box to fit the document’s height, as in the following illustration:
Note: With this adjustment, adding color to the background of your stamp may be problematic since color would be applied to the entire area of the bounding box as it is resized proportionally.
Specifying Absolute Measurements for the Bounding Box
To ensure that the bounding box is the same size and position regardless of the document being processed, check the Use Absolute Measurements box on the Layout palette. Once this option is enabled, the stamp will not scale but will remain the same. Note that this may mean that if a document with a different layout orientation or size is processed, the stamp may be positioned off the page.
Bates Stamp Naming Components
Text
![]() Adds text to your stamp. Once you drag-and-drop the Text icon to the
Naming Components main area, double-click on the icon to enter the appropriate
text.
Adds text to your stamp. Once you drag-and-drop the Text icon to the
Naming Components main area, double-click on the icon to enter the appropriate
text.
Example: Type Document ID to include the static text of “Document ID” to the stamp.
Metadata
![]() Adds metadata to your stamp from other nodes in the workflow as
well as system-defined metadata such as date, file, and system variables. Once you
drag-and-drop the Metadata icon to the Naming Components main area, double-click
on the icon and then click on the Select Metadata Key button to access the
Metadata Browser, as in the following illustration:
Adds metadata to your stamp from other nodes in the workflow as
well as system-defined metadata such as date, file, and system variables. Once you
drag-and-drop the Metadata icon to the Naming Components main area, double-click
on the icon and then click on the Select Metadata Key button to access the
Metadata Browser, as in the following illustration:

Note: The Metadata Browser will only list system-defined variables and metadata from other nodes that are used in the workflow. If you have not added any other nodes, only system-defined variables (Date, File, System, User) will appear.
On the Metadata Browser, you can do the following:
-
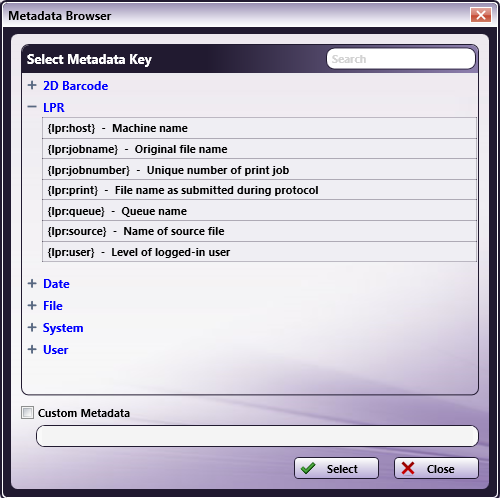
Expand the list by clicking on the + sign next to the metadata that you are interested in. For example, if you are interested in LPR metadata, click on the + sign next to LPR and the following expandable list will appear:
-
Collapse the list by clicking on the - sign next to the appropriate metadata.
-
Choose metadata to add to the stamp by clicking on the metadata and clicking on the Select button. At this point, the Metadata Browser will close and you will return to the Advanced Bates Stamp window.
-
Specify a page-level and/or occurrence number for the metadata reference by clicking on the Custom Metadata check box, dragging-dropping the metadata from the list above into the empty field provided; then entering the correct syntax.
-
Search for metadata by entering the appropriate text string in the empty Search field on the right-hand side of the window.
Example: Add a stamp on every page with LPR metadata that lists the queue name of the LPR In node.
Numeric Counter
 Adds a numeric, sequential counter to your stamp. Once you
drag-and-drop the Numeric Counter icon to the Naming Components main area,
double-click on the icon to customize the counter. On the fields that appear, do
the following:
-
Enter an appropriate starting value for the counter in the Start Value field. The Start Value supports up to 255 characters.
-
Enter an appropriate ending value for the counter in the End Value field. The End Value supports up to 255 characters.
-
Choose either Increment By or Decrement By in the drop-down list to specify whether or not the counter should increase or decrease as the node is processed; in the empty field next to it, enter the appropriate value by which the counter should increment or decrement.
Notes:
-
If you select the Increment By option, the End Value must be greater than the Start Value.
-
If you select the Decrement By option, the Start Value must be greater than the End Value.
-
-
To pad the counter with leading characters, such as spaces, zeros, or other symbols, choose from the Leading Character drop-down list.
-
To disable the counter from cycling, uncheck the Cycles box. This means that the counter will not cycle automatically, and the file(s) will go out on error once the specified End Value has been reached. At this point, the counter’s status changes to EXPIRED.
-
To change how the counter will be determined, you can check the Document Level Counter box. With this option enabled, the counter will continue with each successive document rather than each page. This is helpful if you want to generate the same unique ID for each page within a document. For example, with this option enabled, all pages in doc1 would be stamped with 0001, all pages in doc2 would be stamped with 0002, etc.
The default behavior applies a sequential counter to each page of each document. -
The Counter Status area displays the current status of the counter, with its current value. To reset a counter to its original “Start Value” after the workflow has run at least once, select the Reset link. To lock a counter so that it cannot be reset, select the Lock link.
Example: Specify a stamp on every page with a numeric counter that starts with 1 and ends with 999999999 in increments of 10. Enable the Leading Zeros option. The third page of the processed file would have a stamp of 000000021.
Alphabetic Counter
 Adds an alphabetic counter to your stamp. Once you
drag-and-drop the Alphabetic Counter icon to the Naming Components main area,
double-click on the icon to customize the counter. On the fields that appear, do
the following:
-
Enter an appropriate starting value for the counter in the Start Value field. The Start Value supports up to 255 characters.
-
Enter an appropriate ending value for the counter in the End Value field. The End Value supports up to 255 characters.
-
Choose either Increment By or Decrement By in the drop-down list to specify whether or not the counter should increase or decrease as the node is processed; in the empty field next to it, enter the appropriate value by which the counter should increment or decrement. This field only accepts numeric input. For example, specifying an increment of 2 with a “Start Value” of A and an End Value of “Z” would produce “A, C, E, G, I…, etc.”
Notes:
-
If you select the Increment By option, the End Value must be greater than the Start Value.
-
If you select the Decrement By option, the Start Value must be greater than the End Value.
-
-
To pad the counter with leading characters, such as spaces, zeros, or other symbols, choose from the Leading Character drop-down list.
-
To disable the counter from cycling, uncheck the Cycles box. This means that the counter will not cycle automatically, and the file(s) will go out on error once the specified End Value has been reached. At this point, the counter’s status changes to EXPIRED.
-
To specify that the alphabetic counter be displayed in lowercase, check the Lowercase Output box.
-
To change how the counter will be determined, you can check the Document Level Counter box. With this option enabled, the counter will continue with each successive document rather than each page. This is helpful if you want to generate the same unique ID for each page within a document. For example, with this option enabled, all pages in doc1 would be stamped with 0001, all pages in doc2 would be stamped with 0002, etc.
The default behavior applies a sequential counter to each page of each document. -
The Counter Status area displays the current status of the counter, with its current value. To reset a counter to its original “Start Value” after the workflow has run at least once, select the Reset link. To lock a counter so that it cannot be reset, select the Lock link. With both the Reset and Lock actions, you will receive confirmation messages.
Example: Specify a stamp on every page with an alphabetic counter that starts with A and ends with ZZZZZ at increments of 5. Disable the Lowercase Output option and enable the Leading Spaces option. The third page of the processed file would have a stamp of K (with four spaces before it).
Roman Numeral Counter
 Adds a Roman Numeral counter to your stamp. Once you
drag-and-drop the Roman Numeral Counter icon to the Naming Components main area,
double-click on the icon to customize the counter. On the fields that appear, do
the following:
-
Enter an appropriate starting value for the counter in the Start Value field. The Start Value supports up to 255 characters.
-
Enter an appropriate ending value for the counter in the End Value field. The End Value supports up to 255 characters.
-
Choose either Increment By or Decrement By in the drop-down list provided to specify whether or not the counter should increase or decrease as the node is processed; in the empty field next to it, enter the appropriate value by which the counter should increment or decrement.
Notes:
-
If you select the Increment By option, the End Value must be greater than the Start Value.
-
If you select the Decrement By option, the Start Value must be greater than the End Value.
-
-
To pad the counter with leading characters, such as spaces, zeros, or other symbols, choose from the Leading Character drop-down list.
-
To disable the counter from cycling, uncheck the Cycles box. This means that the counter will not cycle automatically, and the file(s) will go out on error once the specified End Value has been reached. At this point, the counter’s status changes to EXPIRED.
-
To specify that the Roman numeral counter be displayed in lowercase, check the Lowercase Output box.
-
To change how the counter will be determined, you can check the Document Level Counter box. With this option enabled, the counter will continue with each successive document rather than each page. This is helpful if you want to generate the same unique ID for each page within a document. For example, with this option enabled, all pages in doc1 would be stamped with 0001, all pages in doc2 would be stamped with 0002, etc.
The default behavior applies a sequential counter to each page of each document. -
The Counter Status area displays the current status of the counter, with its current value. To reset a counter to its original “Start Value” after the workflow has run at least once, select the Reset link. To lock a counter so that it cannot be reset, select the Lock link. With both the Reset and Lock actions, you will receive confirmation messages.
Example: Specify a stamp on every page with a Roman Numeral counter that starts with 20 and ends with 1 in decrements of 1. Disable the Lowercase Output option disabled. The third page of the processed file would have a stamp of XVIII.
Page Number
 Adds the page number to the stamp by dragging-and-dropping the
Page Number icon to the Naming Components main area.
Example: For the fifth page in the processed file, the resulting stamp would be 5.
Page Count
 Adds the total number of pages to the stamp by
dragging-and-dropping the Page Count icon to the Naming Components main area.
Example: To add a stamp with the number of pages within the total number of pages in the processed file, use a combination of the Page Number, Text, and Page Count naming components. For the first page in a three page document, the resulting stamp would be 1 of 3.
Date
 Adds the current date to the stamp. Once you drag-and-drop the Date
icon to the Naming Components main area, double-click on the icon to customize
the date’s appearance.
-
To add the month, date, and year, select the MM-dd-yyyy radio button.
-
To add the month only, select the MM radio button.
-
To add the day only, select the dd radio button.
-
To add the year only, select the yyyy radio button.
Example: If the MM option was selected and the file was processed in May, the resulting stamp would be 05.
Time
 Adds the current time to the stamp. Once you drag-and-drop the Time
icon to the Naming Components main area, double-click on the icon to customize
the time’s appearance.
-
To add the hour, minutes, and seconds, select the HH:mm:ss radio button.
-
To add the hour only, select the HH radio button.
-
To add the minutes only, select the mm radio button.
-
To add the seconds only, select the ss radio button.
Example: If the HH option was selected and the file was processed at 2:00 p.m., the resulting stamp would be 14.
Separators
 Adds a wide variety of separators to the stamp. Once you
drag-and-drop the Separator icon to the Naming Components main area,
double-click on the icon to choose the appropriate separator from the drop-down
list. Options include:
Space
Colon (:)
Semi-colon (;)
Comma (,)
Tilde (~)
Exclamation point (!)
At sign (@)
Pound sign (#)
Dollar sign ($)
Percent sign (%)
Period (.)
Plus sign (+)
Dash (-)
Underscore (_)
Example: Use a dash between a file name and a counter. The resulting stamp might be: doc1-00010.
File Name
 Adds the name of the file to the stamp by dragging-and-dropping
the File Name icon to the Naming Components main area.
Example: If the file name of the processed document was recordxxxx, the resulting stamp would be recordxxxx.
File Extension
 Adds the extension of the file to the stamp by
dragging-and-dropping the File Extension icon to the Naming Components main
area.
Example: If the file extension of the processed document was JPG, the resulting stamp would include the words JPG.
File Size
 Adds the size of the file (in bytes) to the stamp by
dragging-and-dropping the File Size icon to the Naming Components main area.
Example: If the file size of the input file was 278KB, the resulting stamp would be 283926.
Image Width
 Adds the width of the image to the stamp by
dragging-and-dropping the Image Width icon to the Naming Components main area.
Example: If the width of the image file was 960 pixels in width, the resulting stamp would be 960.
Image Height
 Adds the height of the image to the stamp by
dragging-and-dropping the Image Height icon to the Naming Components main area.
Example: If the height of the image file was 300 pixels in height, the resulting stamp would be 300.
Editing a Bates Stamp
Once a Bates Stamp has been created, you can select the Bates Stamp to edit by doing one of the following:
-
Select it from the Bates Stamp List,
or
-
Select the Bates Stamp’s bounding box on the Edit Stamps area.

