Devices Tool
Dispatcher Phoenix Web’s Devices Tool enables administrators to organize their devices as well as discover devices, create groups, and register and/or edit/delete multiple devices or groups without needing to stop a running workflow. To get started, do the following:
- Log into Dispatcher Phoenix Web with your Windows user credentials.
- Select the Devices tile.
The following illustration shows the Devices tile:
![]()
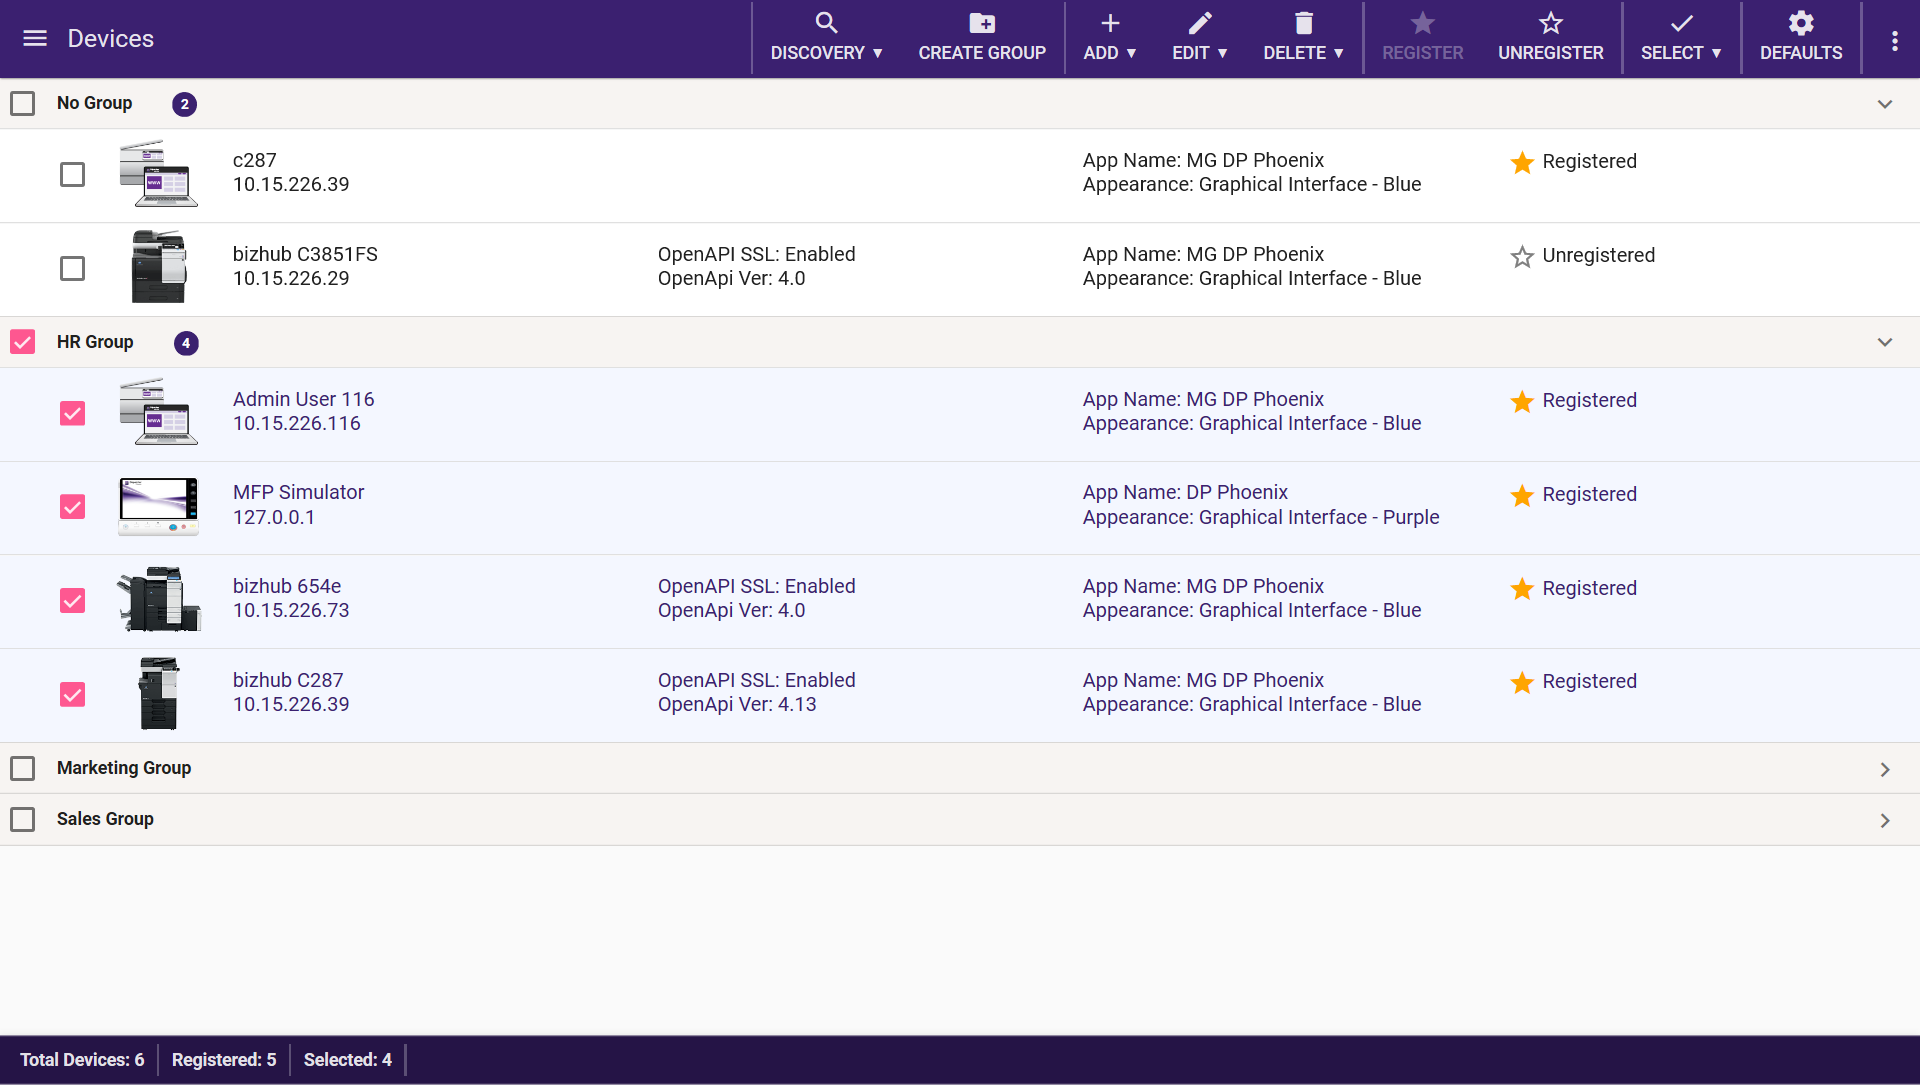
The Devices Home Page lists any devices that have already been discovered, added, or registered. Any discovered devices not associated with a group appear in the No Group category. See the following illustration for an example:

Using the Toolbar
The Devices toolbar provides a variety of buttons that allow you to manage and register your devices. Many toolbar buttons access drop-down menus listing the options they provide as well as keyboard shortcuts to the options. The toolbar appears in the following illustration:

The following buttons appear on the Devices toolbar:
-
DISCOVERY - Automatically detect and find all devices on the network.
-
CREATE GROUP - Define groups of devices for easy visualization and management, including groups for the Web Capture node.
-
ADD - Manually add an individual device for registration. The Import Devices option accesses the Bulk Import Devices Tool.
-
EDIT - Modify app settings and authentication options for selected devices. This button also provides options to change the group to which a device is assigned as well as rename groups.
-
DELETE - Remove selected devices from the list and/or remove selected devices from groups.
-
REGISTER - Register Dispatcher Phoenix on selected devices.
-
UNREGISTER - Unregister Dispatcher Phoenix from selected devices.
-
SELECT - Select registered devices, unregistered devices, select all devices, clear any selections, or expand/collapse all groups.
-
DEFAULTS - Define default app settings and authentication options for all newly added devices.
-
VERTICAL ELLIPSIS - Access Help topics, view keyboard shortcuts, and more.
Discovering Devices
Devices must be “discovered” before they can be registered and/or added to device groups. If a device appears on the Devices home page, it has already been discovered.
To discover devices on the network, select the Discovery button. The following options appear:
On this window, you can do the following:
-
Select specific devices to add to the Devices page for registration.
-
Check the Select All Devices box to select all devices listed.
-
Select Save to add all selected devices to the default No Group.
-
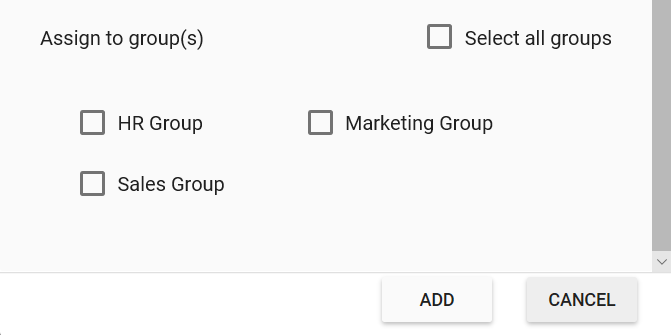
Assign to group(s)-You can add the selected device(s) to a specific group(s).
Search Devices for Konica Minolta Embedded Terminal
To search for Konica Minolta devices only, select the Search Devices for Konica Minolta Embedded Terminal option. The Device Discovery window appears, listing all devices discovered on the network. See the following illustration for an example:
Search Devices for Web Capture Terminal
Use this option to discover devices for use in the Web Capture node.
To search for all devices on your network, including Konica Minolta devices, select the Search Devices for Web Capture Terminal option. The Device Discovery window appears, listing all devices that have been found on the network. See the following illustration for an example:
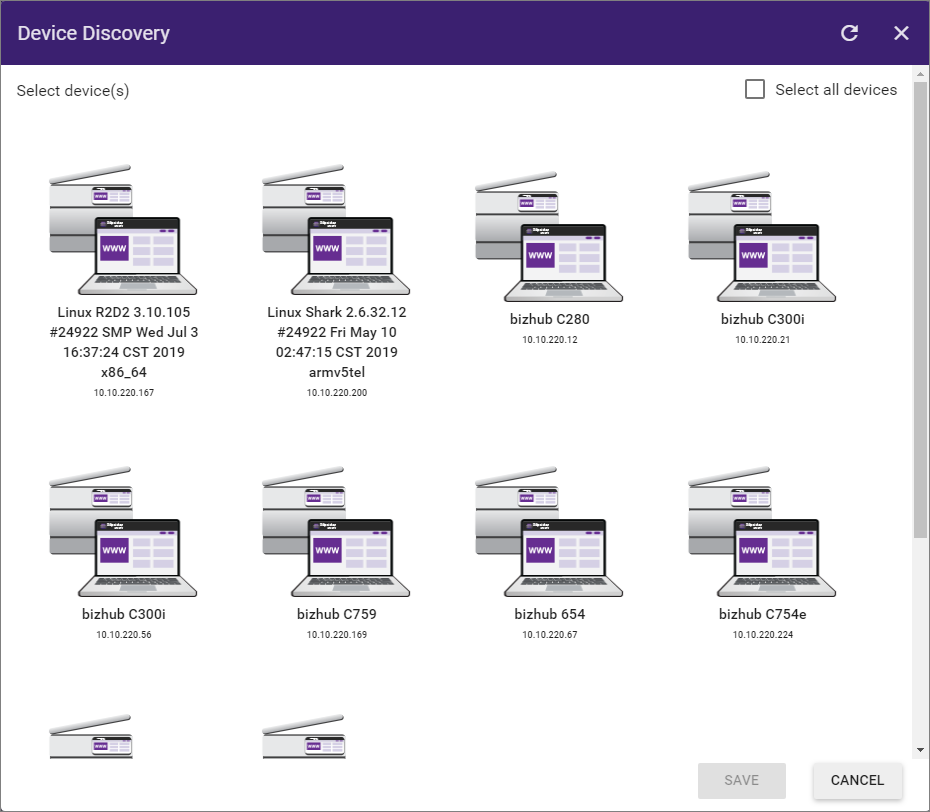
Note: We recommend using Konica Minolta MFPs within your workflows to access their full functionality, including default scan settings.
Creating Groups
Administrators can create groups to easily organize and manage their devices into various groups, a critical requirement for enterprise-level businesses with hundreds of devices. Registered devices in device groups can be added to any workflow, including a workflow running in Dispatcher Phoenix without having to stop the workflow. Note that unlike the MFP Panel node, you can configure the Web Capture node only with device groups and not with individual devices.
To create a group, do the following:
-
Select the Create Group button. The Create Group window appears:
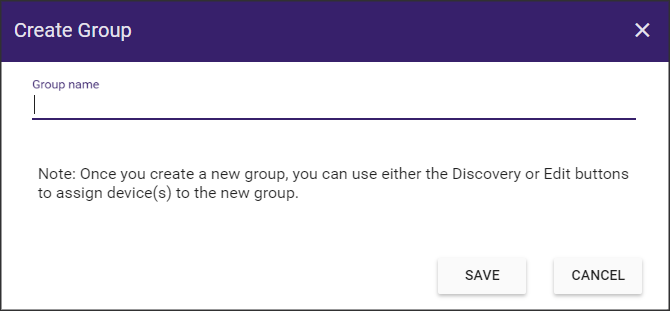
-
Enter a name for the group and then select Save.
-
The newly created group appears in the Devices page. The number of devices included in the group displays next to the group name.
-
To add new devices to a group, do one of the following:
-
Option 1: Using the Device Discovery tool:
-
Select the Discovery button on the toolbar.
-
On the Device Discovery window, select the desired devices.
-
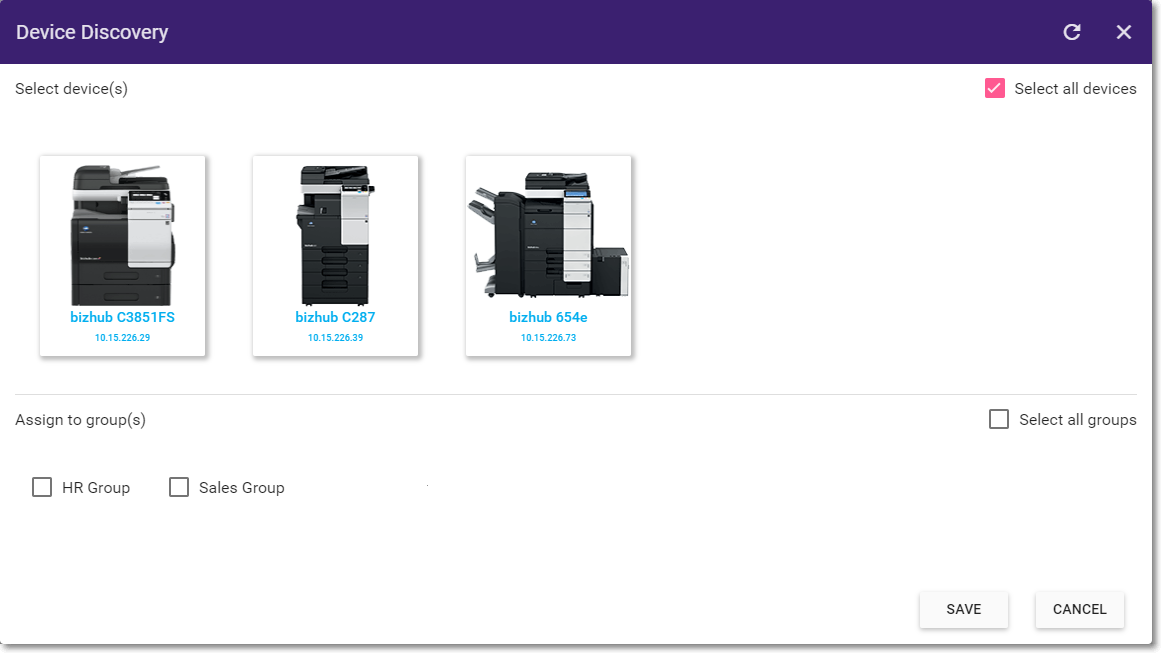
Select the group to which you want to add the devices, as shown in the illustration below:
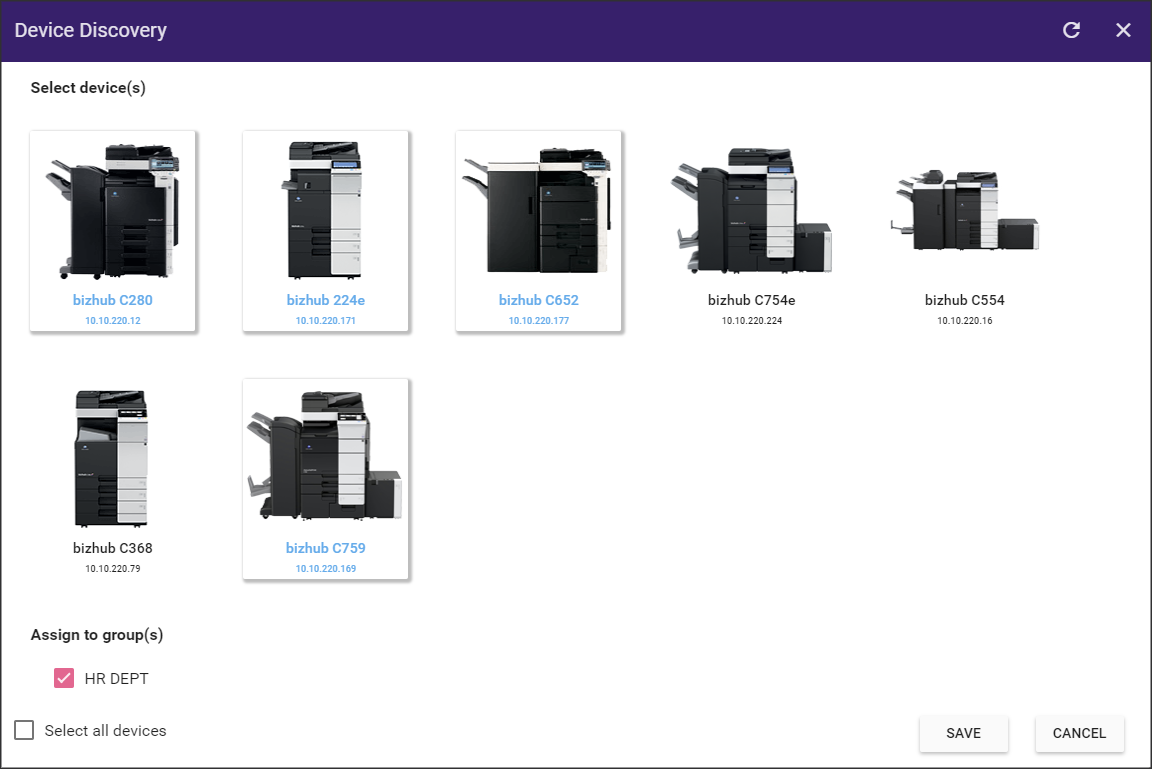
-
Select the Save button to add the devices to the specified group(s) and return to the Devices home page, as shown in the illustration below:
-
-
Option 2: Using the Devices home page:
- Select the devices you want to add to a group.
- Select the Edit button on the toolbar.
- On the menu that appears, select either the Edit Device or Change device groups option.
Note: Double-clicking on a single device’s name opens the Edit Device window directly.
-
Adding Devices Manually
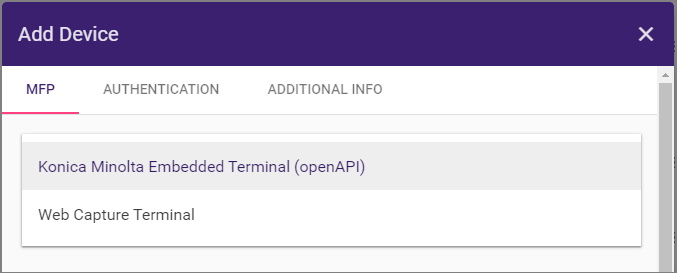
If the Discovery option cannot find a particular device, you can manually add a single device if you know the IP address of the device. Click on the ADD button and select Add Device from the drop-down, as shown in the following illustration:

Note: To add multiple Konica Minolta MFPs at one time to Dispatcher Phoenix, select Import Devices to access the Bulk Import Wizard. This option is available for Konica Minolta MFPs only.
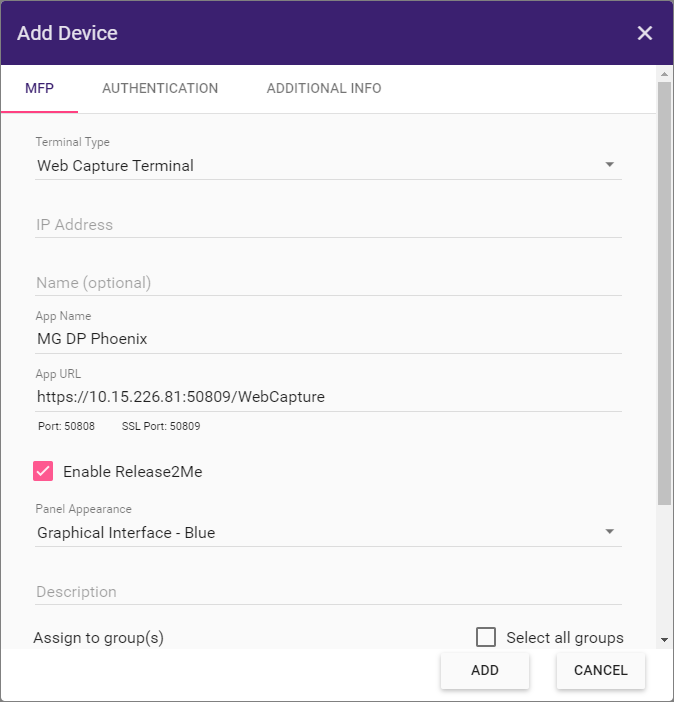
The Add Device window appears, displaying the MFP tab as in the following illustration:
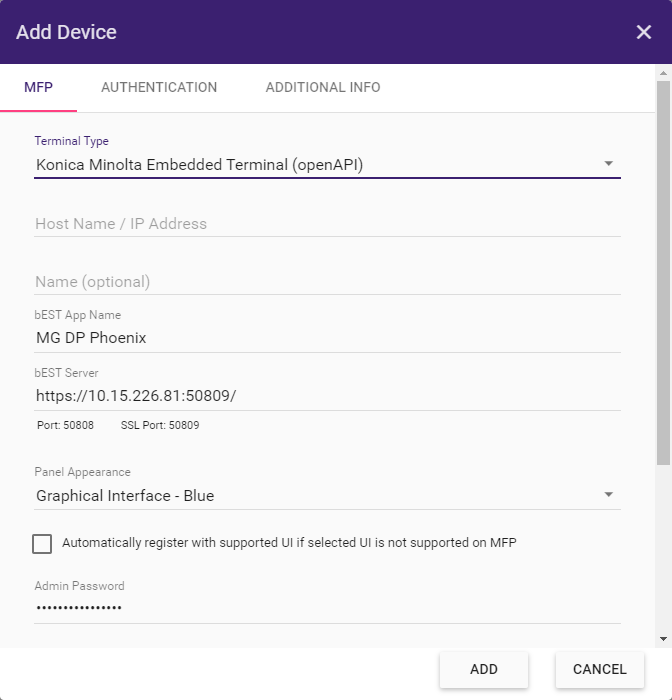
On the Add Device window, you must first specify a terminal type. The fields that display on the MFP tab vary depending on the terminal type you select. The following instructions describe the options available for both terminal types:
- Konica Minolta Embedded Terminal (OpenAPI) - For use with Konica Minolta devices, using the MFP Panel node.
- Web Capture Terminal - For use with any device, using the Web Capture node.
Adding a Konica Minolta Embedded Terminal (OpenAPI)
To register the application on a Konica Minolta MFP, do the following:
MFP Tab
The following options appear on the MFP tab.
-
Terminal Type - Click on the dropdown list, then select the Konica Minolta Embedded Terminal (OpenAPI) option.
-
Host Name/IP Address - Enter the Hostname or IP address of the device you want to add.
-
Name - Enter an identifying name for the device. This name is used on the Devices page.
-
bEST App Name - Enter a unique name for your application as you want it to appear on the MFP panel.
-
bEST Server - The URL for the bEST server displays by default. You can customize this URL for advanced networking situations (e.g., bEST Server is registered on a different server, bEST Server is embedded into IIS, Dispatcher Phoenix is installed on a VM with NAT networking, etc.) The bEST service, installed locally on your PC with Dispatcher Phoenix, allows you to use this technology with compatible MFP devices on your network. By entering your IP address or Server Host Name, you let the MFP know where to find the service. This is especially important in the case of multiple IP addresses on a computer to tell the MFP which one to use.
-
Panel Appearance - Choose a panel appearance for the application. Click on the field to display a drop-down list of options. If the MFP does not have the i-Option installed or licensed, choose the Native Interface option.
Automatically register with supported UI if selected UI is not supported on MFP - Check this box to avoid registration failure over panel appearance options. With this option enabled, registration will not fail if the Graphical Interface option is specified for a device that does not have the i-Option installed. Instead, the application will be automatically registered in the Native User Interface mode.
-
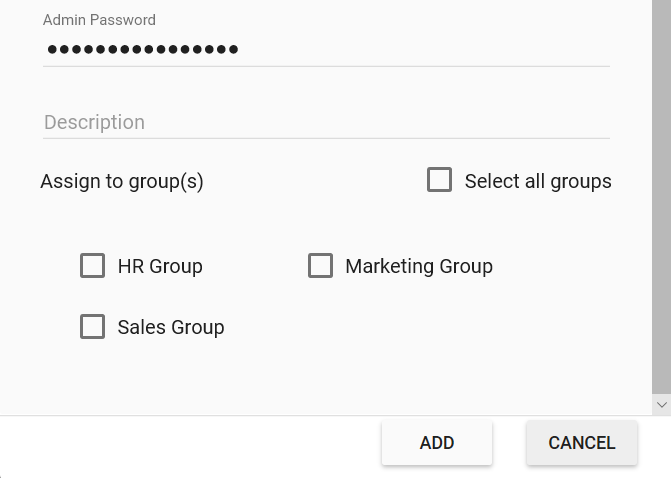
Admin Password - Enter the password required for administrative access to the MFP.
-
Description - Enter a description of the MFP. A description is not required, but a unique description can make the MFP easier to identify when multiple devices are registered under your name.
-
Assign to group(s) - To assign the device to one or more groups, check the box next to the each group name. To assign to all groups, check the Select All Groups box.
-
ADD - Add the device and exit the window.
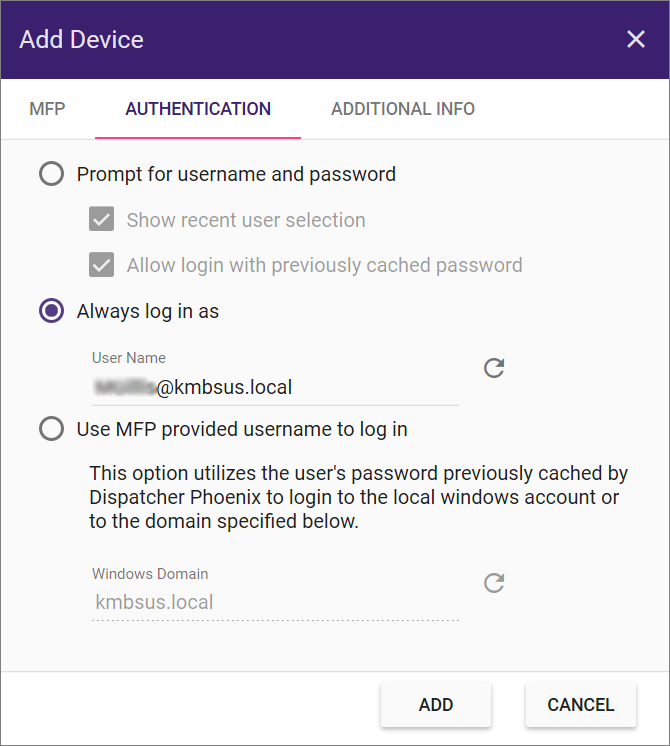
Authentication Tab
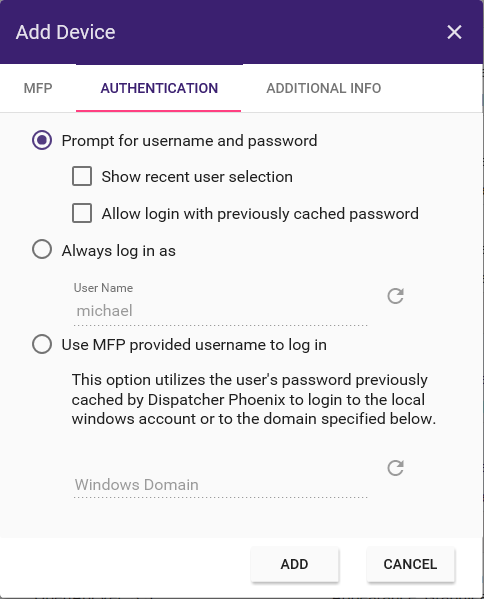
Use this tab to edit the authentication settings. The following illustration provides an example:
Using the Authentication tab, you can do the following:
-
Prompt for username and password - Enter a username and password on the MFP control panel screen before accessing workflows. With this setting, the following options are also available:
- Show recent user selection - With this option enabled, users can choose a username from a drop-down list of the last 1000 users who have previously logged in, eliminating the need to manually enter this information. However, users must still provide a password. - Allow login with previously cached password - With this option enabled, users can log in without entering a password. The previously entered password is used. Note that if the password is changed and the MFP is restarted, the cached password will be lost.
Note: If you change your Windows username and password, you will not be able to access your workflows.
-
Always log in as - Select this option to minimize set up and quickly access your workflows on the control panel. This option eliminates the need to manually enter a username and password on the device control panel screen. With this option enabled, only the actively running workflows for that particular user will display, and jobs scanned from the panel will run as that user. This field is pre-populated with the username and domain name (if available) of the current user. Use the Refresh button next to the field to reset the value to the currently logged-in user.
-
Use MFP provided username to log in - Select this option for single sign-on (SSO). This option is designed to work with MFP or Active Directory authentication. Optimal for shared workflows, this option will automatically log into Dispatcher Phoenix as the user logged into the MFP. With this option enabled, the Windows Domain field can be pre-populated with the current domain of the logged-in system, or the field can be left blank.
Note: First-time use requires manually entering a password.
-
ADD - Click to save your settings and exit the window.
-
CANCEL - Click to exit the window without saving changes.
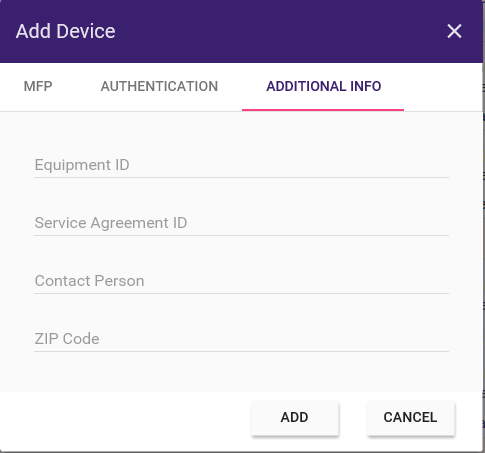
Additional Info Tab
Select this tab to edit the additional device information including Equipment ID, Service Agreement ID, Contact Person and Zip Code.
OpenAPI Version Number
When you finish adding a new device, you return to the Devices Home page where the OpenApi version displays for each Konica Minolta device (but not for Web Capture Terminal devices). Note that if the Native Interface is selected for a device, the OpenApi version number defaults to 3.5.

Adding a Web Capture Terminal
To add devices for submitting or scanning documents via a web browser, do the following:
Note: Unlike the MFP Panel node, you can configure Web Capture nodes only with device groups and not with individual devices. To add a device to a group, see the Assign to Groups step below.
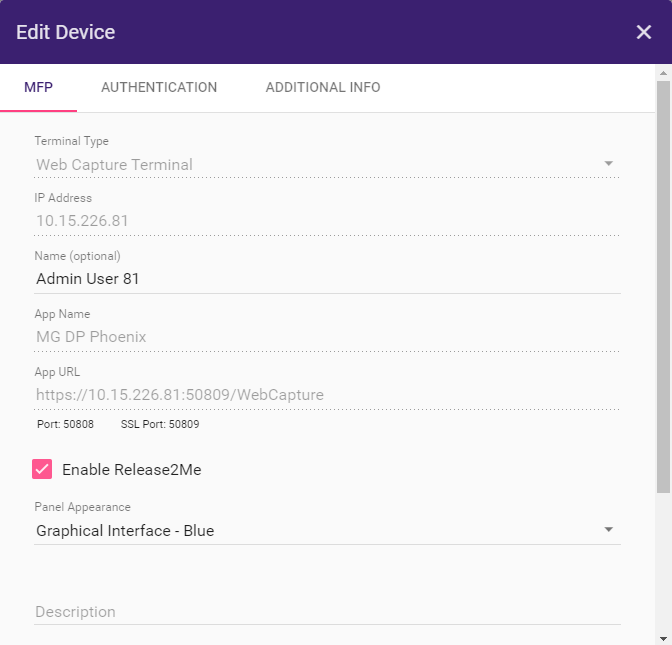
MFP Tab
The following options appear on the MFP tab:
-
Terminal Type - Click on the dropdown list, then select the Web Capture Terminal option.
-
IP Address - Enter the IP address of the device you want to add.
-
Name - Enter an identifying name for the device. This name is used on the Devices page.
-
App Name - Enter a unique name for your Web Capture application.
-
App URL - The URL for the Web Capture server displays by default. Paste this URL into your web browser to display all running workflows assigned this user in Dispatcher Phoenix.
-
Enable Release2Me - To access your Release2Me print queue from the web browser, check this box.
-
Panel Appearance - Choose a panel appearance for the Web Capture application. Click on the field to display a drop-down list of options.
-
Description - To enter a description of the device, click on this field. A description is not required, but a unique description can make the device easier to identify when multiple devices are registered under your name.
-
Assign to group(s) - To assign the device to one or more groups, check the box next to the each group name. To assign to all groups, check the Select All Groups box. Note that Web Capture must be assigned to a group to run in a Dispatcher Phoenix workflow.
-
ADD - Add the device and exit the window.
Authentication Tab
Use this tab to edit the authentication settings. See the following example:
Using the Authentication tab, you can do the following:
-
Prompt for username and password - Enter a username and password on the device control panel screen before accessing workflow(s). With this setting, the following options are also available:
- Show recent user selection - With this option enabled, users can choose a username from a drop-down list of the last 1000 users who have previously logged in, eliminating the need to manually enter this information. However, users must still provide a password. - Allow login with previously cached password - With this option enabled, users can log in without entering a password. The previously entered password is used. Note that if the password is changed and the MFP is restarted, the cached password will be lost.
Note: If you change your Windows username and password, you will not be able to access your workflows.
-
Always log in as - Select this option to minimize set up and quickly access your workflows on the control panel. This option eliminates the need to manually enter a username and password on the device control panel screen. With this option enabled, only the actively running workflows for that particular user display, and jobs scanned from the panel will run as that user. This field is pre-populated with the username and domain name (if available) of the current user. Use the Refresh button next to the field to reset the value to the currently logged-in user.
-
ADD - Click to save your settings and exit the window.
-
CANCEL - Click to exit the window without saving changes.
Additional Info Tab
Select this tab to edit the additional device information including Equipment ID, Service Agreement ID, Contact Person and Zip Code.
- ADD - Click to save your settings and exit the window.
Editing App Settings
On Dispatcher Phoenix Web’s Devices page, you can edit specific app settings for a single device. Some settings are not editable, depending on the terminal type and the registration status of the device.
To edit the app settings for a device, do the following:
-
On the Devices page, click on the box next to the device you want to edit. You can also double-click on the device.
-
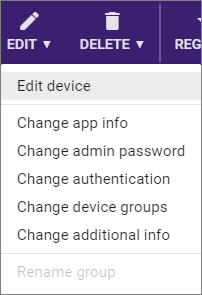
If you don’t double-click, select the Edit button on the top tool bar. A drop-down list appears offering the following edit options:
-
Select Edit device to access the Edit Device window.
The following describes the available options for a Konica Minolta Embedded Terminal (OpenAPI) terminal type. A description of the options for the Web Capture terminal type appears farther below in this topic.
Editing Konica Minolta Embedded Terminal (OpenAPI) Terminal Types
Not all device settings in the Edit Device window are editable. To determine if a field is editable, click on it.
- Terminal Type - This field displays the terminal type of the device selected for editing. The terminal type determines the options that appear on this window. You cannot edit this field. To change the terminal type of a device, you must delete the device and re-create it.
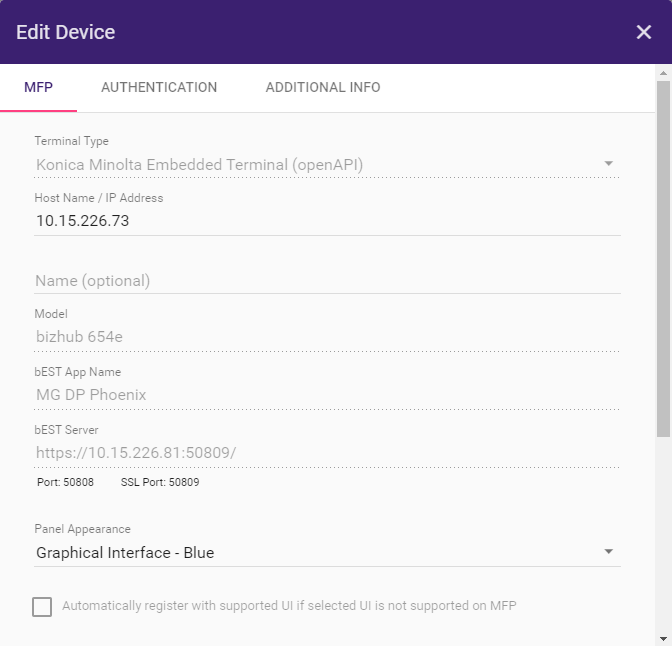
For information on the fields on this screen, see Adding a Konica Minolta Embedded Terminal (OpenAPI).
Note: The Edit Device window contains the following field that does not appear on the Add Devices window:
- Model - The device model name appears. This field is not editable.
Editing Web Capture Terminal Types
This section describes editing the Web Capture terminal type. Not all device settings in the Edit Device window are editable. To determine if a field is editable, click on it.
- Terminal Type - This field displays the terminal type of the device selected for editing. The terminal type determines the options that appear on this window. You cannot edit this field. To change the terminal type of a device, you must delete the device and re-create it.
Note: For Web Capture terminals, the IP Address field defaults to the logon user and you cannot edit it. To change the IP address of a device, you must delete the device and re-create it.
For further information on the fields on this screen, see Adding a Web Capture Terminal.
Editing Authentication Options on a Single Device
To edit the authentication settings for a device, use the Authentication tab on the Edit Settings window. The available options vary depending on the terminal type of the selected device.
Editing the Authentication Options for Konica Minolta Embedded Terminals (OpenAPI)
The options that appear on this tab vary depending on the terminal type of the selected device. The following describes the available options for a Konica Minolta Embedded Terminal (OpenAPI) terminal type. A description of the options for the Web Capture terminal type appears farther below in this topic.
Using the Authentication tab, you can do the following:
-
Prompt for username and password - To require users to enter a username and password on the MFP control panel screen before accessing MFP Panel workflow(s), select this option. With this setting, the following options are also available: - Show recent user selection - With this option enabled, users can choose a username from a drop-down list of the last 1000 users who have previously logged in, eliminating the need to manually enter this information. However, users must still provide a password. - Allow login with previously cached password - With this option enabled, users can log in without entering a password. The previously entered password is used. Note that if the password is changed and the MFP is restarted, the cached password will be lost.
Note: If you change your Windows username and password, you will not be able to access your workflows.
-
Always log in as - Select this option to minimize set up and quickly access your workflows on the control panel. This option eliminates the need to manually enter a username and password on the device control panel screen. With this option enabled, only the actively running workflows for that particular user will display, and jobs scanned from the panel will run as that user. This field is pre-populated with the username and domain name (if available) of the current user. Use the Refresh button next to the field to reset the value to the currently logged-in user.
-
Use MFP provided username to log in - Select this option for single sign-on (SSO). This option is designed to work with MFP or Active Directory authentication. Optimal for shared workflows, this option automatically logs into Dispatcher Phoenix as the user logged into the MFP. With this option enabled, the Windows Domain field may be pre-populated with the current domain of the logged-in system, or the field may be left blank. Use the Refresh button next to the field to reset the value to the current domain.
Note: First-time use requires manually entering a password.
-
Save - Click this button to save your settings.
Editing the Authentication Options for Web Capture Terminals
The options that appear on this tab vary depending on the terminal type of the selected device. The following describes the available options for a Web Capture terminal type. A description of the options for the Konica Minolta Embedded Terminal (OpenAPI) terminal type appears in the previous topic.
-
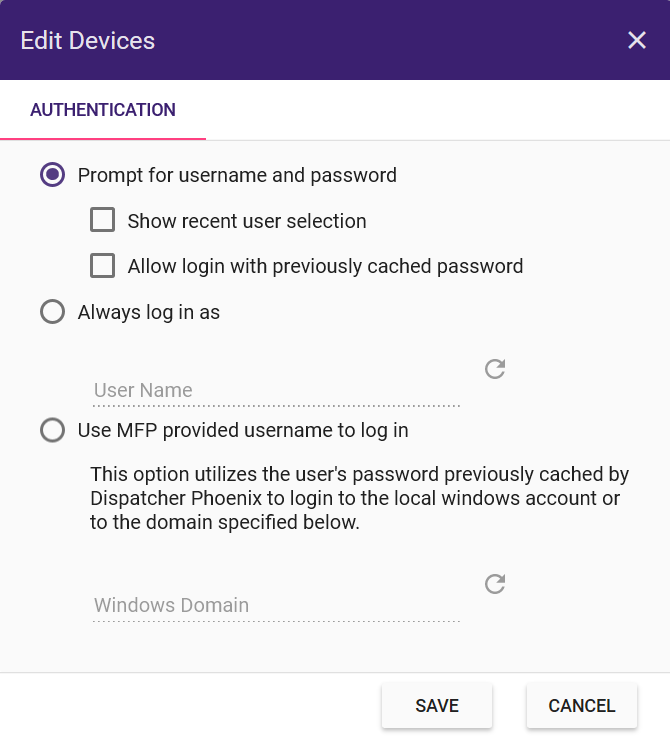
Authentication - Use this tab to edit the authentication settings as shown in the following illustration:
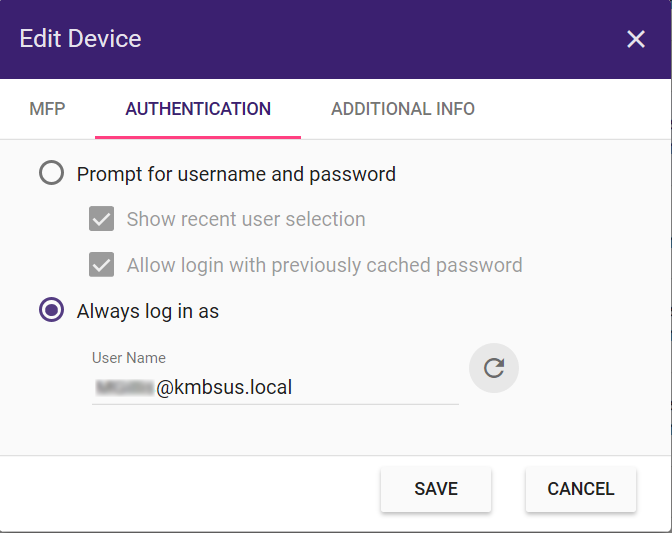
Using the Authentication tab, you can do the following:
-
Prompt for username and password - To require users to enter a username and password on the device control panel screen before accessing workflows, select this option. With this setting, the following options are also available:
- Show recent user selection - With this option enabled, users can choose a username from a drop-down list of the last 1000 users who have previously logged in, eliminating the need to manually enter this information. However, users must still provide a password.
- Allow login with previously cached password - With this option enabled, users can log in without entering a password. The previously entered password is used. Note that if the password is changed and the MFP is restarted, the cached password will be lost.
Note: If you change your Windows username and password, you will not be able to access your workflows.
-
Always log in as - Select this option to minimize set up and quickly access your workflows on the control panel. This option eliminates the need to manually enter a username and password on the device control panel screen. With this option enabled, only the actively running workflows for that particular user will display, and jobs scanned from the panel will run as that user. This field is pre-populated with the username and domain name (if available) of the current user. Use the Refresh button next to the field to reset the value to the currently logged-in user.
-
-
Save - Click this button to save your settings.
Editing Multiple Devices
The Dispatcher Phoenix Web’s Devices page also allows you to configure multiple devices at the same time. You can multi-select specific devices as well as select an entire group and then do the following:
-
Edit app settings/authentication options for all of the selected devices or all of the devices in the group.
-
Add multiple devices to a new or existing group.
Do the following:
-
On the Devices page, select individual devices, devices within a group, or an entire group. You can also check the No Group box to select all devices that have not been already categorized into a group.
-
Select the Edit button, where you can edit any of the options that appear in the drop down.
Deleting Devices/Groups
Administrators can remove a device from any group, delete devices, or delete groups by using the Delete button on the top tool bar.
Note: Only unregistered MFPs can be deleted. To delete a registered MFP, you must unregister it first.
Do the following:
-
Select one or more device or group.
-
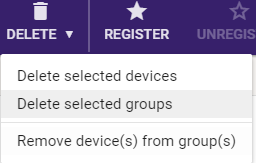
Select the Delete button in the toolbar to open the drop-down list as show in the following illustration:
-
Do one of the following:
- Delete selected devices - Remove selected devices from the Devices Tool. This option also removes the selected devices from all groups to which they were assigned.
- Delete selected groups - Remove a group or multiple groups from the Devices Tool. If the devices within the selected group(s) do not belong to any other group, they appear in the No Group category.
- Remove device(s) from group(s) - Remove selected devices from a group.
Registering/Unregistering Devices
Devices must be registered in Dispatcher Phoenix before they can be used in a workflow. You can register devices using Dispatcher Phoenix Web.
To register devices, do the following:
-
On the Devices page, select one or more devices to register.
-
Select the Register button on the top tool bar. This button is active only if you select at least one unregistered device on the Device page.
Notes:
-
If you register a large number of MFPs all at once (e.g., 10 or more MFPs), the MFPs register concurrently, four at a time, with the rest placed in a queue status.
-
When registering, the bEST App Name that displays at the MFP must be unique among all users. Click here for more information about taking over registrations.
To unregister devices, do the following:
-
On the Devices page, select one or more devices to unregister.
-
Select the Unregister button on the top tool bar. This button is active only if you select at least one registered device on the Device page.
Setting Defaults
Use the Defaults window to configure default device settings and authentication options for all registered devices. You can then override the default settings for individual devices, if desired, using the Edit window.
Note: Any changes made on the Defaults window are saved but not applied to or validated against any device until the device is either registered for the first time or unregistered and then registered again.
Default MFP Settings
This section describes the settings on MFP tab.
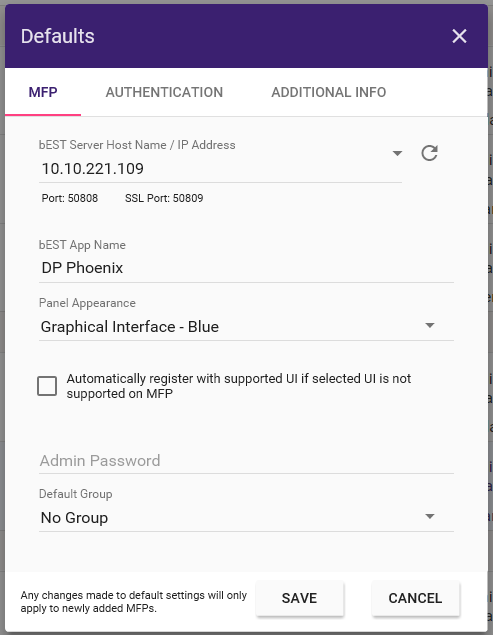
- bEST Server Host Name / IP Address - Use this field to set the default location of the Application Server. Enter your IP address or Server Host Name in the field. By default, the field populates with the IP address of your computer.
In addition, you can specify default settings for your applications on this window by doing the following:
-
bEST App Name - Enter the name you want to appear on the control panel to identify your bEST applications.
-
Panel Appearance - Choose how you want the workflow to appear on the control panel. You have the following options:
-
Graphical Interface - Displays the details of the scan settings for the workflow, along with a thumbnail image of the workflow itself. This is the default setting.
-
Native Interface - Lists the workflow in a non-graphical, text-based manner. Select this option for devices for which the i-Option is not licensed and installed.
Note: For Web Capture device types, if the default setting is set to Native Interface, the setting reverts automatically to Graphical Interface.
-
-
Automatically register with supported UI if selected UI is not supported on MFP - To avoid registration failure over panel appearance options, check this box. With this option enabled, the MFP automatically registers as a Native UI if it is does not have Graphical UI support (and the Graphical User Interface option is specified for that MFP).
-
Admin Password - Enter a password to provide administrative access to the device. This password will be used automatically the next time you register a bEST application.
-
Default Groups - Choose an existing group to be the default group. All new devices will be automatically assigned to this default group.
-
Save - Save your changes and exit the window.
Default Authentication Settings
This section describes the default the user authentication settings for your workflows.
Note: Any authentication changes made on this tab apply ONLY to newly defined MFPs, not existing MFPs.

-
Prompt for username and password - This is the default setting. It requires users to enter a username and password on the MFP control panel screen before accessing their workflows. With this setting, the following options are also available:
-
Show recent user selection - With this option enabled, users can choose a username from a drop-down list of the last 1000 users who have previously logged in, eliminating the need to manually enter this information. However, users must still enter a password.
-
Allow login with previously cached password - With this option enabled, users can log in without entering a password. The previously entered password will be used. Note that if the password is changed and the MFP is restarted, the cached password will be lost.
Note: If you change your Windows username and password, you will not be able to access your workflows.
-
-
Always log in as - To minimize set up and quickly access your workflows on the control panel, you can choose to use your Windows log in name every time when accessing workflows. This option eliminates the need to manually enter a username and password on the MFP control panel screen. With this option enabled, only the actively running workflows for that particular user will display, and jobs scanned from the panel will run as that user. This field is pre-populated with the username and domain name (if available) of the current user.
Use the Refresh button next to the field to reset the value to the currently logged-in user.
-
Use MFP provided username to log in - This single sign-on (SSO) option is designed to work with MFP or Active Directory authentication. Optimal for shared workflows, this option automatically logs into Dispatcher Phoenix as the user logged into the MFP. With this option enabled, the Windows Domain field can be pre-populated with the current domain of the logged-in system, or the field can be left blank. Note that first-time use requires manually entering a password.
Use the Refresh button next to the field to reset the value to the current domain.
Note: For Web Capture device types, if the default setting is set to Use MFP provided username to log in, the setting reverts automatically to Prompt for username and password.
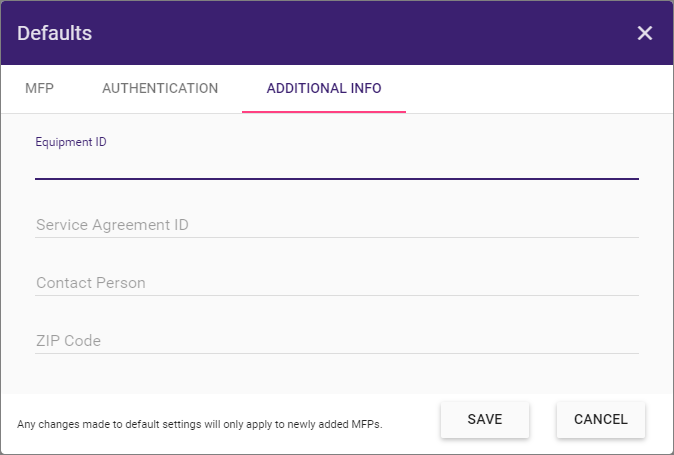
Default Additional Information Settings
Use the Default Additional Information settings to configure default “additional information” for Dispatcher Phoenix devices. When adding devices, the information you specify here appears for the new device. You can accept the default or specify new information. These customizable fields include the following:
- Equipment ID
- Service Agreement ID
- Contact Person
- Zip Code