ODBC
The ODBC process node allows you to do the following:
-
Retrieve data from an ODBC (Open Database Connectivity) data source and associate it with the file as metadata (e.g., {odbc:column name}).
-
Use existing metadata associated with a file or workflow in order to update data in the ODBC data source.
Note: ODBC metadata variables are case-sensitive. When using ODBC metadata in your workflow, make sure that you use the appropriate case.
Drivers
In order to use this node, the appropriate ODBC driver must be installed on the same PC as Dispatcher Phoenix. There are ODBC drivers for every major database system. Go to the SEC web site for links to some of the available drivers: https://www.sec.kmbs.us/version2/products/dppe/odbc.html.
Important!
-
With 32-bit Operating Systems, you must use 32-bit Drivers.
-
On 64-bit platforms, the driver’s architecture must match the software’s architecture. If you want the ODBC node to work within a 64-bit installation of Dispatcher Phoenix, you should find a 64-bit ODBC Driver.
-
If you have installed a 32-bit version of Microsoft Office on a 64-bit Operating System, you will not be able to install the 64-bit Access Drivers.
-
If you cannot access any 64-bit ODBC Drivers, you can uninstall the 64-bit version of Dispatcher Phoenix and install the 32-bit version of the application on your 64-bit Operating System; however, this should only be considered as a last step (if you cannot install a 64-bit version of Microsoft Office or any 64-bit Drivers).
-
Overview of ODBC
The following section provides brief definitions of ODBC and its infrastructure.
-
ODBC. ODBC is the open standard method for connecting applications to database servers for the purposes of accessing data. For example, ODBC allows Dispatcher Phoenix users to connect transparently to a data source at the MFP panel.
-
Data Source. Data that is used by an application. Examples include a SQL Server database or a Microsoft Access database.
-
ODBC Drivers. In order for databases to be accessible to applications like Dispatcher Phoenix, drivers must be installed on the client system where the application resides. The ODBC driver connects to the data source, translates the standard SQL statements into syntax that the data source can process, and returns any requested data to the application. When you connect to a data source from an application through an ODBC driver, the driver makes the connection for you, either locally or across a network.
Using the Dispatcher Phoenix ODBC Node
The ODBC node resembles the following illustration:
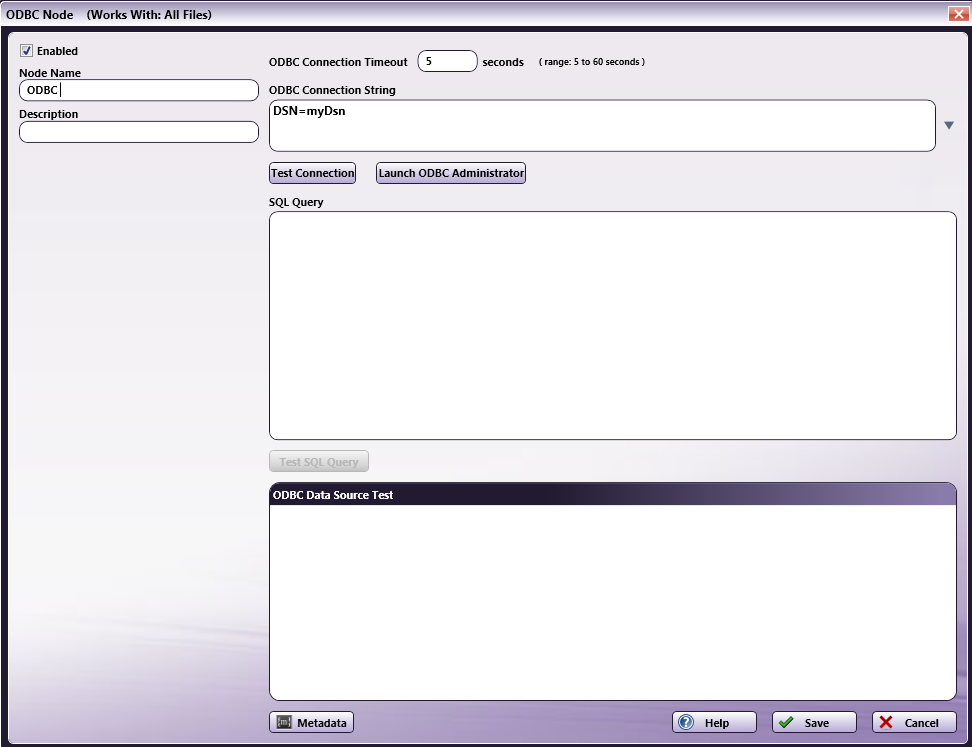
Do the following:
-
Enter a name to identify this specific configuration in the Node Name field.
-
Enter a description for the node in the Description field.
-
Specify a time period (in seconds) for the connection to be established before ending the attempt in the ODBC Connection Timeout field.
-
Enter a connection string to connect to the appropriate data source in the ODBC Connection String area. The application comes with numerous sample connection strings that you can use to help you get started. Click on the down arrow to view and select from a list of strings. If you are uncertain about how to enter this information, refer to the documentation for your ODBC Driver and/or database.
-
To make sure that the connection string you entered is valid, select the Test Connection… button.
-
If the connection is valid, data will appear in the ODBC Data Source Test area.
-
If the connection is invalid, error messages will appear in the ODBC Data Source Test area.
-
To manage database drivers and data sources, select the Launch ODBC Administrator button. Refer to Microsoft Windows documentation for more information on that dialog box.
-
To submit SQL queries to the data source, enter SQL statements in the SQLQuery area.
Note: While SQL is standardized, there may be driver-specific deviations to account for how one database operates.
-
You can use metadata within your SQL queries. To help you integrate these variables, you can click on the Metadata button, which will open up the Metadata Browser window. The Metadata Browser window lists all metadata included in the workflow. From the Metadata Browser window, you can drag-and-drop metadata into the ODBC window.
-
To make sure your SQL statements are retrieving the correct records from the data source, select the Test SQL Query button. Note that you can add form variables to the SQL query.
Associating Data from an ODBC Data Source to a File
You can retrieve data from an ODBC data source to be associated with incoming files using the SELECT statement in your SQL query. You can also retrieve specific data from a data source based on the results of a query that uses metadata from the workflow, such as OCR zones, Bates stamps, barcodes, and index form fields. When setting up your SQL query, you can click on the Metadata button to open the Metadata Browser window and find the metadata variables that you need.
Once the data is retrieved from the data source, it is attached to the files as ODBC metadata for future use in the workflow.
Syntax for ODBC metadata is {odbc:[name of variable[page number]]} (e.g., {odbc:address[1]}). When referencing workflow metadata in SQL queries, you must specify a page number in brackets.
Note: Supported SQL syntax may differ by driver. Please consult your ODBC Driver and Database for documentation about their supported syntax and operations.
To retrieve all records:
SELECT \* from [table name]
To retrieve select records based on a specific condition:
SELECT [column] FROM [table name] WHERE [column]=’[metadata]’
Note: Use single quotes around text values; numeric values do not need to be enclosed in quotes.
Example of SQL Query using the SELECT statement:
Sample Data Source:
Last - First - Address
Doe - John - jdoe@gmail.com
Doe - Jane - janedoe@gmail.com
Smith - Jane - jsmith@hotmail.com
Crockett - Davey - dcrockett@aol.com
An OCR zone named “last” has been created to extract last names from incoming documents (using the Advanced OCR node). With the ODBC node, you can retrieve the email address found in a data source for the last name that appears on the document (extracted using the Advanced OCR process). The email address that is found via the ODBC node is attached to the file as ODBC metadata and can then be used in the Email Out node to send the documents to the correct email destination.
To retrieve the email address found in the Address column when the “last” OCR zone metadata {zone:ocr.last} returns “Doe,” use the following statement:
SELECT [address] FROM [customers] WHERE [Last]='{ocr:zone.last[1]}'
Updating Data Within an ODBC Data Source
Useful for record keeping, you can also update data in an ODBC data source based on other metadata in the workflow, such as OCR zones, Bates stamps, barcodes, and index form fields, using the UPDATE statement in your SQL query. When setting up your SQL query, you can click on the Metadata button to open the Metadata Browser window and find the metadata variables that you need.
Note: Supported SQL syntax may differ by driver. Please consult your ODBC Driver and Database for documentation about their supported syntax and operations.
Syntax to use for Update statements:
UPDATE [table] SET [column]= 'metadata' WHERE [column name]='metadata';
Notes:
-
Update statements do not produce metadata.
-
When referencing workflow metadata in SQL queries, you must specify a page number in brackets (e.g., {bates.YourStamp[1]}.
-
Use single quotes around text values; numeric values do not need to be enclosed in quotes.
Example of SQL Query using the UPDATE statement:
Sample Data Source:
File - Count
xyz - 1

abc - 2

rty - 3

yui - 4
You can update a column in the ‘customers’ table when the file name of the incoming document matches another column in the table. For example, every time the “xyz” file is scanned, the count in the “Count” column increases by 1 to record how many times that file has been scanned.
Use the following statement:
UPDATE customers SET count=count+1 WHERE file='{file:name}';
Inserting Data Into an ODBC Data Source
You can also insert new records into an ODBC data source based on other metadata in the workflow using the INSERT INTO statement in your SQL query. When setting up your SQL query, you can click on the Metadata button to open the Metadata Browser window and find the metadata variables that you need.
Note: Supported SQL syntax may differ by driver. Please consult your ODBC Driver and Database for documentation about their supported syntax and operations.
Syntax to use for Insert Into statements:
INSERT INTO [table] [column1, column2,…] VALUES [value1, value2, …];
Notes:
-
Insert statements do not produce metadata.
-
When referencing workflow metadata in SQL queries, you must specify a page number in brackets (e.g., {bates.YourStamp[1]}.
-
Use single quotes around text values; numeric values do not need to be enclosed in quotes.
Example of SQL Query using the INSERT statement:
Sample Data Source (table name is ‘files’):
File - Count
abc - 1

def - 2

ghi - 3

jkl - 4
You can insert a new record with the following data of ‘mno’ and ‘5’ into the ‘files’ table, using the following statement:
INSERT INTO files (File, Count) VALUES ('mno', 5);