Setting Up Production Print
This guide provides the steps that are necessary to integrate Dispatcher Phoenix with production print models. Current supported models are:
- 1250 Series (bizhub PRESS 1250, bizhub PRO 1100, bizhub PRESS 1052, bizhub PRO 951)
- C1070 Series (bizhub PRESS C1070, bizhub PRESS C1060, bizhub PRO C1060L)
- C1100 Series (bizhub PRESS C1085, bizhub PRESS C1100)
- C2070 Series (AccurioPress 2070, AccurioPress C2060, AccurioPrint 2060L)
- C3070 Series (AccurioPress C3080, AccurioPress C3070, AccurioPrint C3070L)
- C6085 Series (AccurioPress C6085, AccurioPress C6100)
This guide assumes that Dispatcher Phoenix has been installed properly on a PC.
Required Options
| Series | Required Options |
|---|---|
| 1250 | UK-205 Upgrade Kit |
| C1070 |
|
| C1100 |
|
| C2070 | IC-603A KM Image Controller |
Step 1. Install Firmware
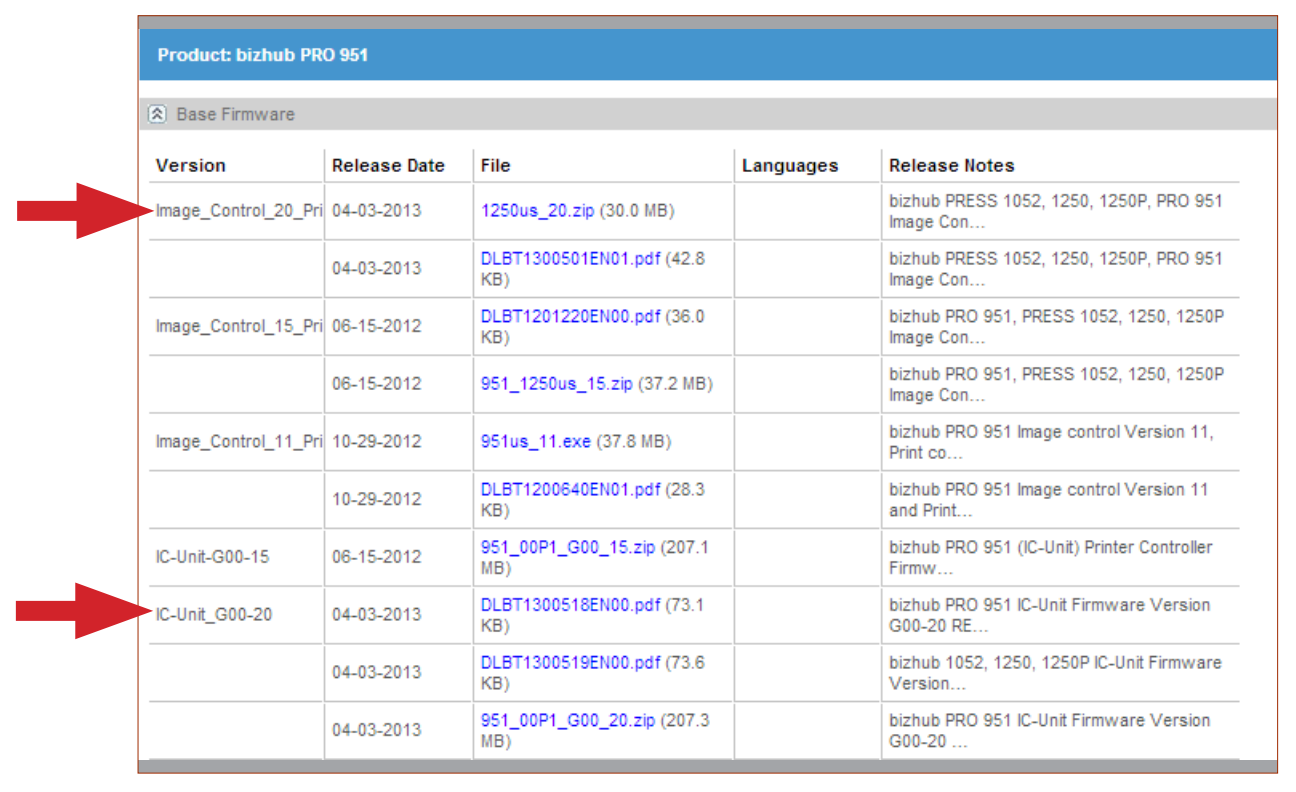
For the 1250 Series
Update the firmware to the following (or later versions):
- Image_Control_20 (file name: 1250us_20.zip; release notes: DLBT11300501EN01.pdf)
- IC-Unit_G00-20 (file name: 951_00P1_G00_20.zip; release notes: DLBT1300518EN00.pdf)
See the following figure:
For the C1070 Series
Make sure that the MFP is running G00-18 or later. Additionally, when installing the Web Browser ROM on these devices, you must select the ROM starting with A5AA0Y0. The other provided browser ROMs for these devices are not compatible with Dispatcher Phoenix.
For the C1100 Series
Make sure that the MFP is running G00-18 or later. Additionally, when installing the Web Browser ROM on these devices, you must select the ROM starting with A5AA0Y0. The other provided browser ROMs for these devices are not compatible with Dispatcher Phoenix.
For the bizhub PRO 1100 Series
Make sure that the MFP is running GU0-20 or later.
For the AccurioPress C2070 Series
All firmware supports Dispatcher Phoenix.
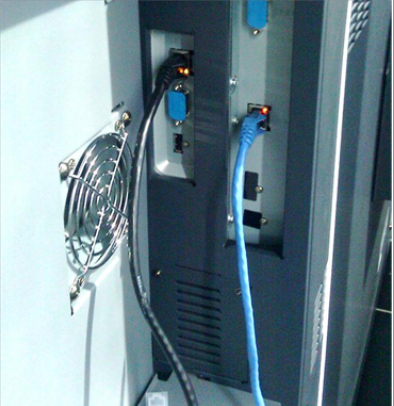
Step 2. Configure MFP and Controller for the Network (for 1250 Series only)
Connect and configure the MFP and Controller for the network. See the following illustration for an example:
Step 3. Configure Controller Switches
When configuring controller switches, refer to the documentation for your specific device for guidance. The following are general guidelines as well as recommendations for a few specific devices.
To configure controller switches, do the following:
-
Tap on the MACHINE tab on the panel’s top bar.
-
Press the Controller button in the MACHINE screen of the control panel. The Controller Machine Setting Menu screen is displayed.
-
Press the 08 Administrator Setting button.
-
On the Administrator Setting screen, press the 01 Software Switch Setting button.
-
Choose the Switch Number button, then enter the number in the field.
-
When done, press the On button. Next, press Set.
For the 1250 Series
For best results, we recommend you change controller switches 51 and 52 to 1.
- Changing switch 51 to 1 enables scanning to Dispatcher Phoenix at 1200 dpi.
- Changing switch 52 to 1 enables scanning multiple pages as a single file.
For the AccurioPress C4080 Series
For best results, we recommend you change software switch 83 to ON.
-
Changing switch 83 to ON enables scanning multiple pages as a single file to Dispatcher Phoenix.
Note: For the C4080 series, it is important to change the software switch, which is different from a controller switch. For more information on how to find software switch 83, please consult your local Konica Minolta field engineer.
To find the controller switches on the C6085, make the following selections:
- [Utility] → [Administrator Setting] → [Controller] → [Software Switch Setting]
For All Other Supported Production Print Devices
For best results, we recommend changing controller switch 83 to 1.
- Changing switch 83 to 1 enables scanning multiple pages as a single file to Dispatcher Phoenix.
Step 4. Register Dispatcher Phoenix
To register Dispatcher Phoenix on a supported production print machine, follow these steps:
-
In Dispatcher Phoenix, launch the MFP Registration Tool by selecting MFP Registration Tool from the Tools menu in Dispatcher Phoenix.
-
Add the device by doing one of the following:
- Select the Add MFP button to manually enter the device’s IP address, or
- Select the Find MFP button to use the MFP Explorer tool to automatically search for all MFPs on the network.
-
Configure the default bEST Server Settings and authentication settings, if necessary. Refer to the Dispatcher Phoenix Web Help for more information.
-
Select the device listed; then click on the Register MFP button.
-
Add the registered device to a workflow.
Step 5. Accessing Dispatcher Phoenix
Once Dispatcher Phoenix has been registered, a Phoenix tab will appear on the top, right-hand side of the display panel, as in the following figure:
Note: If other applications are installed, an “APP” tab will appear instead.
-
Tap the Phoenix tab to display the Dispatcher Phoenix application icon.
-
Touch the Dispatcher Phoenix application icon to begin. All running workflows will appear.
Troubleshooting for the 1250 Series
If the MFP NIC does not have network connectivity, a blank screen will be displayed
Important!
- Use of the MFP’s Start button to begin the scan is not supported on any production print device.
- The number keypad does not work on any production print device.
- OpenAPI solutions, including Dispatcher Phoenix, do not work with 3rd party controllers.