HTTP In

Note: This node works with all format file types.
The HTTP In Node receives documents that are uploaded through a web service. This node can run in multiple workflows but each node must have a unique Workflow Alias Name. The target workflow to which the documents are submitted is determined by that Workflow Alias Name, one of the request parameters specified in the URL. Any type of file may be submitted to this node.
Creating the HTTP In Node
Add the HTTP In Node to the workflow by dragging the node’s icon onto the Workflow Builder canvas, and then double-clicking on the icon to open the HTTP In Node:

-
Select the Enabled checkbox so that the process will run. When unchecked, this process is ignored. Documents pass through as if the node were not present (i.e., continue along the default or positive path). Note that a disabled node will not check for logic or error conditions.
-
In the Node Name field, enter a meaningful name for the HTTP In Node.
-
In the Description field, enter a description for the HTTP In Node. This is not required, but can be helpful with multiple collection points. If the description is long, hover the mouse over the field to read its entire contents.
-
In the Workflow Alias Name field, enter a unique name for the HTTP In Node. This is used to identify which workflow needs to run when a file is uploaded.
Note: Only alphanumeric characters and two special characters (“-“ and “_”) are allowed in this field.
-
Click the Save button to save the changes. If Cancel is selected and the window is closed, the changes are not saved.
-
Click the Help button to access online help.
Note: The IP Address and Port number are the same used for the Dispatcher Phoenix Web install.
Using the HTTP In Node
Use a third-party HTTP job submission application to send jobs to the HTTP In Node. This is done using Dispatcher Phoenix Web’s web service.
On the HTTP In Node screen below, a sample URL is noted in the Web Services Settings box:
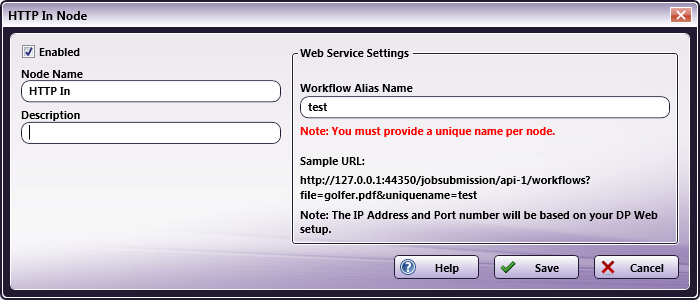
The sample URL value is the destination where the data (POST) is sent by the HTTP job submission application.
Using the third-party job submission application, specify the URL value (including the target file name and workflow Alias Name) to post the data via HTTP to the HTTP In Node.
The URL format should match the template that follows:
http://[ipaddress]:[port]/jobsubmission/api-1/workflows?file=[filename]&uniquename=[Workflow Alias Name]
The values of the bracketed components are noted below:
- ipaddress: the IP Address of the server upon which Dispatcher Phoenix Web is running.
- port: the port used by the server upon which Dispatcher Phoenix Web is running.
- filename: the name of the file submitted by the third-party application
- Workflow Alias Name: The Workflow Alias Name value entered in the HTTP In Node settings screen. In the example above, that value is test. Set a workflow alias to the data acquisition destination (GET). This value is used as the destination to post the data via HTTP to the HTTP In Node.
Using the third-party application’s configuration settings, the URL above is specified. Files may then be submitted to this workflow using this URL. The file is mapped to the workflow using the bracketed values.
For more details about Web Site hosting on a Web Server, please refer the following: DP Web Hosting Options
Sample of an HTTP In Workflow
Once the HTTP In Node is created and the third-party application is configured with the correct URL information, jobs may then be sent to the workflow.
In the sample workflow, jobs from a third-party application are sent to the HTTP In Node, and then moved to an Output Folder:
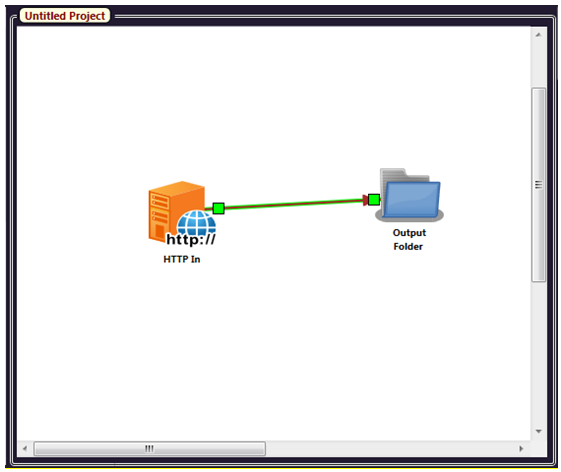
If the URL information entered via the third-party application contains the correct bracketed information for the Dispatcher Phoenix Web’s workflow, this workflow will function as noted.
Sample Code for Uploading files
SAMPLE CURL COMMAND LINE CODE
The Curl Command Line code that follows can be used to upload a job using a workflow’s HTTP In Node:
curl -i -X POST -H "Content-Type: application/pdf"
"http://127.0.0.1:44350/jobsubmission/api-1/workflows?file=A4.pdf&uniquename=test" --data-binary "@./sample.pdf"
When using Curl Command, you must specify the correct URL as noted in Section Using the Http In Node above.
Use the following link to download the Curl Command Line tool:
https://winampplugins.co.uk/curl/
For more details about this tool, please check the website of any third-party application you use to send HTTP jobs to an HTTP In Node.
SAMPLE JAVA SERVER CODE
The Java Server code that follows can be used to upload a job to a workflow’s HTTP In Node:
package httpnodes;

import java.io.File;
import java.io.IOException;
import java.io.OutputStream;
import java.io.OutputStreamWriter;
import java.io.PrintWriter;
import java.net.HttpURLConnection;
import java.net.MalformedURLException;
import java.net.URL;
import java.net.URLConnection;
import java.nio.file.Files;

public class HttpIn {
	public static void main(String args[]) throws MalformedURLException, IOException{
		//Update the URL as per your configuration below.
		String url = "http://127.0.0.1:44350/jobsubmission/api-1/workflows?file=sample.pdf&uniquename=test";
		String charset = "UTF-8";
		//update the location of your file here.
		File sampleFile = new File("C:\\Users\\test.user\\Desktop\\Test\\input\\sample.pdf");
		String boundary = Long.toHexString(System.currentTimeMillis());
		String CRLF = "\r\n";

		URLConnection connection = new URL(url).openConnection();
		connection.setDoOutput(true);
		connection.setRequestProperty("Content-Type", "application/pdf; boundary=" + boundary);

		try (
		    OutputStream output = connection.getOutputStream();
		    PrintWriter writer = new PrintWriter(new OutputStreamWriter(output, charset), true);
		) {
			//send file
		    writer.append("--" + boundary).append(CRLF);
		    writer.append("Content-Disposition: form-data; name=\"file\"; filename=\"" + sampleFile.getName() + "\"").append(CRLF);
		    writer.append("Content-Type: text/plain; charset=" + charset).append(CRLF);
		    writer.append(CRLF).flush();
		    Files.copy(sampleFile.toPath(), output);
		    output.flush();
		    writer.append(CRLF).flush();
		    writer.append("--" + boundary + "--").append(CRLF).flush();
		}

		int responseCode = ((HttpURLConnection) connection).getResponseCode();
		System.out.println(responseCode); // Should be 200 for success
	}
}
SAMPLE PHP SERVER CODE
The PHP Server code that follows can be used to upload a job to a workflow’s HTTP In Node:
<?php
//Update the URL as per your configuration below.
$request = curl_init('http://127.0.0.1:44350/jobsubmission/api-1/workflows?file=sample.pdf&uniquename=test');

curl_setopt($request, CURLOPT_POST, true);
curl_setopt(
    $request,
    CURLOPT_POSTFIELDS,
    array(
      'file' => '@' . realpath('C:/Users/test.user/Desktop/Test/input/sample.pdf') //update the location of your file here.
    ));

curl_setopt($request, CURLOPT_RETURNTRANSFER, true);
echo curl_exec($request);
curl_close($request);
?>
Note: Dispatcher Phoenix Web Server must be installed to use the HTTP In Node.
Note: The HTTP In Node does not support multiple files in a single request. Submit one file at a time to the node and wait a few seconds before submitting the next file.