Worksheet Normalizer

Note: This node works with XLSX, CSV and TXT files.
Note: Refer to Limitations later in this document for more details about the limitations of each file format.
The Worksheet Normalizer node edits a given worksheet file based on defined conversion rules and creates a CSV file. The following features can be defined in conversion rules:
- Adding/Deleting/Rearranging columns.
- Merging contents in cells by column.
- Adding/Replacing the text in cells.
Add the Worksheet Normalizer node to the workflow by dragging the Worksheet Normalizer node’s icon onto the Workflow Builder canvas, and then double-clicking on the icon to open the Worksheet Normalizer node’s window.
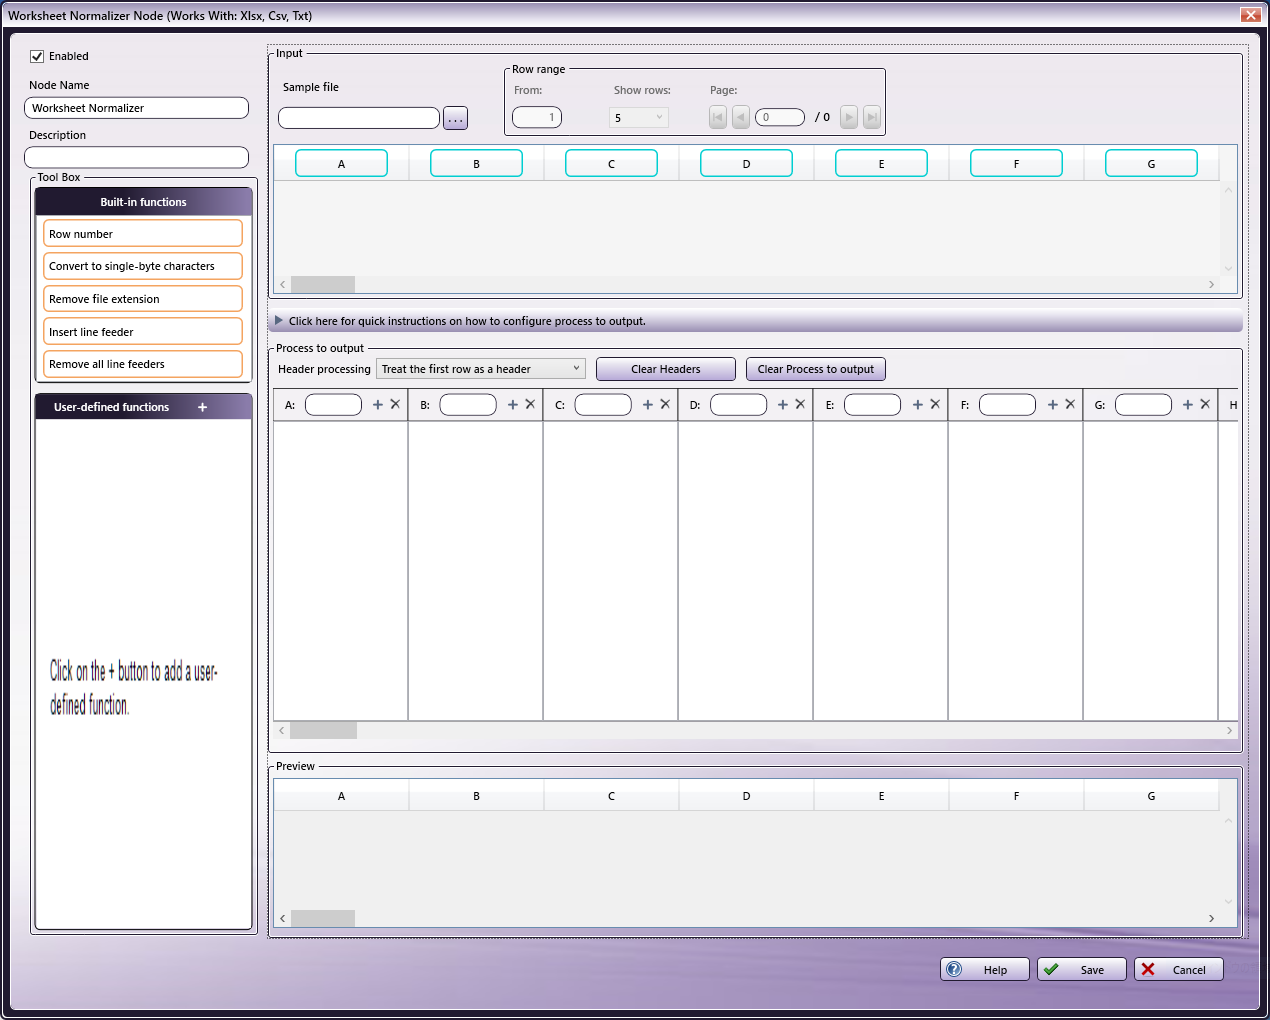
- Select the Enabled checkbox so that the process will run. When unchecked, this process is ignored. Documents pass through as if the node were not present (i.e., continue along the default or positive path). Note that a disabled node will not check for logic or error conditions.
- In the Node Name field, enter a meaningful name for the Worksheet Normalizer Node.
- In the Description field, enter a description for the Worksheet Normalizer Node. This is not required, but can be helpful to distinguish between multiple processes. If the description is long, you can hover the mouse over the field to read its entire contents.
- Click the Save button to save the Worksheet Normalizer definitions. If Cancel is selected and the window is closed, the changes are not saved.
- Click the Help button to access online help.
Using the Functions
Two types of functions are supported with the Worksheet Normalizer node, “Built-in functions” and “User-defined functions”.
You can use these functions to configure the Process to output setting.
Built-in functions
Built-in functions are functions that have pre-defined conversion rules defined in the Worksheet Normalizer node. To use the built-in function, drag-and-drop the function to the Process to output area.

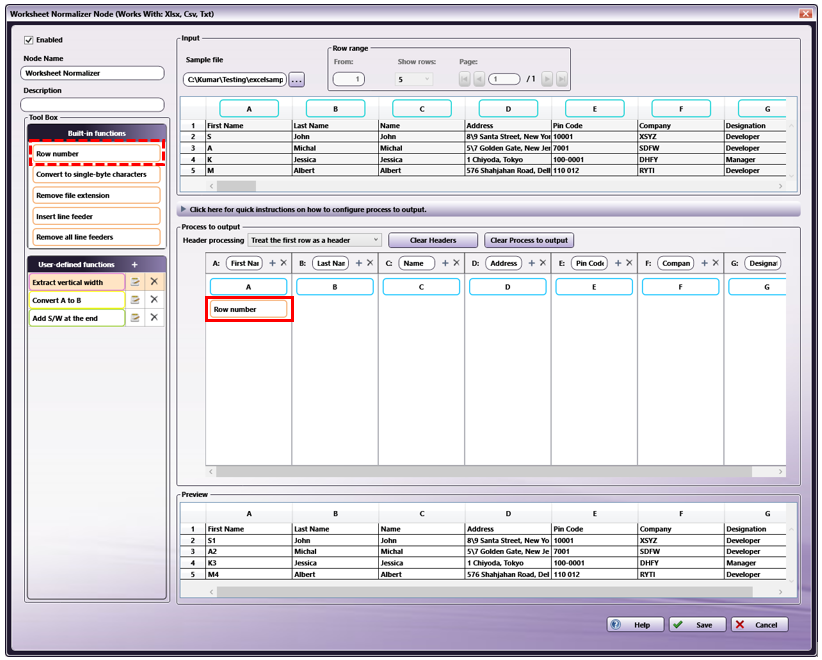
The following is an example that the Row number is dragged and dropped from the Built-in functions to column A in the Process to output area.
The Worksheet Normalizer node supports following Built-in functions.
- Insert the row number of the cell.
- Convert to single-byte characters: Convert multi-byte alphanumeric characters and symbols into single-byte characters. For example, “123xyz” will be converted into “123xyz”.
- Remove file extension: Remove the file extension (such as .pdf or .csv) of a file. For example, “JOB0001.csv” will be processed as “JOB0001”.
- Insert line feeder: Insert a new line into all cells in a column.
- Remove all line feeders: Removes all new lines from the cell
Note: You cannot edit or delete any of the Built-in functions.
Built-in functions placed in the Process to output area will be highlighted with light orange color box.
User-defined Functions
To use a User-defined function, add a User-defined function to the node and drag-and-drop the added function into Process to output area.
Adding User-defined functions
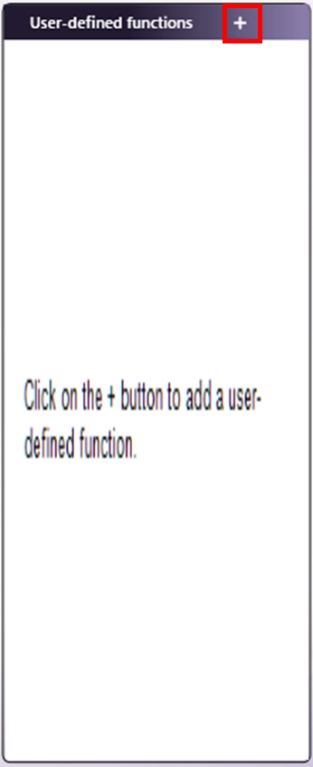
To add a new user-defined function, click the  button in the User-defined functions header.
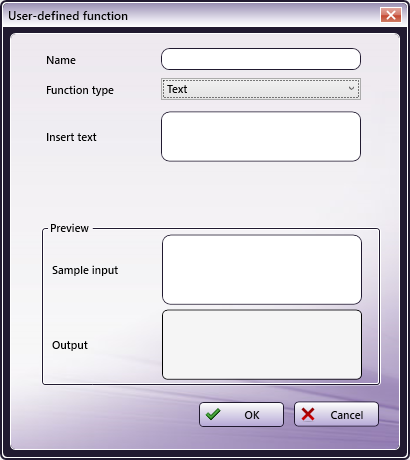
The User-defined function window will be displayed.
-
In the Name field, enter the name of the user-defined function.
-
In the Function type, select the function type from the drop-down.
Note: Refer to the User-defined Function types later in the document for more details about the types of user-defined functions.
-
Enter a sample value in the Sample input field within the Preview section. When a sample value is entered, the result of processing the sample input value will be displayed in the Output field as a preview reference to the user.
Note: Sample input field is not mandatory.
-
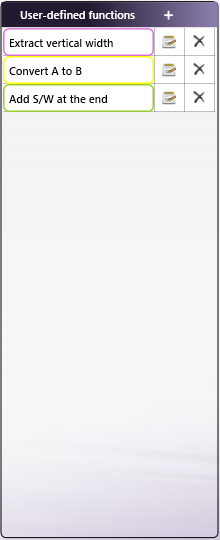
Click the OK button to save the user-defined function. A new user-defined function will be added as below.
- If the Cancel or the × button is clicked, the window is closed and the changes are not saved.
To add more user-defined functions, click the + (Add) button in the User-defined functions header.
The display order of the user-defined function in the list can be changed by dragging and dropping the added one within the list.
Note: A maximum of 30 User-defined functions can be added.
Editing User-defined functions
Click the  (Edit) button in a previously registered user-defined function to edit that user-defined function.
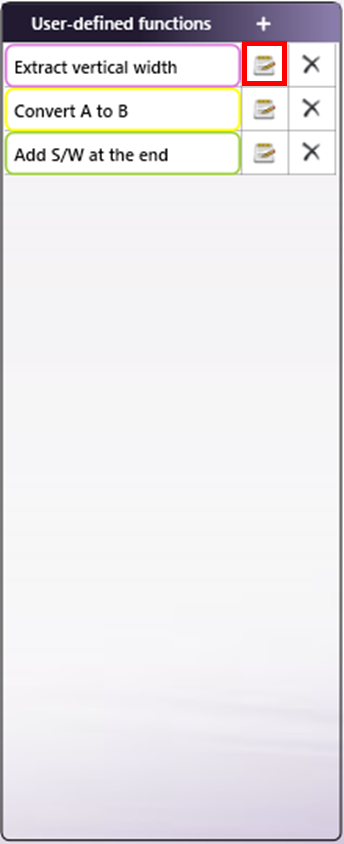
The User-defined function window will be displayed in which you can edit the user-defined functions. For more information on items, see Adding User-defined functions above in this document.

Deleting User-defined functions
Click the  (Delete) button of a previously registered user-defined function to delete that user-defined function. As an alternative, use the right-click context menu in the User-defined functions and select “Delete all functions” to delete all current User-defined functions.
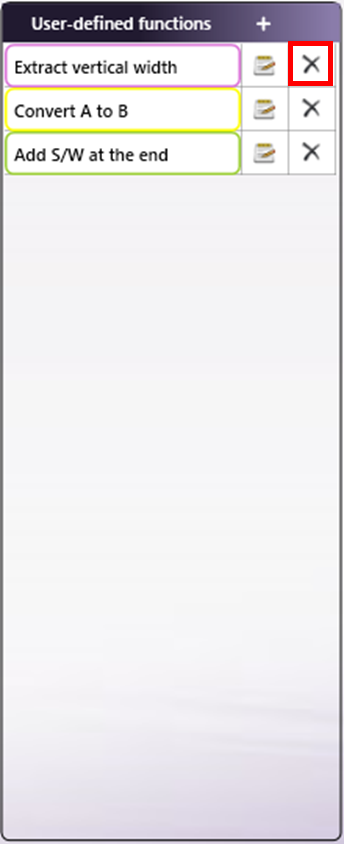
- When the user-defined function is not used in the table of the Process to output panel, the message “Do you want to delete the selected user-defined function?” is displayed. Click the Yes button to delete the user-defined function.
- When the user-defined function is used in the table of the Process to output panel, the message “Do you want to delete the selected user-defined function? It will also remove the reference in the Process to output section.” is displayed. Click the Yes button to delete the user-defined function from Process to output table and User-defined functions panel.
Note: In case a user-defined function used in the table of the Process to output area is deleted from User-defined functions panel, then the user-defined function will be deleted from the Process to output table as well.
User-defined Function types
The Worksheet Normalizer node supports Text, Replace and Regex as User-defined function types. Select a Function type in the User-defined function window. Each user-defined function type is described below.
Text
The Text function type appends the text specified in the Insert text field to the output.
Select Text as the Function type in the User-defined function window to use the Text function type.
The Text function type in the User-defined functions panel will be highlighted with green color box.
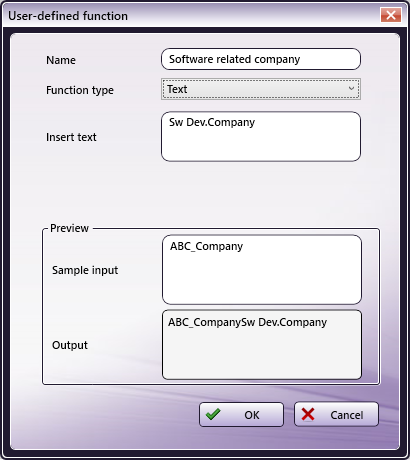
Important! A maximum of 250 characters can be entered in the Insert text field.
Replace
The Replace function type replaces the value specified in the Find what field with the value specified in the Replace with field.
Select Replace as the Function type in the User-defined function window to use the Replace function type.
The Replace function type in the User-defined functions panel will be highlighted with yellow color box.
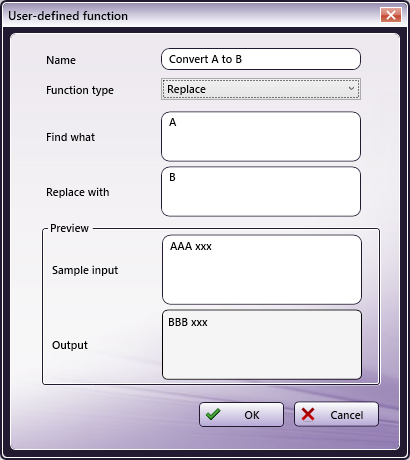
Important! A maximum of 250 characters can be entered in the Find what and Replace with text fields.
Regex
The Regex function type extracts a string by a regular expression pattern, or replaces the extracted string with a specified string.
Select Regex as the Function type in the User-defined function window to use the Regex function type.
The Regex function type in the User-defined functions panel will be highlighted with purple color box.
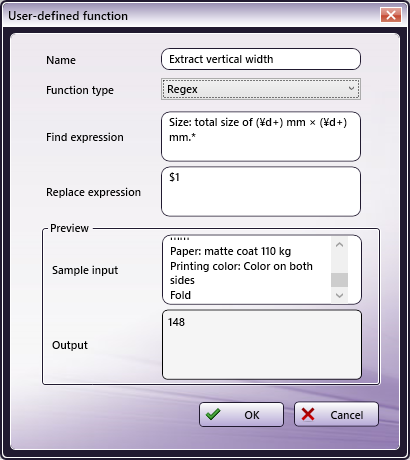
In the Find expression< field, enter a regular expression for finding a matching string from input data.
Enter a Regex representing a pattern for extracting or replacing matched strings in the Replace expression field.
If matching string is not found, the value of Sample input field will be displayed as it is in the Output field.
Examples of string extraction with regex are shown below.
Example 1: Extract required data
| Input Data | Regex | Expected Output |
|---|---|---|
| “Offset printing/Leaflet or flier printing/A6 leaflet or flier Delivery date: 4 business days after receipt of order (ship on November 1, 2017) Size: total size of 148 mm × 105 mm Paper: matte coat 110 kg Printing color: Color on both sides Folding process: None” |
|
148 |
Example 2: Replace required data
| Input Data | Regex | Expected Output |
|---|---|---|
| “Authorities announced that people need to keep the street clean. They also decided to decorate main street side-walks with sculptures.“ |
|
“Authorities announced that people need to keep the road clean. They also decided to decorate main road sidewalks with sculptures.“ |
Please refer to this page for more information about regular expressions.
The following is an example that the User-defined functions Add Text is dragged and dropped to column A in the Process to output area.
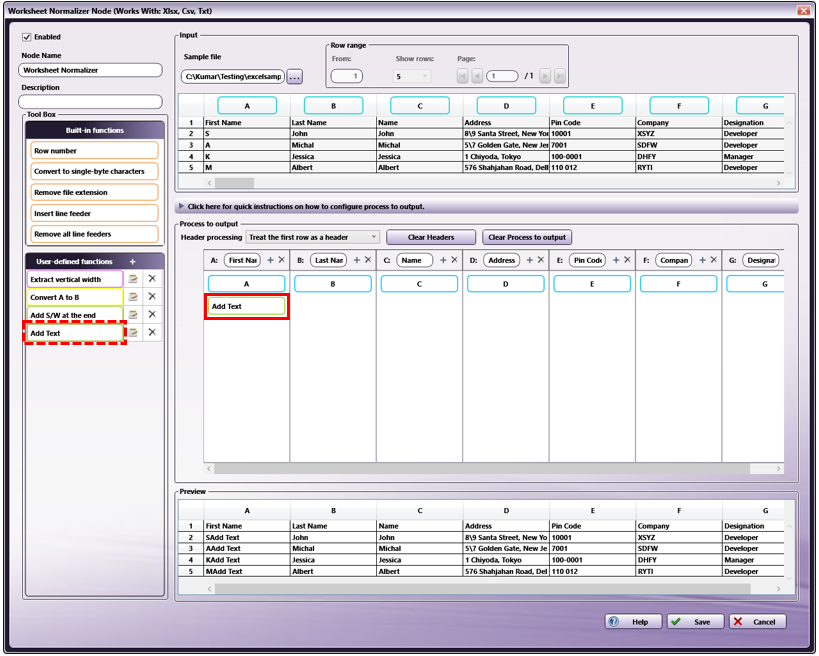
Note: The User-defined function works only for the column placed.
Input
Upload a sample file in the Input field to input a file into the Worksheet Normalizer node.
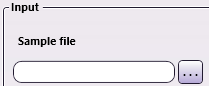
In the Sample file field, click on the ellipsis  button to browse to and select the file to be uploaded. As an alternative, user can manually input the file path of sample file to be uploaded.
Any of the following file formats may be uploaded to the node: XLSX, CSV and TXT.
The selected file will be displayed in the Sample file field.
Notes:
-
If an unsupported file is given as input, an error will occur.
-
If you try to upload a new sample file when there is already a function or column item configured in the Process to output area, a confirmation message of overwriting the Process to output setting will be displayed. Based on your selection as below, the Process to output setting will be maintained or overwritten with a new sample file.
- Click Yes to clear the current Process to output setting.
- Click No to maintain the current Process to output setting.
- Click Cancel to cancel uploading a new sample file.
Specifying Row range
By configuring the Row range, it is possible to specify the number of rows to be displayed out of the uploaded file.

-
In the From field, enter the starting row to be displayed in the Input area. Note that only numbers are allowed as input in the From field and that a maximum of 10000 can be given as input.
-
In the Show rows drop-down, select the number of rows to be displayed in the Input area. By default, the number of rows that will be displayed is 5. For example, if “Show rows” value is selected as “10”, then 10 rows will be displayed in the Input and Preview area.
-
Maximum number of rows that can be displayed per page is 100.
-
Page Navigation: Click on the arrows to navigate through multiple pages if the uploaded file has more than 5 rows and “Show rows” value is less than the total number of rows in uploaded sample file.
-
Total number of pages displayed and navigated depends on the number of rows in the uploaded sample file and value of “Show rows”. For example, if uploaded sample file has 1000 rows and value of “Show rows” is selected as “5”, then total number of pages that can be displayed and navigated will be 200.
-
In addition, when the From rows are specified, the total number of Page is the number of rows specified from the From to divided by Show rows.
-
Only numerical values can be entered in page navigation field. If the value entered in page navigation field is greater than total number of pages that can be displayed, then the Input and Preview area will be navigated to the last page. For example, if total number of pages that can be displayed is “200” and if any value greater than “200” is entered, then the Input and Preview area will navigate to page number “200”.
-
Page navigation will be disabled when number of rows in uploaded sample file is less than or equal to the selected “Show rows” value. For example, if uploaded sample file has 8 rows and “Show rows” value is selected as “10”, all rows will be displayed in one page and page navigation will be disabled.
Notes:
-
If value “0” is entered in page navigation text field, then the Input and Preview area will navigate to first page.
-
 /
/  button navigates to previous page or next page
 -
 /
/  button navigates to first page or last page.
Input Area
When a sample file is uploaded to the Input area, the data in the file will be displayed in the Input area.

-
The Input is a read-only table.
-
After uploading the sample file, based on Show rows drop-down value and sample file data, the Input table displays the input data.
-
The header columns (“A”, “B”, “C" and so on in the blue frame in the example UI) in the Input table can be used as setting item by dragging and dropping to the Process to output area.
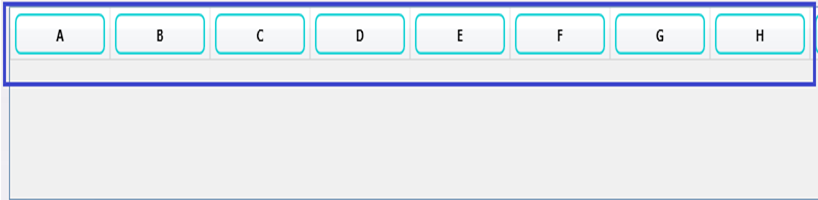
Note: Items other than column IDs cannot be dragged and dropped to the Process to output.
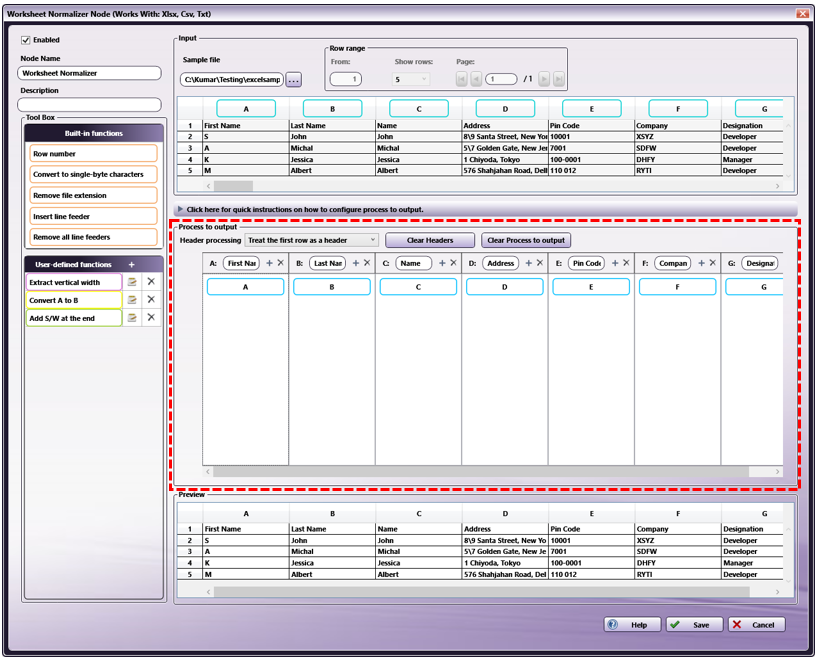
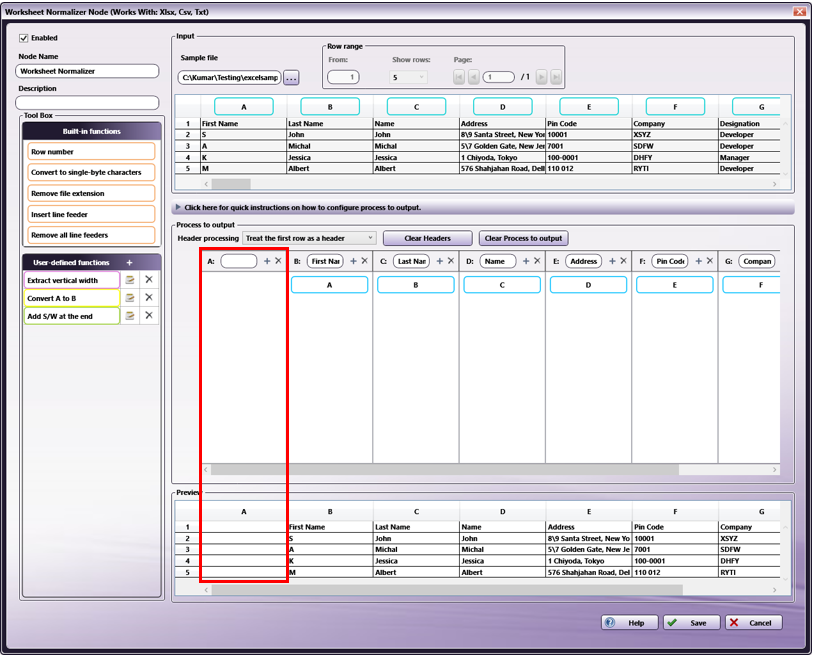
Process to output
The Worksheet Normalizer node generates a CSV file as an output based on the Process to output settings.
In the Process to output, you can add new columns to the input file or delete any columns. In addition, you can configure the column settings for the change to be made on the input file by applying the built-in functions and the user-defined functions.
By default, columns A to CV are displayed in the Process to output table. If the input file contains fewer columns than the range of A to CV, then the number of columns corresponding to the column range of the input file will be displayed.
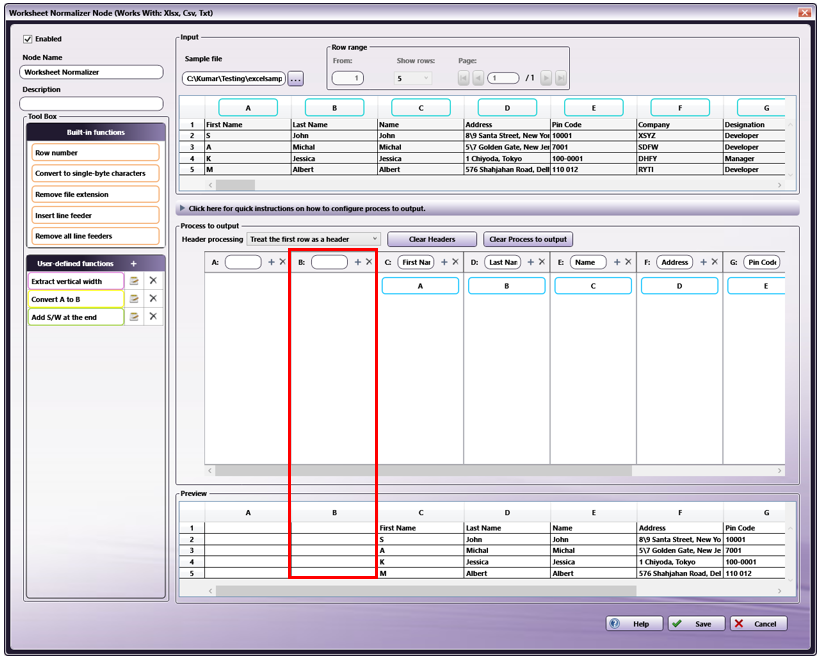
Add / delete columns
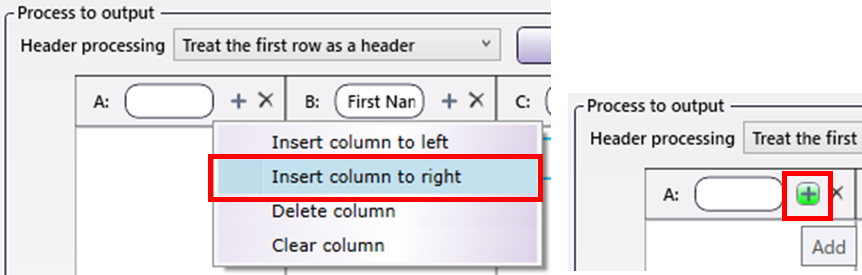
To add a new column to the Process to output table, click on the + Add icon in the column header. Alternatively, you can add a column to the right or left side of the selected column by selecting Insert column on right or Insert column on left from the context menu displayed by right-clicking the column header
To delete a column, click on the Delete X icon in the column header. Alternatively, you can delete the selected column by selecting Delete column from the context menu displayed by right-clicking the column header.
You can clear Items configured in the selected column by selecting Clear column from the context menu displayed by right-clicking the column header.
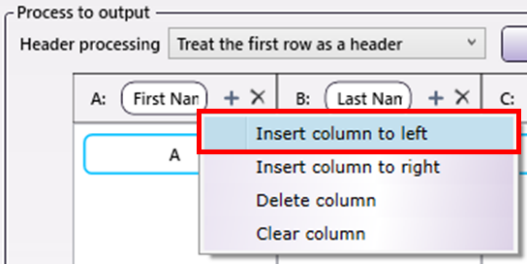
The case of adding a column to the left of column A
1. Right click on the header of column A 2. Click Insert column to left from the context menu
1. Right click on the header of column A 2. Click Insert column to right from the context menu Or Click on the Add button in the header of column A.
Add / Edit / Delete Functions in Process to output area.
Items such as Built-in functions, User-defined functions, and Column headers in the Input table can be added to the Process to output table and configure it.
Built-in function and User-defined function when added to a column is applied to every cell in that particular column of Process to output table.
To add an Item to the Process to output table, select the function or the column ID to be added and drag-and-drop it to the desired column in the Process to output table.
The display location and order of the added items can be changed.
To change the display location or order of the added items, select the item and drag-and-drop to the desired location.
User-defined function added to the Process to output table can be modified directly by using mouse double click on selected User-defined function item in Process to output table.
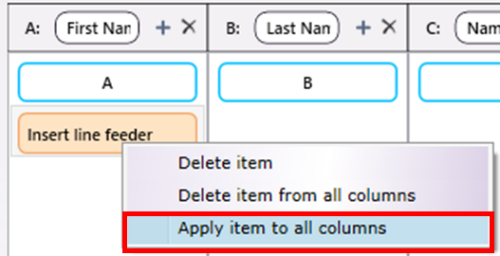
To apply the added item to all the columns, right-click on the item and select Apply item to all columns from the context menu displayed. This will apply the settings of the selected item to all columns.
To delete the added item, right-click on the item and select Delete item from the context menu displayed.As an alternative, use keyboard “Delete” key to delete the selected item from Process to output table.
To delete item settings from all columns, right-click on the item and select Delete item from all columns from the context menu displayed. This allows item settings to be deleted from all columns.
For example:
- Drag-and-drop the Insert line feeder from the Built-in functions area to column A in the Process to output area.
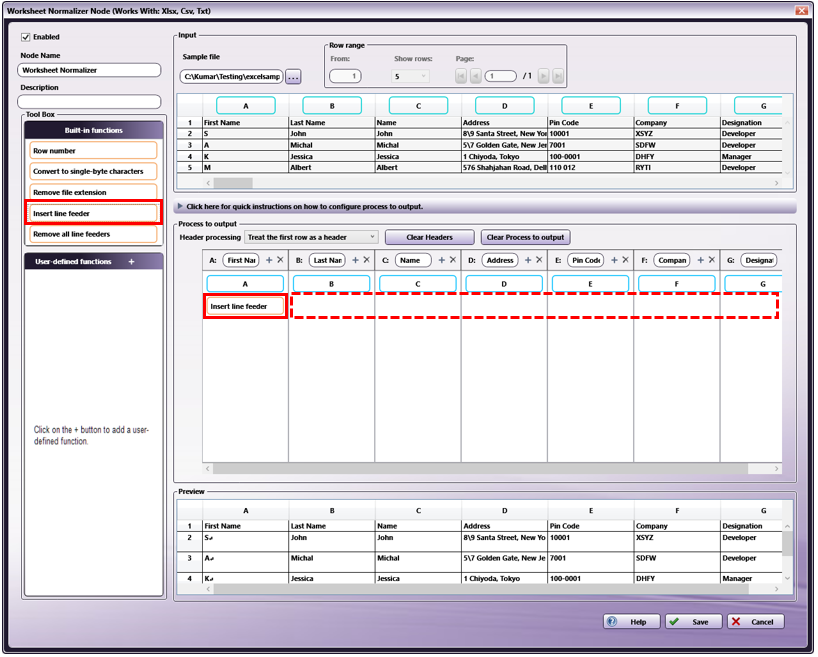
- To apply the function to all columns, right-click on the function and select Apply item to all columns from the context menu.
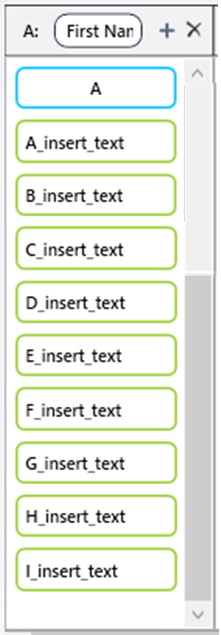
For example, when the selected function applied to all columns:

Note: The total number of functions that can be set to the Process to output is up to 300. It is the sum of the functions set for all column cells. Column IDs are also included in the total. The maximum number of functions that can be set for each column is 10. If you try to add more than the maximum number of functions, an error message is displayed and cannot be added.
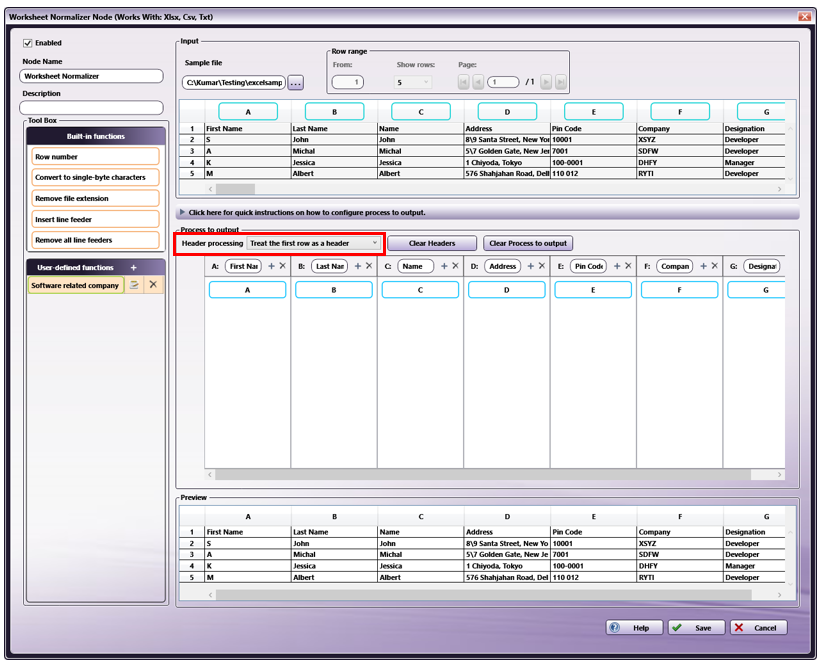
Header Handling
Set up a method to handle headers of the output file in the Header processing drop-down. By default, this is Treat the first row as a header.
| Function | Description |
|---|---|
| Treat the first row as a header | Edit the first row of the input file and use the edited row as the header for the output. |
| Add a new header at the beginning | Define a new first row for the input file, and use this newly defined row for the headers in the output. The existing first row will be treated as data and will be processed in the output. |
Note: The header from the input file will not be the header used for the output of the file. The header of the generated output file will be the contents set in the header text within the “Process to output” *section of the configuration window.
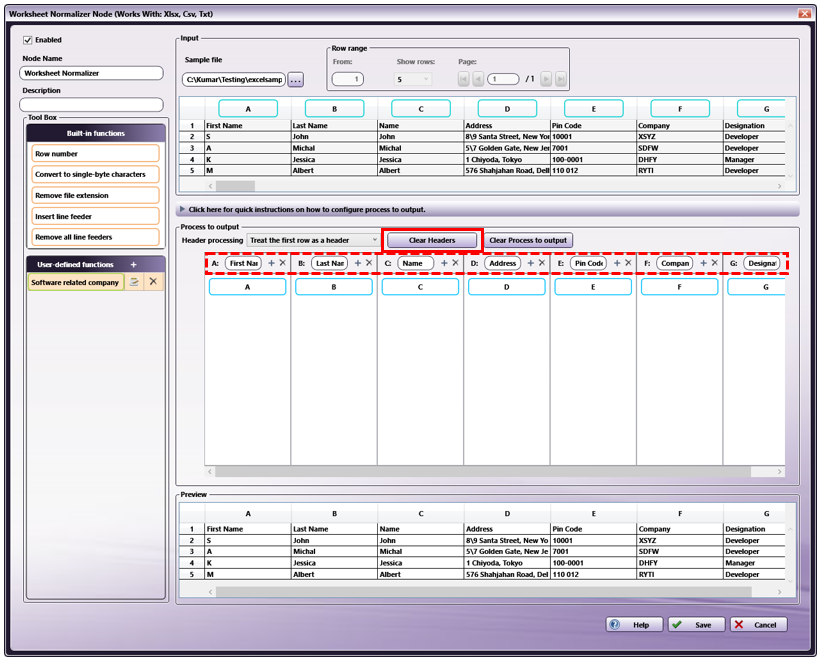
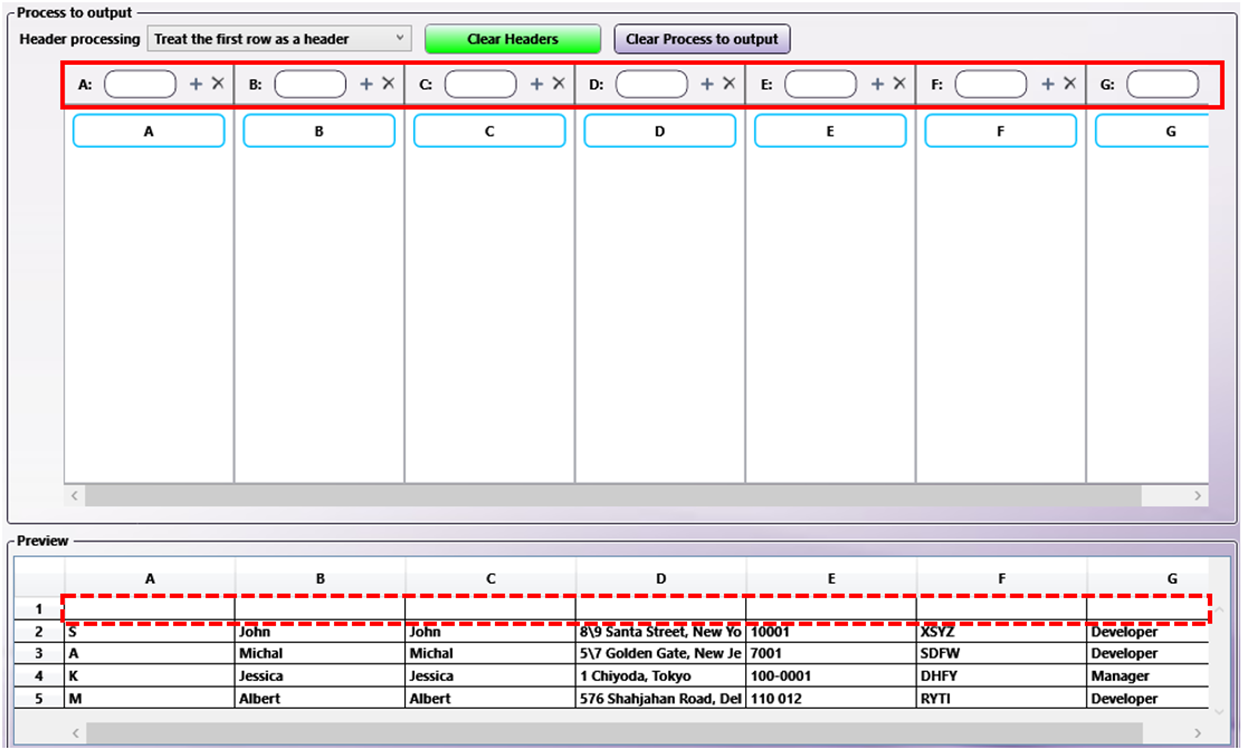
Clear Process to output header
Click the Clear Headers button to clear the header text that has been entered in the header form in the Process to output area.
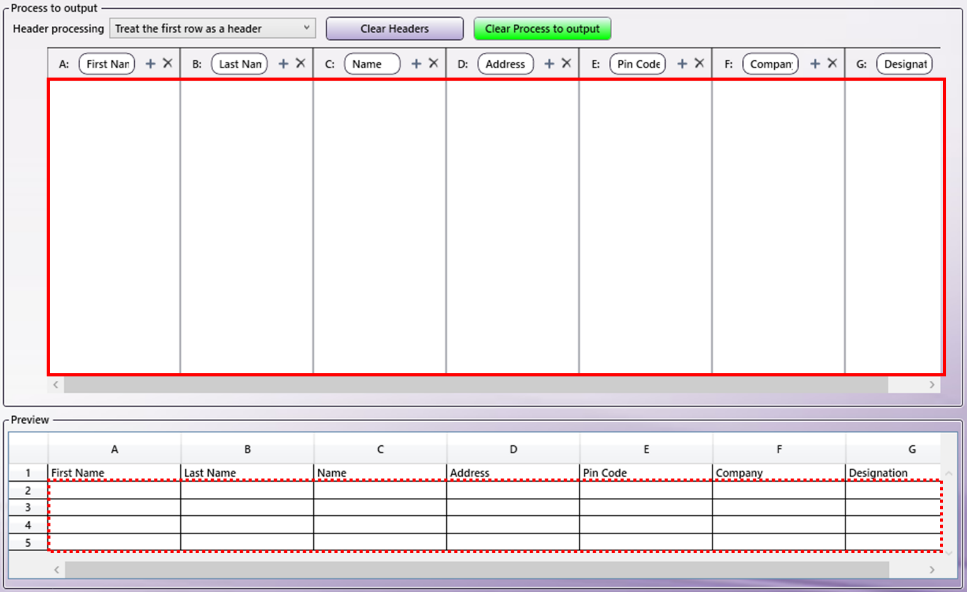
Clearing Configured Items in the Process to output area
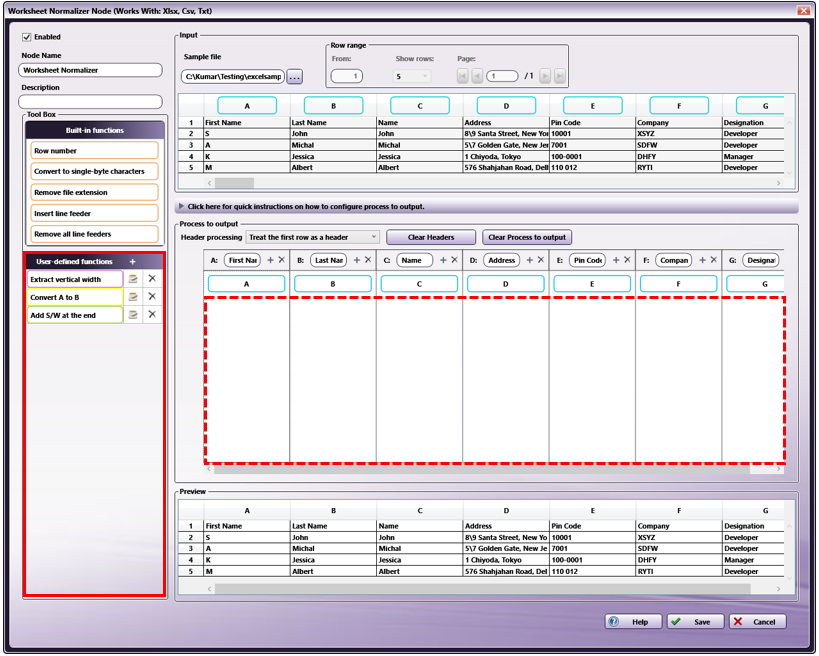
To clear the items that have been configured in the Process to output area, click the Clear Process to output button.
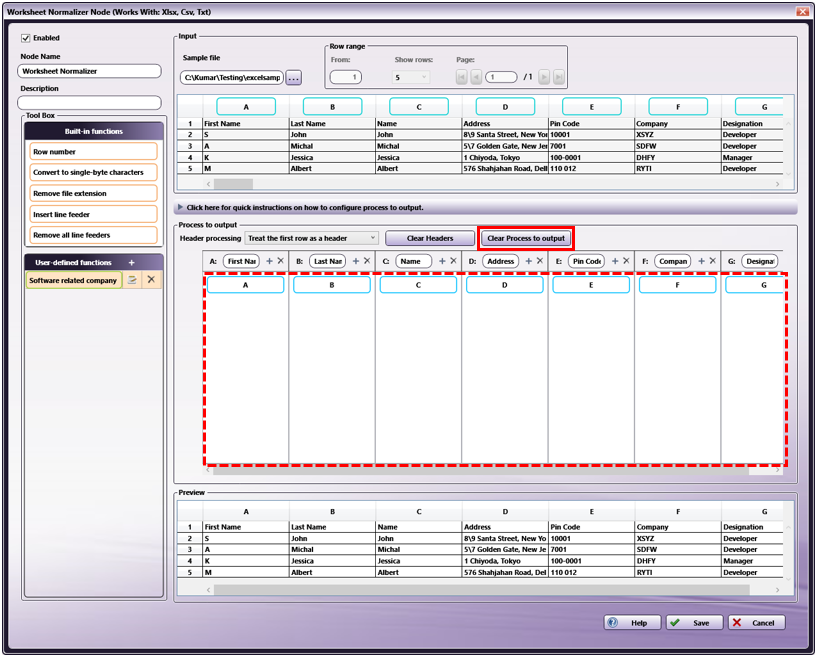
For example, when all items set in the Process to output area are cleared:
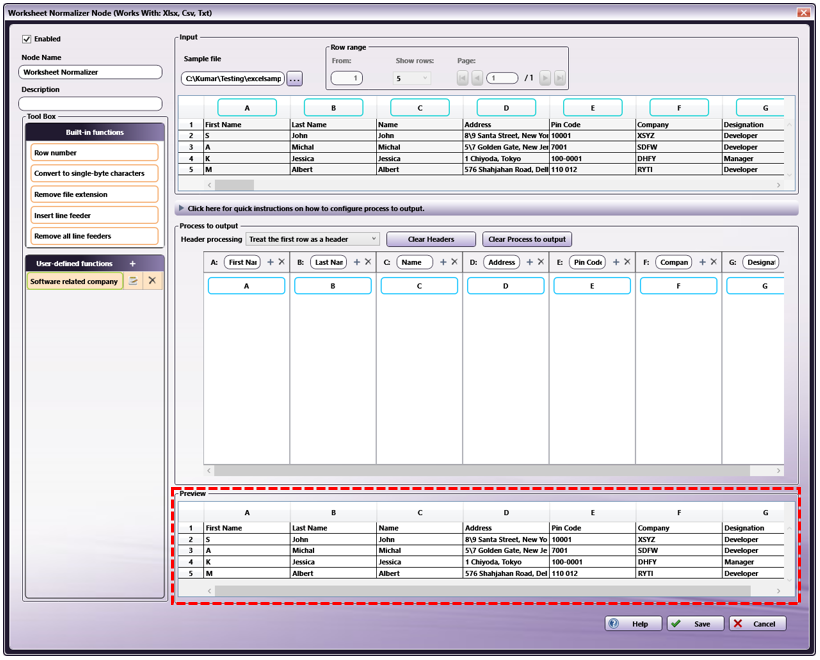
Preview
The Preview area displays a preview of the output result. Output result is generated by applying the configuration of the Process to output table to the input data.
Sample Workflow with the Worksheet Normalizer Node
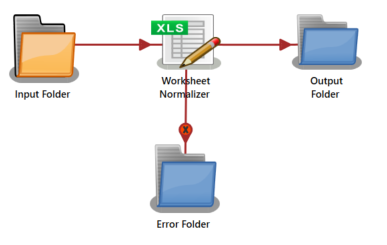
In this sample workflow, the Worksheet Normalizer node is configured to insert text strings to the specified cells of the input CSV file and generate a new file as an output.
The files collected from the Input Folder node are forwarded to the Worksheet Normalizer node. The files processed by the Worksheet Normalizer node are output to the Output Folder node.
Input Folder: Configure the Input Folder to collect CSV, XLSX and TXT files from the Input Folder node and forward them to the Worksheet Normalizer node.
An example is shown below for processing the following CSV data. The CSV file is saved locally as “Worksheet_sampledata.csv.”
Worksheet Normalizer: Upload the sample file (Worksheet_sampledata.csv) to the Worksheet Normalizer node. During the upload, all the headers in the sample file will be copied to the Process to output table
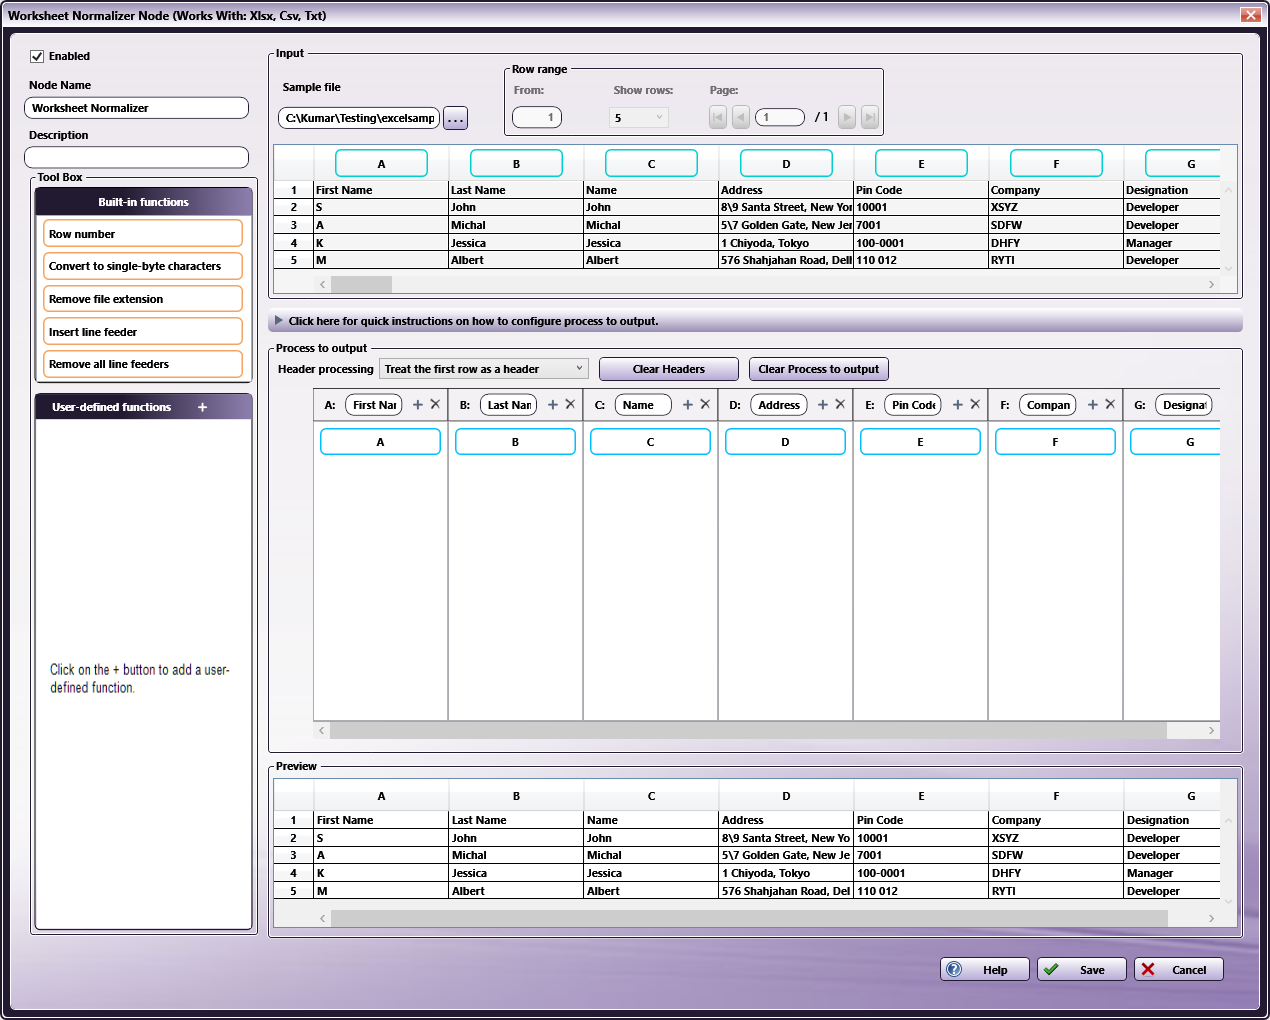
Use the following procedure to process the file with the Worksheet Normalizer node. In this example, it is configured to add the string “Sw Dev.Company” as the type of company after the company name.
- Click on in the User-defined functions header to create a user-defined function “Software related company”.
- Configure the “Software related company” function with the following details:
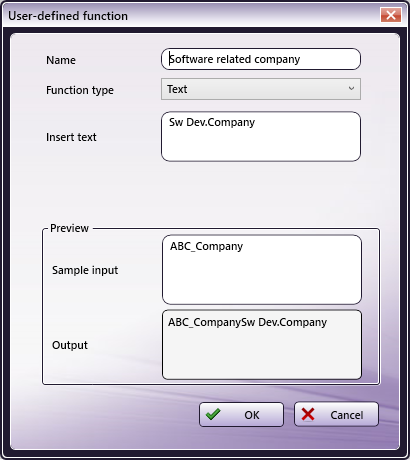
- Name: Enter "Software related company" as the name for the user-defined function.
- Function type: Select "Text" as the function type.
- Insert Text: Enter "Sw Dev.Company" as the text string to append to the output.
- Sample input: When a sample value is entered in the Sample input field, the output result applied the defined function will be displayed in the Output field. In this example, it is illustrated the case that “ABC_Company” is entered as an input value, and then the “Sw Dev.Company” will be appended to the input value as defined by the user-defined function.
- Click the OK button.
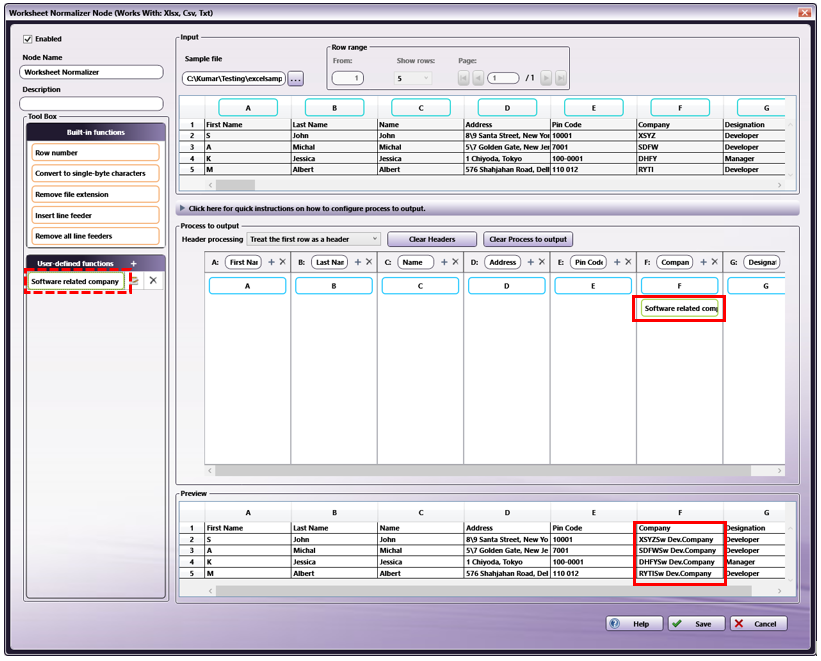
The “Software related company” function will be added to the User-defined functions area.
Configure the Process to output table to append the string “Sw Dev.Company” to the values in the column “F” of Company data in the Input table as defined by the user-defined function created in the step 2. Drag-and-drop the “Software related company” from the User-defined functions area to column “F” (Company) in the Process to output table.
Output Folder: Configure the Output Folder node, then save and validate the workflow. When the work-flow is executed, as shown below, a file is generated in which the text value “Sw Dev.Company” is appended after the cell values of the company name in column F of the input sample file as defined by the user-defined function in the Worksheet Normalizer node.
First Name,Last Name,Name,Address,Pin Code,Company,Designation S,John,John,"8\9 Santa Street, New York ",10001,XSYZSw Dev.Company,Developer A,Michal,Michal,"5\7 Golden Gate, New Jersey ",7001,SDFWSw Dev.Company,Developer K,Jessica,Jessica,"1 Chiyoda, Tokyo ",100-0001,DHFYSw Dev.Company,Manager M,Albert,Albert,"576 Shahjahan Road, Delhi ","110 012",RYTISw Dev.Company,DeveloperLimitations
Important!
-
Maximum file size supported by this Node is shown in below.
-
Preview output:
- Up to 10,000 rows and 100 columns, as well as less than 10 MB in file size.
-
Workflow execution:
- Up to 75,000 rows and 100 columns, as well as less than 30 MB in file size.
-
-
Only UTF-8 encoding is supported for CSV and TXT files.
-
The following limitations apply to XLSX files.
-
The XLSX file encrypted with password is not supported.
-
If there are multiple sheets in the XLSX file, only the leftmost sheet is processed and the other sheets is ignored.
-
-