FTP In
The FTP In collection node connects to an FTP server to monitor a configured folder for new files at a regular interval. This collection node can also filter files by name, size, or modified date prior to passing documents along a workflow for processing and routing.
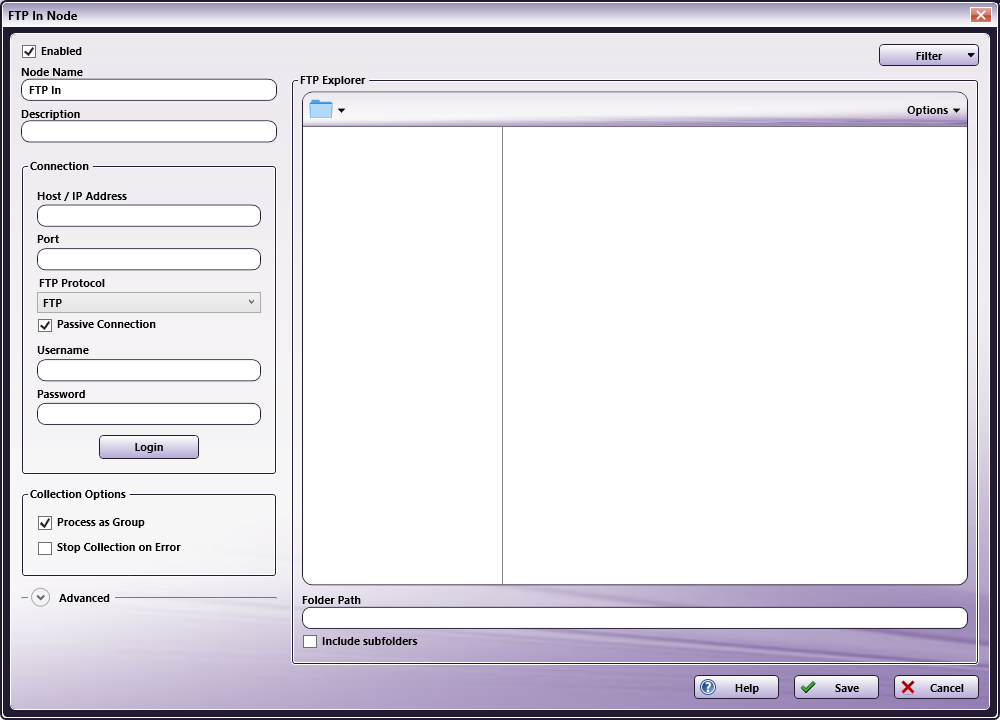
To open the FTP In node, add a collection node for FTP In to the workflow; then double-click on it.
Do the following:
-
Make sure the Enabled box is checked. When unchecked, this input will be ignored. While the workflow will still validate, documents will not be collected and may be lost.
-
In the Node Name field, enter a meaningful name for the FTP In node.
-
In the Description field, enter a description for the FTP In node. Although this is not required, it can be helpful when you have more than one input. If the description is long, you can hover the mouse over the field to read its entire contents.
-
In the Connection area, enter the following settings to connect to an FTP server:
- Host / IP Address: The address of the FTP server.
- Port: The port of the FTP server.
- FTP Protocol: The FTP protocol over which the connection will be made and the files will be transmitted. The options include: FTP or FTPS (FTP over SSL). FTPS can be implicit or explicit encryption.
- Passive Connection: Select this check box when using a passive connection. With a passive connection the client establishes a command channel which prompts requests for the server to begin listening on a port. The client then opens a data connection with that open port. Otherwise, the connection to the FTP server will be by active connection meaning the client must establish a command channel while the server establishes a data channel.
Note: A passive connection may be required when there is a firewall present.
-
If authentication on the server is required, enter in the Username and Password associated with the FTP server in the Authentication area.
-
Use the Login button at the bottom of the Connection area to verify that Dispatcher Phoenix is communicating correctly with the FTP server.
-
In the Collection Options section, select the relevant options:
- Process as Group: When this option is checked, files from the folder will be processed as a group. When this box is unchecked, files will be processed from the FTP server individually.
- Stop Collection on Error: When this option is checked, file collection will be stopped when an error occurs.
-
In the Advanced section, configure the following options:
- Data Connection Timeout: The time, in seconds, in which a data connection attempt will last before timing out and being counted as failing.
- Log All Communications: When this option is checked, the FTP In node will log all FTP communications in the Dispatcher Phoenix activity log (debug level logging required).
-
Once the connection with the FTP server has been established, use the Filter drop down in the upper, right-hand corner to identify the conditions, if any, for collecting files. When using filters, only files that meet the specified criteria will be collected from the FTP server.
-
Filter File Name: Check this box to enable the collection of files that match the identified file name, including the file extension.
- In the File Name field, enter in the File Name that Dispatcher Phoenix should collect from the FTP server.
- Select Regular Expression box to dynamically filter files using a pattern describing a certain amount of text.
- Check the box next to Match Case if the file name is case sensitive.
Note: Only one of these options can be enabled at a time: Match Case or Regular Expression.
-
Filter Folder Name: Check this box to enable the collection of files from folders that match the identified folder name.
- In the Folder Name field, enter in the Folder Name that Dispatcher Phoenix should collect files from on the FTP server.
- Select Regular Expression box to dynamically filter folders using a pattern describing a certain amount of text.
- Check the box next to Match Case if the folder name is case sensitive.
Note: Only one of these options can be enabled at a time: Match Case or Regular Expression.
-
Filter File Size: Check this box to select the size criteria the file should meet before it is pulled from the FTP server into a Dispatcher Phoenix workflow.
- Use the file size dropdown to specify whether the file should be greater than, less than, equal, greater than or equal, less than or equal, or in between the specified value(s).
- Enter the file size into the blank field.
- Specify the file size measurement unit: bytes, KB, MB, GB or TB.
-
Filter Modified Date: Check this box to enable filtering of files that have been modified before, after or on a specific date range.
- Use the file size dropdown to specify whether the file’s modified date should be newer than, older than, in between, or equal to the specified date.
- Use the calendar to select the appropriate date or enter in the date using the following format: MM/DD/YYYY
-
Filter Criteria
- Match any one filter criteria: If one of the filter criteria is met, the file will be collected from the FTP server.
- Match all filter criteria: If all of the filter criteria are met, the file will be collected from the FTP server.
-
-
Use the Options button in the upper-right corner of the FTP Explorer to adjust or configure the folder view.
- Select Show Tree View to view the complete folder structure in a tree view.
- Use Show Files to show files within the folder browsing view.
- Use the New Folder option to create a new folder in the currently selected folder path on the FTP server.
- Refresh the folder browser tree view in the FTP Explorer.
-
The Folder Path field below the folder tree will auto-populate when you make your folder selection in the FTP Explorer. If you do not want to navigate the file explorer, you may manually enter the Folder Path in the field.
- Select the check box next to Include Subfolders if Dispatcher Phoenix should also collect files from all of the subfolders located within the folder path.
-
Select the Save button to keep your FTP In node configuration. You can also select the Help button to access online help and select the Cancel button to exit the window without saving any changes.
Metadata
The following metadata is created in the FTP In node:
| Metadata Value | Description |
|---|---|
| {ftpin:count} | The total number of files collected from the FTP server. |
| {ftpin:filename} | The collected file name. |
| {ftpin:folder} | The name of the folder on the FTP server that files are collected from. |
| {ftpin:fullpath} | The full path (including filename) of the FTP file. |
| {ftpin:host} | The address of the FTP server. |
| {ftpin:path} | The path to the folder on the FTP server that files are collected from. |