Doc-Classifier

Use the Doc-Classifier node to automatically categorize scanned documents, electronic files, etc., into pre-defined classes using Dispatcher Phoenix’s Optical Character Recognition (OCR) capability. The node extracts information, matches it against pre-defined classification definitions, and produces the following metadata values:
- Classification - The detected Classification Type or, if not detected, “other”.
- Confidence Level - A percentage rating indicating the probability the document was classified correctly.
Other processing nodes in the workflow can then use the metadata for processing/routing the files. This node replaces the process of manually categorizing and distributing documents.
The Doc-Classifier node includes many pre-defined Classification Categories such as birth certificates, loan applications, and purchase orders. The categories contain keyword-based rules to extract information and produce metadata outputs of classification and confidence level information. However, the actual forms within the Classification Categories are hidden. That is, you can select categories for use but you cannot modify them.
This node works with the following file types:
- TIFF
- JPG
Notes:
- The Doc-Classifier node only supports files with a resolution of 300 dpi.
- The node does not permit any additional processing actions such as Highlight/Strikeout or Redact.
- The node collects data for which you can generate reports using the Dispatcher Phoenix Web Report Generator Tool.
- The node includes the OmniPage OCR engine.
Configuring the Doc-Classifier Node
To open the Doc-Classifier node, drag-drop the node from the Process list into a workflow and double-click on the node. The Properties window appears:

-
Enabled - To enable this node in the current workflow, check the box at this field. If you leave the box blank, the workflow ignores the node and documents pass through as if the node was not present. Note that a disabled node does not check for logic or error conditions.
-
Node Name - The node name defaults into this field. This name appears in the workflow below the node icon. Use this field to specify a meaningful name for the node that indicates its use in the workflow.
-
Node Description - Enter an optional description for this node. A description can help you remember the purpose of the node in the workflow or distinguish nodes from each other. If the description is long, you can hover the mouse over the field to read its entire contents.
Buttons
- Advanced OCR Settings - To access the OCR Settings window, click this button.
- Help - To access Dispatcher Phoenix Online Help, click this button.
- Save - To preserve your node definition and exit the window, click this button.
- Cancel - To exit the window without saving any changes, click this button.
Classification Type
For each Doc-Classifier node you add to a workflow, you must select a Classification Type. Each type applies a distinct detection method to imaged documents. Choose one of following options:
- Basic – The “full-page” option, this Classification Type applies OCR zones to the entire page area and searches for keywords defined in the Classification Categories you select for the node. The search looks for the first keyword and, if found, searches for other document classification qualifiers via the full-page zones.
- Standard - The “template-based” option, this Classification Type applies pre-defined templates to search for keywords defined in the Classification Categories you select for the node. Each template contains a set of OCR zones, rules, sub-rules, and regular expressions.
- Upload a custom template - If the above detection methods do not adequately extract the information required to classify a particular document type, you can request the Solutions Engineering Center (SEC) to create a custom template for use with the document type. You use this option to apply the custom template to the node. For more information, contact SEC.
Note: Classification Types are constantly being refined and updated. When you select a Classification Type, if multiple template versions exist, a drop-down menu appears listing the available versions. Select the version you want to use. The default option is the most recent version, and the templates list in reverse-chronological order.
About Classification Types
- All Classification Types create metadata. However, only the Standard type creates the Confidence Level metadata type.
- When a keyword is not detected in a document, metadata is created to classify the document as Other.
- While you can apply only one Classification Type to a Doc-Classifier node, you can configure another Doc-Classifier node, apply a different Classification Type, and add it to the workflow. By setting up two nodes in one workflow, you can run additional classification processes as a check.
Classification Categories
Each Classification Category contains a template that was created based on a sampling of documents associated with that category. For example, the template in the Purchase Order category was constructed based on a sampling of actual purchase orders. Each template contains a set of OCR zones, rules, sub-rules, and regular expressions. The template uses these elements to search for keywords in the scanned documents and classifies the documents based on the keywords detected (or not detected).
In addition, for each document scanned, the template calculates a “confidence level” and generates metadata based on that level. Basically, the greater the number of OCR zones in the category that detect the keyword, the higher the confidence level. You can then route documents in the workflow based on the confidence level.
Once you select a Classification Type, the Classification Categories area populates with available categories. Select one or more categories by which to classify documents in the workflow. Classification Categories are constantly being refined and new categories added. The following categories are currently available:
| Category | Category |
|---|---|
| Bank Statements | Non-Disclosure Agreements |
| Bills of Lading | Police Reports |
| Birth Certificates | Purchase Orders |
| Bylaws | Report Cards |
| Census Forms | Student Application Admission Forms |
| Insurance Claims | UB-04 Claim Forms |
| Invoices | W-2 Forms |
| Loan Applications | Wills |
| Memorandums of Understanding |
Confidence Level
To help you route documents accurately and with confidence, each Classification Category generates a confidence level - a percentage rating indicating the confidence level that the document was classified correctly. Keywords detected by a Classification Category produce confidence-level metadata, and you can then route documents based on the confidence level. For example, you can choose to route all documents that meet or exceed a confidence level of 90 to the selected Classification Category, and route all documents not exceeding 90 to the “Other” category where they can be reviewed and re-classified.
Each Classification Category consists of one or more search rules, and each rule applies an OCR zone used to detect the content in a specified area of the document. The greater the number of rules a Classification Category contains, and the more keywords the rules in those zones detect, the higher the confidence that the document was classified correctly.
Notes:
- Confidence levels are used only in the Classification Categories in the Standard Classification Type, and not in the Basic Classification Type.
- If multiple Classification Types are detected, a confidence level is produced for each and the document is routed to the highest level detected.
- To view the confidence level found for a classified document, you must add a Metadata to File node to the workflow and view the metadata section of the file generated by the workflow. See the workflow example 2 below.
Metadata
The following metadata is created in the Doc-Classifier node:
| Metadata | Description |
|---|---|
| {sdc:classification} | Document-level metadata containing values for each Classification Category found. |
| {sdc:confidence} | Document-level metadata containing a confidence level (that is, a percentage rating indicating the confidence level that the document was classified correctly) for each Classification Category found. |
Note: The Doc-Classifier node creates only document-level metadata.
Sample Workflow 1
The following is a typical Doc-Classifier workflow to route documents by Classification Category:
- Collect documents from an input folder.
- Process the documents against user-defined Doc-Classifier categories.
- Output the document categories as metadata and send the metadata to the Metadata Route node.
- Distribute all classified documents to an output folder.
- Distribute all un-classified documents to another output folder.

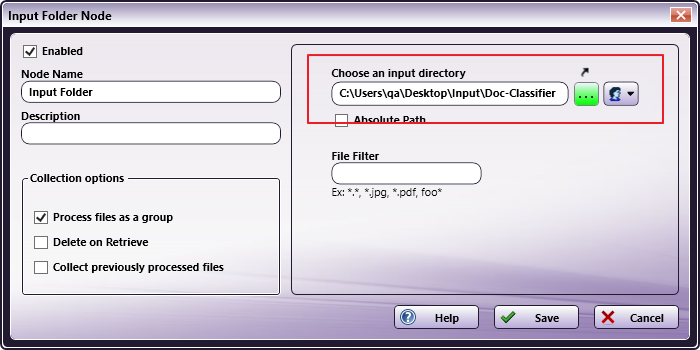
Step 1 - Add an Input Folder
Add an Input Folder to the workflow and specify the input directory to be the folder containing the documents to classify.
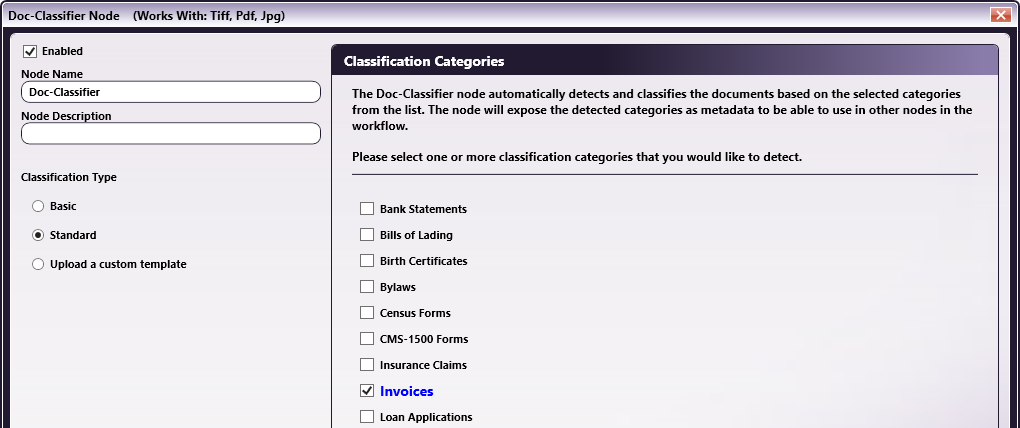
Step 2 - Configure the Doc-Classifier Node
Add a Doc-Classifier node to the workflow. Select a Classification Type and one or more Classification Categories.
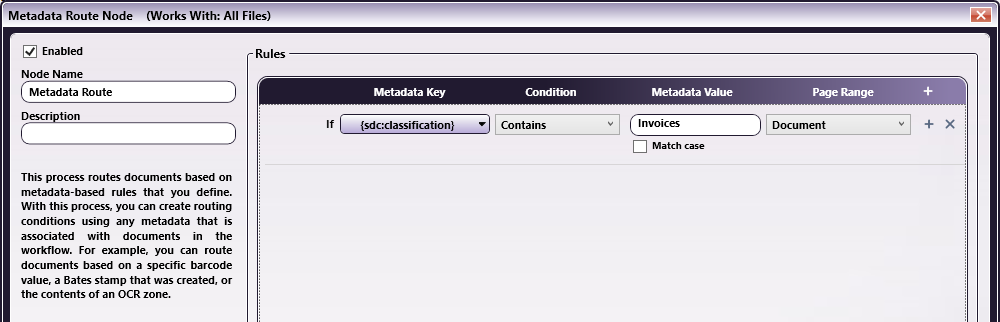
Step 3 - Configure the Metadata Route Node
Add a Metadata Route node to the workflow and configure it as in the following illustration:
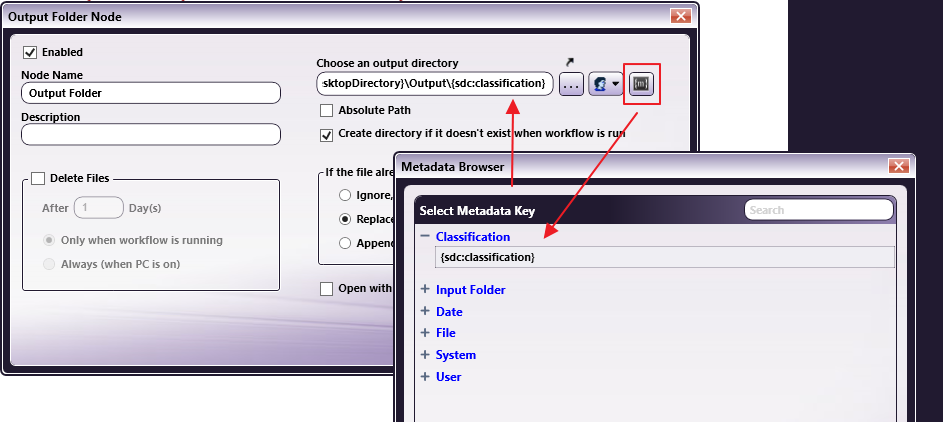
Step 4 - Configure the Output Folders
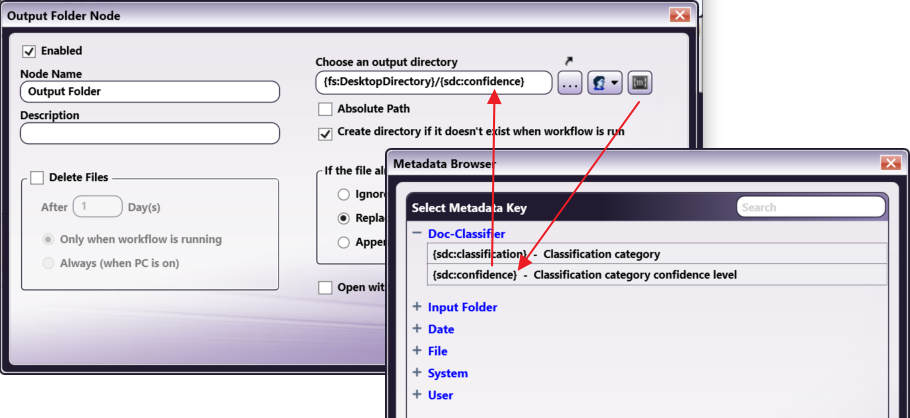
Add two Output Folder nodes to the workflow. For each Output Folder node, specify the output directory to be created based on the metadata.
Step 5 - Connect the Nodes in the Workflow
Connect the nodes as in the following illustration:
Step 6 - Run the Workflow
Run the workflow. The Doc-Classifier node creates classification metadata for all documents in the Input folder. All invoices are distributed to a named folder. All other documents are distributed to a folder called Other.
Sample Workflow 2
The following is a typical Doc-Classifier workflow designed to route documents by confidence level:
- Collect documents from an input folder.
- Process the documents against user-defined Doc-Classifier categories.
- Output the document categories as metadata and send the metadata to the Metadata Route node.
- Add two Metadata to File nodes to collect metadata in files for viewing.
- Distribute all classified documents meeting a specified confidence level to an output folder.
- Distribute all un-classified documents and all classified documents not meeting a specified confidence level to another output folder.

Step 1 - Add an Input Folder
Add an Input Folder to the workflow and specify the folder containing the documents to classify as the input directory.
Step 2 - Configure the Doc-Classifier Node
Add a Doc-Classifier node to the workflow. Select a Classification Type and one or more Classification Categories.
Step 3 - Configure the Metadata Route Node
Add a Metadata Route node to the workflow and configure it as in the following illustration. In this example, the Confidence metadata expression will route all documents whose confidence level is greater than or equal to 90 to the detected category, and route all other documents to the “Other” folder.
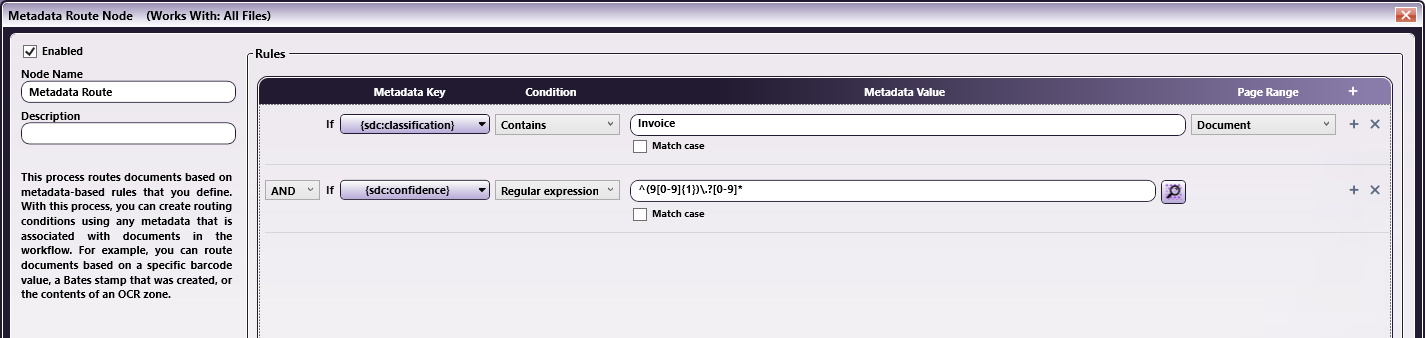
The following expressions can be used to route documents whose confidence level is greater than or equal to the confidence level indicated in the table below:
| Confidence Level | Expression |
|---|---|
| Confidence >= 60 | ^(6[0-9]{1}|[7-9]{1}[0-9]{1})\.?[0-9]* |
| Confidence >= 65 | ^(6[5-9]{1}|[7-9]{1}[0-9]{1})\.?[0-9]* |
| Confidence >= 70 | ^(7[0-9]{1}|[8-9]{1}[0-9]{1})\.?[0-9]* |
| Confidence >= 75 | ^(7[5-9]{1}|[8-9]{1}[0-9]{1})\.?[0-9]* |
| Confidence >= 80 | ^(8[0-9]{1}|9[0-9]{1})\.?[0-9]* |
| Confidence >= 85 | ^(8[5-9]{1}|9[0-9]{1})\.?[0-9]* |
| Confidence >= 90 | ^(9[0-9]{1})\.?[0-9]* |
| Confidence >= 95 | ^(9[5-9]{1})\.?[0-9]* |
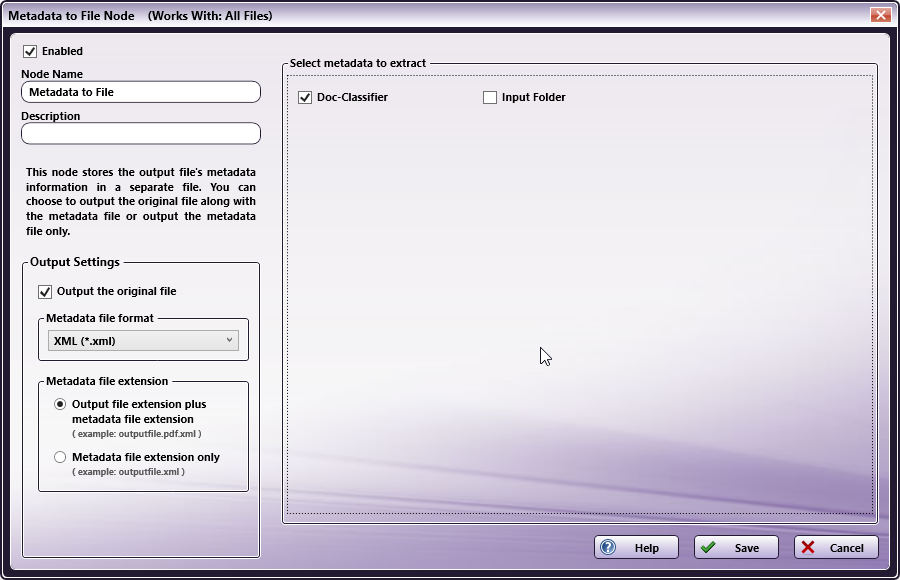
Step 4 - Configure the Metadata to File Nodes
Add two Metadata to File nodes to the workflow. For each Metadata to File node, select the Doc-Classifier option as the metadata to extract.
Step 5 - Configure the Output Folders
Add two Output Folder nodes to the workflow. For each Output Folder node, specify the output directory to be created based on the metadata.
Step 6 - Connect the Nodes in the Workflow
Connect the nodes as in the following illustration:
Step 7 - Run the Workflow
Run the workflow. The Doc-Classifier node creates Confidence metadata for all documents in the Input folder. All invoices meeting the Confidence criterion are distributed to a named folder. All other documents are distributed to a folder called Other.