Desktop Bubble Sheet Generator
The Bubble Sheet Generator is a tool for creating bubble sheet answer keys and student answer sheets for automatic grading and report generation.
Using the Bubble Sheet Generator, you can do the following:
-
Customize the number of questions and the number of responses per question.
-
Configure how many student answer sheets to print.
-
Customize the Bubble Sheets with a logo.
-
Save a customized template.
-
Export a customized template as TIFF, PDF, or XPS.
-
Print a customized template.
-
Configure the Bubble Sheet tests with course and teacher details.
-
Fill in the answer key.
-
Customize the student answer sheets with individual names and IDs.
Note: Most of the changes that you make will be reflected automatically in the Preview area.
Accessing the Bubble Sheet Generator
The Bubble Sheet Generator Tool is available from:
-
The Windows Start menu (it will be listed underneath the Konica Minolta/Dispatcher Phoenix folder).
-
The Tools menu from the Dispatcher Phoenix main application screen.
-
The Bubble Grader Processing node properties window.
-
The SEC website.
In addition, you can open up the Bubble Sheet Generator tool by double-clicking on a saved Bubble Sheet Generator file (*.bgtx).
Using the Tool Bar
The menu items and icons on the tool bar can assist you when generating answer keys and student answer sheets.
| Tool Bar Icons | Click to… |
|---|---|
 |
Start creating a new template. |
 |
Open an existing Bubble Sheet file that has already been generated and saved by the Bubble Sheet Generator. |
 |
Save a Bubble Sheet template using the Save or Save As commands. The Bubble Sheets will be saved as a Bubble Sheet Package File (*.bgtx). You can double-click on the file to open up the Bubble Sheet Generator automatically. |
 |
Export a Bubble Sheet answer key and student answer sheets into a PDF, TIFF, or XPS file. You can also choose to have the exported file automatically open in its associated application once the export is complete by checking the Open with associated application box. Once you’ve specified a file format, select the Export button. |
 |
Print the Bubble Sheet answer key and student answer sheets. |
 |
Open online help information about the Bubble Sheet Generator. |
 |
Click on this icon to display the preview document at its actual size. |
 |
Click on this icon to fit the width of the preview document to the width of the preview area. |
 |
Click on this icon to fit the height of the preview document to the height of the preview area. |
 |
Zoom in and out (using either the magnifying glass icons or the sliding bar). You can also use the mouse wheel to zoom in and out. |
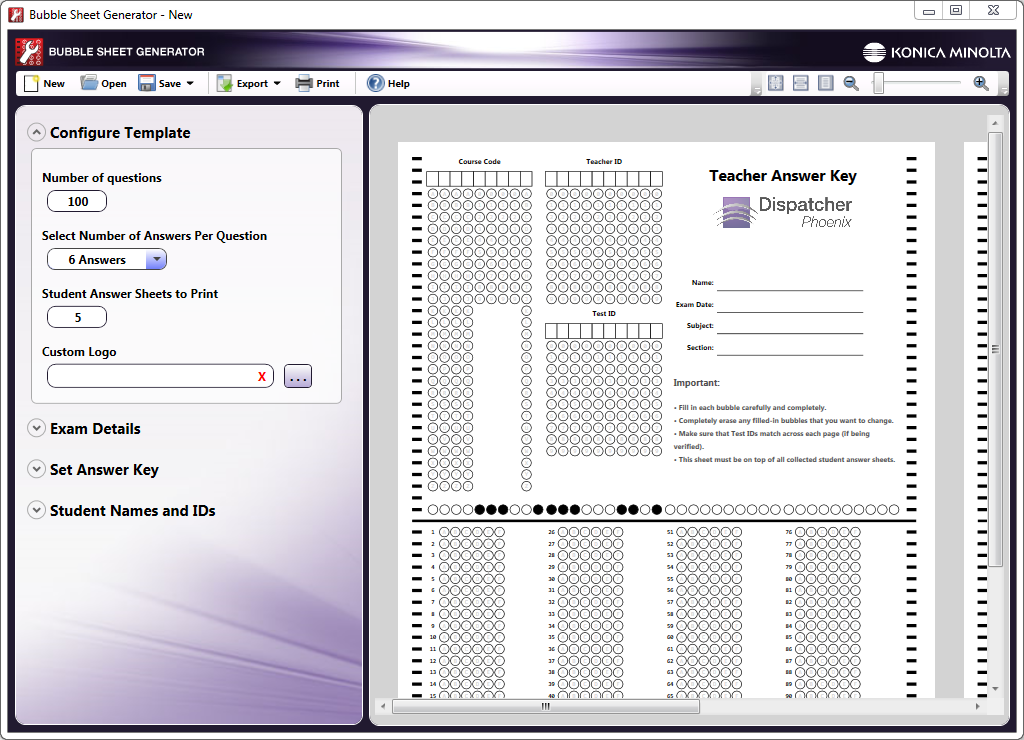
Configure Template
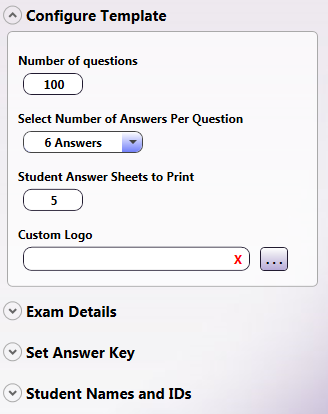
In the Configure Template area, you can do the following:
-
In the Number of questions field, enter the number of questions for the bubble sheet.
Note: The minimum number of questions is one and the maximum number of questions is 200.
-
Use the Select Number of Answers Per Question drop-down list to select the number of responses per question.
Note: The maximum number of answers per question is 6. If you have more than 150 questions, you will only be able to select a maximum of 4 answers per question.
-
In the Student Answer Sheets to Print field, enter the number of student answer sheets that you want to print.
-
If you want to customize the answer key and student answer sheets with a logo to replace the Dispatcher Phoenix logo, do one of the following:
-
Click on the Browse button next to the Custom Logo field. A Windows Explorer window will open, allowing you to browse for and select the logo image that you want to use.
-
Paste a URL for the image in the Custom Logo field.
-
Once you specify a custom logo, the image will appear in the Preview area and also below the Custom Logo field, as in the following illustration:
Exam Details
When you click on the down arrow next to Exam Details, additional fields will appear, allowing you to customize the answer key, as in the following illustration:

You can do the following:
-
In the Course Code fields, enter a course code. This will be added to the answer key and student answer sheets. Please note this field only accepts alphanumeric characters.
-
In the Teacher ID field, enter an ID for the teacher. This will be added to the answer key. Please note this field only accepts alphanumeric characters.
-
In the Test ID field, enter an ID for the test. This will be added to the answer key and student answer sheets. Please note this field only accepts alphanumeric characters.
-
In the Instructor Name field, enter the name of the teacher/professor that is giving the test. This will be added to the answer key and student answer sheets.
-
In the Exam Date field, specify the date of the exam. This will be added to the answer key and student answer sheets. You can use the calendar icon to pop-up a representation of a calendar to easily select a date.
-
In the Subject field, enter the test subject. This will be added to the answer key.
-
In the Section field, enter a class section, if necessary. This will be added to the answer key.
Set Answer Key
When you click on the down arrow next to Set Answer Key, additional fields will appear, allowing you to fill in the answer key with the correct answers, as in the following illustration:

Do one of the following:
-
With your mouse, click on the correct numbered bubbles in the list. Once you click on a bubble, it will automatically be filled in; to clear the selection, click on the x button in the specific row. Once you are done making your selections, select the Apply button. The Answer Key in the Preview area will reflect your changes.
-
Select the Import From File button to import a CSV or Excel file that has a list of correct answers. The following drop-down palette will appear:

-
Select the Browse for CSV File… or Browse for Excel File… button to find the correct file. Once you select the correct file for import, correct answers will be automatically reflected in the drop-down palette. You should select the Apply button when you are done; the Answer Key in the Preview area will then reflect your changes.
Note: The data imported from the file will be trimmed for content that cannot be bubbled in. For example, if there is more than one letter in a row in the Excel or CSV file, then the entire row in the answer sheet will be left blank.
-
-
Select the Clear All button to clear all selections made.
Student Names and IDs
When you click on the down arrow next to Student Names and IDs, additional fields will appear, allowing you to customize the student answer sheets, as in the following illustration:

Any information entered here will appear on the student answer sheets only when they are printed or exported.
Note: These fields only accept alphanumeric characters.
Do one of the following:
-
With your mouse, enter the student first name, last name, and ID for each student answer sheet. To clear your information, click on the x button in the specific row.
-
Select the Import From File button to import a CSV or Excel file that has a list of student names and IDs. The following drop-down palette will appear:

- Select the Browse for CSV File… or Browse for Excel File… button to find the correct file. Once you select the correct file for import, student information will be reflected in the drop-down palette.
Note: The data imported from the file will be trimmed for content that cannot be bubbled in. For example, if the file contains a student name of “h3i,” only “hi” will be bubbled in.
-
Select the Clear All button to clear all selections made.