Deskew
The image process node for Deskew corrects the angle of a scanned image when it is not lined up with the paper. Deskew works by detecting possible lines of text in an image, running either horizontally or vertically. Note that OCR is not performed during the deskew process, and heavily graphical documents may not deskew as expected.
The Deskew node offers both standard and advanced settings. To open the Deskew Node window, add a process node for Deskew and double-click on it.
-
Check the Enabled box so that the process will be run. When unchecked, this process will be ignored. Documents will pass through as if the node was not present (i.e., continue along the default or ‘positive’ path). Note that a disabled node will not check for logic or error conditions.
-
In the Node Name field, enter a meaningful name for the Deskew node.
-
In the Description field, enter a description for the Deskew node. This is not required, but helpful to distinguish one process from another. If the description is long, you can hover the mouse over the field to read its entire contents.
-
Select the Save button to keep the Deskew definition. You can also select the Help button to access online help and select the Cancel button to exit the window without saving any changes.
Deskew - Standard Settings
As a default, you will see the Standard settings first.

-
Use the Accuracy sliding bar to specify whether you want accurate deskewing results (More) or faster processing time (Less).
-
Use the Expected skew of originals sliding bar to define the range that should be used for deskewing. “More” will indicate a larger skewed angle and “Less” will indicate a smaller skewed angle. For a visual representation, the red dotted lines coming out of the thumbnail image of the right hand side will adjust accordingly.
Deskew - Advanced Settings
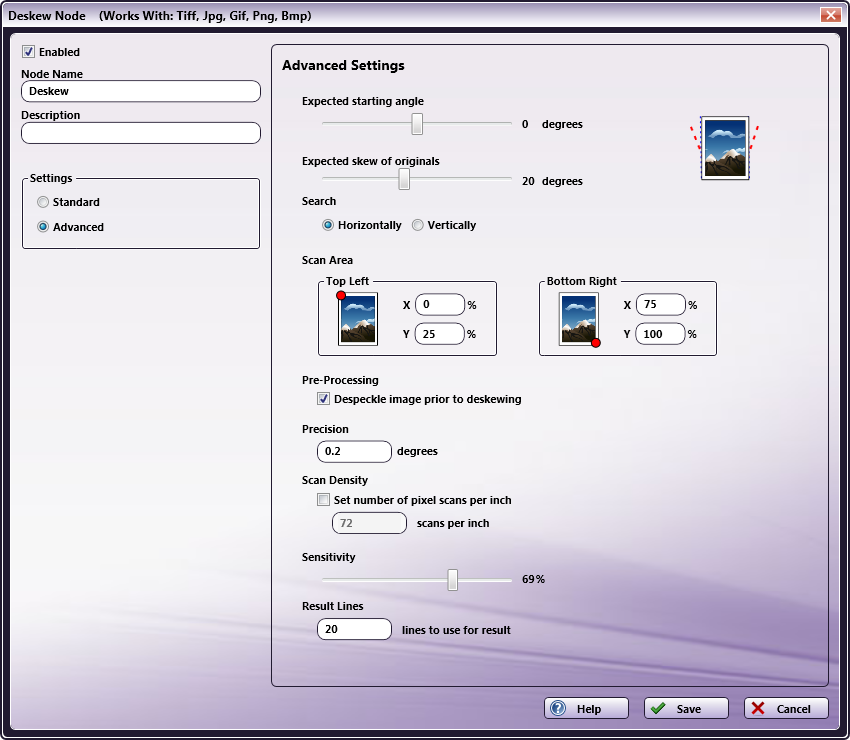
To customize the deskew process further, click on the Advanced radio button in the Settings area. This is useful if you have a variety of differently skewed documents, and need to adjust the deskew performance. The Advanced Settings view resembles the following illustration:

-
Use the Expected starting angle and Expected skew of originals sliding bars to further define the scope of deskewing.
-
Specify the degrees of the skew angle using the Expected starting angle sliding bar. This will be the starting point for the deskew process and will tell the application to start with the assumption that the images are approximately this many degrees rotated. The default of 0 means that there is no assumption. For a visual representation, the thumbnail image on the right hand side will rotate accordingly.
-
Specify the range for the deskewing using the Expected skew of originals sliding bar. For example, if you indicate 5 degrees for the Expected starting angle with an Expected skew of originals of 15, the application will correct the document up to 20 degrees. For a visual representation, the red dotted lines coming from the thumbnail image of the right hand side will adjust accordingly.
-
-
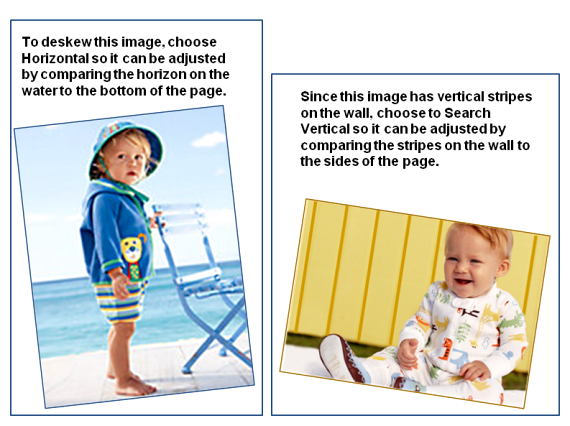
Use the Search Horizontally or Search Vertically radio buttons to specify whether the application will look for horizontal or vertical lines during the deskew process. Search Vertically is useful if you have a document with vertical text or one that was scanned in as landscape. See the following illustrations for more information:

-
The Scan Area defines the zone (area of the page) that is used for the deskewing process. The default scan area is the center half of the page. To change this setting, enter percentage values for X and Y starting from the top left side down to the bottom right side of the document. Note that the larger scan area that is defined, the longer the deskew process will take.
-
By default, images are despeckled before the deskewing process begins. Although this does not visually affect the output, it may strengthen the lines and help with edge detection during the deskew process. Uncheck the Despeckle image prior to deskewing box if you want to disable this option (and speed up your deskew processing time).
-
Use the Precision field to define the increments in which the document’s skew angle is checked and corrected. For example, if you enter .5, the application will correct the document’s skew angle at each .5 degrees. Note that the smaller the increment chosen for accuracy, the longer the image file will take to deskew.
-
As another performance modification, you can change the Scan Density setting. The default setting is to downscale the image to 72 dpi. You can increase the maximum dpi to improve accuracy; however, the deskew processing time will be slower.
-
The Sensitivity sliding bar controls the level of contrast that will be used to detect lines during the deskew process. A lower sensitivity value will pick up more lines than a higher value.

