Metadata To File
Use the Metadata to File process node to extract metadata from incoming files and store that information in a separate file. You can output to a variety of metadata file formats or create customized output file formats to fit your own specific needs.
For each Metadata to File node you add to a workflow, you specify the following:
-
Which metadata to extract. You can select one or more metadata types. The list below shows some possible selection options:
- Bates stamp
- SMTP
- LPR
- Advanced OCR
- Barcode (standard)
- 2D barcode
-
The type of file in which to store that information.
-
The format of the new metadata file’s extension.
The following lists some of the uses for a newly created metadata file:
- Record keeping
- Import into other systems for search purposes
- Routing in other nodes in a Dispatcher Phoenix workflow, for example the Parse & Distribute node.
Note: This process works with all file types.
Using the Metadata to File Node
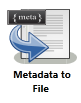
To open the Metadata to File properties window, add a Metadata to File process node to a workflow and double-click on it. The following illustration shows the Metadata to File properties window.
Note: The illustration may not display all possible metadata.
General Settings
- Enabled - To enable this node in the current workflow, check the box at this field. If you leave the box blank, the workflow ignores the node and documents pass through as if the node was not present. Note that a disabled node does not check for logic or error conditions.
- Node Name - The node name defaults into this field. This name appears in the workflow below the node icon. Use this field to specify a meaningful name for the node that indicates its use in the workflow.
- Description - Enter an optional description for this node. A description can help you remember the purpose of the node in the workflow or distinguish nodes from each other. If the description is long, you can hover the mouse over the field to read its entire contents.
- Help - To access Dispatcher Phoenix Online Help, click this button.
- Save - To preserve your node definition and exit the window, click this button.
- Cancel - To exit the window without saving any changes, click this button.
Output Settings
This area contains the following options:
-
Output the original file - To output the original file along with the newly created metadata file, check the box. To output only the metadata, leave the box blank.
-
Metadata file format - Choose the format of the file you want to store the metadata. You have the following options:
- XML (Extensive Markup Language)
- INI (Initialization)
- CSV (Comma-Separated Values)
- JSON (JavaScript Object Notation)
- Custom - For more information, see the Creating Custom Output Files section below.
- Custom (Batch) - This option allows for the creation of a single CSV file that contains all metadata from all processed documents in the batch.
Note: The Custom and Custom (Batch) output file format options are not available when used with the following Dispatcher Phoenix licenses:
-
Metadata file extension - Select the extension for the newly created metadata file. Choices are:
-
Output file extension plus metadata file extension - This option includes the output file’s extension along with the metadata file’s extension. For example, if you enable this option and the node is processing a file named 123.TIFF and you chose to create an INI file, the newly created metadata file would be 123.TIFF.INI.
-
Metadata file extension only - This option includes the metadata file’s file extension. For example, if you enable this option and the node is processing a file named 123.TIFF and you chose to create an XML file, the newly created metadata file would be 123.XML.
Note: The newly created metadata file uses the same file name as the output file.
-
Select metadata to extract
This area lists all of the metadata types available within the workflow. For example, if you have added an Advanced OCR node to the workflow with zones defined, a check box for Advanced OCR will appear. Check the box next to one or more metadata you want to extract to a separate file. The following table lists some of the possible metadata types that may appear in this area:
| Metadata | Description |
|---|---|
| 2D Barcode | To extract 2D barcode metadata, a 2D Barcode Processing node must come before the Metadata to File process at some point in the workflow. |
| Advanced OCR | To extract OCR metadata, an Advanced OCR node must come before the Metadata to File process at some point in the workflow. When defining the Advanced OCR node process, zones must be specified (either manually or automatically) and the “Original Document + Metadata” option must be chosen for the OCR output. |
| Annotate | To extract Annotation metadata, an Annotate processing node must come before the Metadata to File process at some point in the workflow. |
| Barcode | To extract standard barcode metadata, a Barcode Processing node must come before the Metadata to File process at some point in the workflow. |
| Bates stamp | To extract Bates stamping metadata, an Advanced Bates Stamp node must come before the Metadata to File process at some point in the workflow. |
| MFP Panel | To extract MFP Panel node metadata, a MFP Panel node must come before the Metadata to File process at some point in the workflow. |
| To extract email metadata, an Email Parser node must come before the Metadata to File process at some point in the workflow. When defining the Email Parser node process, you must choose which metadata will be forwarded along with the extracted email attachments. | |
| Forms Processing | To extract forms processing metadata, a Forms Processing node must come before the Metadata to File process at some point in the workflow. When defining Forms Processing zones, you must specify the Metadata Key for the zone. |
| Index Form | To extract Index Form metadata, a MFP Panel node with an Index Form associated with it must come before the Metadata to File process at some point in the workflow. |
| LPR In | All LPR metadata received at the time of submission will be extracted from the output file. |
| ODBC | To extract ODBC metadata, an ODBC processing node must come before the Metadata to File process at some point in the workflow. |
| Parse | To extract the values from regular expression search operations, a Parse node must come before the Metadata to File process at some point in the workflow. |
| Parse and Distribute | To extract the values from regular expression search operations, a Parse and Distribute node must come before the Metadata to File process at some point in the workflow. |
| PDF Data | To extract PDF metadata, a PDF Data Extraction node must come before the Metadata to File process at some point in the workflow. |
| Release2Me | To extract Release2Me metadata, a Release2Me node must come before the Metadata to File process at some point in the workflow. |
| SMTP | All SMTP metadata received at the time of submission will be extracted from the output file. |
| Split | To extract Split metadata, a Split node must come before the Metadata to File process at some point in the workflow. |
Structure of XML File
XML files consist of one root element named <file/\> with the following
required attributes:
-
name - the name of the file that this XML document is associated with.
-
size - the number of bytes of the ‘name’ file.
-
mtime - the number of seconds from the UNIX epoch that the ‘name’ file was modified.
The <file/\> element may contain one or more <meta/\> elements. No other XML
element may exist as a direct child of <file/\>.
The <meta/\> element has two required attributes:
-
group - A short but friendly descriptor used to separate where the variables came from.
-
name - The variable name, either defined by the system or by the Index Form designer.
The <meta/\> element may have one of two possible child elements:
-
document - Contains the variable’s value.
-
page - This element contains the variable’s value as it relates to specific pages.
Structure of an INI File
The format of an INI file follows this structure:
    [file]
    name=sample-file.pdf
    size=205491
    ctime=0
    mtime=1622651543

    [group]
    metadata-variable-name1=matadata-value1
    metadata-variable-name2=matadata-value2
Note: ctime refers to the time the node took to create the file. mtime refers to the time the node took to modify the file.
Structure of a CSV File
The format of an CSV file follows this structure:
    file,name,sample-file.pdf
    file,size,205491
    file,ctime,0
    file,mtime,1622651543

    group,metadata-variable-name1,"matadata-value1"
    group,metadata-variable-name2,"matadata-value2"
Structure of JSON File
The format of JSON files follow this structure:
    {name:’’, size:0, ctime:0, mtime:0, meta: [
    {group:’’, name:’’, values: {
    Document = {doc: %VALUE%}
    Per Page = {%PAGE%: %VALUE%}
    }
    ]
    }
For example:
    {
    "name" : "pdf_form_maker1_new.pdf",
    "size" : 58750,
    "ctime" : 0,
    "mtime" : 1427808953,
    "meta" : [
    {
    "group" : "pdf",
    "name" : "editable",
    "values" : {
    "doc" : "true"
    }
    }
    ]
    }
Creating Custom Output Files
Dispatcher Phoenix also gives you the option to create your own file format in which to store metadata. This is useful if you need to control the output of the file to fit your system, for example when the other standard formats such as XML will not work with the content management system or other application that you are working with.
Note: The Custom and Custom (Batch) output file format options are not available when used with the following Dispatcher Phoenix licenses:
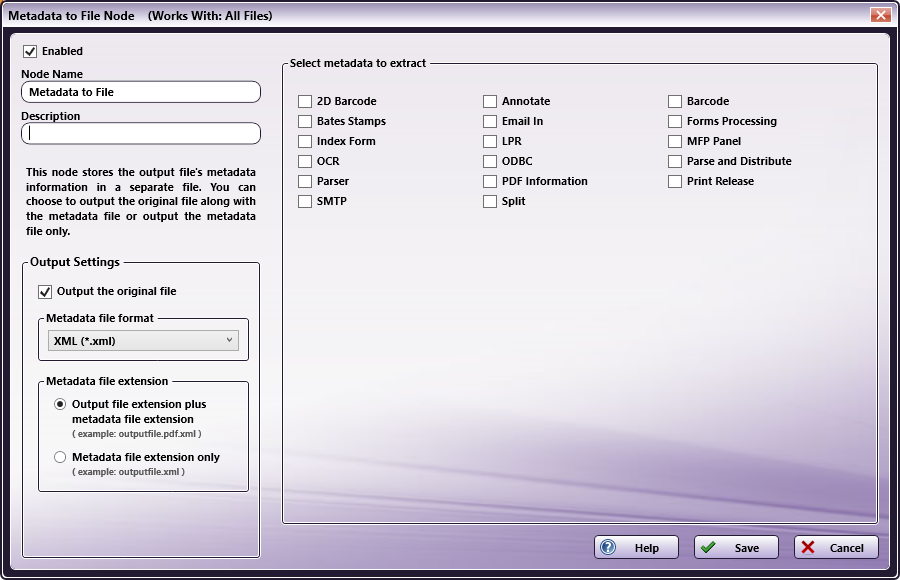
To create a customized file format, choose the Custom option from the Metadata file format drop-down list. Once selected, the Select metatdata to extract box containing the various metadata types disappears and is replaced by the Create script to extract metadata box. This text box is pre-populated with syntax highlighting for Lua (for more information about Lua, see the Lua 5.3 Reference Manual). You can use this very simple example to get started. See the following illustration:
Export Function
The Lua script must implement a function called “export” that accepts the two arguments:
-
The first argument (hereafter
file) represents the basic file information and metadata-
file.name
-
file.ext
-
file.fullname
-
file.size
-
file.mtime
-
file.ctime
-
file.contents
-
read(count)
-
readline()
-
seek(whence, offset)
-
lines([format])
Note: The optional format string can be “base64” to perform conversion.
-
-
file.{metadata group name} (i.e., pdf, bates, ocr, etc.)
-
file.pdf.author
-
file.pdf[‘author’]
-
file.bates.Stamp1
-
file.ocr[‘zone.MyZone’][1] = value of zone.MyZone on 1st page
-
file.ocr[‘zone.MyZone’][2] = value of zone.MyZone on 2nd page
Note: If the metadata contains periods, it must be wrapped in brackets and quotes, like [“zone.MyZone”].
-
-
-
The second argument (hereafter
jid) represents user information-
jid.user contains all
{user:****}values- Examples: jid.user.name, jid.user.domain, jid.user.email (if defined)
-
jid.fs contains all
{fs:****}values- Examples: jid.fs.DesktopDirectory, jid.fs.CommonApplicationData
-
The “Export” function should return an instance of ‘File.new()’ or ‘nil’. Tocreate your output file, use the following syntax:
local out = File.new(“my filename here”)
Or
local out = File.new(file.fullname)
File Object Methods
Here are the file object methods that you can use:
-
write(“some data”)
-
writeln(“some data that has a newline appended to it”)
-
ext(“change file extension”)
-
ext(“txt”)
-
ext(“xml”)
-
-
eol(“change newline character”)
-
eol(“\n”)
-
eol(“\r\n”)
-
There is also a global function called ‘Print’ that can be used to log messages.
Example
In a workflow that extracts data from invoices, the following XML file is created:
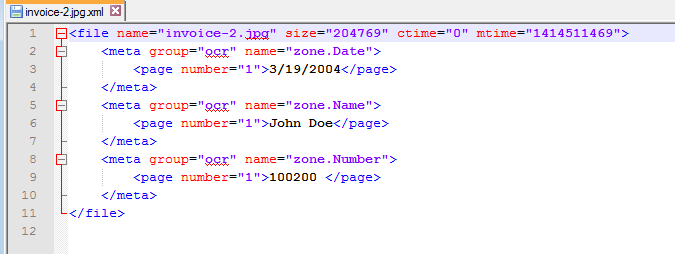
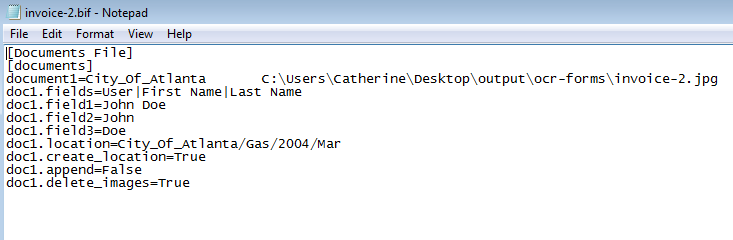
However, the format and content of this XML will not work with a customer’s existing system. In this case, the following custom file was created:
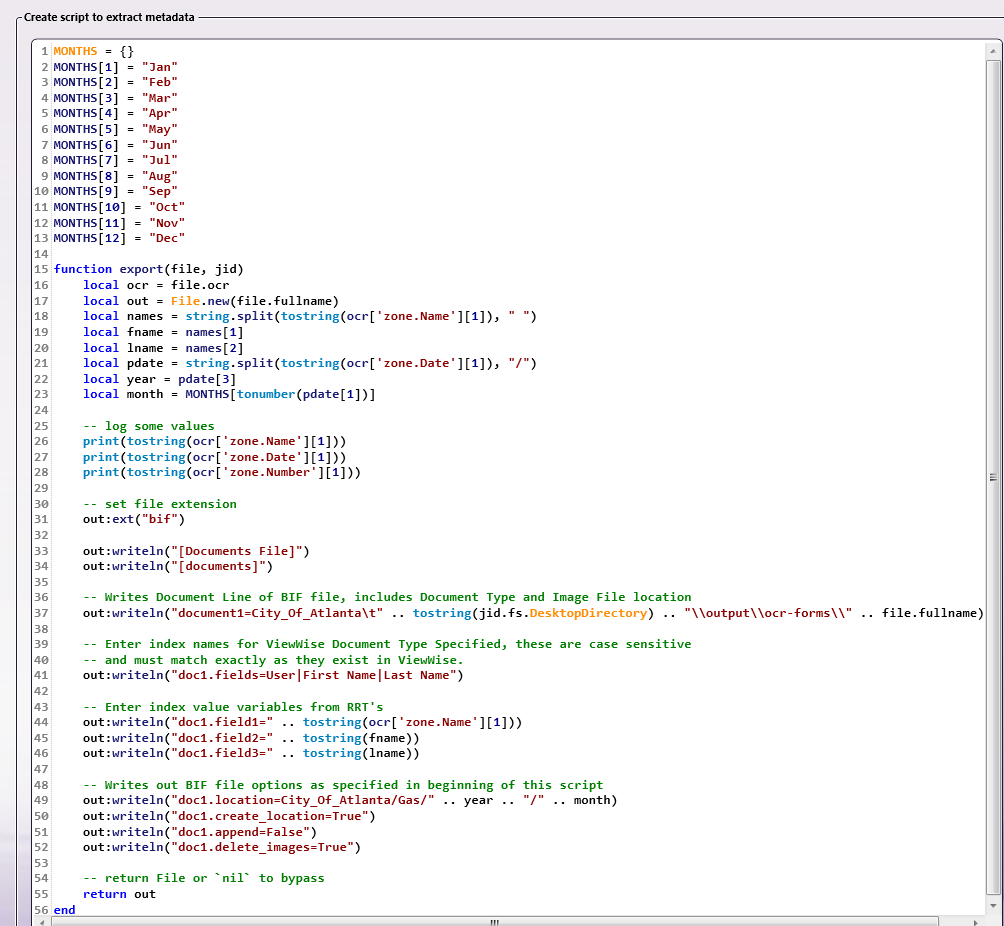
The following custom script was used to create this custom file: