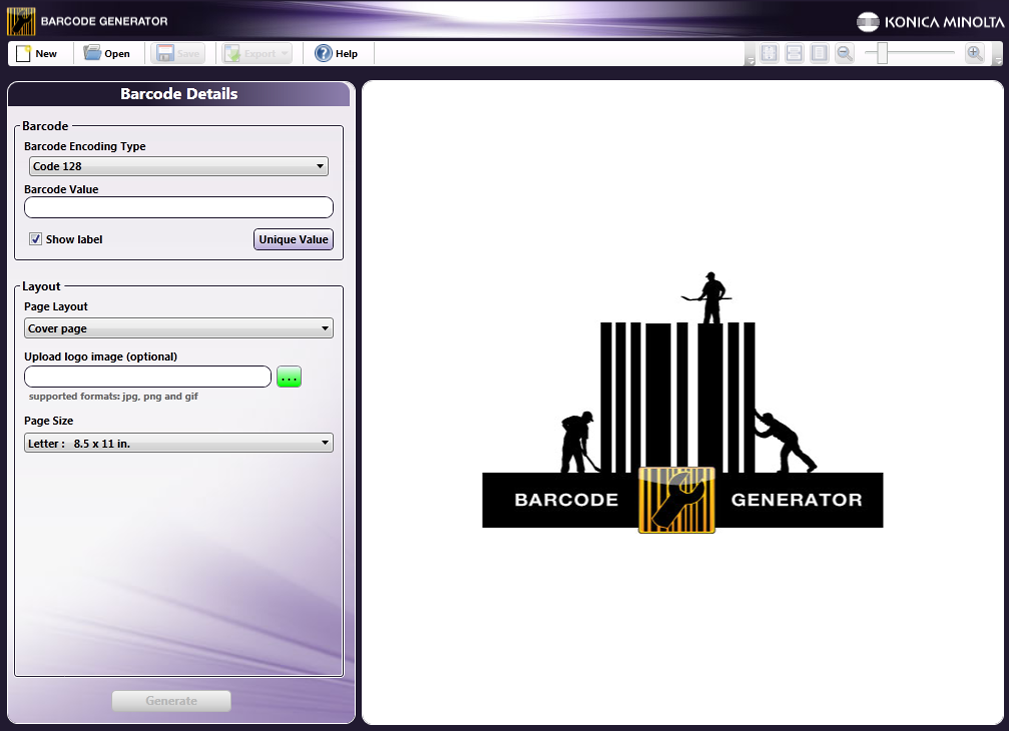
Barcode Generator
The Barcode Generator is a stand-alone tool that generates barcode cover pages (with or without descriptive information) or a multi-column page of barcodes for label printing. You can use the generated barcode(s) in your workflow to split and route documents or extract important metadata information associated with documents. The Barcode Generator can produce barcodes of varying size, type, and value, and output those barcodes in a variety of image file formats.
The Barcode Generator can be accessed from the following locations:
-
Windows Start menu (it will be listed underneath the Konica Minolta folder).
-
Tools menu from Dispatcher Phoenix main application screen.
-
Barcode Processing node properties window.
-
By double-clicking on a saved Barcode Generator file.
Using the Tool Bar
The menu items and icons on the tool bar can assist you when generating barcodes.
| Tool Bar Icons | Click to… |
|---|---|
 |
Start creating a new barcode. |
 |
Open an existing barcode that has already been generated and saved by the Barcode Generator. |
 |
Save a barcode that has been generated. The barcode will be saved as a Barcode Package File (*.wfxb). The Barcode Package File will resemble the following illustration:  - Double-click on this icon to open up the Barcode Generator automatically. - Double-click on this icon to open up the Barcode Generator automatically. |
 |
Export a generated barcode to a graphic file format. |
 |
Open Online Help information about the Barcode Generator. |
| Revert the preview barcode cover page or label page to its original size. Keyboard shortcut: Ctrl + 1. | |
| Stretch the preview barcode cover page or label page to fit the width of the Preview area. Keyboard shortcut: Ctrl + 2. | |
 |
Display the preview barcode cover page or label page so that it fits completely in the Preview area. Keyboard shortcut: Ctrl + 3. |
| Zoom in and out (using either the magnifying glass icons or the sliding bar). Keyboard shortcuts: Press Ctrl and + to zoom in. Press Ctrl and - to zoom out. | |
Creating a Barcode
To create a barcode, you need to choose the barcode type, enter the barcode value, and choose the barcode output using the Barcode Details section of the window. When you are done, select the Generate button and the generated barcode will appear on the Preview area.
Do the following:
-
Choose a type of barcode from the Barcode Encoding Type drop-down list. The Barcode Generator supports the most popular barcode types, including Code 39, Code 128, Interleaved 2 of 5, EAN8, EAN13, UPC-A, UPC-E, Codabar, PostNet.
-
Enter a corresponding value for the barcode in the Barcode Value field. Correct values depend on the barcode type specified. For example, an EAN-13 barcode type requires 12-13 numbers. Note the following:
-
Code 39 supports up to 58 characters. The Code 39 character set can only contain uppercase letters (A through Z), numeric digits (0 through 9) and a number of special characters (-, ., $, /, +, %, and space).
-
Code 128 and Interleaved 2 of 5 support up to 100 characters.
-
-
To generate a unique value for the barcode, click on the Unique Value button and the Barcode Value field will be automatically populated with an application-generated value. This button will only be available for those barcodes that accept unique values.
-
To display the specified value below the barcode, check the Show Label box. The UPC-A, EAN 8, and EAN 13 barcodes produce check digits; you will notice their check digits appear separated by a space.
-
Choose the barcode output from the Page Layout drop-down list. Options are:
-
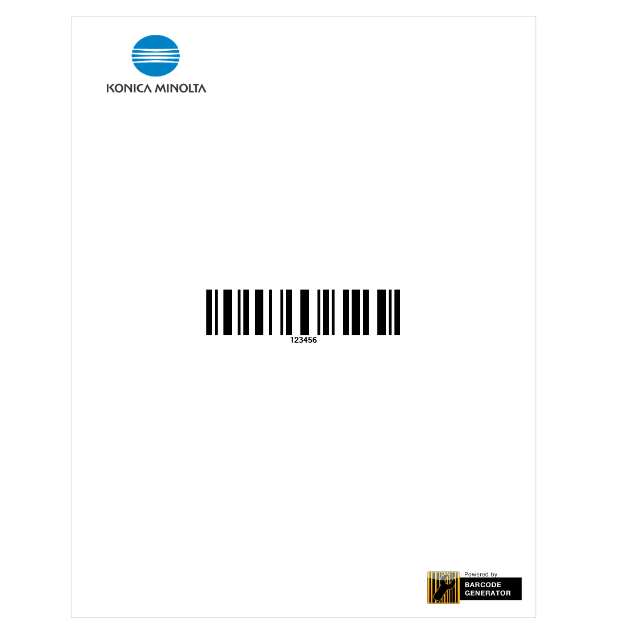
Cover page - Generates a cover page with the specified barcode. Default Konica Minolta logos will be included.
-
Cover page with info - Generates a cover page with the specified barcode, as well as customized information. Default Konica Minolta logos will be included. See below for more information.
-
Labels - Avery Form 5161 - Generates a sheet of barcode labels that will be pre-formatted to work with Avery Form 5161 sheets. With this option, you will not be able to change the page size.
-
Labels - Custom Layout - Generates a sheet of barcode labels with a layout that you can customize. See below for more information.
Note: To change the default logos provided when generating a cover page, select the Browse button next to the Upload logo image field and find a suitable image. Supported formats are JPG, PNG, and GIF.
-
-
Choose the size of the cover or label page from the Page Size drop-down list.
Specifying Cover Page with Info
If you choose to create a cover page with descriptive information on it, additional fields will appear below the Page Layout drop-down list, as in the following illustration:
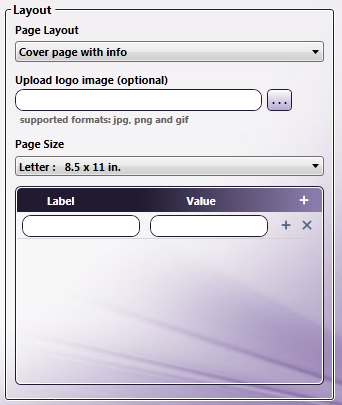
Use the Label and Value fields to enter specific information (e.g., Date and Author). To add another row of empty fields, click on the + icon. To delete a row, click on the X icon. This information will appear below the generated barcode, as in the following illustration:
Specifying Labels with Custom Layout
If you want to create a sheet of barcodes that will print out as labels and you want to customize the layout, choose the Labels - Custom Layout option from the Page Layout drop-down list. Additional fields will appear (along with a visual representation) in the Layout area, as in the following illustration:
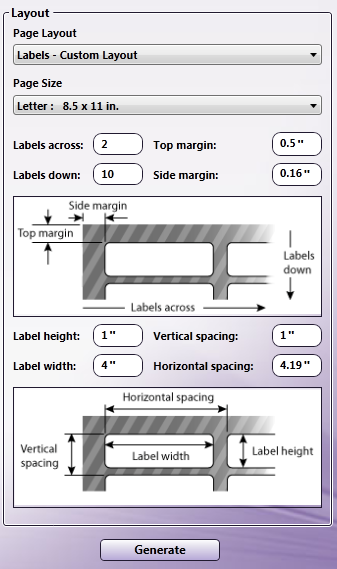
Do the following:
- Use the Labels across field to enter the number of labels to place across the page.
- Use the Labels down field to enter the number of labels to place down the page.
- Use the Top margin and Side margin fields to enter any margin specifications.
- Use the Label height and Label width fields to enter the exact height and width measurements of a single label.
- Use the Vertical spacing and Horizontal spacing fields to adjust the spacing between the labels on the page.
Note: All measurements are in inches.
Exporting a Barcode
Once the label has been generated, you can export a barcode cover page or label page. Select the Export button on the Tool Bar. You can export to the following file formats:
- JPG
- PNG
- TIFF
- XPS
You can also choose to open the barcode in its associated application when the barcode is generated. Once you choose the appropriate file format, click on the Export button. A Windows Explorer window appears, allowing you to save the exported file in the correct location. By default, the file name will be the name of the barcode type (e.g., EAN13.png). A Konica Minolta logo will be included at the top of the exported page, as well as a “Powered by Barcode Generator” icon at the bottom of the page.