PJL Print Preferences
The PJL Print Preferences process allows you to specify basic and advanced PJL print preferences for your job. These preferences can be applied automatically or specified directly at the MFP. This process is designed to be used as part of Dispatcher Phoenix’s Release2Me solution.
To allow users to specify print settings at the MFP after their print jobs have been released from the queue, you can attach a PJL Print Preferences index form to a Release2Me node. In this case, you must make sure that the PJL Print Preferences node comes after the Release2Me node in the workflow.
You can also use this node to add, replace, or remove advanced PJL headers from your print files.
Note: These print settings are designed to work with the Dispatcher Phoenix Print Driver. Support for other drivers will vary. Settings specified here will not necessarily override PS and PCL files.
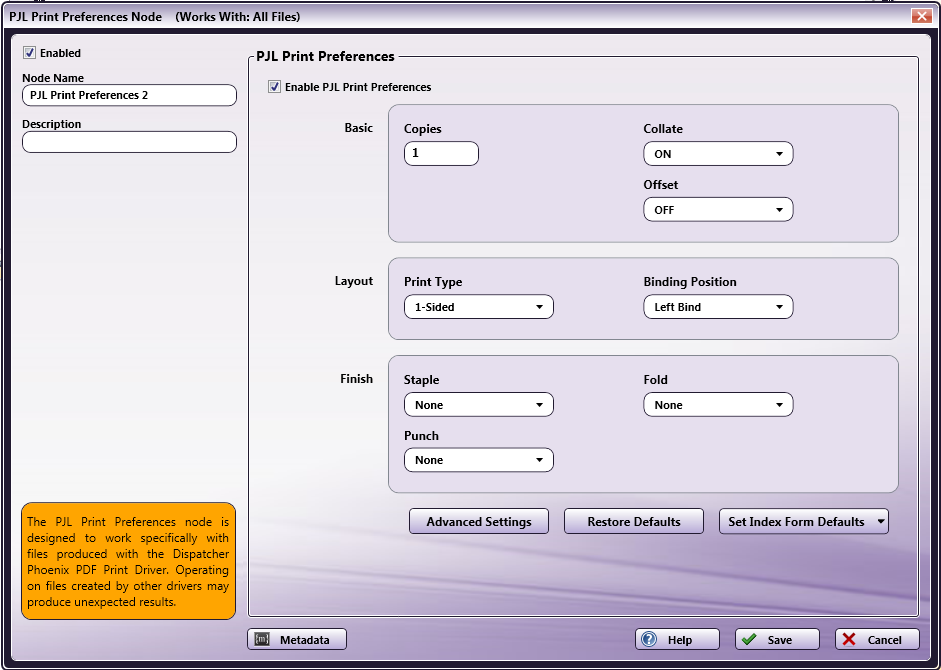
To open the PJL Print Preferences Node window, add a process node for PJL Print Preferences and double-click on it.
-
Check the Enabled box so that the process will be run. When unchecked, this process will be ignored. Documents will pass through as if the node were not present (i.e., continue along the default or ‘positive’ path). Note that a disabled node will not check for logic or error conditions.
-
In the Node Name field, enter a meaningful name for the PJL Print Preferences node.
-
In the Description field, enter a description for the PJL Print Preferences node. Although this is not required, it can be helpful to distinguish multiple processes from each other. If the description is long, you can hover the mouse over the field to read its entire contents.
Specifying PJL Print Preferences
Using this node, you can do the following:
-
To modify PJL print preferences, make sure the Enable PJL Print Preferences box is enabled. To add customized PJL headers to incoming documents, uncheck this box.
-
Specify the following Basic settings:
-
Copies - Enter the number of copies to print.
-
Collate - Choose ON, OFF, or None to keep existing settings in incoming documents.
-
Offset – Choose ON, OFF, or None to keep existing settings in incoming documents.
-
-
Specify the following Layout printing preferences:
-
Print Type – Choose 1-Sided, 2-Sided, Booklet, or None to keep existing settings in incoming documents.
-
Binding Position – Choose Left Bind, Right Bind, Top Bind, or None to keep existing settings in incoming documents.
-
-
Specify the following Finish printing preferences:
-
Staple – Choose Corner, 2 Position, or None to keep existing settings in incoming documents.
-
Fold – Choose Center Fold or None to keep existing settings in incoming documents.
-
Punch – Choose 2 Hole, 3 Hole, or None to keep existing settings in incoming documents.
Notes:
-
Booklet overrides Collate, Staple, and Punch settings. With the Booklet Layout, Staple and Punch are set to Off and Collate is set to On.
-
Fold overrides Staple, Punch, Collate, and Offset settings. With the Fold Finish, Collate is set to On, Offset is set to Off, and Staple and Punch are set to Off.
-
Staple overrides Offset. With the Staple Finish, Offset is set to Off.
-
-
To add custom PJL headers to incoming documents, select the Advanced Settings button.
-
To restore the PJL Print settings to their default values, select the Restore Defaults button.
-
This node can also be used in the Index Form Builder to allow users to access printing preferences directly at the MFP panel. By default, the Index Form will be created with the Copies, Print Type, and Staple options; however, you can customize the Index Form by selecting the Set Index Forms Defaults button. A drop-down palette will appear, which allows you to choose the fields that you want added automatically to the Index Form when you drag-drop a PJL Print Preferences node onto the Index Form Builder’s canvas area. See the following illustration:
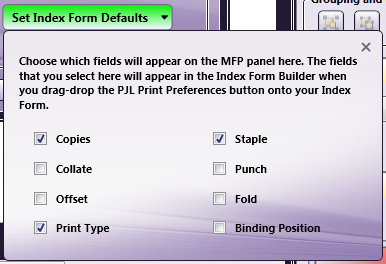
Note: If you choose three fields (or less), they will be displayed as buttons on the Index Form; however, if you choose more than three fields, they will be displayed in drop-down list format.
Specifying Additional PJL Headers
You can also use this node to do the following:
-
Add additional PJL headers to incoming documents.
-
Modify the values of existing PJL headers in incoming documents.
-
Delete existing PJL headers from incoming documents.
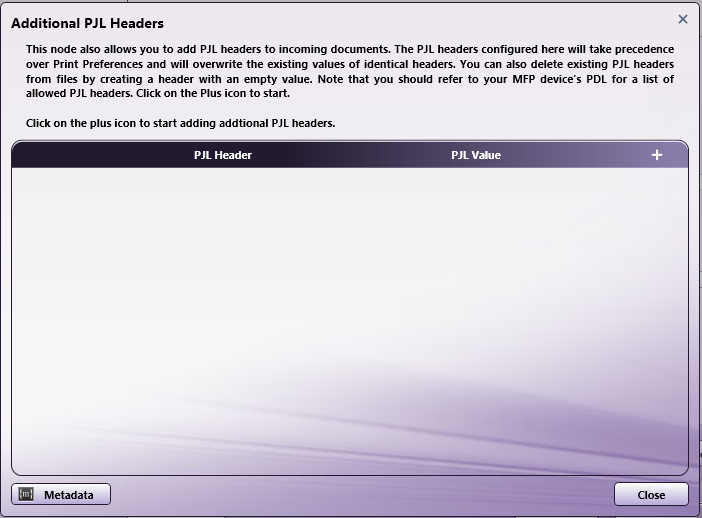
Important! Adding custom PJL headers may cause the document to not print correctly. Make sure you know which PJL headers are suitable for the specific device you are printing to.
Do the following:
-
To get started, select the Advanced Settings button. The following palette will appear:
-
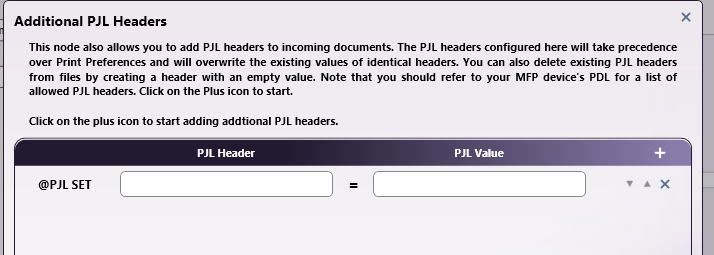
Click on the + button. An empty row will appear, as in the following illustration:
-
Enter the name of the PJL Header next to the @PJL SET label and its corresponding value after the = sign.
-
Continue adding rows as necessary.
-
To delete a row, click the X button.
-
To move a row up or down in the list, click the arrow buttons.
-
If you create a PJL Header row with an empty value, that specific PJL Header in incoming documents will be removed.
-
Any value specified here will overwrite existing values for the same PJL Header in incoming documents.