Microsoft Exchange

Use the Microsoft Exchange Node to distribute documents through Microsoft Exchange, a server-based application used for email hosting, calendar sharing, and contact management.
This node supports Government Community Cloud (GCC) and GCC High environments to meet the security needs of government agencies and the contractors that support them. More information about configuring Dispatcher Phoenix in a GCC High environment can be found here.
Important! When upgrading from Dispatcher 8.6 or older to Dispatcher Phoenix 8.7 or newer, any workflows using a Microsoft Exchange node will need to have that node and any associated Index Forms replaced and configured before those workflows can be restarted.
Exchange Versions Supported:
- Microsoft Exchange 2010 SP2
- Microsoft Exchange 2013
- Microsoft Exchange 2016
- Microsoft Exchange 2019
- Office365
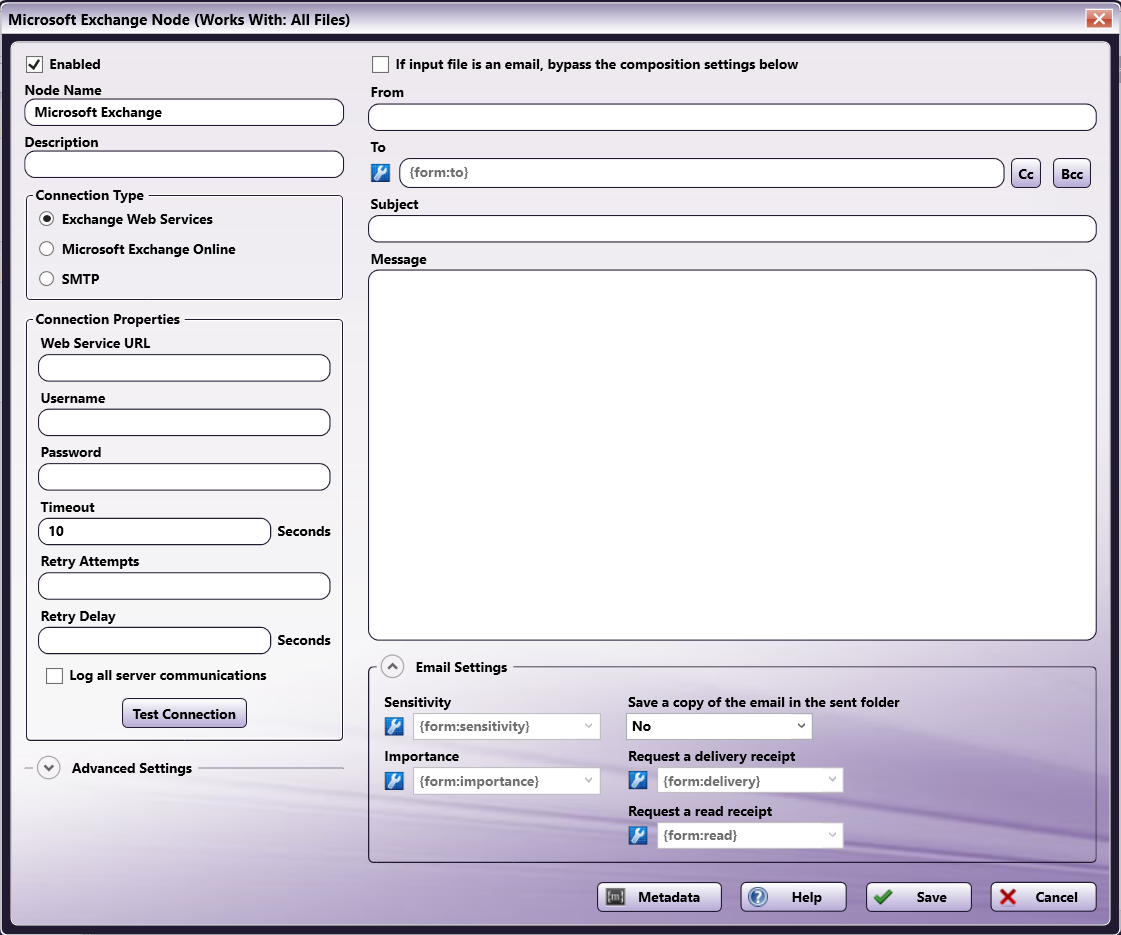
To open the Microsoft Exchange Node properties window, add an output node for Microsoft Exchange to the workspace and then double-click on it. The window appears in the illustration below:
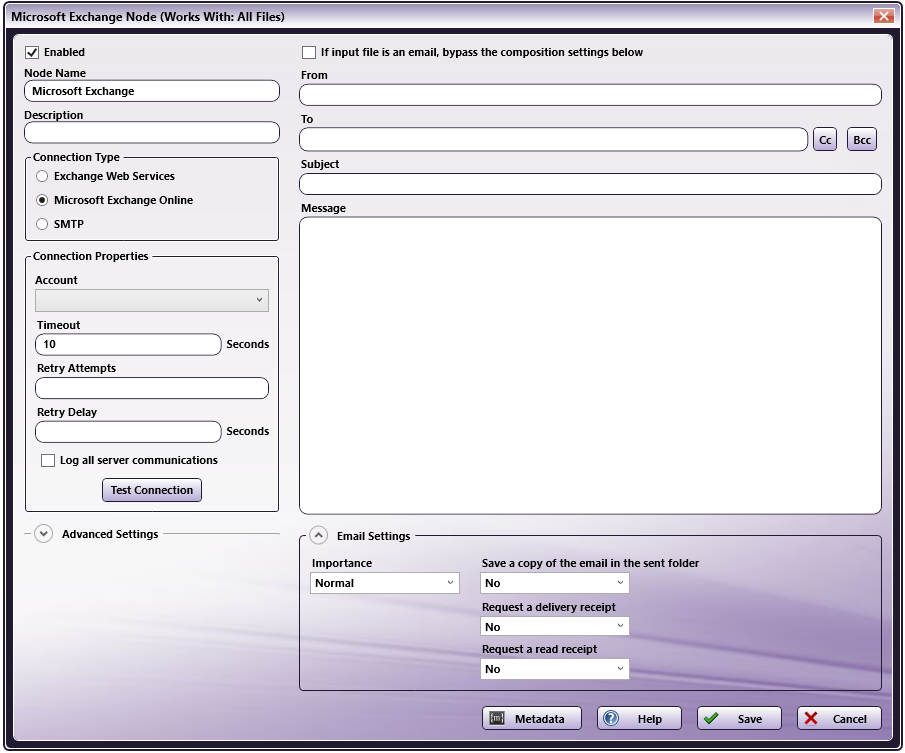
Configuration Options
To configure the Microsoft Exchange Node, first specify your preferences at the following fields and then specify preferences in the other areas of the page.
-
Enabled - For multiple output locations, check this box. If unchecked, this output will be ignored. While the workflow will still validate, documents will not be output and may be lost.
-
Node Name - Enter a meaningful name for the Microsoft Exchange Node.
-
Description - Enter a description for the Microsoft Exchange Node. This is not required, but it can be helpful when you have more than one output destination. If the description is long, you can hover the mouse over the field to read its entire contents.
Connection Type
To specify a connection type, select one of the following options:
- Exchange Web Services - The native Microsoft Exchange protocol.
- Microsoft Exchange Online - The online Microsoft Exchange protocol.
- SMTP - The Simple Mail Transfer Protocol that is standard for email transmission.
Note: The options available in the Email Settings section vary based on your selection here.
Connection Properties
Specify the connection properties for your selected connection type.
Exchange Web Services
-
Web Service URL - Enter the URL of the Microsoft Exchange’s EWS endpoint. The format is: https://<server>/EWS/Exchange.asmx
-
Username - Enter the username for your Microsoft Exchange account.
-
Password - Enter the password for your Microsoft Exchange account.
-
Timeout - Enter the seconds allotted for the time without communication before a timeout occurs, if necessary.
Note: If multiple servers are associated with a hostname (e.g., smtp.office365.com), each server will be allowed the full timeout.
-
Retry Attempts - Enter the number of times to retry the connection before timeout.
-
Retry Delay - Enter the seconds allotted before a retry is attempted.
-
Log all server communications - Check this box to log all server communications.
-
Test Connection - Click this button to check if the URL and credentials that were entered are valid.
Note: To view the log, right-click the Activity Log of the workflow, select Log Level, then select Debug.
Microsoft Exchange Online
- Account - Select an account from the dropdown menu. Note that you must first add a Microsoft Exchange account in Dispatcher Phoenix Web before it will appear in the dropdown.
- Timeout - Enter the seconds allotted for the time without communication before a timeout occurs, if necessary.
- Retry Attempts - Enter the number of times to retry the connection before timeout.
- Retry Delay - Enter the seconds allotted before a retry is attempted.
- Log all server communications - Check this box to log all server communications.
Notes:
-
If you have not already set up a Microsoft Exchange through Dispatcher Phoenix Web, you must do this before it will appear in the dropdown.
-
The Microsoft Exchange Online function works for both the Microsoft Exchange Online and Outlook.com email services.
SMTP
-
Host / IP Address - Enter the identifying host name for the outgoing, external SMTP email server or its IP address.
-
Port - Enter the port used by the server for SMTP communication (default is 25).
-
Enable SSL - Enable this option to connect to SMTP servers that allow only SSL connections. With this option, support for SSL servers is enabled. If you check this box, the port number automatically changes to the secure SMTP port default of 465 unless the port was customized already. For configuration options with particular SMTP servers, please refer to their latest documentation.
-
Username - Enter the username for your Microsoft Exchange account.
-
Password - Enter the password for your Microsoft Exchange account.
-
Timeout - Enter the seconds allotted for the time without communication before a timeout occurs, if necessary.
Note: If multiple servers are associated with a hostname (e.g. smtp.office365.com), each server will be allowed the full timeout.
-
Retry Attempts - Enter the number of times to retry the connection before timeout.
-
Retry Delay - Enter the seconds allotted before a retry is attempted.
-
Log all server communications - Check this box to log all server communications.
Note: To view the log, right-click the Activity Log of the workflow, select Log Level, then select Debug.
-
Test Connection - Click this button to check if the URL and credentials that were entered are valid.
Advanced Settings
The following advanced settings are available:
-
Include file attachments - To include file attachments, click the drop-down and select Yes. Otherwise, select No.
-
Send email for each attachment - To send an email for each attachment, click the drop-down and select Yes. Otherwise, select No.
Note: If you choose to send all attachments in a single email, then using per file metadata may not work as intended. That is, if you choose to send all attachments in a single email and you use the “filename” metadata in your node, the system will pick the filename of one of the attachments. To use per file (or page level) metadata, choose to send an email for each attachment.
-
Message Limits
- Max number of Attachments - Enter the maximum number of attachments you want to include on the email.
- Max Attachment Size - Enter the maximum size (in KB) of an attachment you want to include on the email.
-
Filename Encoding - You can customize the way email attachments’ filenames are sent to the SMTP server. This option is available only for the SMTP Connection Type. Use this advanced feature when an email client is incorrectly displaying attachment filenames that are sent from Dispatcher Phoenix. The following options are available:
- Modern Email Clients - This option encodes filenames using the RFC2231 encoding scheme. This is the newest standard and is recommended for use with modern email clients.
- Legacy Email Clients - This option encodes filenames using the RFC2047 encoding scheme, which uses character sets that cause the filenames to be encoded in the lowest possible size.
- Legacy Email Clients Compatibility Mode - This option encodes filename using the RFC2047 encoding scheme, which uses base64 UTF-8 encoding for all filenames. With this option, the filenames will be largest but compatible with the largest number of email clients.
Compose Mail
Use this area to do the following:
-
If input file is an email, bypass the composition settings below - To allow the composition settings (From, To, Cc, Bcc, Subject, Message) and any email attachments to be pulled from an email file, check this box. Additionally, any header information in the email file is also sent. When an email file is detected in the Microsoft Exchange node, its settings are used instead of the information provided in the composition settings fields and its attachments are sent. The supported email file types are: “.eml” files captured from third-party software and “.mbox” files generated by the SMTP In node.
Notes:
-
If you enable this option, the Send email for each attachment option is automatically set to Yes and is no longer configurable. This is because email files can contain their own list of attachments. Since the workflow cannot mix email file attachments with other input files as attachments, this setting requires an individual email to be sent for each input file.
-
If you select Exchange Web Services (EWS) as your connection type, the From, To, Cc, Bcc, Subject, Message, and email attachments are extracted from the email file and converted into the EWS format expected by the Microsoft Exchange server. In other words, any other header information from the email file is not used.
-
If you select SMTP as your connection type, the Microsoft Exchange node will send email files with all associated header information from the file (since SMTP supports the email file format directly).
-
-
From - Specify the sender’s email address.
-
To - Specify the recipient’s email address. For multiple addresses, separate by inserting a comma, semicolon, or new line.
- Cc - To display the Cc field where you can enter one or more “carbon copy” email addresses for the email, click this button.
- Bcc - To display the Bcc field where you can enter one or more “blind carbon copy” email addresses for the email, click this button.
Note: The above address fields support the use of dynamic variables.
-
Subject - Specify a subject line for the email.
-
Message - Specify the message to accompany the output file(s).
Email Settings
The options available in this section vary based on your selected connection type.
-
Sensitivity - Use the dropdown list to select the sensitivity of the message. You have the following options:
- Normal
- Private
- Personal
- Confidential
Note: Sensitivity setting is not available when using the Microsoft Exchange connection type.
-
Importance - Use the dropdown list to select the importance of the message. You have the following option:
- Low
- Normal
- High
The following options are available only if you select Exchange Web Services as the connection type:
- Save a copy of the email in the sent folder - Use the drop-down list to select whether or not to save a copy of the email in the sent folder of the From account.
- Request a delivery receipt - Use the drop-down list to select whether or not to request a delivery receipt.
- Request a read receipt - Use the drop-down list to select whether or not to request a read receipt.
Note: If you attach an index form to a workflow containing the Microsoft Exchange node, all options in the Email Settings area except the Save a copy of the email in the sent folder option will be overridden by settings in the index form and you cannot edit them here. For more information, see the Using the Microsoft Exchange Index Form section below.
Buttons
-
Metadata - To open the Metadata Browser, click on this button.
Note: Metadata is available only if it has been added by another node first.
-
Help - To access the Online Help, click this button.
-
Save - To keep your changes, click this button.
-
Cancel - To exit the window without saving any changes, click this button.
Using Dynamic Variables for Email Header Metadata
The address fields (From, To, CC, and Bcc) support the following:
-
Sending to multiple email addresses using commas (,), semi-colons (;), and spaces. See the following examples:
accounting@emailhosting.com; manufacturing@emailhosting.com sales@emailhosting.comaccounting@emailhosting.com, manufacturing@emailhosting.com, sales@emailhosting.comaccounting@emailhosting.com manufacturing@emailhosting.com sales@emailhosting.com -
The use of metadata.
-
Specifying a backup address if the metadata doesn’t exist. In this case, the keywords “or”, “orelse,” “else,” and “or-else” can be used to specify back up addresses for metadata.
With these keywords, if the metadata specified on the left side of the keyword doesn’t exist, the email address specified on the right side will be used as in the following examples:
{email : accounting} else accounting@emailhosting.com{email : accounting} or accounting@emailhosting.com, {email : manufacturing} or manufacturing@emailhosting.com, {email : sales} or sales@emailhosting.comYou can combine multiple back up addresses if you wish to check multiple metadata fields as well. In these cases, the first metadata, from left to right, that is present will be used, as in the following example:
{email : accounting} or {email : account manager} or accounting@emailhosting.comNote: The backup logic is always read from left to right. In the following example, the metadata will never be used because the static email value will be read first:
accounting@emailhosting.com or {email : accounting}
Using the Microsoft Exchange Index Form
Dispatcher Phoenix’s Index Form Builder includes a pre-built index form for use with the Microsoft Exchange node. Once you add the node to a workflow, you can access the index form using the Index Form Builder. This process consists of the following basic steps:
- Make sure your workflow includes an MFP Panel node and a Microsoft Exchange node.
- Configure the Microsoft Exchange node to connect to the appropriate server. You must complete this step prior to configuring the Microsoft Exchange index form.
Configuring the Microsoft Exchange Index Form
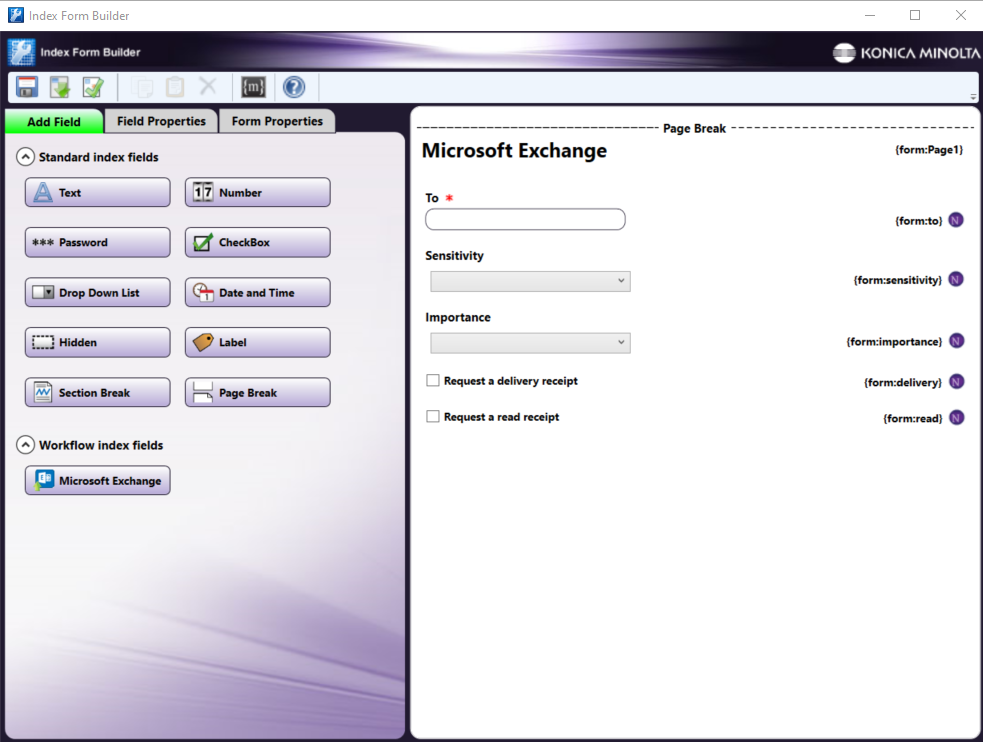
In the MFP Panel node in your workflow, open the Index Form Builder and drag-drop the Microsoft Exchange icon from the Workflow Index Fields section to the work area on the right side of the window. The index form appears in the pane next to the Add Field tab, as shown in the following illustration:
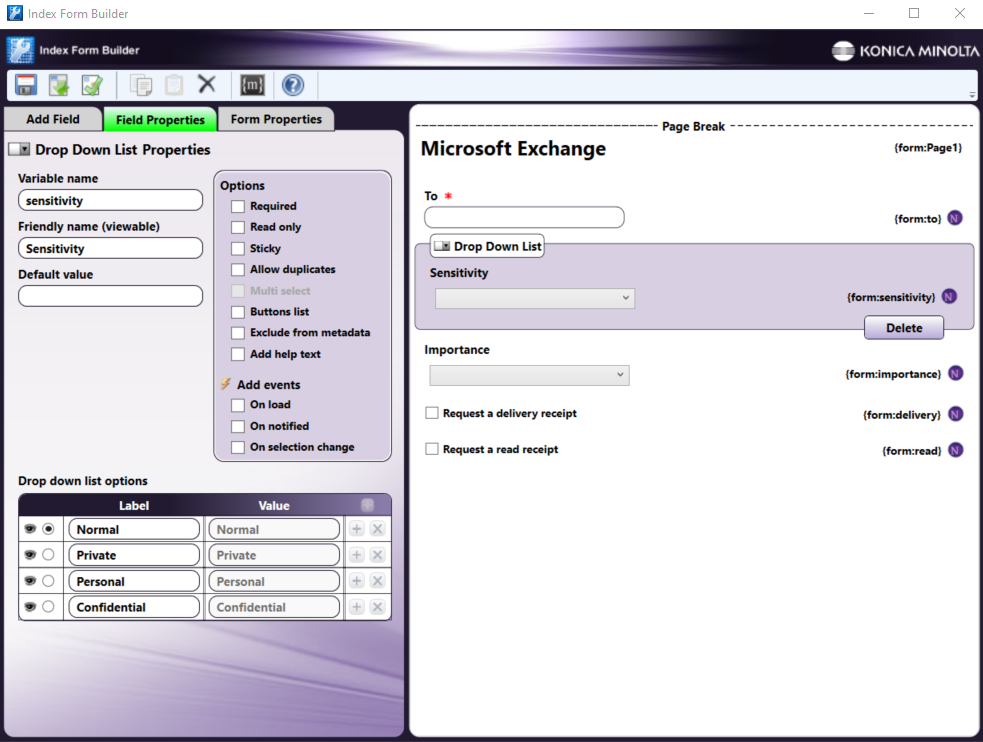
When you click on one of the index form fields in the work area, the Field Properties tab opens in the left pane displaying options for the selected field. The illustration below shows the options for the Sensitivity field:
The Microsoft Exchange index form includes the following fields:
-
To - This Text field displays the contents (if any) of the Default Value field on the Field Properties tab, where you can specify one or more default destination email addresses to appear at the To field on the MFP.
-
Sensitivity - Use this Drop-down field to specify the “sensitivity” of the email. The drop-down includes the following options:
- Normal
- Private
- Personal
- Confidential
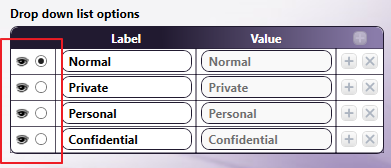
For each item at the Drop down list options field, the following options are available:
-
Eye icon - To hide one or more options from view at the MFP, click the Eye icon next to a Sensitivity option.
-
Radio button - To select a default value to appear at the MFP, click the radio button next to a Sensitivity option.
-
Importance - Use this Drop-down field to specify the “importance” of the email. The drop-down includes the following options:
-
Low
-
Normal
-
High
For each item at the Drop down list options field, the following options are available:
- Eye icon - To hide one or more options from view at the MFP, click the Eye icon next to an Importance option.
- Radio button - To select a default value to appear at the MFP, click the radio button next to an Importance option.
-
-
Request a delivery receipt - This field provides the option to request a delivery receipt for the email at the MFP. Default labels “Yes” and “No” are provided. You can specify your own labels.
-
Request a read receipt - This field provides the option to request a read receipt for the email at the MFP. Default labels “Yes” and “No” are provided. You can specify your own labels.
Note: If you enable the Microsoft Exchange index form via the MFP Panel Node, the fields on the index form overwrite the fields of the Microsoft Exchange node (for example the Sensitivity and Importance fields) and you cannot edit them unless you disable the index form. See the following illustration:
 Firewall note
Please note the following with regard to your connection type.
SMTP
If you are using SMTP as your connection type, note that third-party firewall applications, including some anti-virus software, may block ports used by Dispatcher Phoenix Email Out nodes. By default, Email Out uses port 25. However, this port number is configurable, so it may differ if the number has been changed. If mail fails to send, check the workflow log for the following message:
[Warning\][SMTP user@mail.com\]Connection failed to SMTP server mail.com:25
To allow the Microsoft Exchange node to function properly, consult your firewall application documentation to either stop blocking port 25 or to allow access by the workflow engine process, “blox-erl.exe.”
EWS
If you are using EWS as your connection type, a firewall may still block outbound traffic, though it is unlikely.