aiDocuDroid
Important! As of the 9.7 release on October 3, 2024, aiDocuDroid is no longer available in Dispatcher Phoenix. As of this date, no new installations, upgraded installations, or transferred installations will include any aiDocuDroid capabilities. Workflows containing aiDocuDroid will need to be reconfigured to use the Tesseract or OmniPage OCR engines.
aiDocuDroid is a form automation and digitalization software for PDF and scanned form digital images featuring AI-based ICR/OCR, image processing and document layout analysis technology. aiDocuDroid works for a variety of form structures with contents filled in either printed or handwritten text in the same workflow. The following sections describe the usage of aiDocuDroid in Advanced OCR Node and Forms Processing Node.
Advanced OCR Node
Use the aiDocuDroid to refine optical character recognition (OCR) and intelligent character recognition (ICR) results and extract metadata through the use of zones. Through zones, you can define how you want the aiDocuDroid engine to recognize text on the page. For example, to capture invoice numbers from incoming documents, you can create a zone in the area of the document where invoice numbers appear. In addition, zones can extract metadata automatically and associate the metadata with the original document.
aiDocuDroid for Advanced OCR Node works with the following file types:
- TIFF
- JPG
- PNG
- BMP
Forms Processing Node
Use aiDocuDroid for optical character recognition (OCR) and intelligent character recognition (ICR) results in order to conduct advanced searches for unique identifiers in imaged documents via text searches. You can extract and/or process (redact, highlight, or strikeout) information based on rules you define - without knowing the exact content of the information or even its exact position on the page.
aiDocuDroid for Forms Processing Node works with the following file types:
- TIFF
- JPG
Notes:
-
The document’s images should be captured by scanner, not a camera.
-
The recommended minimum DPI for scanned documents is 150 dpi and more.
-
The documents should be printed with font size greater than 10pt and lower than 18pt.
-
Information on the form that needs to be extracted should not be damaged by noise and other artifacts.
-
CPU version is workable but it is very slow. GPU is recommended for better performance. NVIDIA Geforce GTX 1650 (4GB, 10.2 CUDA support) or a more powerful, faster GPU card is recommended.
-
aiDocuDroid engines are workable in 64-bit operating systems only, not supported in 32-bit operating systems.
AIDocuDroid Engines
aiDocuDroid supports the following OCR/ICR engines in Advanced OCR and Forms Processing Nodes.
- aiDocuDroid (OCR)
- aiDocuDroid Handwritten (ICR)
Properties Window - Advanced OCR Node
To configure the aiDocuDroid in Advanced OCR Node, drag-drop the node on to the Workflow Builder’s work area and double-click on it. The Advanced OCR Node properties window appears, as in the following illustration:

The above illustration shows the default configuration for the Properties window. You can change the OCR Engine between aiDocuDroid and aiDocuDroid Handwritten from the drop-down, as in the following illustration:

Properties Window - Forms Processing Node
To configure the aiDocuDroid in Forms Processing Node, drag-drop the node on to the Workflow Builder’s work area and double-click on it. The Forms Processing Node properties window appears, as in the following illustration:

The above illustration shows the default configuration for the Properties window. You can change the OCR Engine between aiDocuDroid and aiDocuDroid Handwritten from the drop-down, as in the following illustration:
Note: A sample image should be uploaded to the Forms Processing Node prior to executing the workflow. If a sample document is not associated with the node, then it is likely that rules created for the form will not trigger, despite the correct text being present.
General Settings - Advanced OCR Node
Defining Type/Content for Zones
You can choose settings for each zone to match the specific format of your zone content. With the zone selected on the Preview area, click on the ![]() icon on the toolbar to display the Zone Type drop-down palette. Next, choose a type for the zone. As of now, the aiDocuDroid engines support only Text Zone type.
icon on the toolbar to display the Zone Type drop-down palette. Next, choose a type for the zone. As of now, the aiDocuDroid engines support only Text Zone type.
Choosing an Output Format
Use the Output field to specify the format of the output file. This area appears at the left of the page, below the Zone List.
At the Output field, if you click on the drop-down, a list of output options appears. The aiDocuDroid engines can affect the list of options available in this field. If an option does not appear at the Output field, it is not supported by the engine. See the table below.
Note: All processed output files include only the content captured in the user-defined zones, with the following exceptions. These output formats include the original file along with the content captured in the zones:
- Original Document + Metadata
| Output Option | aiDocuDroid | aiDocuDroid Handwritten |
|---|---|---|
| Original Document + Metadata - Outputs the original file along with metadata extracted from defined zones. This is the default setting and is necessary to use metadata in other nodes within the workflow, such as Metadata to File and Metadata Route, for further processing. | Y | Y |
| Text - Outputs the document to plain text (*.TXT) that can be read by most text editors and word processors. | Y | Y |
| Comma Separated Text - Outputs the document into a tabled text file that can be read by Excel (*.CSV). | Y | Y |
| Formatted Text - Outputs the document to a *.TXT file, trying to retain the layout of the page by inserting extra spaces. | Y | Y |
| Text with line breaks - Outputs the document to text with a line break after each line. | Y | Y |
| Unicode Text - Outputs the document to plain text, using two-byte Unicode characters. | Y | Y |
| Unicode Comma Separated Text - Outputs the document into a tabled text file using two-byte Unicode characters. The output file can be read by Excel. | Y | Y |
| Unicode Formatted Text - Outputs the document to formatted text, using two-byte Unicode characters. | Y | Y |
| Unicode Text with line breaks - Outputs the document to text with a line break after each line and uses two-byte Unicode characters. | Y | Y |
| XML - Outputs the document to an XML file format. | Y | Y |
| PDF Searchable - PDF output converter that retains the original image in the foreground with the recognized text hidden in the background (in the correct position). PDF Searchable output files have a maximum of 8191 pages. | Y | Y |
Creating Zones
The aiDocuDroid engines support manual zone creation only, automatic zone creation is not supported.
Notes:
-
Test zone feature is also not supported by aiDocuDroid engines. The automatic zone creation icon (
 ) & Test Zone(s) icon (
 ) from preview toolbar and Test this zone & Test selected zones options from Zone List will not be visible/enabled for the aiDocuDroid engines.
 -
Created zones are intelligently adjusted for input document images of various sizes to ensure target text can be extracted.
General Settings - Forms Processing Node
The general settings when using aiDocuDroid with Forms Processing Node are mostly the same as with other OCR engines. The details can be found in Forms Processing Node
aiDocuDroid additionally offers the capability to process checkboxes. This results in some menus differing somewhat in their appearance and functions. These differences will be described below.
Forms Processing Checkbox Recognition
The aiDocuDroid engines support detection of various types of checkboxes in forms, along with recognition of whether the checkboxes are marked in input documents.
Checkboxes consist of elements of the form which can be indicated as true or false based on a simple marking in the image. Two general types of checkboxes are supported: standard and non-standard.
Standard Checkboxes
Standard checkboxes consist of small squares or rectangles, typically adjacent to a text label:
Example of Square Checkboxes:

Example of Rectangular Checkboxes:

Non-Standard Checkboxes
Non-standard checkboxes encompass a number of styles, including circles, underlines, and brackets, again typically adjacent to a label. This also includes checkboxes in which the label itself is intended to be circled or otherwise marked:
Example of Circular Checkboxes:

Example of Underline Checkboxes:

Examples of Bracket Checkboxes:

Example of Labels as Checkboxes:

Auto detection of Checkbox Rules
Since forms can consist of a large number of checkboxes, an autodetection mechanism is in place to facilitate creation of checkbox rules. An additional option is available in the Add New Rule dialog, under Rule Type:

- Forms Processing : Use this option for creating a typical text-search rule, or to manually create a checkbox rule (described below.)
- Checkbox Detection : Use this option to create a Region of Interest (ROI) for automatic checkbox rule creation.
After creating the Checkbox Detection rule, the dimensions can be adjusted just like other rules. There are a few extra options which can be set.

To configure the checkboxes which will be detected, the following settings can be configured:
- Search Type : There are two additional options, to detect either Standard or Non-Standard checkboxes. In this case, standard checkboxes will be detected.
- Search Mode and Search For : These options work exactly like they do in normal text-search Rules. They are used to limit the checkboxes that are detected. Only those checkboxes with labels that match the search settings will be created as rules. In the case of Normal search mode, multiple checkbox labels can be listed, one per line; any checkbox with a label in this list will be returned as a rule.
- Checkbox Position : This option is used to control how the checkbox itself is positioned relative to its associated label. Left indicates that the checkbox precedes the label; Right indicates that it comes after the label.
Automatic checkbox detection should be done with a blank template–one that is not already marked. Detection of checkboxes which already have markings is likely to fail. In such cases, checkboxes can be manually created for any that are not detected automatically.
Checkbox Detection rules can only be created as base rules, and cannot be created as sub rules. Multiple Checkbox Detection rules can be created. Once all desired rules are created, detection can be initiated by clicking the Run Checkbox Detection button:

Upon completion of checkbox detection, the Checkbox Detection rule(s) will each be replaced by one or more checkmark rules.

The names of the auto-generated rules will consist of the original Checkbox Detection rule name prepended to the label text detected for the checkbox.
Automatic detection of non-standard checkboxes is similar. A Checkbox Detection rule can be created which contains all desired checkboxes, but with the Search Type set to Non-Standard Checkbox:

When detecting non-standard checkboxes, one additional option is available along with the Checkbox Position. If Label as Checkboxes is checked, then the text itself is treated as a checkbox. This is for the case in which labels are intended to be circled or underlined in order to indicate that an option is checked. When this option is selected, the Checkbox Position has no effect and is grayed out.
Autodetection results for non-standard checkboxes otherwise behave the same as for standard checkboxes.
Manual Creation of Checkbox Rules
In some cases, it may be necessary to create checkbox rules without autodetection. This is mostly the case when unique characteristics of the form prevent proper autodetection of one or more checkboxes. Additionally, as noted above, Checkbox Detection rules cannot be created as sub rules. If checkmark recognition is desired to be done as a sub rule, it is necessary to create the rule manually.
Creating a checkbox rule is nearly identical to the creation of a normal text-search rule. When initially creating the rule, the Rule Type should be set to Forms Processing:

The Search Type for a manually-created checkbox rule must be set accordingly, to either Standard Checkbox or Non-Standard Checkbox.

When creating the rule boundaries, the dimensions should match up closely to the dimensions of the checkbox itself in order to facilitate checkmark recognition:

Metadata
When checkbox rules are automatically detected, the Metadata tab under Actions will also be automatically populated. The Metadata key will match the automatically generated rule name:

When checkbox rules are manually created, the Metadata configuration is not automatically created. It is necessary to enter the desired Metadata Key manually:

Note that the Remove Duplicates option is only available if the manually created rule is a sub rule.
When processing a form with checkbox rules, if a checkmark is detected the Metadata value will be set to 1. Otherwise it is set to 0.
Recognition
When the workflow is executed, the checkbox rules will be processed according to the input file to determine if the checkbox is marked. Checkmark recognition can be sensitive to the mark type used. In general, a clear marking that does not overlap other page content will give the best results for recognition.
Checkmark detection is most effective when the workflow is configured with a blank template–one that has not been marked. If a marked template is used, then checkmark detection on the input file will be less accurate.
Supported Checkmarks
Some examples of supported checkmarks are:

When the label itself is a checkbox, recognition is best when the label is circled completely:

Unsupported Checkmarks
There are a number of cases in which checkmarks are unlikely to be detected properly.
In this case, the checkbox is marked outside of the region specified for the rule:

In this case, although the top checkbox will likely be shown as marked as intended, the bottom checkbox will probably also show as marked which is likely unintended:

In this example, the marking is so minimal that it is unlikely to be indicated as marked:

Advanced Settings - Advanced OCR Node and Forms Processing Node
The aiDocuDroid engines use the advanced settings to adjust the accuracy of the OCR/ICR results as well as the performance time of the OCR/ICR process. The Advanced OCR and Forms Processing Nodes contains the Advanced Settings button, which accesses the OCR/ICR Settings window.
When you access the Advanced Settings window, the set of options that are available is determined by the aiDocuDroid engine, based on the functional capabilities of the engine.
The Advanced Settings window contains the following tabs, each with a set of related settings. You can specify settings for:
Note: aiDocuDroid engines do not support Output format settings for output document creation.
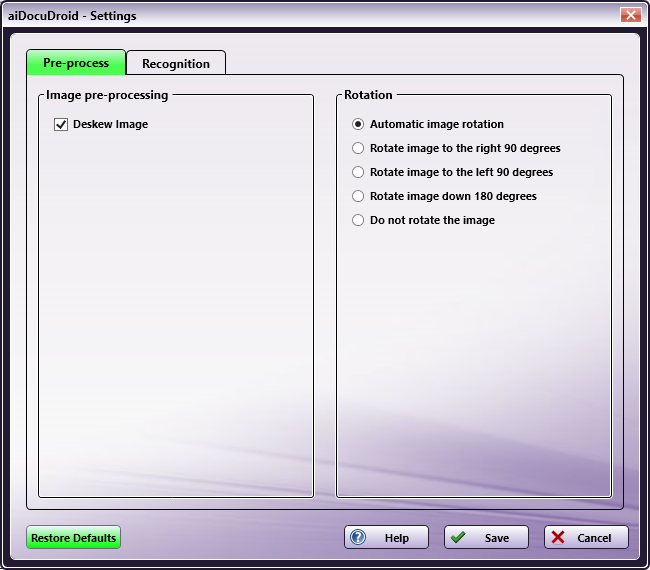
Pre-process Tab
Use this tab to set parameters specifying how to prepare and pre-process images before OCR/ICR analysis and recognition begins. The illustrations below show the options available for the aiDocuDroid engines. All options are described in the section below the illustrations.
aiDocuDroid Options
aiDocuDroid Handwritten Options

Image Pre-processing
Pre-processing procedures can be applied to images to enhance their quality before OCR/ICR recognition is performed. Enabling or disabling these options may improve the quality of your output and/or the performance time of the OCR/ICR process.
-
Deskew Image - When this setting is enabled, images that have been scanned in crookedly are automatically straightened during the preparation process. The default value is enabled.
Note: Turning off the Deskew Image pre-processing option may cause the OCR/ICR process to fail. If you turn off the option, you may need to add the Deskew node to the workflow so that the document can be properly processed.
Rotation
Before performing OCR/ICR, the application tries to detect and correct incorrectly oriented pages. If you already know the exact misalignment of incoming files and want to speed up processing time by avoiding this auto-detection process, you can choose specific options here.
-
Automatic image rotation - This option is available only for the aiDocuDroid engine. When this setting is enabled, the orientation of incoming images is detected and improperly oriented page images are automatically rotated (by 90, 180, or 270 degrees) before OCR takes place. This enabled option is the default value for rotation and mirroring.
-
Rotate image to the right 90 degrees - When this setting is enabled, improperly oriented page images are rotated by 90 degrees, clockwise.
-
Rotate image to the left 90 degrees - When this setting is enabled, improperly oriented page images are rotated by 90 degrees, counter-clockwise.
-
Rotate image down 180 degrees - When this setting is enabled, improperly oriented page images are turned upside down.
-
Do not rotate the image - When this setting is enabled, the image is not rotated.
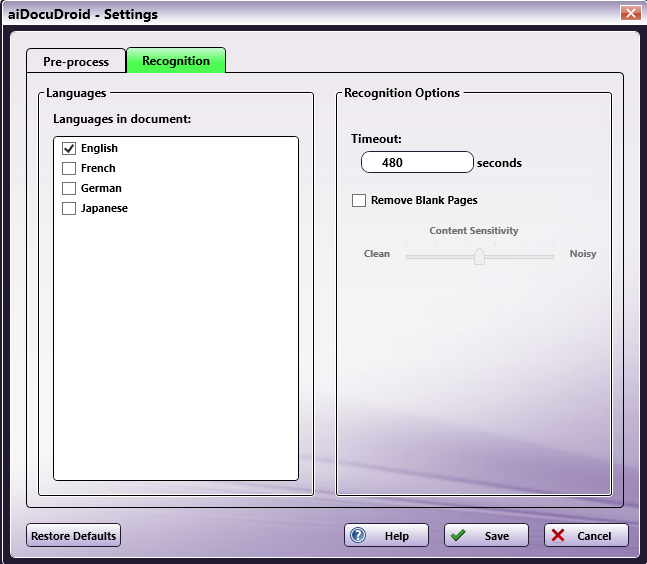
Recognition Tab
To improve OCR/ICR accuracy and processing time, you can specify specific settings to assist in the recognition process.
aiDocuDroid Options
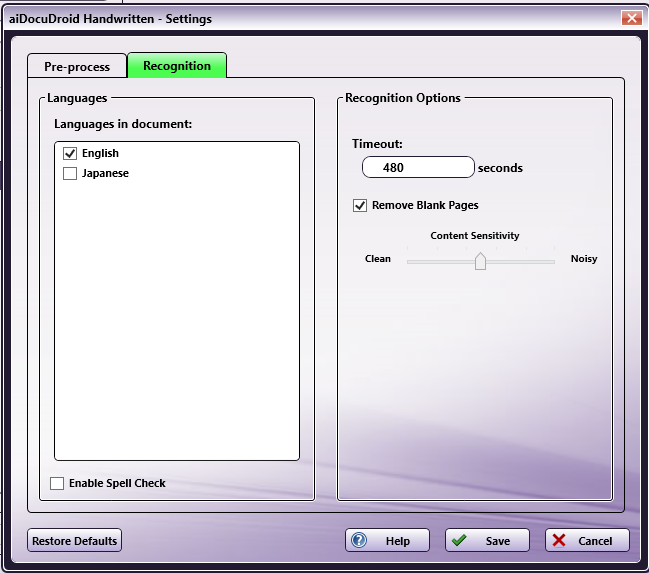
aiDocuDroid Handwritten Options
Languages
-
Languages in document - This window displays all languages currently supported by aiDocuDroid engines. Check the box next to the languages you want to include in the OCR/ICR recognition process. You must select at least one language. aiDocuDroid engines currently support English, French, German, Japanese, Italian, and Spanish languages for OCR; only English and Japanese are supported for handwritten recognition. English and Japanese can be selected together, but French, German, Italian, or Spanish cannot be selected in combination with another language. The default language is English.
-
Enable Spell Check - This option is available only for the aiDocuDroid Handwritten OCR English engine. To enable spell checking during OCR recognition, check this box.
Unlike suggestion-based spell checkers, the aiDocuDroid spell checker automatically corrects misspelled words (recognition errors) from recognition engine output in an unsupervised way. The aiDocuDroid spell checker is a deep learning model trained with over several million examples of possible misspelled words and corrected spelling pairs.
-
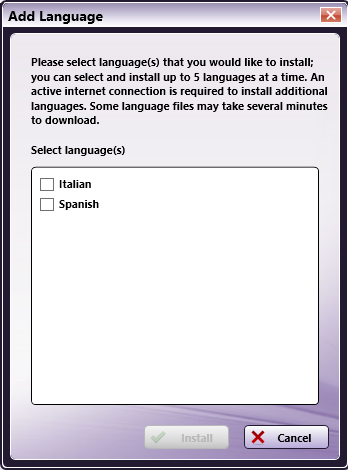
Add Language - This button will cause a new window to be displayed, from which additional supported languages can be installed. Any available, but uninstalled, languages will be listed in this window. Upon installation, they will be available in the Languages in document window:
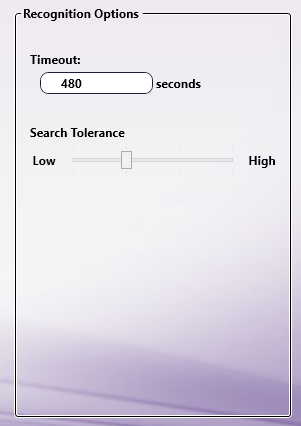
Recognition Options
-
Timeout - Specify the time in seconds you want to elapse before the OCR/ICR recognition process times out. The default timeout period is 480 seconds.
-
Remove Blank Pages - Specify whether blank pages in the input image should be detected and excluded from the output file. This will affect only those output types which are paginated, such as PDF Searchable.
When selected, the Content Sensitivity slider can be used to control how much extraneous content can be present on the page and still be considered “blank.” Setting the slider to the “Clean” side will result in fewer pages being considered blank, while setting it to the “Noisy” side will allow for greater degrees of marking on the page while still being considered blank.
Additional Option for Forms Processing
When accessing this menu from a Forms Processing Node, a different option will be available in place of Remove Blank Pages.
-
Search Tolerance - Allows for setting how strict matching is when “Fuzzy Search” is selected. By setting a higher tolerance, search results can be matched even when OCR results have errors. Setting this to a low tolerance can prevent false matches due to similar words. In particular, when searching for small words (fewer than four or five characters,) fuzzy search can indicate a high number of false results, so setting the tolerance low or disabling fuzzy search altogether may be optimal.
Recognition of handwritten text can be particularly error prone. Therefore, it is strongly suggested to use fuzzy search for handwritten text, and to consider using a higher tolerance.