Dispatcher Phoenix Installation
This page contains instructions on how to install and register the standard application, add-in nodes, and maintenance.
Dispatcher Phoenix has a per machine license, meaning the application is licensed and registered to be used on a specific PC only. For instructions on how to transfer a license to a new computer visit License Transfer.
Before you begin installing the application, please make sure that you have administrative privileges on the PC.
To install Dispatcher Phoenix from a CD/DVD or executable file, do the following:
-
Insert the CD/DVD into the appropriate drive or double-click on Dispatcher Phoenix icon to start the installation process.
-
If installing from a CD/DVD, the AutoPlay window will appear. Click on the Run autorun.exe option.
The Dispatcher Phoenix Installer will appear. The following illustration is an example of the Dispatcher Phoenix Installer:

-
Select the item that you want to install from the drop-down list (Dispatcher Phoenix, Offload license, or Workstation).
-
Select the version (64-bit or 32-bit) of the application using the radio buttons provided.
-
Select the Install Application button.
-
If the User Account Control window appears, asking for confirmation to have Dispatcher Phoenix make changes to your system, select Yes.
-
On the Welcome window, select the Next button as shown below:

The User License Agreement window will now appear.
-
On the User License Agreement window, read the license agreement; then click on the I accept the agreement radio button to continue with the installation process. Select the Next button when you are done. The Information window will now appear.
-
On the Information window, you can view release information about the application. Select the Next button to continue. The Select Additional Tasks window will now appear.
-
On the Select Additional Tasks window, you can specify what kinds of icons you want to add to your desktop or toolbar. Select the Next button when you are done.
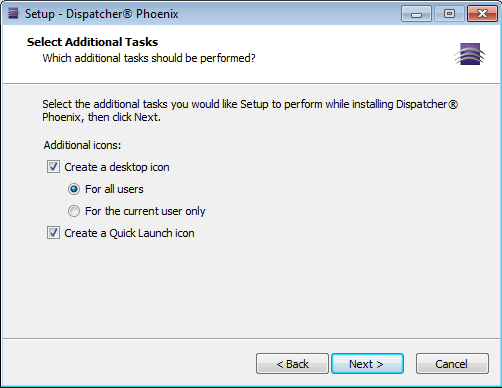
Note: The Show Quick Launch option must be enabled in order for a Quick Launch icon to be created. For many operating systems, the Show Quick Launch option can be found on the Taskbar and Start Menu Properties window (accessed by right-clicking on the Start menu and then choosing Properties).
-
A Ready to Install window will now appear with a summary of what you have chosen. Once you select the Install button, the Set Up window will begin setting up your system for Dispatcher Phoenix.
-
If multiple source locations are detected (e.g., CD/DVD, USB drive, Internet, etc.), the Select a package repository window will appear, listing all available source locations for package repositories for you to choose from. See the following illustration for an example of the Select a Package Repository window:

For more information on registering Dispatcher Phoenix, please see the Registration page.
Installing Dispatcher Phoenix Without Internet Access
If you need to install Dispatcher Phoenix at a site that has either no or limited Internet connection, do the following:
-
Copy the Web repository.
-
Install updates from that downloaded repository.
Note: For fresh installs of Dispatcher Phoenix, this process will only work if all of the Dispatcher Phoenix prerequisites (Microsoft .Net Framework 4.8, etc.) are installed.
Copy Web Repository
-
Open the Add-In Manager.
-
Select the Options button.
-
On the Options window, click on the Copy Web Repository button.
-
The Choose a destination to copy the Web repository window will open. Select some external media (e.g., USB drive) to save the repository in; then click on the Select Folder button.
Note: Make sure you copy the web repository to the media’s root directory or any first-level directory; otherwise, Add-In Manager will not be able to auto-detect the local repository.

-
The powershell.exe window appears and begins downloading the web repository to the specified location. See the following illustration for an example:

Install Updates From Downloaded Repository
To install updates using the repository that you just downloaded to some external media, do the following:
-
Make sure that the media on which you downloaded the web repository is connected to the system that you are trying to update.
-
Do one of the following:
-
From Dispatcher Phoenix, do the following:
-
Choose the Check for Updates option from the Help pull-down menu.
-
The Select a package repository window will appear.
-
Select the source location that contains your downloaded repository.
-
Add-In Manager will launch and begin downloading/installing files from that location.
-
-
From Add-In Manager, do the following:
-
Click on the Select Updates From: link on the left-hand side of the window.
-
Select the source location that contains your downloaded repository.
-
Select the Install Updates button.
-
-
Updating Dispatcher Phoenix from a Network Share
Downloading updates for each license may be time-consuming if a business has multiple licenses of Dispatcher Phoenix. As a solution, Add-In Manager can be configured to install all updates from a network share. To set this up, do the following:
-
Copy the Web repository.
-
Copy the downloaded repository to a network share.
-
Open Add-In Manager.
-
Select the Options button.
-
Select the Specify optional local repository Browse button to find and select the packages.xml on the network share that contains the downloaded repository. See the following illustration:

-
Select the Save button to save your changes and close the Add-In Manager.
Using the Add-In Manager
Dispatcher Phoenix offers an Add-In Manager tool that allows for easy installation of additional optional nodes and updates to existing nodes, as well as un-installation of nodes and packages.

For more information about the Add-In Manager, visit the Add-In Manager page.
Registering Add-In Modules
Dispatcher Phoenix is installed with several powerful features. With Add-In modules, you can expand and enhance the features of the application to fit your unique needs.
You can also purchase additional Dispatcher Phoenix base licenses to increase the number of capture sources for your Dispatcher Phoenix workflows. Once you have purchased an additional Dispatcher Phoenix license, follow the instructions below to register the license and increase your number of available inputs.
Due to the fact that you are adding on to an existing installation of Dispatcher Phoenix, the registration process differs slightly from the processes described above for the main application.
Caution! License files are specific to the corresponding installation, so trying to use a license file from a different machine will not work.
To register an add-in, do the following:
-
Choose Register Add-In… from the Help menu in Dispatcher Phoenix, or the Tools pull-down in the Add-In Manager. (The Register Add-In… option changes to Register Product… if you are running a Demo version of Dispatcher Phoenix). The License Manager will open with the Register Add-In tab already opened, as in the following illustration:

-
You can do the following:
- Register automatically
- Register manually
-
Activate the Purchase Code or License File.
The Congratulations window will appear, listing the add-in module(s) that you have just registered.
-
Select the OK button to close the message; then select the Close button on the License Manager. A message will appear, alerting you to the fact that an updated license has been detected and that Add-In Manager will be used to install the new package(s) available for your license.
-
If the User Account Control window appears, asking for confirmation to have Dispatcher Phoenix make changes to your system, select Yes.
-
If multiple source locations are detected (e.g., CD/DVD, USB drive, Internet, etc.), the Select a package repository window will appear, listing all available source locations for package repositories for you to choose from. If this window appears, you should select the appropriate source.
-
Add-In Manager will launch and the appropriate package(s) will be downloaded and installed.
Add Ins - Automatic Web Registration
To register automatically, do the following:
-
Select the Automatic Web Registration and Activation radio button.
-
In the Purchase Code field, enter the purchase code for the add-in module.
-
Select the Activate button.
Add Ins - Manual Registration
For manual registration, select the Manual Registration radio button and copy the Unlock Code. Go to the Konica Minolta Solutions Engineering Center (SEC) website at SEC website and register the application. To do this, follow these steps:
-
Copy the unlock code to the clipboard.
-
Click on the link on the registration page, which will open your browser and bring you to the (SEC website).
-
Select the Register button.
-
Select the Click here to register your add-in or software maintenance radio button.
-
Enter the valid purchase code you received at the time of your Add-In purchase.
-
Enter (or paste) the unlock code from your installation of Dispatcher Phoenix.
Important! Add-Ins require entry of the UNLOCK CODE for verification. This is a departure from the main application registration process.
-
Select the Submit button to generate the license file which corresponds to your application. A link to this file will be displayed. Click the link to download your license file.
-
Return to the Dispatcher Phoenix application, browse to and select the appropriate license file, and click Activate. Do NOT unzip the license file prior to activation.
Note: For additional instructions on how to purchase, download, install and license Konica Minolta SEC Applications, please refer to the “Assistance” section of the SEC website.
Licensing
Dispatcher Phoenix licensing governs what features and abilities the application has from “out of the box” through whichever add-ins you decide to purchase and register to enhance the product. For more information about Dispatcher Phoenix Licensing, visit the License Manager page.
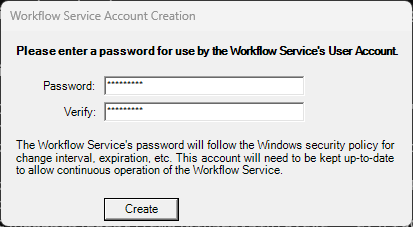
Login Credentials Required
After registration and licensing and during installation, a Windows Service Account Creation window will appear, requesting a password to be entered (or created) and verified, as in the following illustration:
Uninstalling the Application
To uninstall the Dispatcher Phoenix application, use the Uninstall a program option from the Windows Control Panel. When you choose to uninstall the application, a confirmation message appears.