Color Route Vector PDF

Note: This node works with PDF files (version 1.3 or later).
Use the Color Route Vector PDF Node to route documents based on color. By default, Color Detection is only run on vector objects. If the Process both Raster and Vector objects radio button is selected, however, both vector and raster objects are considered when color detection is run.
If unsupported color space is found when color detection is run, the value specified in the Undetected color space in Vector object will be treated as: drop-down is applied. There are also settings that can program the way the node responds to undetected color space when it is detected when color detection is run.
Once color is detected, use the node to automatically forward the file to a node that will send the job to a printer that supports the detected settings. For example, all color documents can be automatically routed to a production print system while black and white jobs can be sent to another print destination.
This node can have the following outbound connectors:
- Yes: If the color page condition has been met.
- No: If the color page condition has not been met.
- Error: If the document type is not supported.
Using the Color Route Vector PDF Node
Add the Color Route Vector PDF Node to the workflow by dragging the node’s icon onto the Workflow Builder canvas, and then double-clicking on the icon to open the Color Route Vector PDF Node’s window:
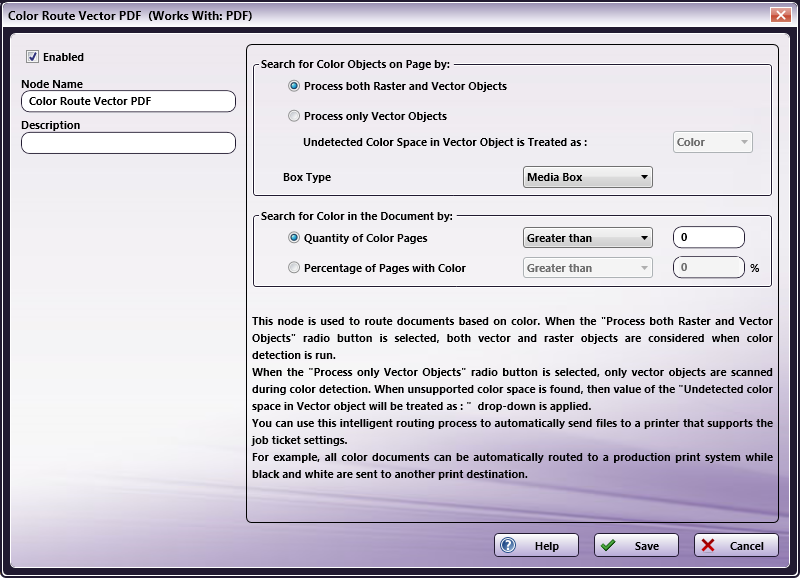
Use this window to specify the Color Route Vector PDF Node’s settings.
-
Select the Enabled checkbox so that the process will run. When unchecked, this process is ignored. Documents pass through as if the node were not present (i.e., continue along the default or positive path). Note that a disabled node will not check for logic or error conditions.
-
In the Node Name field, enter a meaningful name for the Color Route Vector PDF Node.
-
In the Description field, enter a description for the Color Route Vector PDF Node. This is not required, but can be helpful with multiple collection points. If the description is long, hover the mouse over the field to read its entire contents.
-
Click the Save button to save the changes. If Cancel is selected and the window is closed, the changes are not saved.
-
Click the Help button to access online help.
Color Route Vector PDF Settings
-
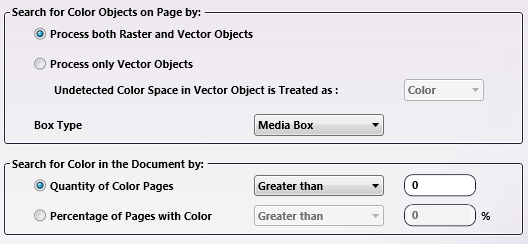
Process both Raster and Vector objects: When this radio button is selected, both Vector and Raster objects in the input file are processed during color detection.
When this radio button is selected, Vector objects are scanned first. If a Color Vector object is found, then the page is identified as Color. If no color Vector objects are found, then the page is rasterized and each pixel is scanned for color detection.
-
Process only Vector objects: When the Process only Vector Objects radio button is enabled, only Vector objects identified in the input file are processed during color detection. If unsupported color space is found, the drop-down value specified in the Undetected color space in Vector object will be treated as: field is applied.
-
Undetected color space in Vector object will be treated as: Select a value from the drop-down. When undetected space is identified, the selected value is applied as the color value of the space.
-
Box Type: From the drop-down, select the type of box that needs to be detected. There are three options: Media Box, Trim Box, Bleed Box. The default value is Media Box. The Media Box conditions of the input PDF file are matched according to the setting.
Note: When a page doesn’t contain a Trim/Bleed Box, then the value defaults to Media Box.
-
Select either the Quantity of Color pages or Percentage of Pages with Color radio button. Once a radio button is chosen, select a supporting value from the corresponding drop-downs.
-
Quantity of Color Pages: Select a delimiter from the drop-down. The options are Equals, Less than, and Greater than.
Once the delimiter is chosen, enter a numeric value in the text field. For example, if the node should route files that have less than 10 color pages to a specific printer, select Less than and enter 10 in the text field.
-
Percentage of Pages with Color: Select a delimiter from the drop-down. The options are Equals, Less than, and Greater than.
Once the delimiter is chosen, enter a corresponding percentage in the text field. For example, if the node should route files that are made up of more than 30% color pages, select Greater than and enter 30 in the text field.
-