HL7 Connector
![]()
A key feature for the Healthcare market, this node distributes documents as industry-standard HL7 (Health Level 7) messages. Dispatcher Phoenix’s support for HL7 provides the interoperability and connectivity needed for healthcare professionals to:
- Look up patient information at the MFP.
- Enter additional patient information at the MFP.
- Securely send scanned documents along with specified patient information as an HL7 message that can then be safely received by any Electronic Health Record (EHR) system.
The Dispatcher Phoenix HL7 Connector supports transmitting HL7 v2.x messages through a direct connection via TCP/IP using the Minimal Lower Layer Protocol (MLLP). The MLLP wrapping protocol is required to recognize the start and the end of each message.
Overview of HL7
HL7 is an international standard for transferring medical data between disparate healthcare systems. An HL7 message is comprised of one-character delimiters that separate the following message parts:
- Segments, separated by a carriage return ( \r )
- Fields, separated by a vertical bar/pipe ( | )
- Components, separated by a caret ( ^ )
- Subcomponents, separated by an ampersand ( & )
HL7 Message Format
See the following illustration for an example of an HL7 message transmitted from the HL7 Connector:

The HL7 message includes the following segments:
| Segment | Description |
|---|---|
| MSH | Message Header. Every message begins with an MSH. |
| TXA | Transcription Document Header. This contains the document type as well as the time/date in which the document was created. |
| PID | Patient Identification. This contains all the patient information provided. |
| OBX | Observation/Results. This contains ED (Encapsulated Data) if a file is being transmitted and TX (Text Data) if text is being transmitted. If file data is being sent, each segment will contain up to 32,768 bytes of base64 encoded files bytes. If text data is being sent, each line of the input text data will be contained in its own segment. |
Message Header Segment
The Message Header includes the following fields:
| Field Index | Field Name | Comment |
|---|---|---|
| 1 | Field Separator | The MSH.1 field will be \ |
| 2 | Encoding Characters | The MSH.2 field will be ^~& \ |
| 3 | Sending Application | The MSH.3 field will be Dispatcher Phoenix |
| 4 | Sending Facility | |
| 5 | Receiving Application | Not used |
| 6 | Receiving Facility | |
| 7 | Date/Time Of Message | Format: yyyyMMddhhmmss |
| 8 | Security | Not used |
| 9 | Message Type | The following message types are supported:
|
| 10 | Message Control ID | |
| 11 | Processing ID | The following processing ID values are supported:
|
| 12 | Version ID | The MSH.12 field shall be 2.3.1 |
Patient Identification Segment
The Patient Identification includes the following fields:
| Field Index | Field Name | Comment |
|---|---|---|
| 1 | Set ID - PID | |
| 2 | Patient ID | |
| 3 | Patient Identifier List | Not used |
| 4 | Alternate Patient ID | Not used |
| 5 | Patient Name | |
| 6 | Mother’s Maiden Name | Not used |
| 7 | Date of Birth | Format: yyyyMMdd |
| 8 | Administrative Sex |
|
| 9 | Patient Alias | Not used |
| 10 | Race | Not used |
| 11 | Patient Address | |
| 12 | County Code | Not used |
| 13 | Phone Number - Home |
Transcription Document Header Segment
The Transcription Document Header includes the following fields:
| Field Index | Field Name | Comment |
|---|---|---|
| 1 | Set ID - TXA | |
| 2 | Document Type | The following document types are supported:
|
| 3 | Type of Referenced Data | Not used |
| 4 | Activity Date/Time | Format: yyyyMMdd |
Observation Value Segment
The Observation Value includes the following fields:
| Field Index | Field Name | Comment |
|---|---|---|
| 1 | Set ID - OBX | |
| 2 | Value Type | The following value types are used:
|
| 3 | Observation Identifier | Contains document identifier, description, and file name. |
| 4 | Observation Sub-ID | Not used |
| 5 | Observation Value | If sending file data, contains MIME application type, encoding (base64), and file bytes. If sending text data, contains a line of text. |
Overview of the HL7 Connector Node
The HL7 Connector node allows you to connect to a TCP/IP server, look up patient information, and specify a variety of message and patient settings.
To configure the HL7 Connector, add a node for HL7 Connector and double-click on it.
Note: You may need to disable any Firewalls that are running or forward the ports of any running Firewall to connect to this server.
On this window, you can do the following:
-
Check the Enabled box when there are multiple output locations. When unchecked, this output will be ignored. While the workflow will still validate, documents will not be output and may be lost.
-
In the Node Name field, enter a meaningful name to the HL7 Connector.
-
In the Description field, enter a description for the HL7 Connector. This is not required, but it can be helpful when you have more than one output destination. If the description is long, you can hover the mouse over the field to read its entire contents.
Connecting to the TCP/IP Server
In the Receiving Facility (TCP/IP) area, enter information about the server to which the HL7 messages will be sent. You must specify the following:
- In the Facility Name field, enter an identifying name for the system that will be receiving the HL7 message.
- In the Server IP field, enter the server address of the system that will be receiving the HL7 message.
- In the Server Port field, enter the server port of the system that will be receiving the HL7 message.
- If the Secure Connection box is checked, the TCP/IP server is required to have TLS enabled in order to transmit scanned documents. When this option is checked, a confirmation message will appear.
- To ensure that ongoing HL7 communication proceeds smoothly, you can check the Wait for Response box to receive an acknowledgment (ACK) message from the receiving system before continuing to send messages. This acknowledgment message serves as a confirmation that the message was received, and the message is valid based on HL7 processing rules.
- Check the Stop Sending on Failure box to ensure that no further messages are sent to the receiving system if a failure occurred when receiving or processing an HL7 message. Please note that if this option is specified, the Wait for Response box must also be enabled.
- In the Sending Timeout (seconds) field, enter the number of seconds to wait before the sending operation times out.
- In the Receiving Timeout (seconds) field, enter the number of seconds to wait before the receiving operation times out. Note that the Wait for Response option must be enabled in order for this setting to take effect.
- Click on the Test Connection button to make sure that the specified connection information entered is valid.
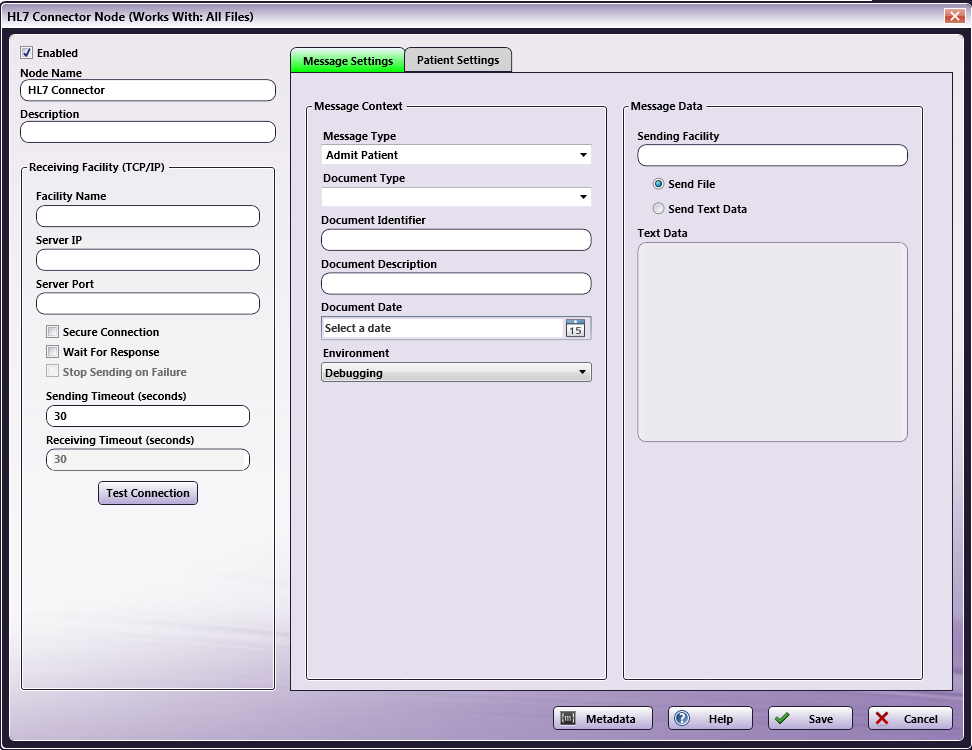
Specifying Message Settings
The Message Settings tab includes fields that allow you to specify the content of the HL7 message. These fields are typically accessed and filled out at the MFP during scan time. Using the Message Settings fields, an MFP user can specify specific information about the message, including:
-
Message Type - Choose from a pre-defined list of most commonly used HL7 message types for patient administration, orders, results, and charges, including: Admit Patient, Discharge Patient, Register Patient, Patient Information Update, Medical Document Upload, and Refer Patient.
-
Document Type - Choose from a pre-defined list to specify what type of document is being transmitted. Options include Consent to Treat, Consultation, Diagnostic Imaging, Discharge Summary, Emergency Department Report, HIPAA Consent, History and Physical Examination, Operative Report, Psychiatric Consultation, Psychiatric History and Physical Examination, Procedure Note, Progress Note, Referral / Order, Surgical Pathology, Transfer Summary.
-
Document Identifier field - Enter a brief title for the document that is being transmitted.
-
Document Description field - Enter a description of the document that is being transmitted.
-
Document Date - Specify when the document is being scanned.
-
Environment - Choose the environment (Debugging, Production, Training) in which the message will be sent.
In the Message Data area, you can also specify specific information that the HL7 message will contain, using the following fields:
-
Sending Facility - Enter the name of the facility from which the message will be sent.
-
Select the Send File radio button to embed the binary file in the HL7 message. With this option enabled, the uploaded document will be sent to the folder that is created on the server system.
-
Select the Send Text Data radio button to include specific formatted text data within the HL7 message. The Text Data can be entered in the Text Data box. This field accepts up to 250 characters. The scanned document will not be sent; only the text entered in the Text Data box will be sent within the HL7 message. For example, the following information is entered in the Text Data box:
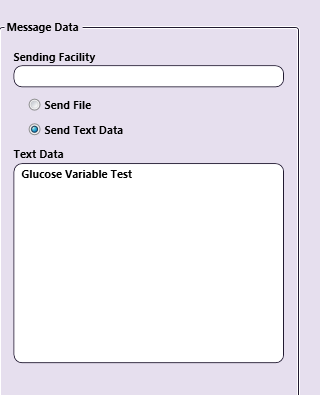
Then the HL7 message would include the following data:

-
Specifying Patient Settings
The Patient Settings tab includes fields that allow you to enter patient information (patient details and patient address/contact data) that can be associated with the scanned document.
Note: The Patient’s First Name and Last Name are required to be entered in order to save the node configuration window.
Patient Details include:
- Patient ID
- First Name
- Middle Name
- Last Name
- Date of Birth
- Gender
- Street Address
- City
- State
- Zip Code
- Country
- Phone number
Note: All fields on the Message Settings and Patient Settings tabs accept Metadata. To browse for metadata to add to the fields, click on the Metadata button and the Metadata Browser window will appear. Using this window, you can drag-and-drop variable names from the Metadata Browser to the appropriate open text fields.
- Select the Save button to keep the HL7 Connector definition. You can also select the Help button to access online help and select the Cancel button to exit the window without saving any changes.
Creating an HL7 Index Form
You can create an index form that allows you to look up patient information, specify message settings, and enter patient information at the MFP. Do the following:
-
Make sure that your workflow includes (at least) a MFP Panel node and HL7 Connector Node.
-
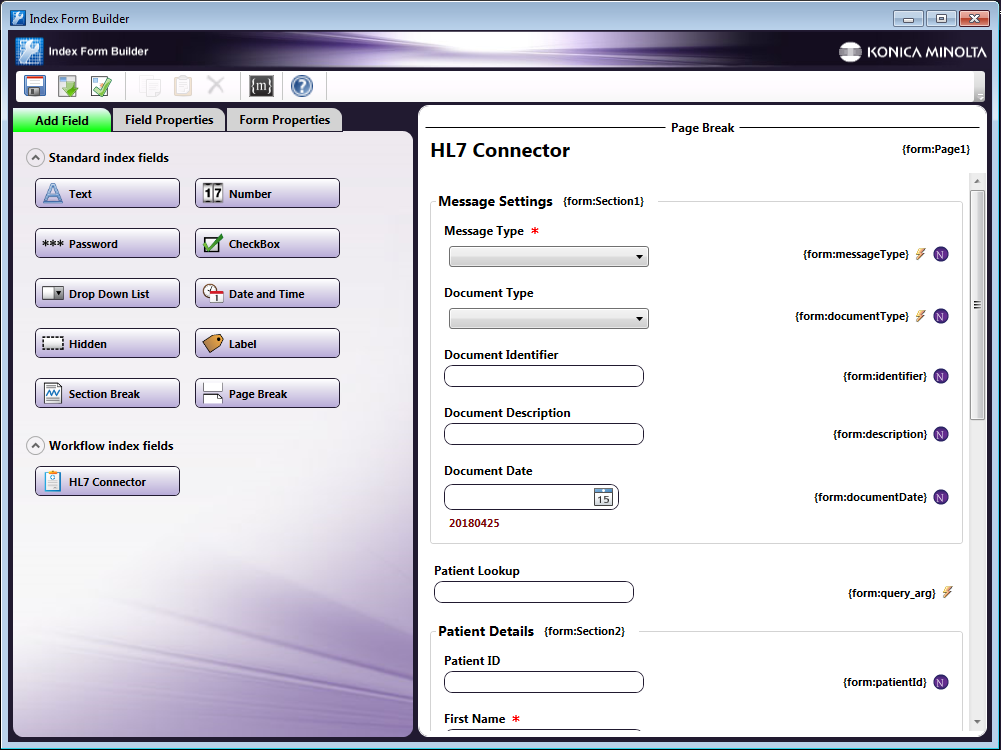
Open up the Index Form Builder from the MFP Panel node. You should see an HL7 Connector button under the Workflow Index Fields area.
-
Drag and drop the HL7 Connector button to the Index Form work area. A default HL7 Connector index form will automatically appear, as in the following illustration:
-
If required, you can configure the Index Form for patient lookups, following these steps:
a. Select the Patient Lookup field.
b. On the Field Properties panel, edit the HL7 Connector Data Source. See the following illustration for an example:
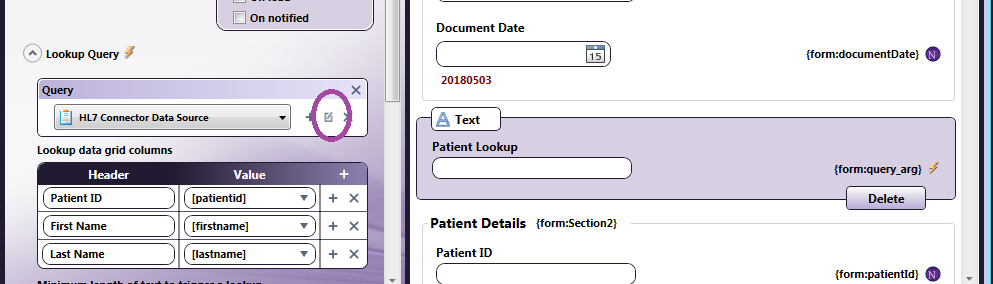
c. The HL7 Connector Data Source window will appear, as in the following illustration:
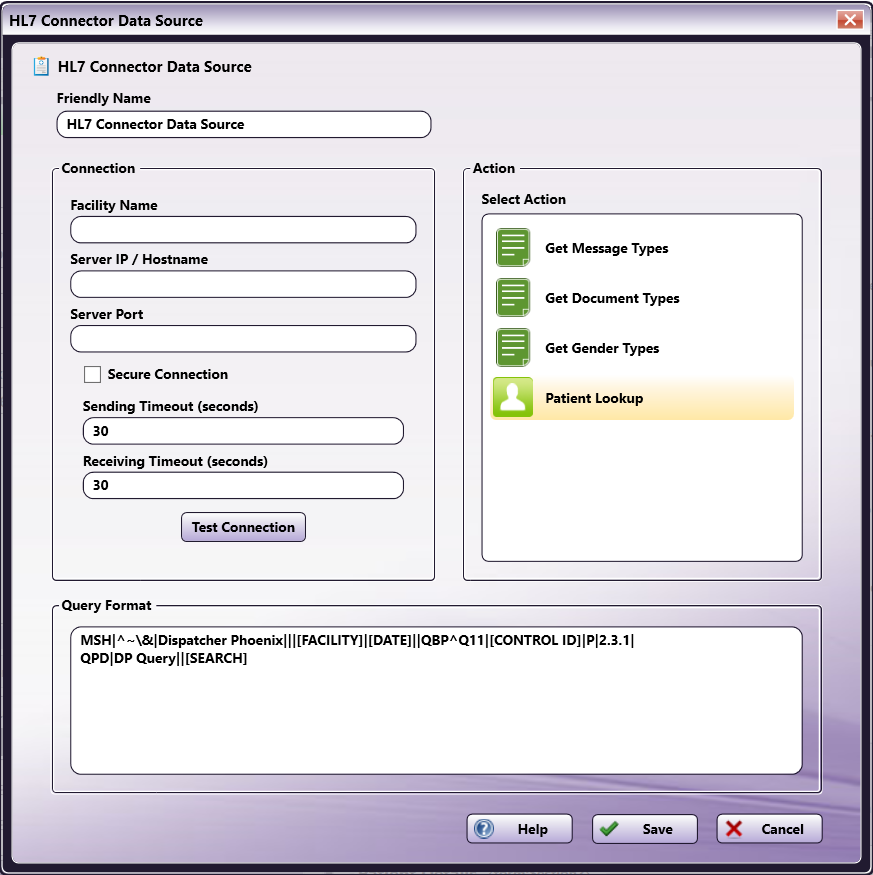
On the HL7 Connector Data Source window, do the following:
-
In the Facility Name field, enter an identifying name for the database that the user will use for patient look up.
-
In the Server IP field, enter the server IP address of the system from which you will be retrieving patient information.
-
In the Server Port field, enter the server port of the system from which you will be retrieving patient information.
-
If the Secure Connection box is checked, the TCP/IP server is required to have TLS enabled in order to transmit scanned documents. When this option is checked, a confirmation message will appear.
-
In the Sending Timeout (seconds) field, enter the number of seconds to wait before the sending operation times out.
-
In the Receiving Timeout (seconds) field, enter the number of seconds to wait before the receiving operation times out. Note that the Wait for Response option must be enabled in order for this setting to take effect.
-
Select the Test Connection button to make sure that the specified connection information entered is valid.
-
Modify the query using the Query Format field. The Query Format field contains the query that will be sent to retrieve patient information from the system when a patient lookup is requested at the MFP. The default query includes the following replacement words:
- FACILITY - The facility name entered in the Connection field.
- DATE - The date/time the message was sent in YYYYMMDDHHMM format.
- CONTROL ID - A randomly generated identifier for the message.
- SEARCH - The search that was entered by the user at the MFP.
This default query can be fully customized with any Index Form metadata to be compatible with the system that is being queried.
-
Select the Save button when you are done.
Notes:
- If you are not using patient lookups at the MFP, make sure that you delete the Patient Lookup field from the Index Form.
- Patient lookups are not supported on the Native MFP User Interface.
-
-
Save and close the Index Form.
-
Configure the MFP Panel node with any necessary MFPs; then save the MFP Panel node.
-
Double-click on the HL7 Connector to configure its connection details.
-
In the HL7 Connector node configuration window, enter connection information about the system that will be receiving the HL7 message. You will notice that the other fields are filled in with Index Form metadata variables, as in the following illustration:
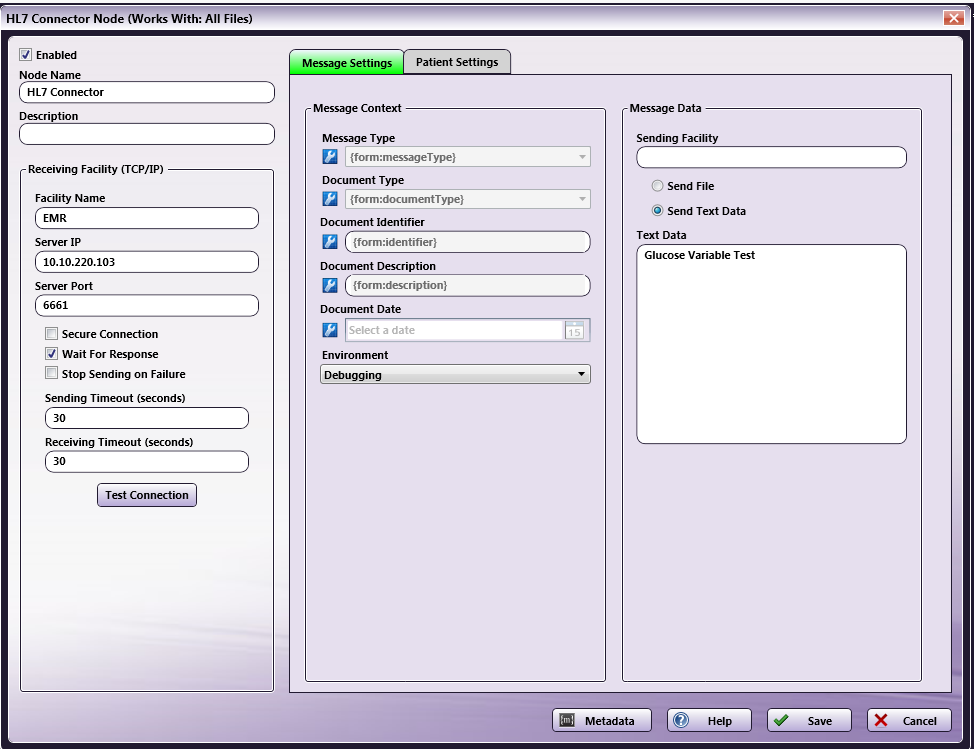
-
Save the HL7 Connector node.
HL7 Metadata for Index Forms
When building a custom index form, Message Types, Document Types, and Genders require the following specific metadata values:
Message Type Metadata Values
| Display Name | Metadata Value |
|---|---|
| Admit Patient | ADT A01 |
| Discharge Patient | ADT A03 |
| Register Patient | ADT A04 |
| Patient Information Update | ADT A08 |
| Medical Document Upload | MDM T02 |
| Refer Patient | REF I12 |
Document Type Metadata Values
| Display Name | Metadata Value |
|---|---|
| [NOT SPECIFIED] | N |
| Consent to Treat | CT |
| Consultation | CN |
| Diagnostic Imaging | DI |
| Discharge Summary | DS |
| Emergency Department Report | ED |
| HIPAA Consent | HC |
| History and Physical Examination | HP |
| Operative Report | OP |
| Psychiatric Consultation | PC |
| Psychiatric History and Physical Examination | PH |
| Procedure Note | PN |
| Progress Note | PR |
| Referral / Order | RO |
| Surgical Pathology | SP |
| Transfer Summary | TS |
Gender Metadata Values
| Display Name | Metadata Value |
|---|---|
| [NOT SPECIFIED] | [BLANK] |
| Ambiguous | A |
| Female | F |
| Male | M |
| Not Applicable | N |
| Other | O |
| Unknown | U |
Scanning at the MFP
To use the HL7 Connector at the MFP, do the following:
-
Create an HL7 workflow that uses the HL7 Index Form.
-
Make sure that the HL7 workflow is running.
-
At the MFP, access the Dispatcher Phoenix app.
-
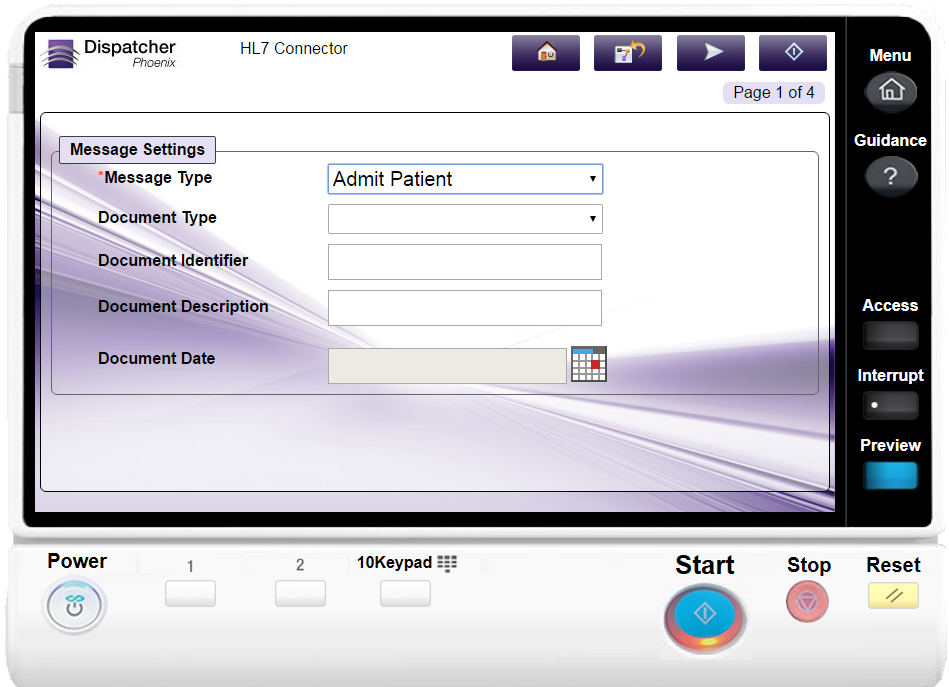
Access the HL7 Index Form. The following screens will appear:
1st Screen: Enter Message/Document Settings
On this screen, you can specify the message type, type of document being scanned, as well as other information that helps identify the document (identifier, description, and scanning date).
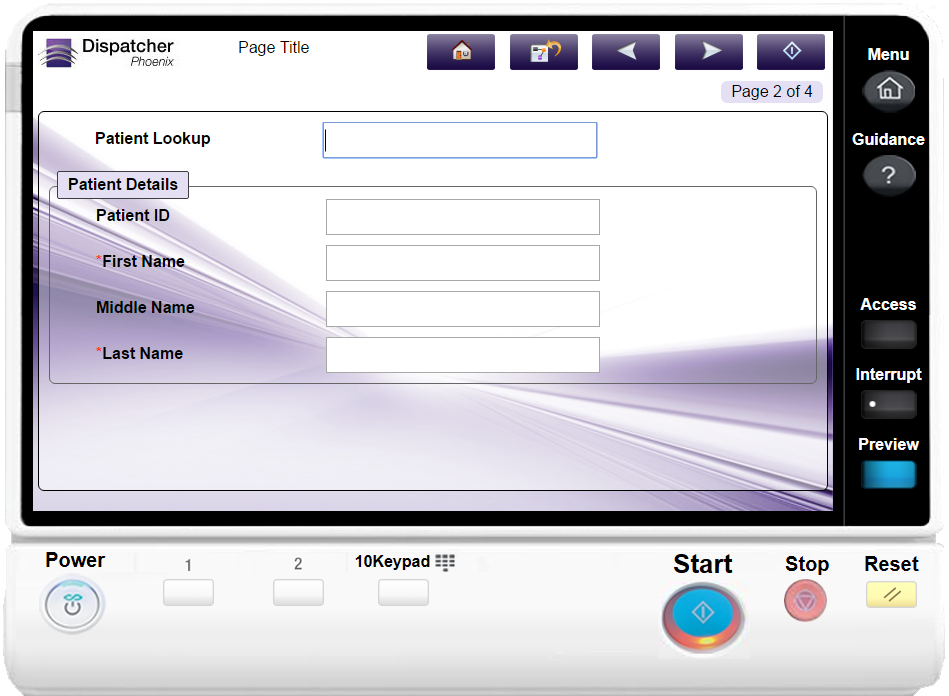
2nd Screen: Look up Patient
On this screen, you can search for a specific patient within the EHR that the scanned document should be associated with. Enter characters in the Patient Lookup field to search; once you choose a patient name, information will be retrieved from the EHR and automatically populated in the other index fields.
3rd Screen: Enter Patient Details (Date of Birth and Gender)
On this screen, you can enter additional information about the patient, including their date of birth and their gender.
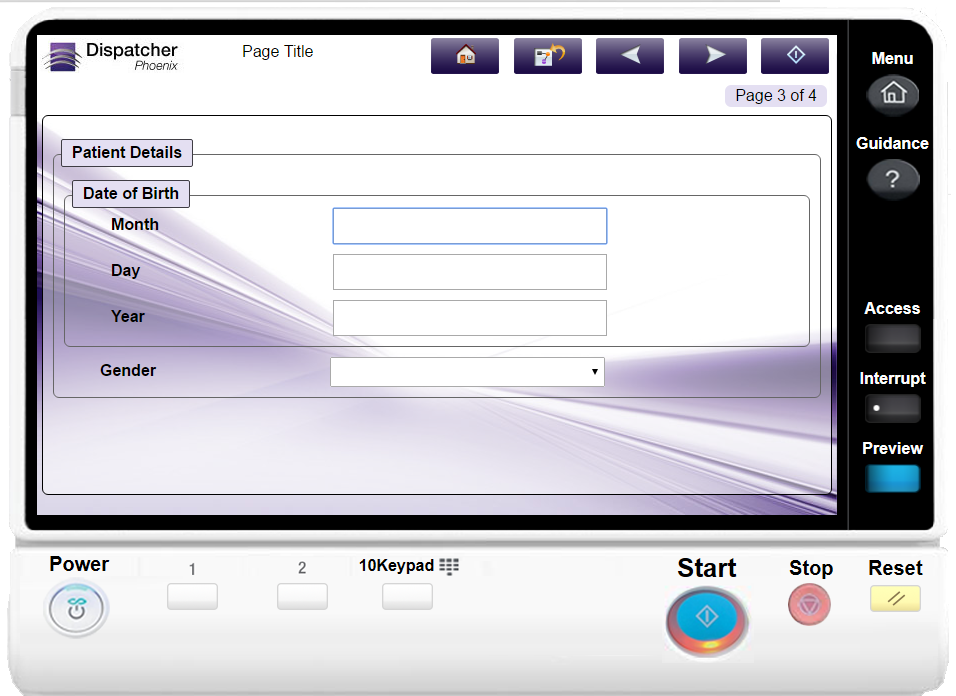
The Date of Birth fields have the following constraints:
- The Month value must be between 1-12.
- The Day value must be between 1-31.
- The Year must be 4 digits.
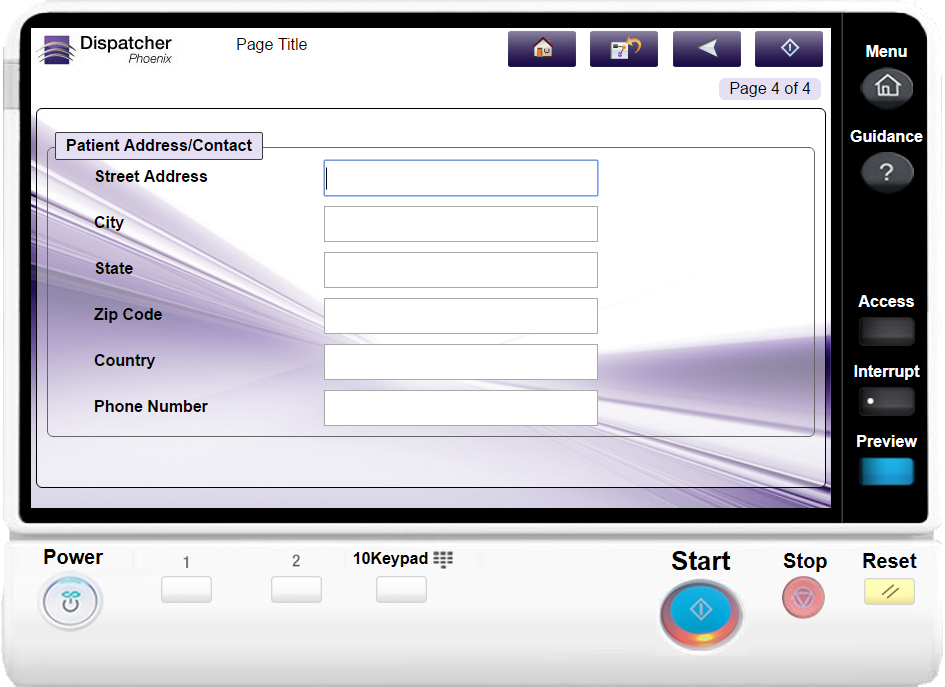
4th Screen: Enter Patient Contact Information On this screen, you can enter additional contact information about the patient.
-
Tap on the Start button when you are done.