Dispatcher Suite
Dispatcher Suite is an advanced platform for both print management and scan workflows, integrating Dispatcher Phoenix for scanning and Dispatcher Paragon for print management, authentication, and cost accounting. By using Dispatcher Suite, your workflows will be optimized for both scanning and printing efficiency. This integrated solution includes the ease of using one installer to download and install both programs, and a seamless, single sign-on experience at the MFP.
To visit the help documentation for Dispatcher Paragon, click here.
Requirements
For Dispatcher Suite, the recommended requirements list the resources that need to be available for Dispatcher Phoenix and Dispatcher Paragon. They are listed below. For more specific recommendations, please contact your Regional Sales Manager or Konica Minolta Authorized Reseller.
Dispatcher Suite requires administrator privileges for installation. If you do not have administrator rights to the computer where you would like to install Dispatcher Suite, contact your network administrator.
For all platforms, we recommend that you upgrade to the latest Windows Service Pack and critical updates available from the Windows Update website to ensure the best compatibility and security. Installation of the latest Windows Service Pack may be required on some operating systems.
Note: Dispatcher Suite must be installed on a machine that is part of the Active Directory domain.
Hardware Requirements
| Category | Small-Medium Deployment Recommendation (ex. up to 100 Users, 40 devices, 10-15 workflows, etc.) | Large Deployment Recommendation (ex. 200+ Users, 200+ devices, 20+ Workflows, etc. per server) |
|---|---|---|
| Processor | 8 core CPU, 2.5 Ghz+ with 512MB VRAM for Higher | 8 core CPU, 2.5 Ghz+ with 512MB VRAM for Higher |
| Memory | 16 GB RAM | 32 GB RAM |
| Hard Disk Speed | 150 MB/s or 100 I0PS or SSD | 150 MB/s or 100 I0PS or SSD and a connection to storage with a throughput of at least 150 MB/s and 300 I0PS |
| Free Space Required | 256 GB Free Space | 1 TB Free Space |
| Dual Server Setup | Recommended |
Note: To improve performance, you should install Dispatcher Suite on a solid state drive (SSD).
Operating System Requirements
Dispatcher Suite is a next-generation workflow automation and print management software.
| Operating System | Service Pack | Dispatcher Paragon | Dispatcher Phoenix |
|---|---|---|---|
| Windows Server 2016 | N/A | ✓ | ✓ |
| Windows Server 2019 | N/A | ✓ | ✓ |
| Windows Server 2022 | N/A | ✓ | ✓ |
Note: While Dispatcher Suite supports Windows Server 2012 and Windows Server 2012 R2, Dispatcher Phoenix and Dispatcher Paragon+ only support Windows Server 2016 and newer.
Dependencies
The following dependencies are required for Dispatcher Suite. Typically, the Dispatcher Suite installer will detect and auto install all the required dependencies if they are missing on the system.
- Microsoft Windows Imaging Component (WIC)
- Windows PowerShell 2.0
- Microsoft Visual C++ 2010 Redistributable (32-bit)
- Microsoft Visual C++ 2010 Redistributable (32-bit)
- Microsoft Visual C++ 2015-2019 Redistributable (32-bit)
- Microsoft Visual C++ 2015-2019 Redistributable (32-bit)
- Microsoft .NET Desktop Runtime 8.0
Firewall Exceptions
Dispatcher Phoenix
Click here for more information on how to configure your firewall exceptions for Dispatcher Phoenix.
Dispatcher Paragon
If antivirus protection is installed on the Dispatcher Paragon server, the entire Dispatcher Paragon directory and Dispatcher Paragon system services must be removed from the real-time anti-virus tests. For more information on the required antivirus settings for Dispatcher Paragon, click here.
Configuring Dispatcher Suite
Caution! Dispatcher Phoenix’s LPR Service will be incompatible with the Dispatcher Paragon FlexiSpooler since both services use the same Port. In this case, to use the Dispatcher Paragon FlexiSpooler for print roaming, do the following:
-
Using the Windows Services application, stop the KMBS SEC LPR Service.
-
Right-click and select Properties from the menu that appears.
-
On the KMBS SEC LPR Service Properties window, select Manual from the Startup type drop-down list; then select the OK button when you are done.
-
Once the Dispatcher Phoenix LPR Service has been disabled, restart the Dispatcher Paragon FlexiSpooler.
To configure Dispatcher Suite, you must do the following:
- Enable Workflow Services Manager for LDAP
- Configure Dispatcher Phoenix System Settings
- Configure Dispatcher Paragon System Settings
- Synchronize LDAP Users
- Set Up Access Rights
- Set Up Device Synchronization
Enable Workflow Services Manager for LDAP
Windows Authentication for LDAP Lookup must be enabled in Dispatcher Phoenix’s Workflow Services Manager. By enabling LDAP Lookup, Active Directory users automatically gain access to their Dispatcher Phoenix workflows when they authenticate at an MFP. Click here for information on setting this up.
Configure Dispatcher Phoenix System Settings
The following properties must be configured in order for Dispatcher Phoenix to successfully send and receive MFP and user information from Dispatcher Paragon.
-
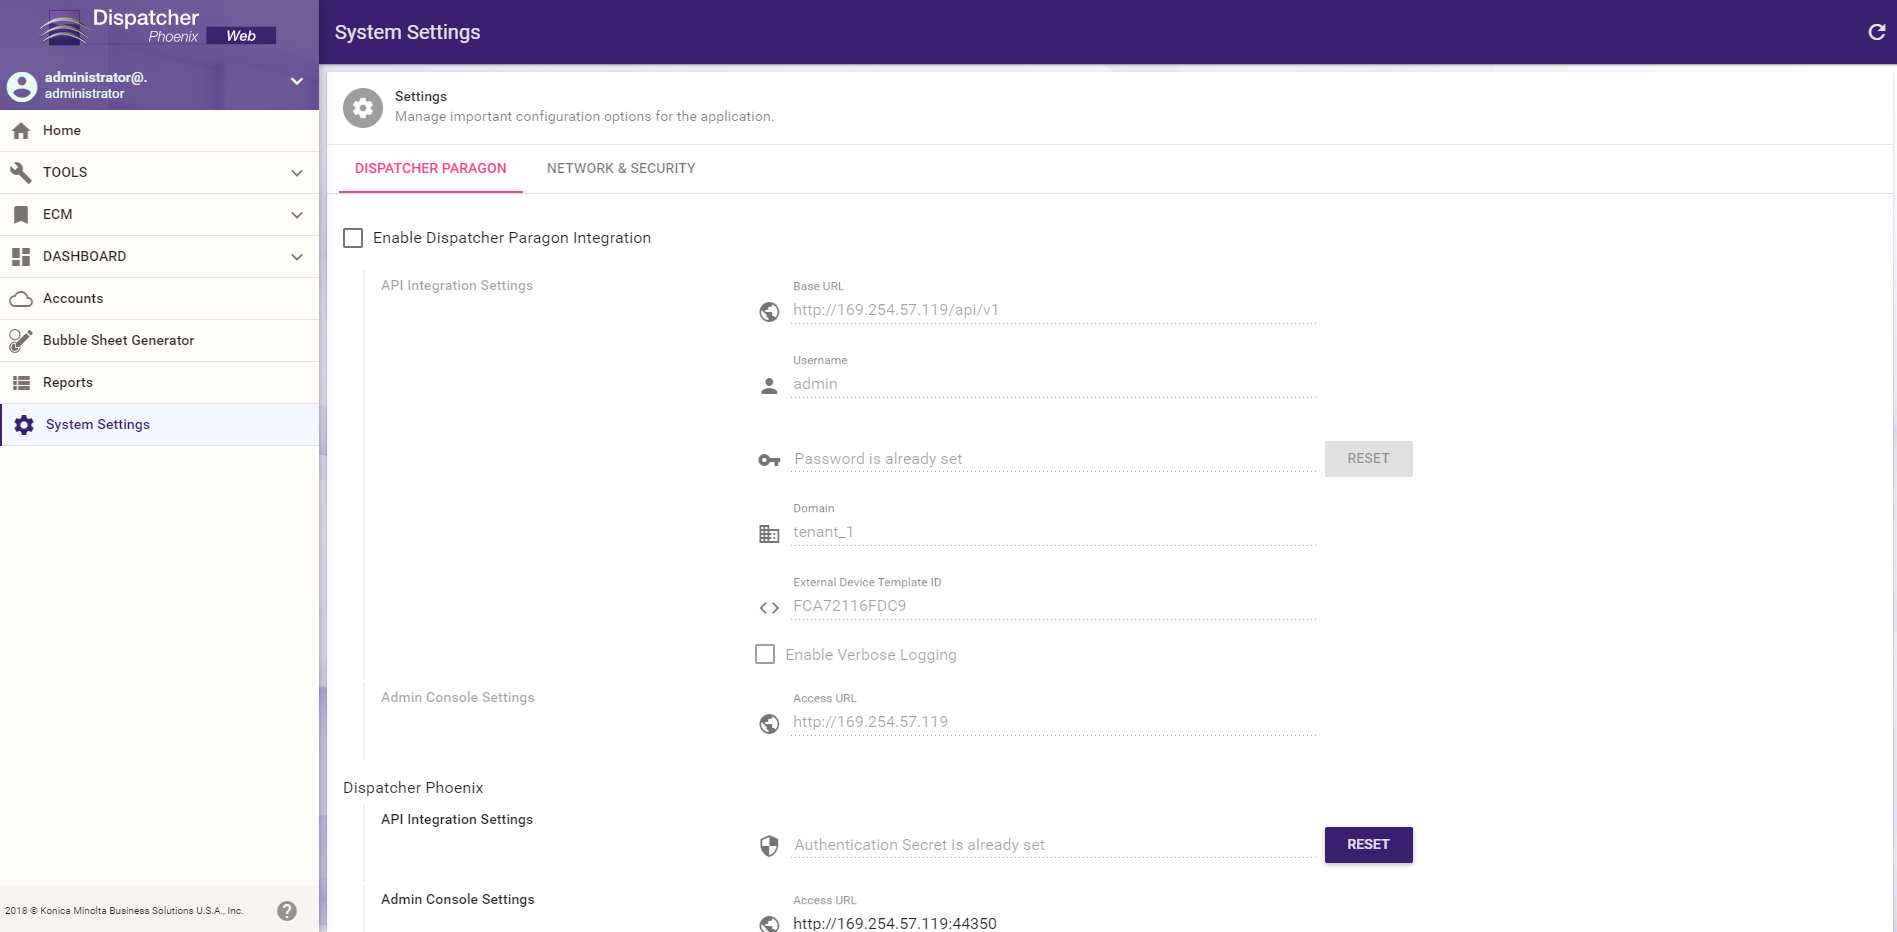
Launch Dispatcher Phoenix Web, and click the System Settings card on the Home page as shown in the following illustration:
Note: You will need to login to DP Web as an administrator to see the System Settings.

-
The System Settings tile includes two tabs, one for Dispatcher Paragon and the other for Network & Security. The Dispatcher Paragon tab includes two sections, one for Dispatcher Paragon Integration and one for Dispatcher Phoenix. The Dispatcher Paragon system settings appear under the Enable Dispatcher Paragon Integration checkbox.
The Dispatcher Paragon system settings contain the following fields:
-
Check the Enable Dispatcher Paragon Integration box.
-
Base URL - This is the API URL for Dispatcher Paragon. This value should match the IP address of the computer or server that both Paragon and Dispatcher Phoenix are installed on.
- If Dispatcher Phoenix and Dispatcher Paragon MU 73+ are installed on the same server, you must change the Base URL from “http” to “https”. For previous versions of Dispatcher Paragon, you can leave the default value as is.
- If Dispatcher Phoenix and Dispatcher Paragon are installed separately (each one on a different server), then update the IP address of the URL to match the IP address of the server where Dispatcher Paragon is installed.
- If the Dispatcher Paragon server is listening to HTTP requests on a port other than default (80), make sure to add the correct port value to the Base URL.
-
Username & Password - Change this to the username and password associated with the designated service account in Dispatcher Paragon as described in the Setup Access Rights help section.
-
The Domain defaults to tenant_1, because Paragon only supports a single tenant. This field should not be changed.
-
External Device Template ID - This value is automatically assigned and should not be changed. The value is used when creating a device template in Paragon and should be written down or saved in a secure location.
-
Enable Verbose Logging - This tool increases the data provided in logs, which can be useful when troubleshooting. Leave this option unchecked unless otherwise necessary.
-
Access URL - This is the Web URL for Dispatcher Paragon.
- If Dispatcher Phoenix and Dispatcher Paragon are installed on the same server, then you can leave the default value as is.
- If Dispatcher Phoenix and Dispatcher Paragon are installed separately (each one on a different server), then update the IP address of the URL to match the IP address of the server where Dispatcher Paragon is installed.
The Dispatcher Phoenix system settings contain the following fields:
-
Authentication Secret - This is an automatically assigned value that will be used when configuring Paragon. Do not modify this field. This value must be the same in Dispatcher Phoenix and Dispatcher Paragon and should be written down or saved in a secure location.
-
Access URL - This is the IP address of Dispatcher Phoenix Web and does not need to be changed.
-
-
Click Save in the lower right corner of the Systems Settings page.
-
The Network & Security tab allows you to configure proxy and certificate settings. For more information, click here.
-
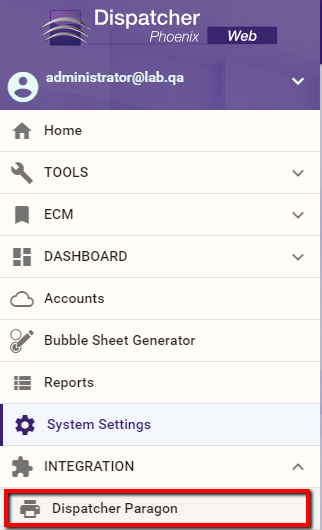
A Dispatcher Paragon button will then be added to the home screen. Additionally, an INTEGRATION section will be added to the side menu automatically with a Dispatcher Paragon link underneath as shown in the following illustration. This link will direct you to the Dispatcher Paragon Management Interface.
After completing the configuration steps, users will be able to navigate to both the Dispatcher Phoenix and Dispatcher Paragon web interfaces from the Dispatcher Phoenix client application using the following instructions:
-
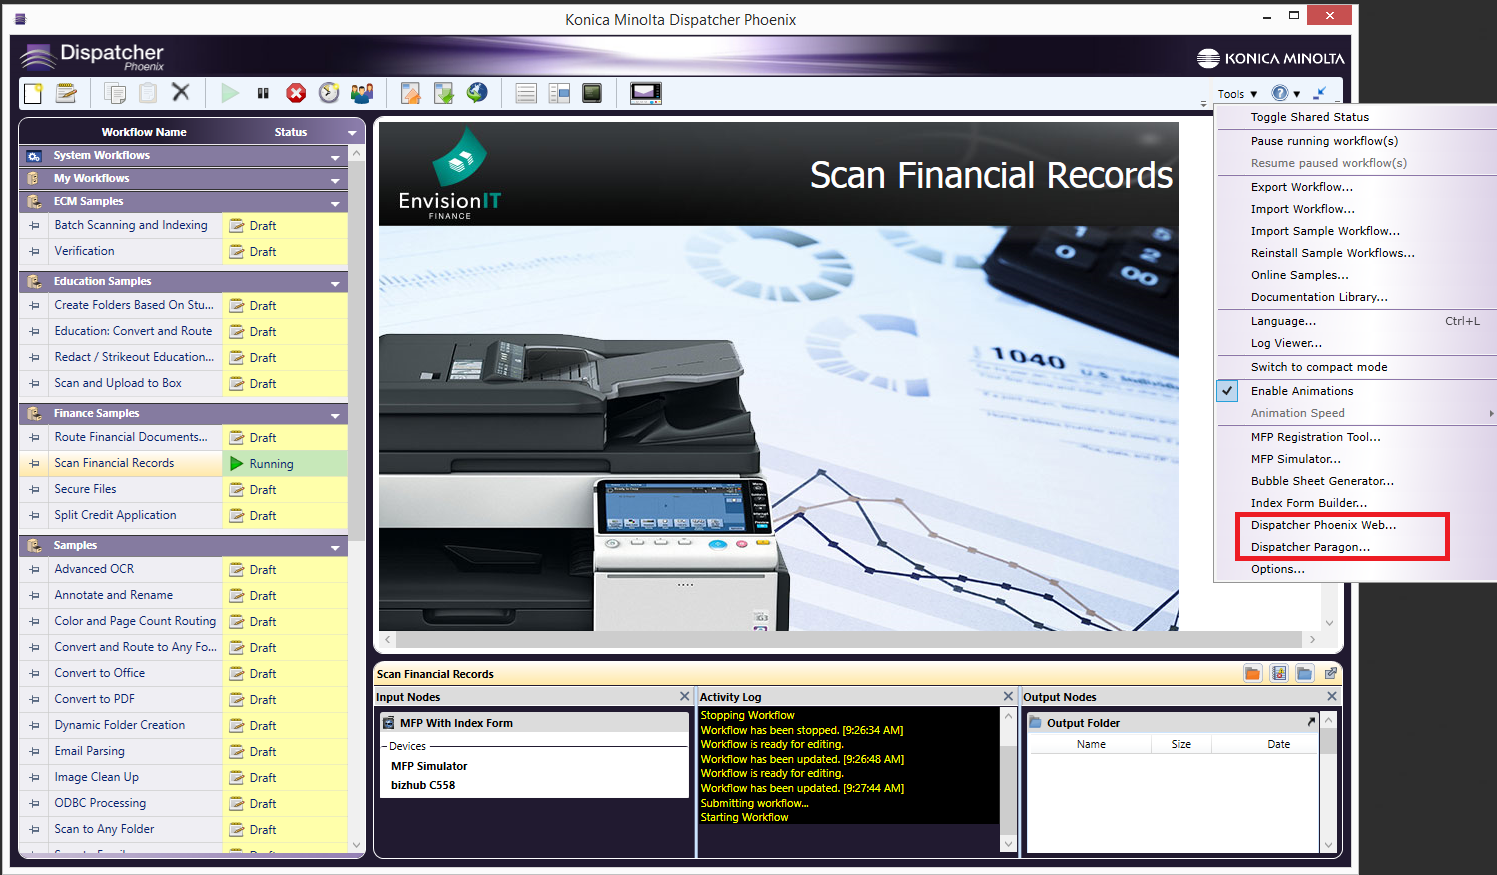
Open Dispatcher Phoenix. Then, navigate to the Tools dropdown in the upper right-hand corner.
-
Navigate to Dispatcher Phoenix Web or the Dispatcher Paragon Management Interface.
Configure Dispatcher Paragon Settings
As the next step in a successful install of Dispatcher Suite, you will need to configure Dispatcher Paragon properly in order for the application to send and receive MFP and user information from Dispatcher Phoenix. To do this, follow the steps below:
-
Once your license has been activated, log back into Dispatcher Paragon. On your Dashboard, in the left-hand menu, navigate to the System button at the bottom. This should navigate you to the Configuration section as shown in the following illustration:

-
Select the Expert button in the top far right of the screen, and then click the Integration API subgroup in the left-hand column. Configure the following properties:
-
Konica Minolta Dispatcher Phoenix API Secret - Enter the Dispatcher Phoenix JSON Web Token (JWT) Key. This can be retrieved by launching Dispatcher Phoenix Web and copying the Authentication Secret from System Settings into this field. For more information, please see the Configuring Dispatcher Phoenix Web Interface help section described above.
-
Konica Minolta Dispatcher Phoenix API URL - Enter the Access URL of the Dispatcher Phoenix API. This value should not change unless Dispatcher Phoenix has been installed on a different device than Dispatcher Paragon. In that case, the Dispatcher Phoenix IP address should be entered.
-
Konica Minolta Dispatcher Phoenix Web URL - Enter the Access URL of the Dispatcher Phoenix Web. This value should not change unless Dispatcher Phoenix has been installed on a different device than Dispatcher Paragon. In that case, the Dispatcher Phoenix IP address should be entered.
-
Konica Minolta Dispatcher Phoenix Integration - Set to Enable.
-
List of the IP addresses that are allowed to communicate with terminal services - Enter the IP Address for the installation.

-
-
Select the Save Changes button when you are done.
Synchronize LDAP Users
Synchronizing these users with LDAP allows them to be shared between Dispatcher Paragon and Dispatcher Phoenix and enables single sign on at the MFP. To do this, follow the steps below:
-
Launch the Dispatcher Paragon Management Interface. Then, navigate to System in the left-hand menu.
-
Select LDAP Integration from the navigation at the top of the page. Then, navigate to the Settings tab.
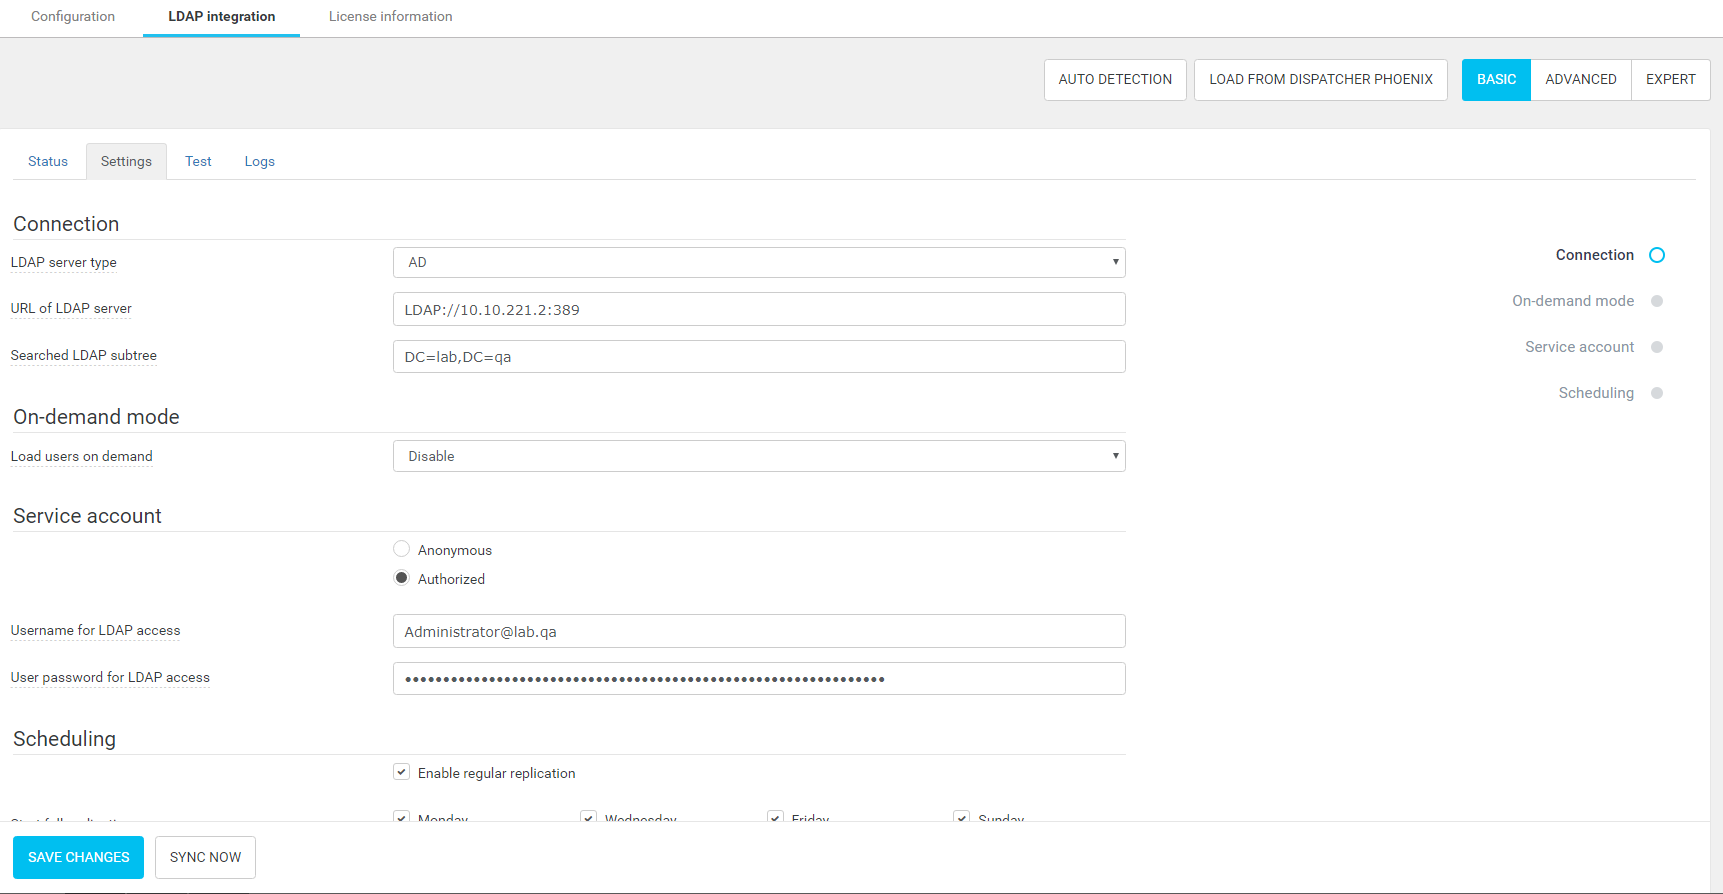
-
Select Load From Dispatcher Phoenix from the top right-hand navigation bar. This step will only work if LDAP lookup has already been configured in Workflow Services Manager. For more information, please see the Configuring for LDAP Lookup help page.
-
Select the Save Changes button.
-
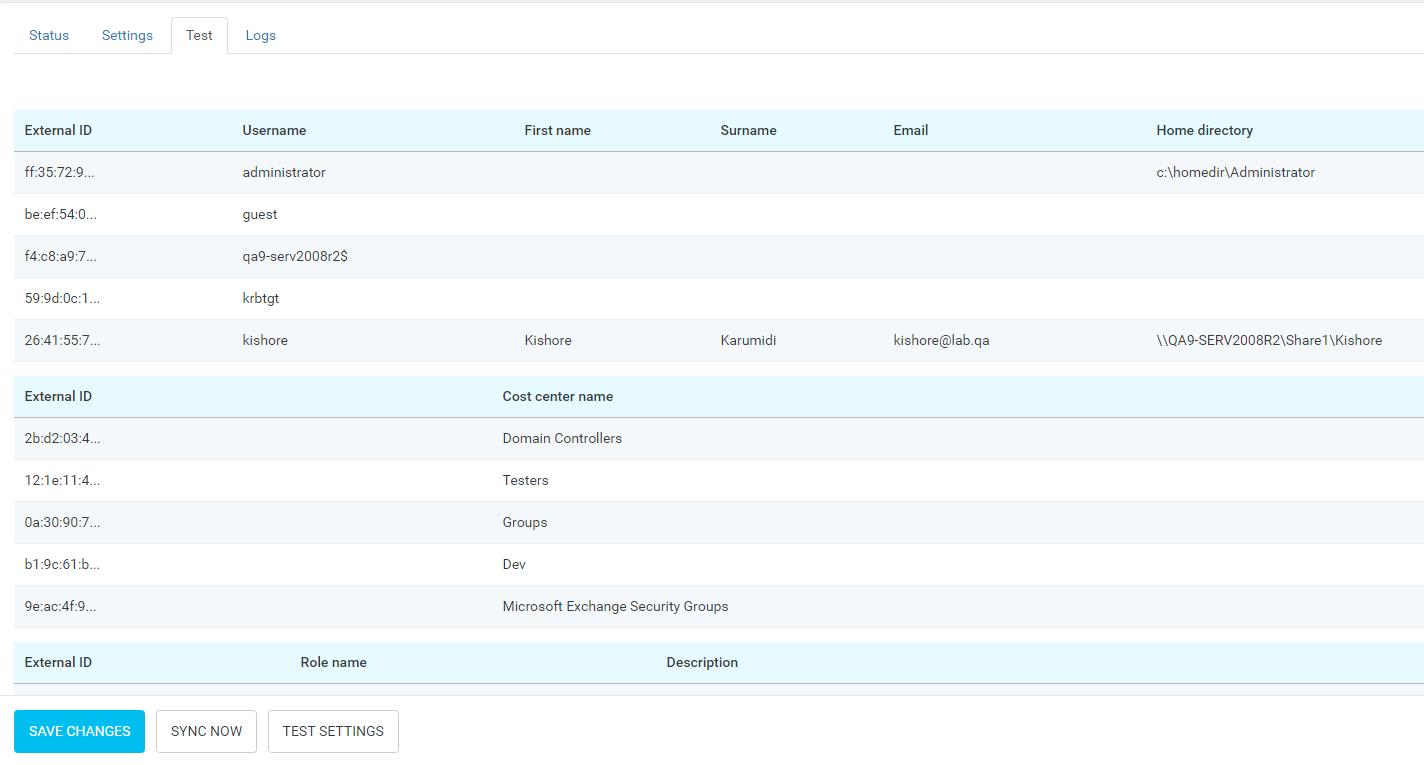
Go to the Test page under LDAP Integration, and select the TEST SETTINGS button at the bottom as shown in the following illustration:
-
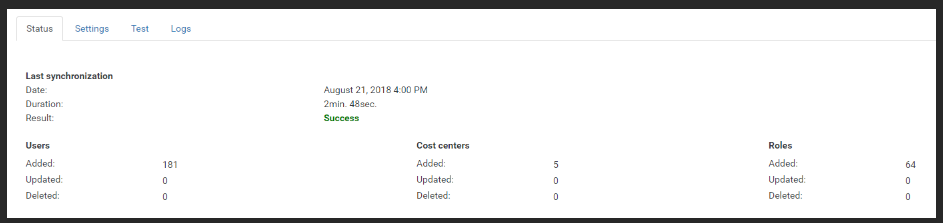
After the settings are tested and return successful results, click the SYNC NOW button to populate the users. To check the progress of the synchronization, click Status tab, and you will be able to see how many users have been added. It will say Success next to Result once the sync is complete as shown in the following illustration:
Setup Access Rights
-
Log in to Dispatcher Paragon Management Interface as an administrator, and navigate to Users in the main menu. From your user database, select a user, other than admin, to be the designated service account that will facilitate communication between Dispatcher Phoenix and Dispatcher Paragon. click here for more information on configuring a service account.
-
Click the Set Up Access Rights icon,
 , that appears to the far right of the user and check that the rights listed below are enabled for this account.
- General
- Remote access via the Management Server REST API
- Devices
- List of printers and queues
- Printers and queues administration
- System
- System settings - basic options
- System settings - advanced options
- System settings – expert options
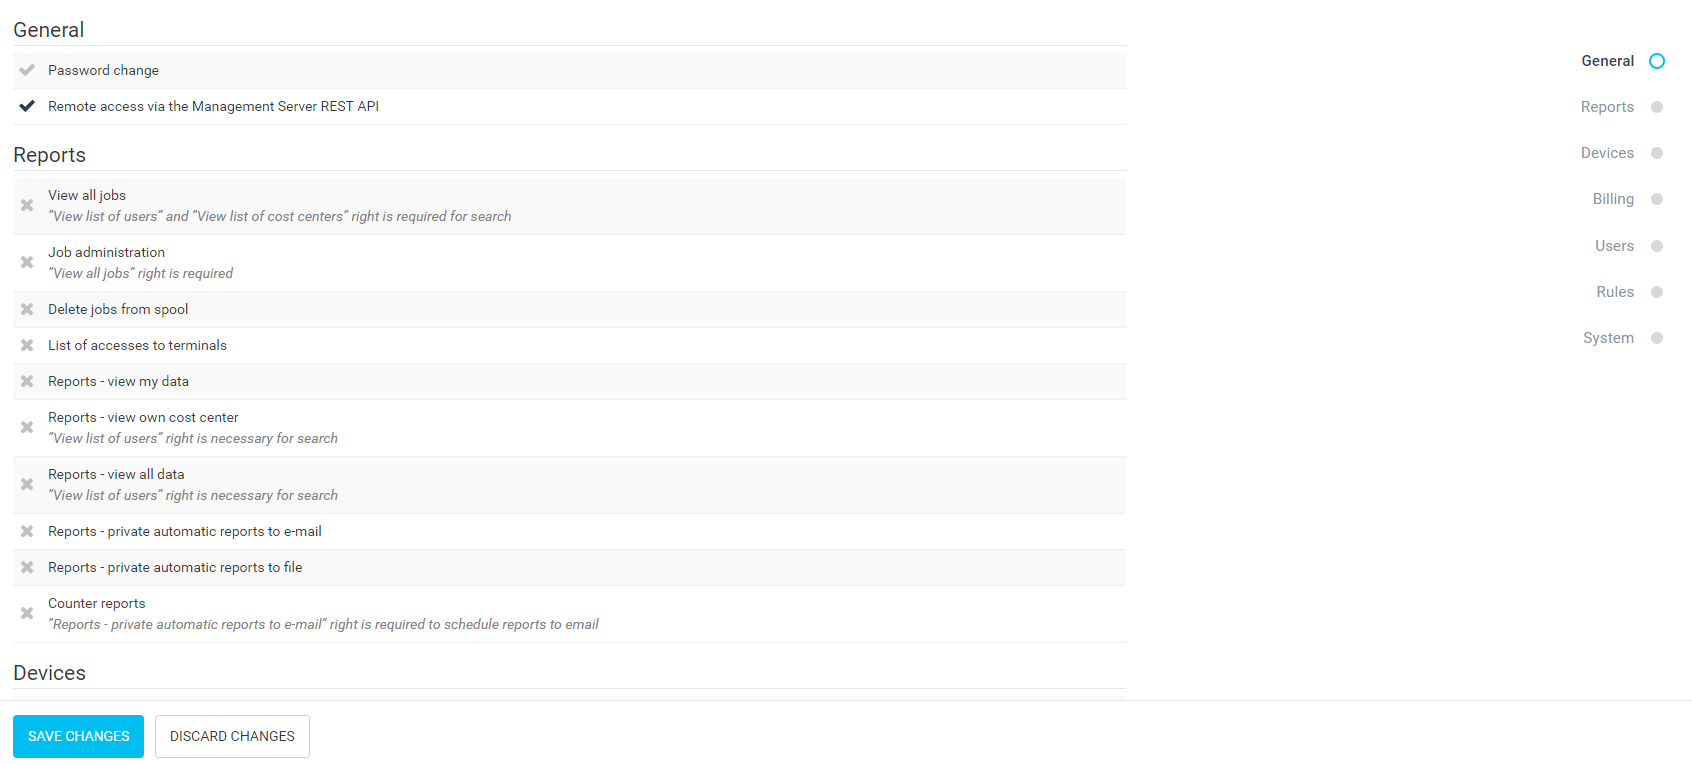
- General
-
Select the Save Changes button.
Note: The service account you choose is set up is used to ensure that Paragon and Phoenix can communicate successfully.
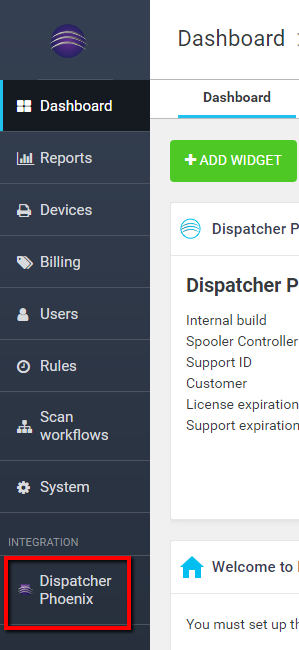
Once you have completed these steps and the Dispatcher Paragon Management Interface is correctly configured, the side menu will automatically add an Integration section with a Dispatcher Phoenix link underneath, as shown in the following illustration. The link will go to Dispatcher Phoenix Web:
Setup Device Synchronization
You must also set up a device template that can be used any time an MFP is added from Dispatcher Paragon. To do this, follow these steps below:
-
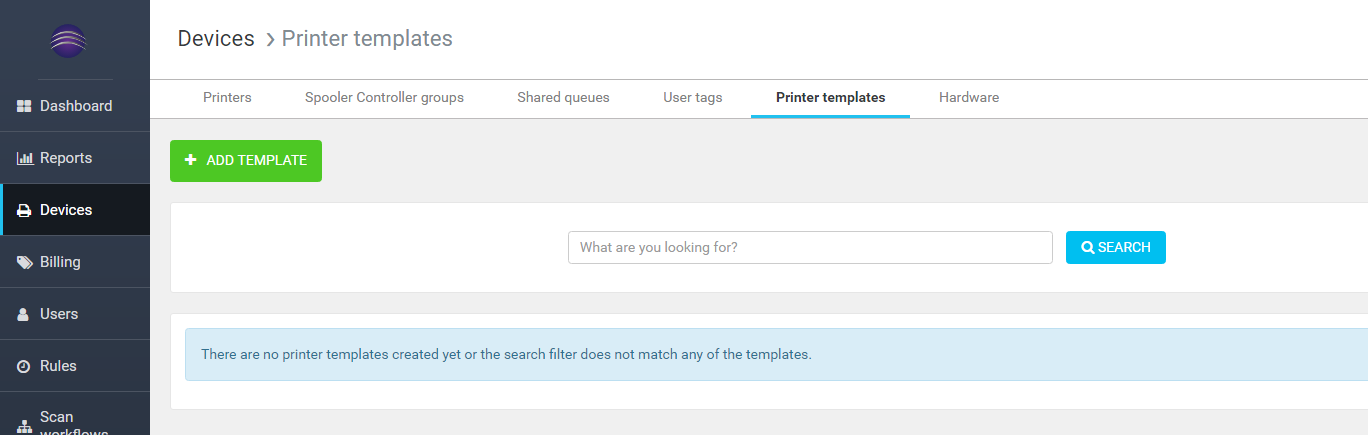
Launch Dispatcher Paragon Management Interface. Navigate to Devices in the left-hand menu, and then select Printer templates as shown in the following illustration:
-
Select ADD TEMPLATE button and fill out the form shown below with the following information:
-
Unique ID - This value can be retrieved by launching DP Web and copying the External Device Template ID from System Settings into this field. For more information, please see the Configuring Dispatcher Phoenix Web Interface help section.
-
Select Terminal type - Dispatcher Paragon Embedded Terminal for Konica Minolta.
-
Select Terminal mode - Dispatcher Paragon Terminal Application - 2nd Gen. with Konica Minolta theme. This option supports Konica Minolta’s updated graphical MFP Interface. To use Konica Minolta’s Native MFP UI, select the Native option.
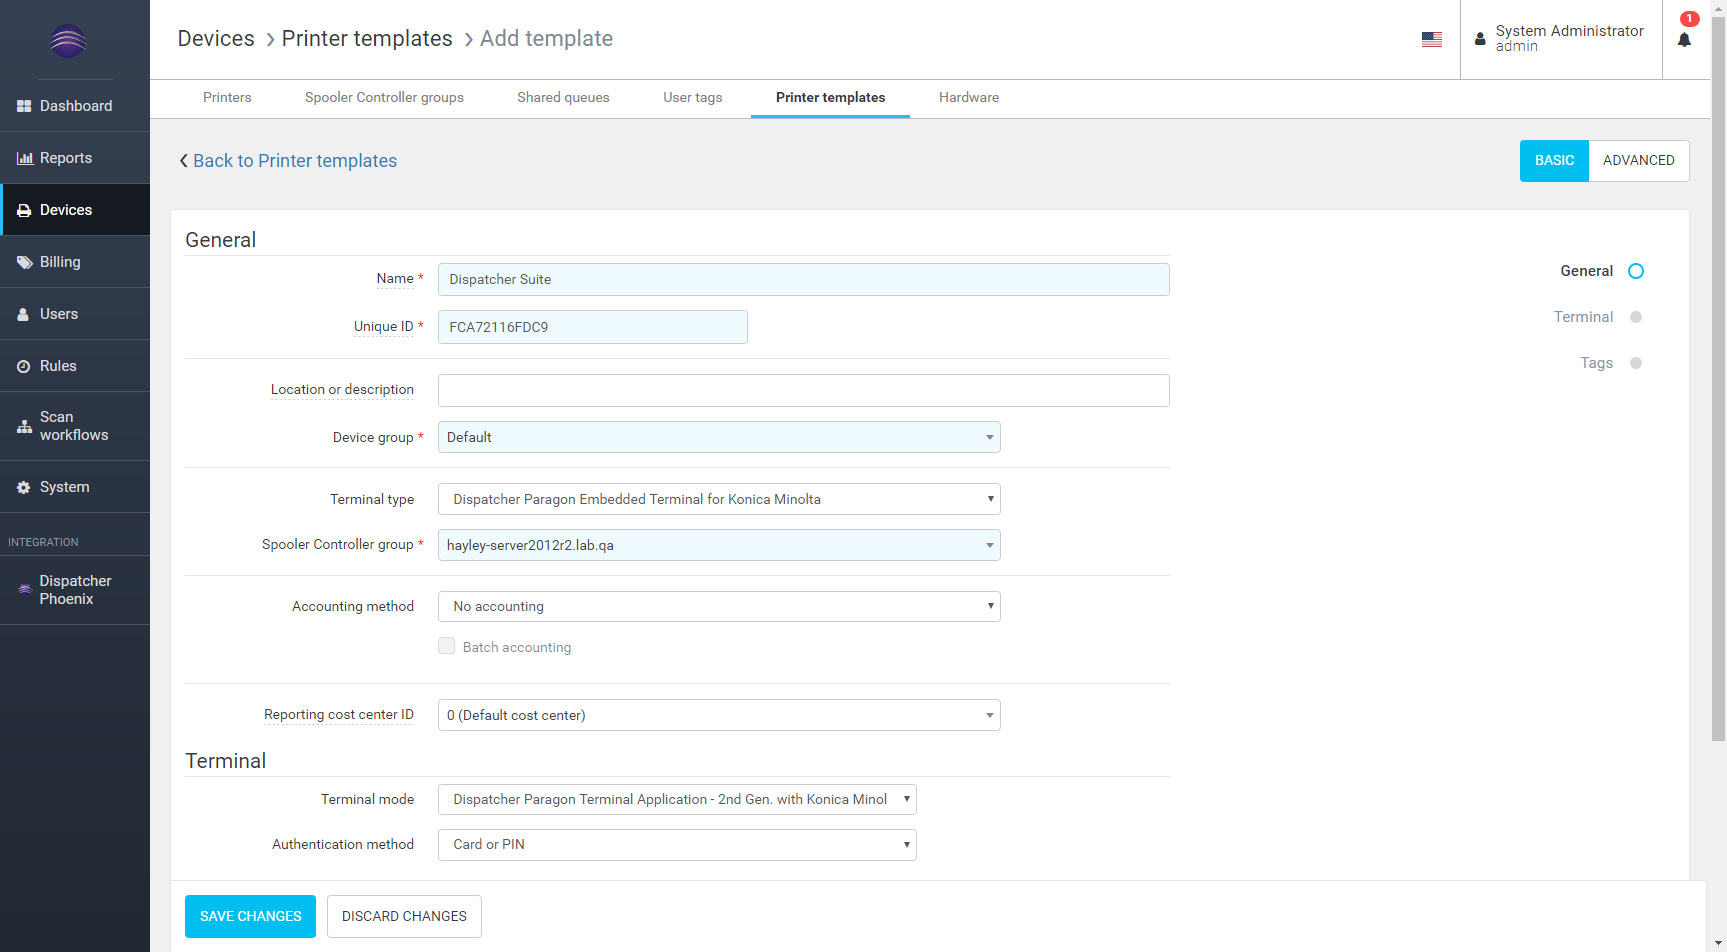
-
-
Select Save Changes.
Device Synchronization
To provide more fine-grain control of devices and to enhance the user experience, Dispatcher Suite offers additional functionality within the Devices tool in Dispatcher Phoenix Web.
When adding an MFP in Dispatcher Phoenix or Dispatcher Paragon, the new device will automatically sync to the other platform. Additionally, changing data on either device list will populate to both device lists. If a device is added in Dispatcher Phoenix without a value in the optional Name field, Dispatcher Paragon will add the device to its device list with the Model as its name. If a value is later added to the optional Name field in Dispatcher Phoenix, that will override the Name in Dispatcher Paragon. If a device is added in Dispatcher Paragon and the Name added is the same as the known-to-Dispatcher Phoenix Model, then only one name will display from the Dispatcher Phoenix registration tool. However, if the Name entered in Dispatcher Paragon is a different value, then the most recently updated name will be displayed.
Note: In certain fields, any information entered or edited into Dispatcher Phoenix will be shared to Dispatcher Paragon, and vice versa, as shown in the following table:
| Dispatcher Phoenix | Dispatcher Paragon |
|---|---|
| Host Name/IP Address | Network Address |
| Name (optional) or Model | Name |
| Admin Password | Admin Password |
| Description | Location or description |
| Equipment ID (located in Additional Info tab) | Equipment ID (located in Meta subsection) |
| Service Agreement ID (located in Additional Info tab) | Service Agreement ID (located in Meta subsection) |
| Contact Person (located in Additional Info tab) | Contact person (located in Meta subsection) |
| ZIP Code (located in Additional Info tab) | ZIP code (located in Meta subsection) |
Important! If the MAC address of your device changes, it is strongly recommended that you remove the existing device from Dispatcher Phoenix and Dispatcher Paragon. Then, you can re-add the device using Dispatcher Phoenix’s Devices Tool. Deleting an MFP from Dispatcher Phoenix will remove it from Dispatcher Paragon. Deleting an MFP from Dispatcher Paragon will remove it from Dispatcher Phoenix, if it is unregistered in Dispatcher Phoenix.
MFP Integration
Once you have configured both Dispatcher Phoenix and Dispatcher Paragon, users can begin using both platforms at the MFP. The Dispatcher Suite solution allows for the single sign-on integration of both print management and scanning capabilities to create a seamless user experience with the same look and feel at the MFP.
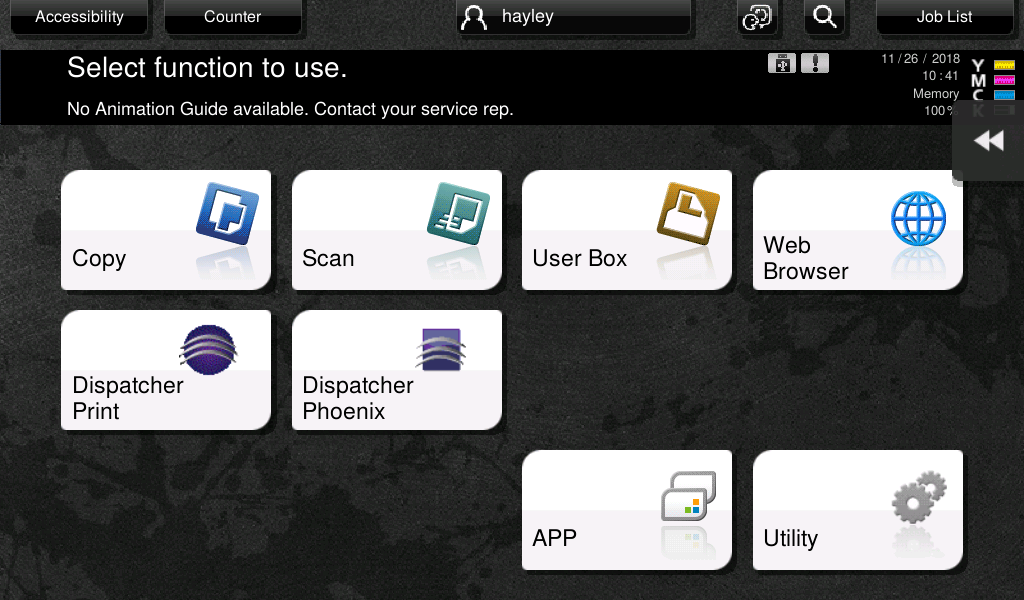
From the MFP panel, you can switch between Dispatcher Phoenix and Dispatcher Paragon.
-
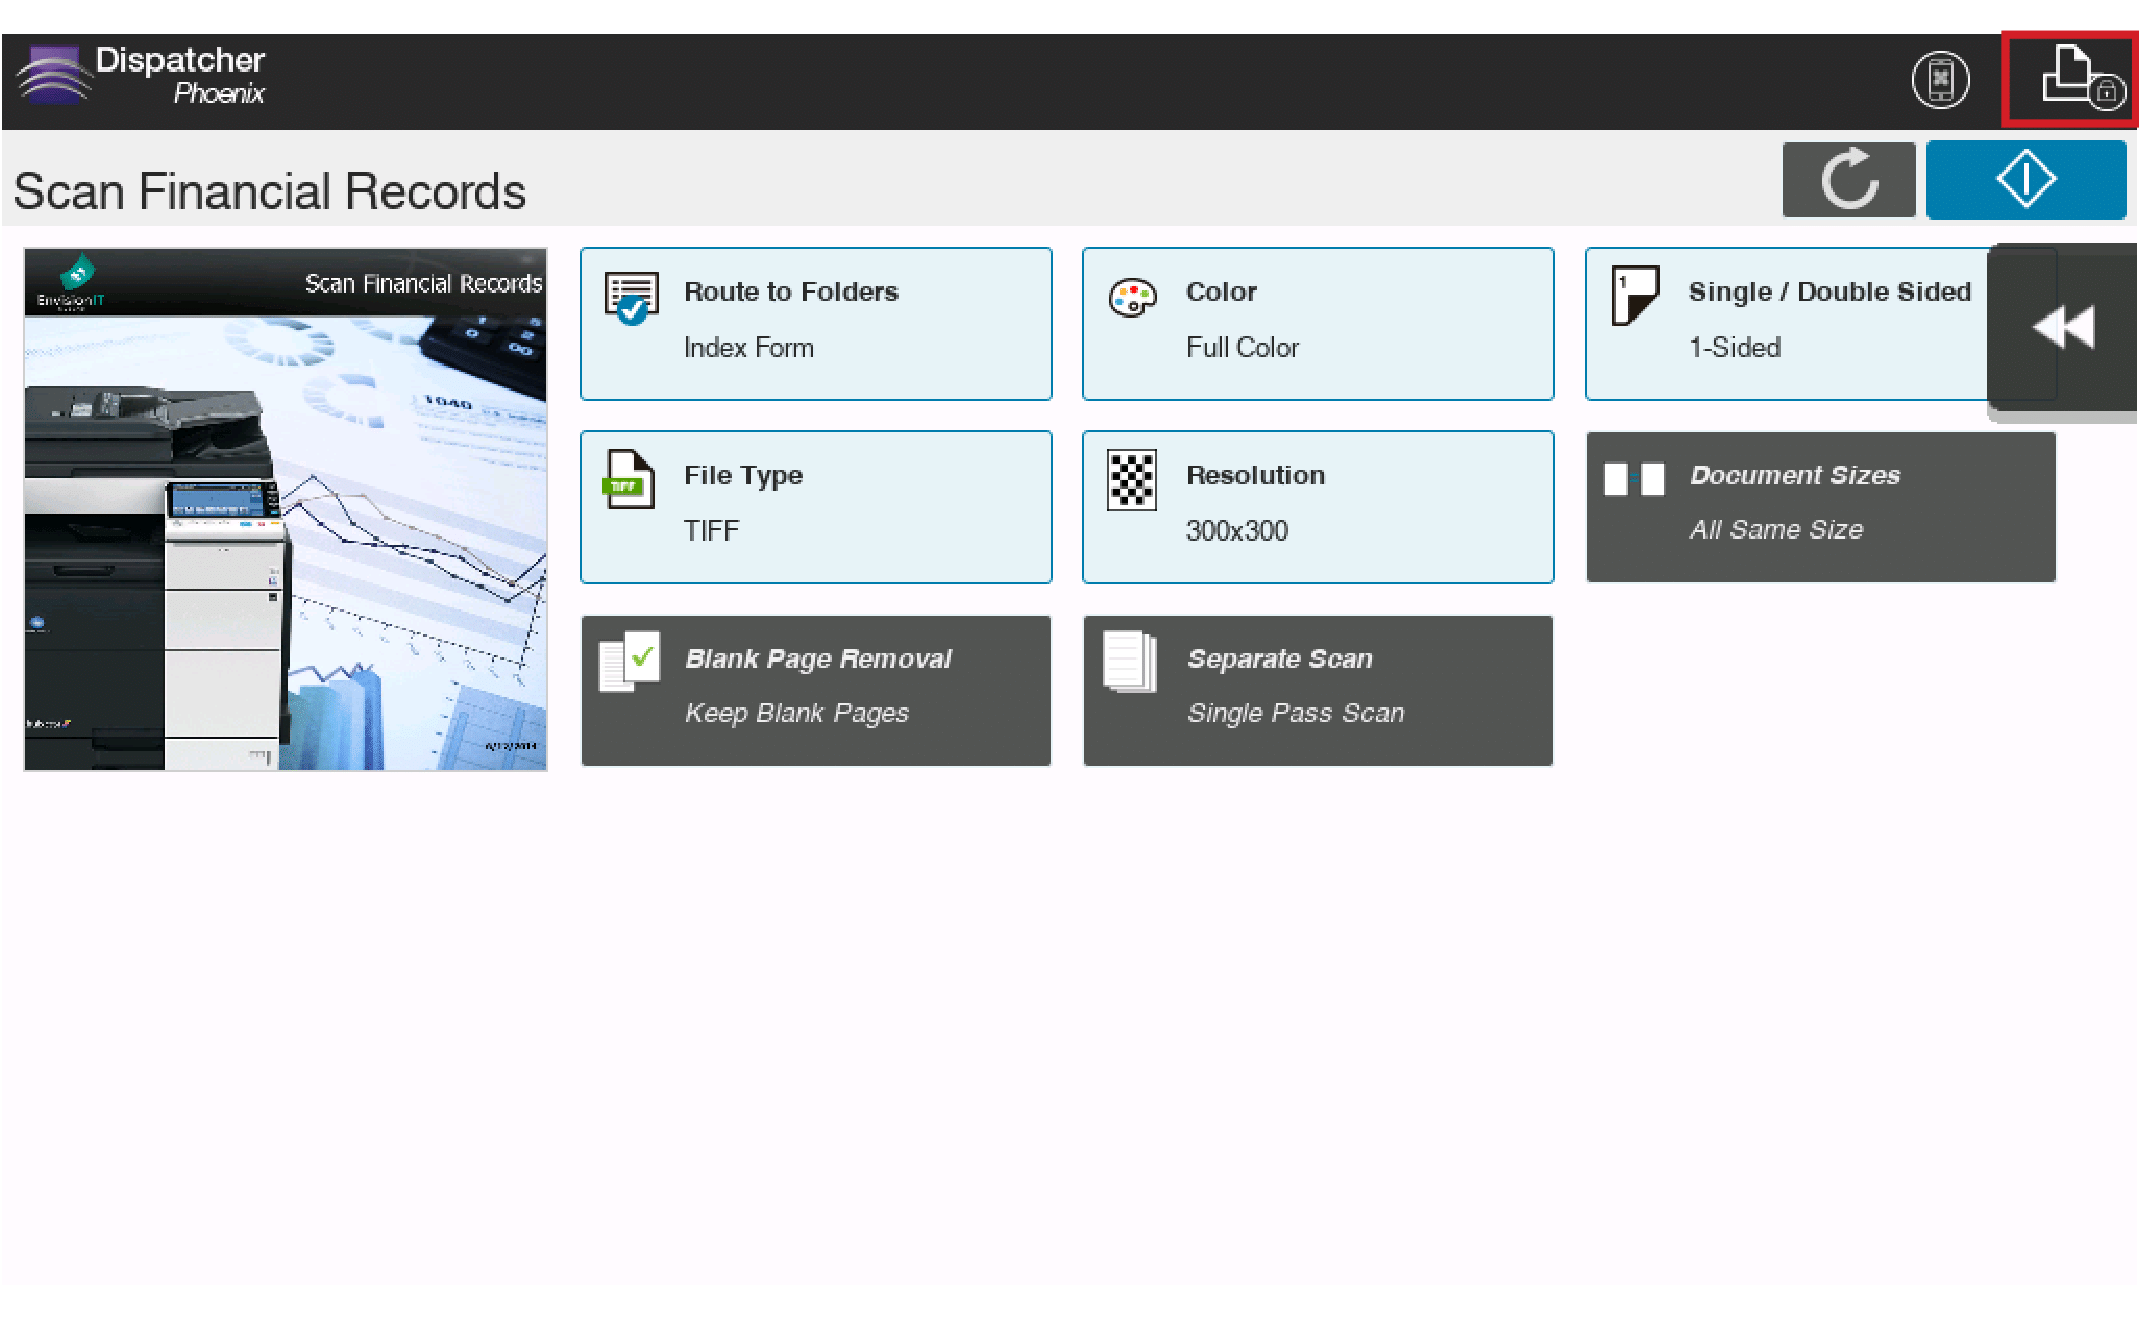
To access Dispatcher Phoenix from Dispatcher Paragon at the MFP, tap the Scan button in the upper, left corner as shown in the following illustration:

-
To access Dispatcher Paragon from Dispatcher Phoenix at the MFP, tap the Print button in the upper, right corner as shown in the following illustration: