DP Web Bubble Sheet Generator
The Dispatcher Phoenix Web Bubble Sheet Generator is the online version of the stand-alone client application for creating Bubble Sheet Answer keys and Student Answer Sheets for automatic grading and report generation. The web version allows you to access the software from any computer at any time. This is done by by logging into Dispatcher Phoenix Web with valid Dispatcher Phoenix Web credentials to a computer with a Bubble Grader license.
The Bubble Sheet Generator allows you to:
-
Customize the number of questions and the number of possible answers per question.
-
Configure how many Student Answer Sheets to print.
-
Customize the Bubble Sheets with a logo.
-
Save a customized template to the web or download it as a pdf.
-
Open a saved template.
-
Import and Export templates.
-
Import Teacher Answer Keys and Student Names and IDs.
-
Print a customized template.
-
Configure the Bubble Sheet tests with course and teacher details.
-
Fill in the Answer Key.
-
Customize the Student Answer Sheets with individual names and IDs.
-
Combine existing first name and last name fields into a single field.
-
Assign weighted point values to individual questions.
-
Allow multiple correct answers for each question.
Note: Any changes made will be reflected automatically in the Preview area after clicking on the APPLY button.
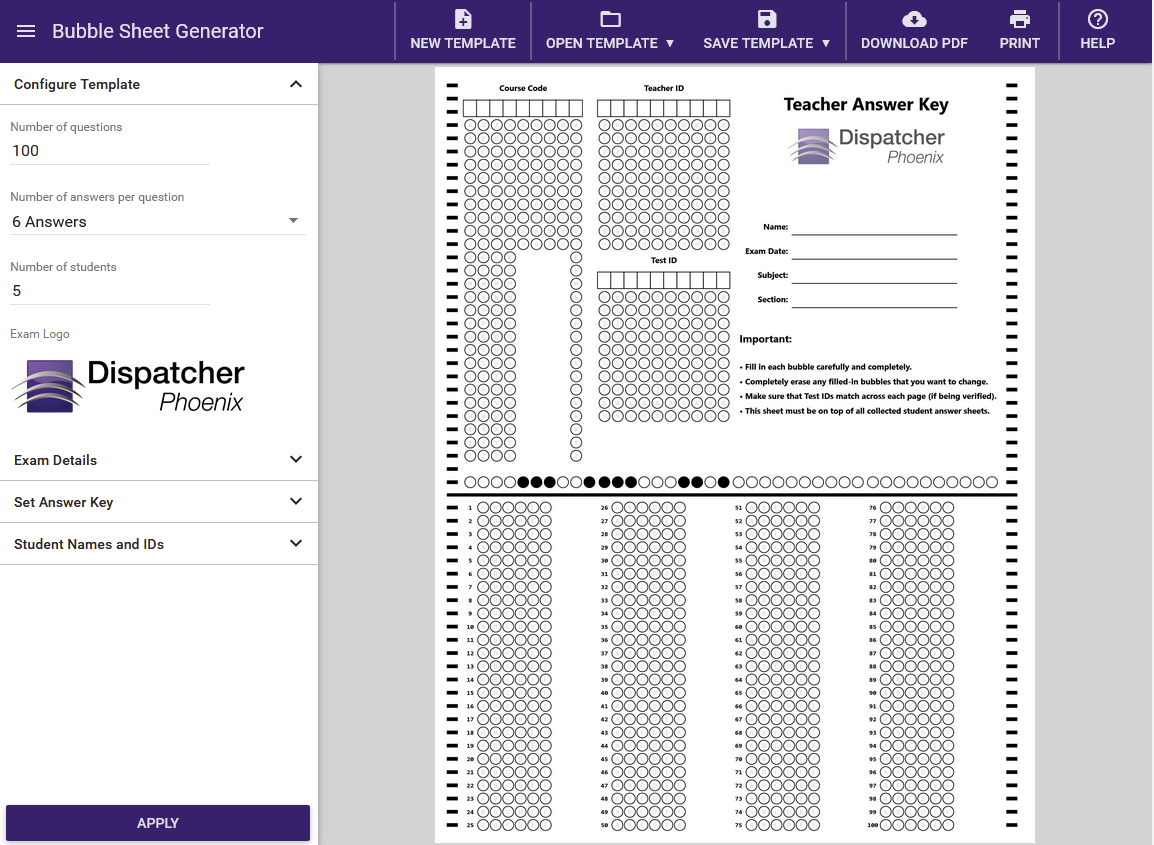
Accessing the Bubble Sheet Generator
The Bubble Sheet Generator Tool is available from Dispatcher Phoenix Web with a Dispatcher Phoenix Education License.
- To access the Bubble Sheet Generator app, select the Bubble Sheet Generator tile on Dispatcher Phoenix Web’s home page, as shown in the following illustration.

Using the Tool Bar
Everything needed to manage your template can be found in the Bubble Sheet Generator toolbar:

New Template:
This resets your Bubble Sheet template to the default settings of the Bubble Sheet Generator, clearing the current state of the template.
Open Template:
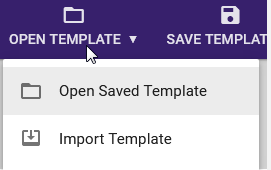
A drop-down menu appears with the options to either open a saved template or import one, as shown in the following illustration:
-
Open Saved Template: Allows you to open an existing Bubble Sheet file that has already been generated and saved by the Bubble Sheet Generator so that you can modify or use as needed.
-
Import Template: Allows you to select an exported file for import.
Save Template:
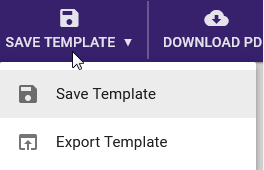
A drop-down menu appears with the options to either save a template or export a template as a .bgtx file as shown in the following illustration:
-
Save Template: Allows you to save your work to Dispatcher Phoenix Web Storage. Unlike exporting a .bgtx file, the saved templates are not downloaded to the local computer. Therefore, saved templates will be accessible from your account on any computer with Bubble Sheet Generator. This option allows you to either overwrite an existing template or save a new one.
-
Export Template: Allows you to save a template (.bgtx file) to your computer.
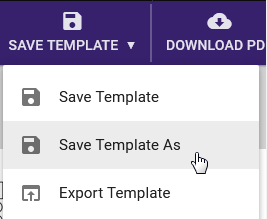
- Save Template As: This will only be available if the current template has already been saved or imported. Selecting this option will prompt you to enter a new template name as shown in the following illustration:
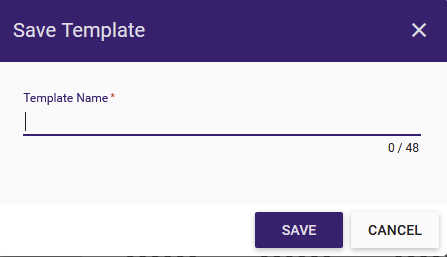
- If the name is valid it will be saved to your DP Web Storage, and you will be able to access and open previously saved templates without having to upload a .bgtx file.
Download PDF:
Downloads the current opened template as a PDF file for using/printing at a later date.
Note: When either exporting a template or downloading a PDF, files will be automatically downloaded to your “Downloads” folder if you do not have your browser configured to ask where to save the file before downloading.
Print:
Allows you to print your Bubble Sheet Answer Key, optional Weighted Sheets, and Student Answer Sheets.
Note: If your web browser does not allow pop ups for DP Web then the printable test packet will open in the current browser tab. Additionally, if a print dialog is not automatically displayed simply click the printer icon on the header of the print preview window as shown in the figure below.
Help:
Opens online help information about the Bubble Sheet Generator.
Configure Template
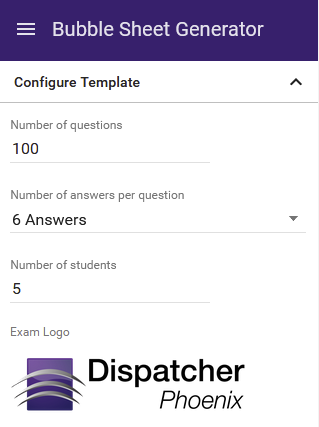
When you click on Configure Template, additional fields will appear allowing you to design your test template.
-
In the Number of Questions field, enter the number of questions for the bubble sheet.
Note: The minimum number of questions is 1 and the maximum number of questions is 200.
-
In the Number of Answers Per Question field, use the drop-down list to select the number of responses per question.
Note: The maximum number of answers per question is 6. If you have more than 150 questions, you will only be able to select a maximum of 4 answers per question.
-
In the Number of Students field, enter the number of Student Answer Sheets that you want to print.
Note: You will only be able to enter a maximum of 50 students.
-
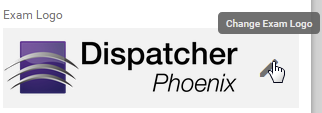
In the Exam Logo section, you can upload your own custom image. Simply hover over the Dispatcher Phoenix logo and select the edit icon and navigate to your image.
- To delete an existing logo, hover over the Exam Logo section and click the X (Reset Exam Logo) icon, as shown in the following illustration:
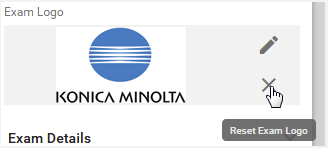
- Once you upload your custom logo, the image will appear in the Preview area and in the Exam Logo section.
Exam Details
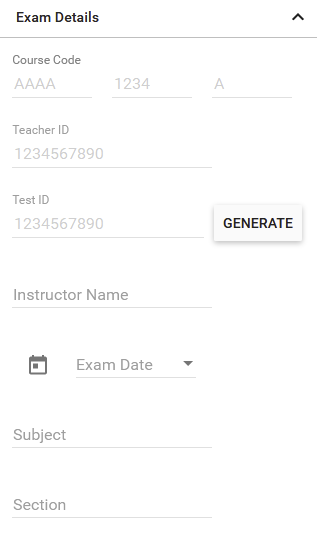
When you click on Exam Details, additional fields will appear, allowing you to customize the answer key, as in the following illustration:
Here you can do the following:
-
In the Course Code fields, enter a course code. This will be added to the Teacher Answer Key and Student Answer Sheets.
Note: This field accepts alphanumeric characters.
-
In the Teacher ID field, enter an ID for the teacher. This will be added to the Teacher Answer Key.
- The GENERATE button next to the Test ID field allows you to automatically generate a test ID when a unique identifier is desired but a specific number scheme is not required.
Note: This field only accepts numeric characters.
-
In the Test ID field, enter an ID for the test. This will be added to the Teacher Answer Key and Student Answer Sheets.
Note: This field only accepts numeric characters.
-
In the Instructor Name field, enter the name of the teacher/professor that is giving the test. This will be added to the Teacher Answer Key and Student Answer Sheets.
-
In the Exam Date field, specify the date of the exam. This will be added to the Teacher Answer Key and Student Answer Sheets. You can use the calendar icon to pop-up a representation of a calendar to easily select a date.
-
In the Subject field, enter the test subject. This will be added to the Teacher Answer Key.
-
In the Section field, enter a class section, if necessary. This will be added to the Teacher Answer Key.
Set Answer Key
When you click on Set Answer Key, additional fields will appear, which will allow you to set point values to individual questions and fill in the Teacher Answer Key with the correct answers.
Weighted Questions
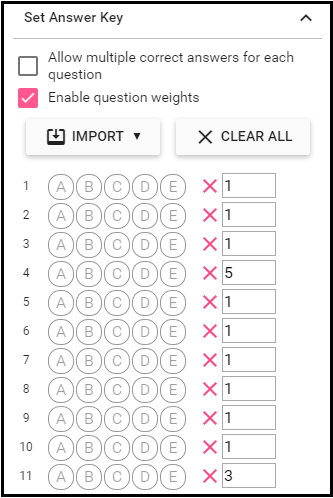
When certain questions have more importance than others on a test, instructors can assign weighted point values relative to the weight of their value, as shown in the following illustration:
To assign weights to the questions, do the following:
-
Check the Enable question weights box.
-
When the weight boxes appear, all questions will be assigned a default point value of 1.
-
Type in point values for each question that will carry a weight higher than 1.
Weight Sheets
Weight sheets are extentions to the answer keys and are automatically generated by the Bubble Sheet Generator when weights are assigned to questions. The weight sheets assign point values to questions through the use of Point Groups. This is what will be used along with the answer key by Dispatcher Phoenix to grade the tests.
-
Each point value assigned to questions on a test is assigned to a Point Group. In turn, each question using that point number will be assigned to that Point Group.
-
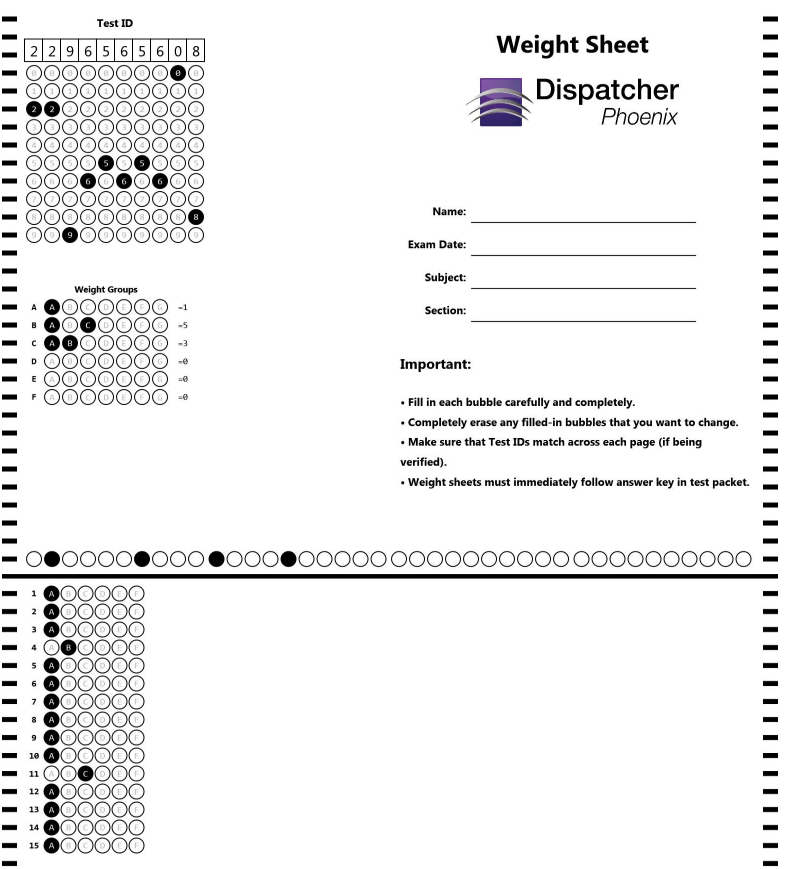
Points are assigned to each question that corresponds with that group, labeled A - F. There are seven bubbles for each weight group, and each bubble is assigned a value to add up to the correct point value. The bubble values are: A=1, B=2, C=4, D=8, E=16, F=32, and G=64. For example, if a weight group was to be assigned a value of five, bubbles A and C would be selected. (Bubble A=1 point, and bubble C=4 points, adding up to a value of 5). The largest value that can be assigned to a weight group is 100.
-
The number of groups per weight sheet are limited to:
-
Six groups for 150 or fewer questions.
-
Four groups for 151 or more questions.
-
-
Additional weight sheets are created if not enough groups exist on a single weight sheet to accommodate all weight values. The bubble sheet generator automatically generates the number of weight sheets needed to accommodate the number of different weights entered. The maximum number of weight sheets for each test is 15.
-
The following figure is an example of a weight sheet, with 15 questions listed and three Weight Groups used. Weight Group A has a value of 1, Weight Group B has a value of 5, and Weight Group C has a value of 3. Weight Groups D - F are not used. All questions except two have a value of 1 because they are assigned to Weight Group A, which has a weight value of 1. The exceptions are Question 4, assigned to Weight Group B and carrying a weight value of 5; and Question 11, assigned to Weight Group C and carrying a weight value of 3:
Assigning Answers
-
To assign answers, click on the correct bubble letter(s) associated with that question. To clear the selection, click on the X button in the specific row. Once you are done making your selections, click the Apply button. The Answer Key in the Preview area will reflect your changes.
-
Click the Import button to import a CSV or Excel (.xlsx) file that has a list of correct answers. The Windows file explorer pop-up window will open to select the Teacher Answer Key import file.
-
Excel - Column A should contain the correct answers (single or multiple) with the heading of “Answers” in Line 1.
-
CSV - The first line should have a header of “Answers” followed with the correct answer(s) in each line.
-
-
Click the Clear All button to clear all selections made.
Multiple Answers
-
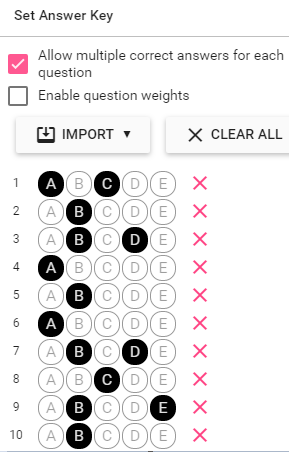
When questions include more than one correct answer, check the box next to Allow multiple correct answers for each question. With your mouse, click on all possible correct bubbled letters associated with that question, as shown in the following illustration
-
Click the Import button to import a CSV or Excel (.xlsx) file that has a list of correct answers. The Windows file explorer pop-up window will open to select the Teacher Answer Key import file.
-
Excel - Column A should contain the correct answers (single or multiple) with the heading of “Answers” in Line 1. Column B should contain the weight values with the heading of “Weights” in Line 1.
-
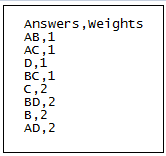
CSV - The first line should have a header of “Answers” followed by a comma and then the header of “Answers” with no space. Each line following should contain the correct answer(s) for each question, followed by the value of the weight with no space. The following image displays a CSV file containing multiple answers and weight values:
-
-
The CLEAR ALL button allows you to easily clear out all the bubbles you have filled in and start a fresh Student Answer Sheet.
Student Names and IDs
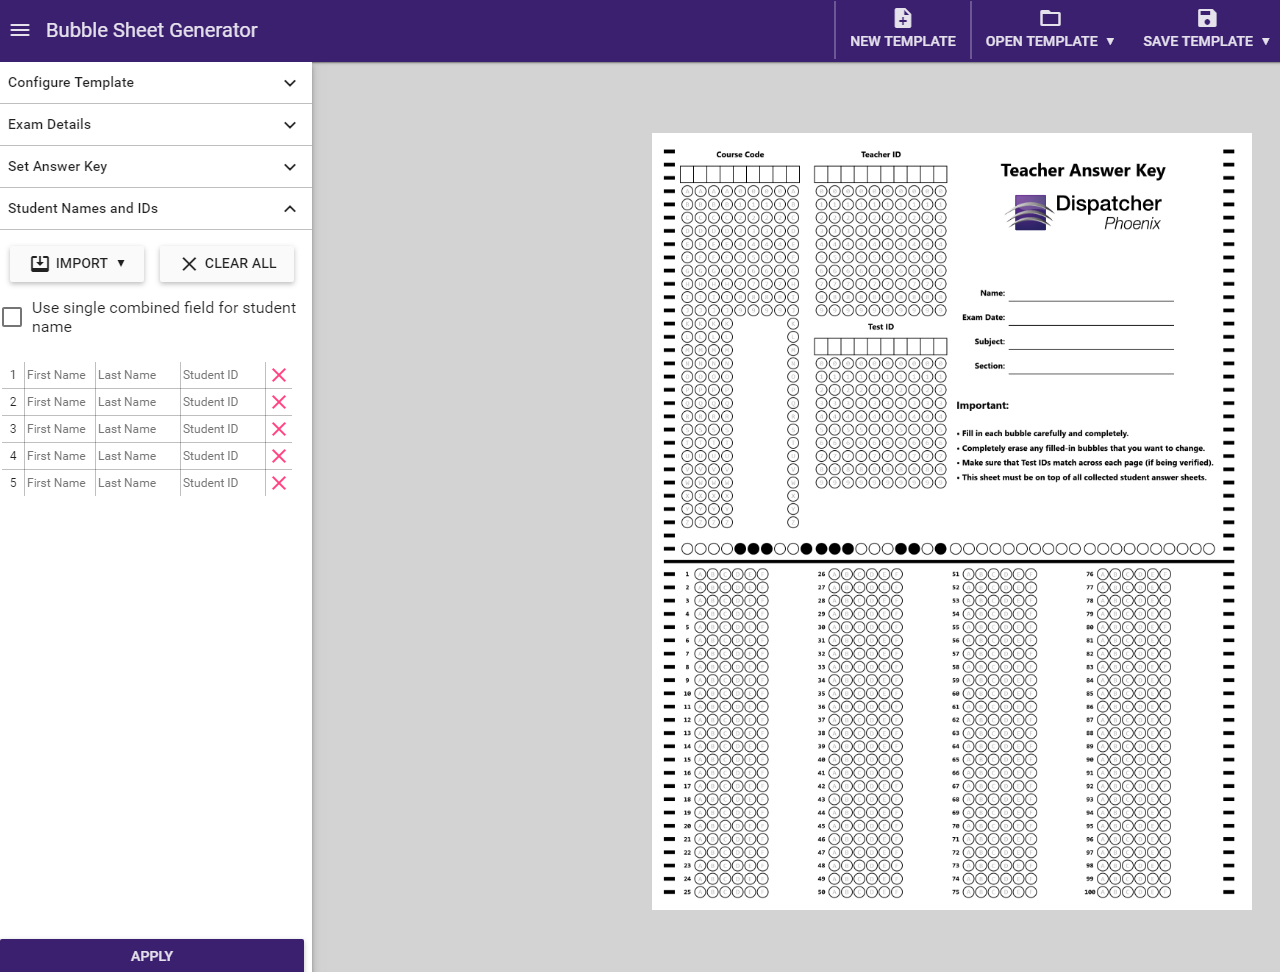
When you click on the down arrow next to Student Names and IDs, additional fields will appear, allowing you to customize the Student Answer Sheets with the student’s first and last name as well as the student’s ID, as in the following illustration:
-
Any information entered here will appear on the Student Answer Sheets only when they are printed or exported.
-
Click the Use single combined field for student name check box to eliminate the separator between the first name and last name, affording the flexibility of providing more characters for students with long names.
-
Use a blank space to distinguish between the first name and the last name.
-
If only one name is specified with no spaces, it will be stored in the Last Name field.
-
-
Enter the student’s first name, last name, and ID for each Student Answer Sheet. To clear your information, click on the X button in a specific row, or select the Clear All button to clear out all the student information.
-
The first and second fields only accept letters, the last field only accepts numeric values.
-
Click the Import button to import an Excel (.xlsx) file that has a list of student names and IDs, and apply the following formatting rules:
- First and Last Name Separated
- First row contains “First” header in Column A, “Last” header in Column B, and “Id” header in Column C.
- Each row following carries information for one student, containing the student’s first name in Column A, the student’s last name in Column B, and the student’s ID in Column C.
- First and Last Name Combined
- First row contains “Fullname” header in Column A, and “Id” header in Column B.
- Each row following carries information for one student, containing the student’s last name, a space, and first name in Column A; and the student’s ID in Column B.
- First and Last Name Separated
-
Click the Import button to import a CSV file that has a list of student names and IDs, and apply the following formatting rules:
- First and Last Name Separated
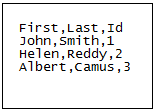
- First row contains “First” header, a comma with no space, “Last” header, a comma with no space, and “Id” header.
- Each row following carries information for one student, containing the student’s first name, a comma with no space, the student’s last name, a comma with no space, and the student’s ID.
- First and Last Name Combined
- First row contains “Fullname” header, a comma with no space, and “Id” header.
- Each row following carries information for one student, containing the student’s last name, a space, the student’s first name, a comma with no space, and the student’s ID.
- The following image displays a CSV file containing separated student names and IDs:
- First and Last Name Separated
-
Click Apply to see your selections displayed in the Preview area.


