Card Registration
Card Registration Overview
The Card Registration Tool allows you to map ID cards (e.g., HID Proximity, iCLASS and MIFARE etc.) to users within your organization’s Directory Server. Once registered, the card can be used for MFP authentication as well as logging into Dispatcher Phoenix at the MFP via single sign-on.
You can also scan a card to return its user registration information within the LDAP server. This allows you to see if a card has already been registered to another user.
To use the Card Registration Tool, you should do the following:
-
Set up the Card Reader.
-
Set up the MFP for authentication.
-
Log into Dispatcher Phoenix Web; then click on the Card Registration card. See the following illustration for an example:
-
Configure the LDAP Settings within the Card Registration Tool.
-
Register cards for users.
-
Look up card information.
This tool also provides help information to get you started and keyboard shortcuts.
TIP: We recommend that you register only one card first with the Card Registration tool to ensure it can be used to authenticate at the MFP; then you can continue registering all other cards.
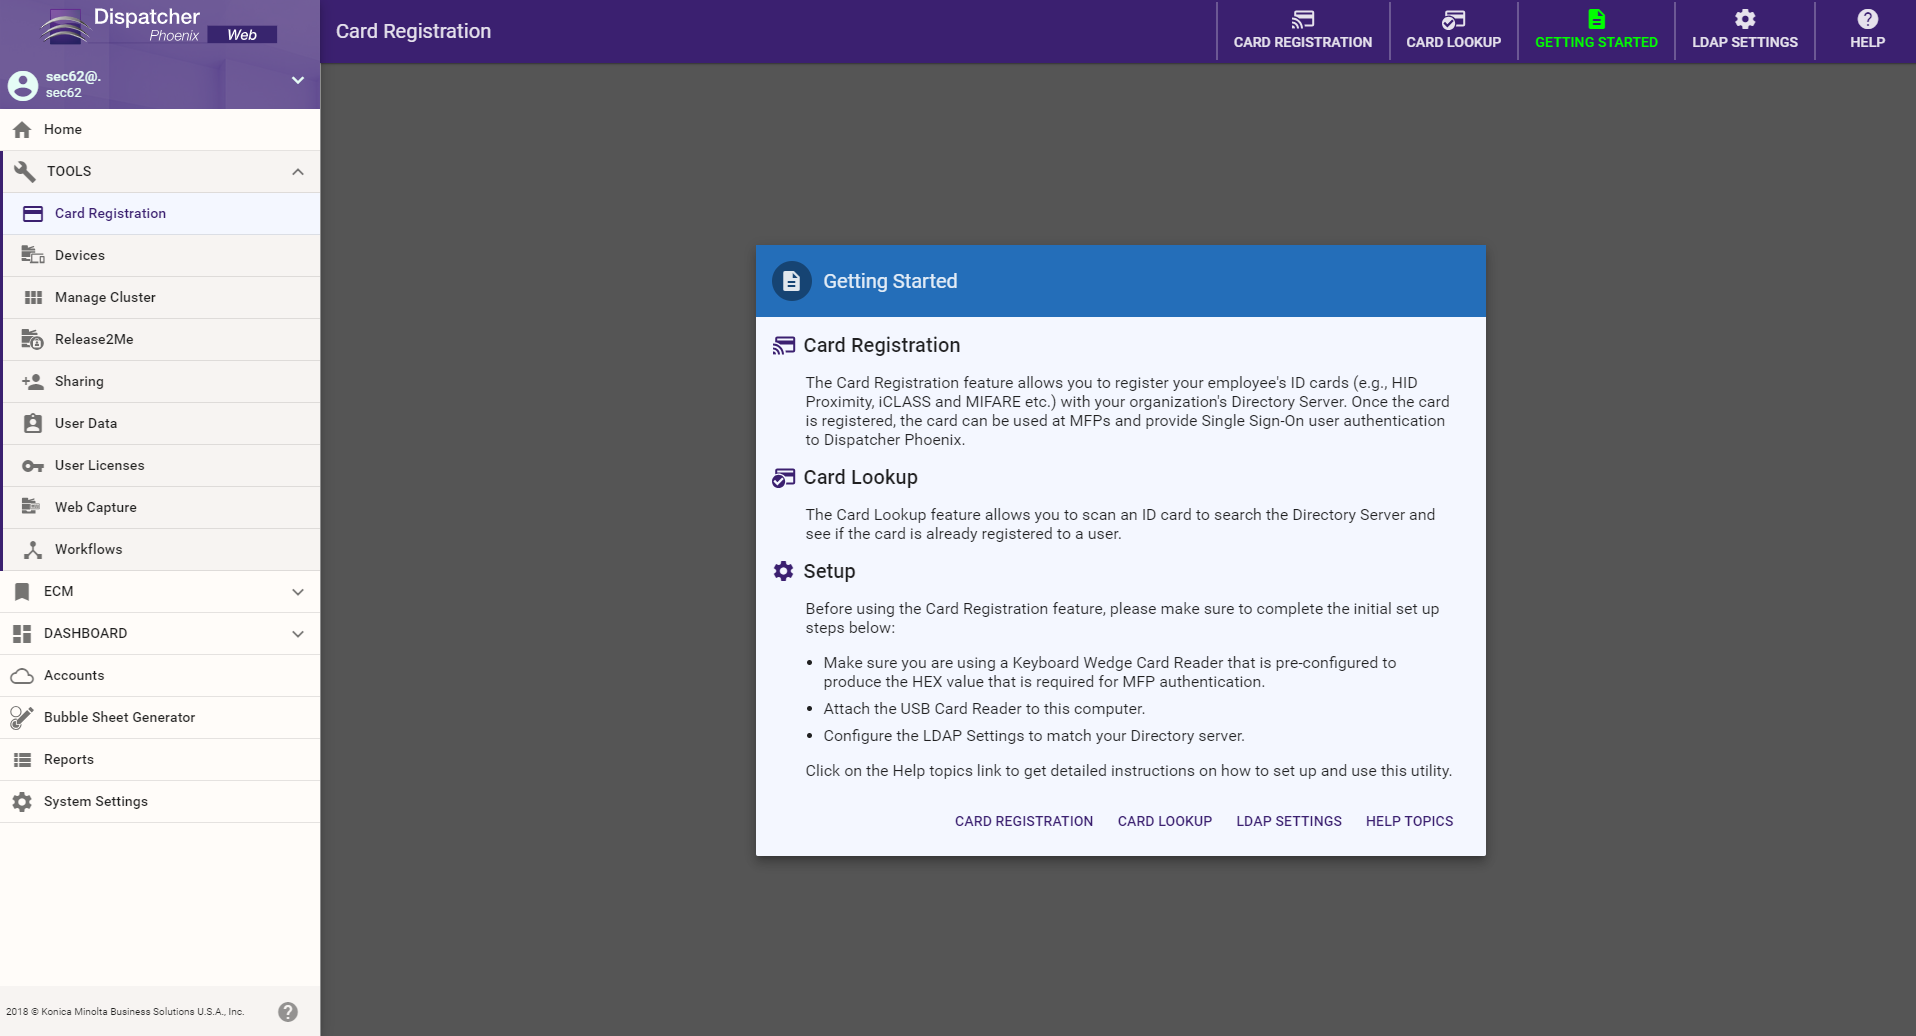
The Card Registration Tool resembles the following illustration:
Requirements
In order to use the Card Registration tool, note the following requirements:
- The Card Reader must have a Keyboard Wedge interface.
- The Card Reader must be attached to your computer.
- You must have an LDAP administrator account that is capable of updating LDAP for other users.
- The LDAP Settings configured within the Card Registration Tool must match the LDAP Server.
Set Up the Card Reader
First, you should set up the card reader to ensure that it sends the HEX value that the MFP requires for authentication.
Important! The card reader used with the Card Registration Tool must have the same configuration as the Card Reader used at the MFP.
For example, with the Konica Minolta AU-205H, you would do the following:
-
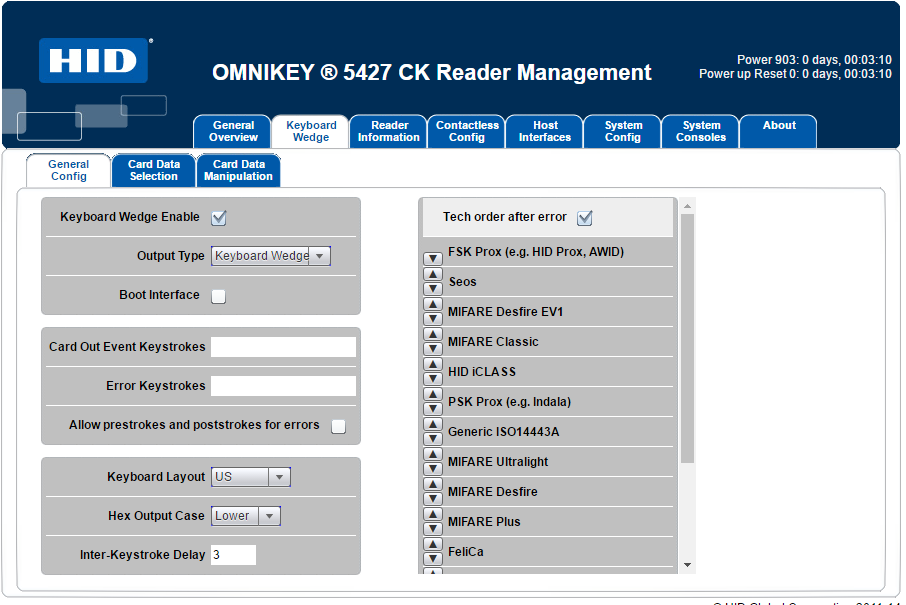
Configure General Settings. This is where you would enable Keyboard Wedge functionality. With this functionality enabled, the device computes like a keyboard and outputs the data as a series of keystrokes. See the following illustration for an example:
-
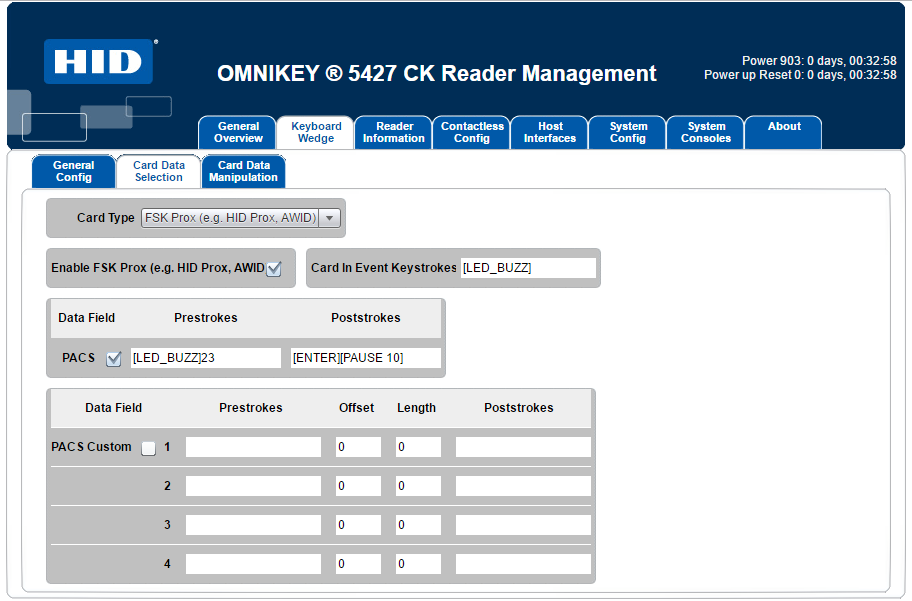
Configure Card Data Selection. You need to specify the card type, select the data that is to be read from the card and reported across the keyboard interface automatically, and set the Keyboard Wedge actions once a card is detected by the reader. See the following illustration for an example:
-
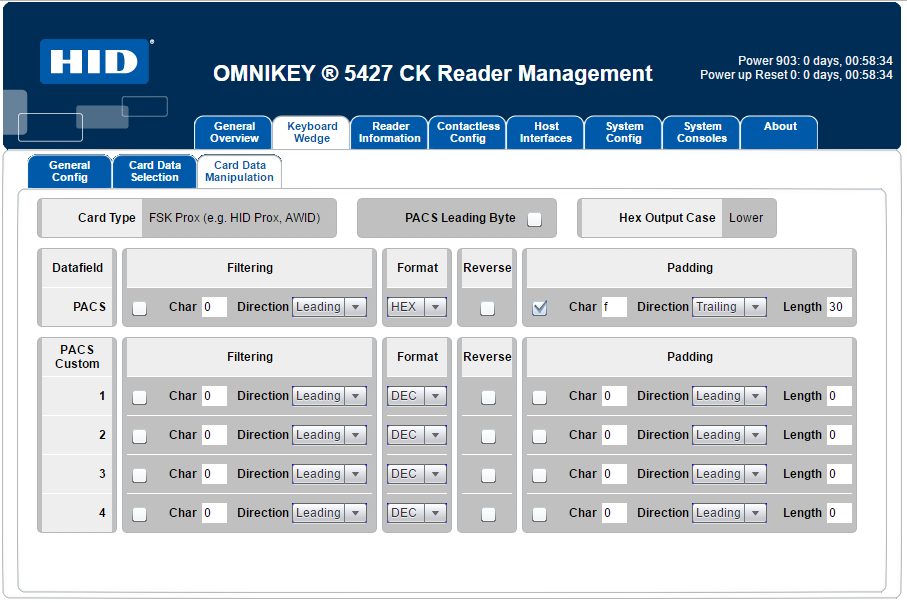
Configure Card Data Manipulation. Use the Card Data Manipulation tab to format the output, as in the following illustration:
Set Up the MFP for Active Directory with Card Reader Authentication
Next, you should set up the MFP for Active Directory/LDAP authentication either at the MFP or via a PageScope Web Connection. You will need to log in as an administrator to perform these instructions.
You must configure the following on the MFP:
Note: These instructions use PageScope Web Connection for MFP configuration.
Configuring the MFP’s time
You must ensure that the MFP’s time is set up to match the card reader. Do the following:
-
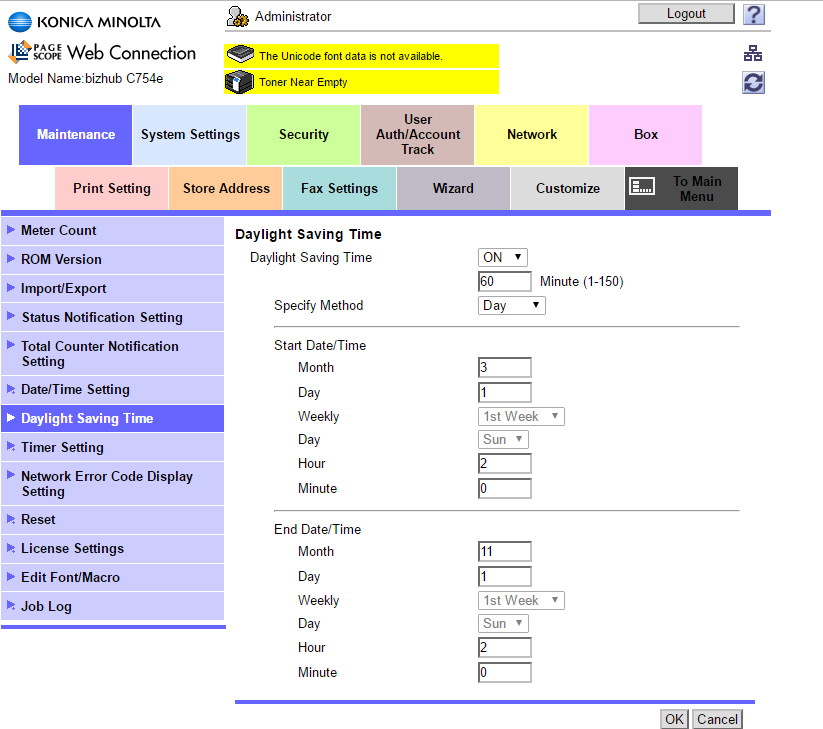
In the administrator mode, select Daylight Saving Time and ensure that ON is selected in the Daylight Saving Time drop-down, as in the following illustration:
-
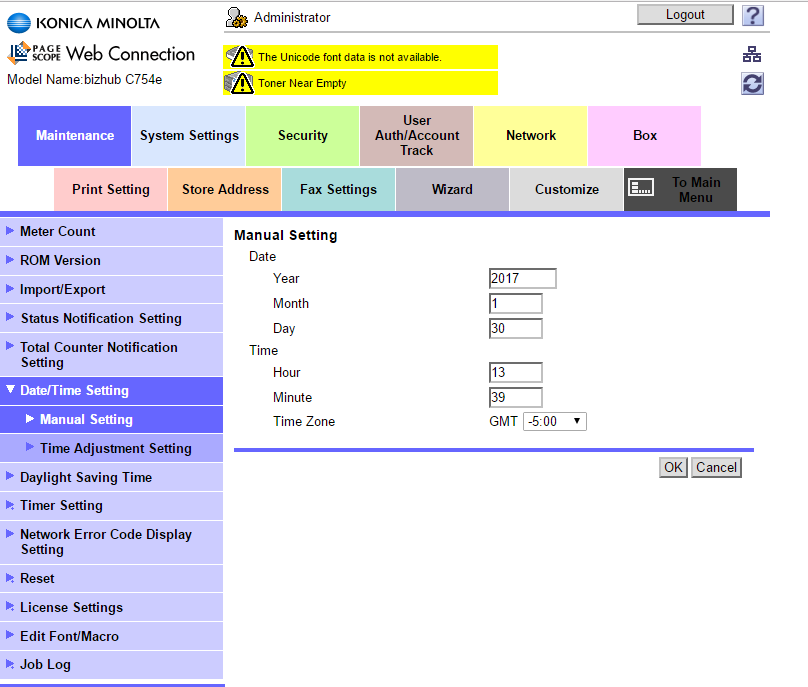
The timezone should be set to the appropriate settings for your location. For example, for the East Coast of the United States, the setting would be GMT -5:00. Go to Date/Time Setting > Manual Setting to set the Time Zone, as in the following illustration:
-
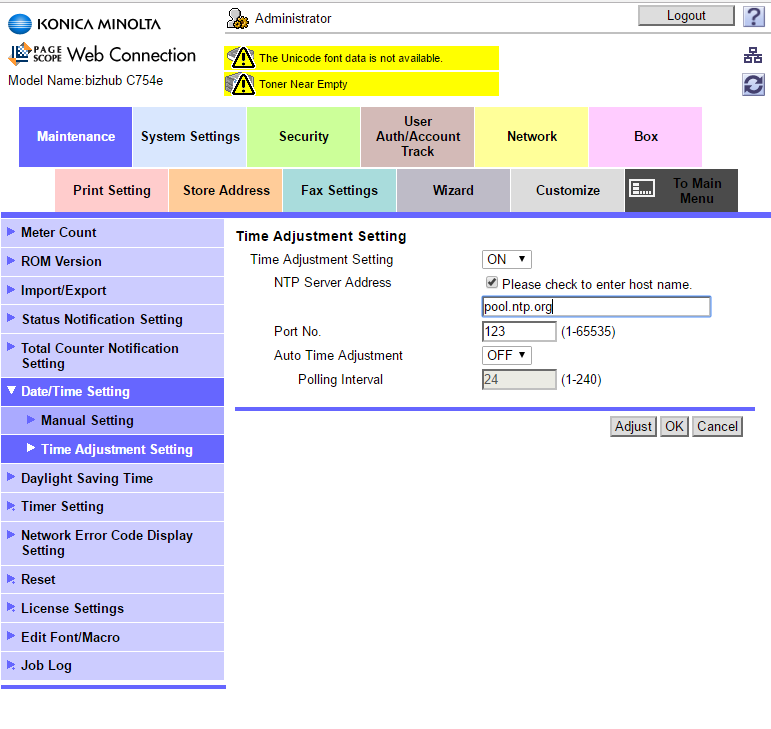
Select Date/Time Setting > Time Adjustment Setting to configure the MFP to use the NTP (Network Time Protocol) server. Do the following:
a. Set the server address to “pool.ntp.org”.
b. Select the Adjust button to force the MFP to update the time correctly.
See the following illustration for an example:
Configuring the MFP’s DNS Server
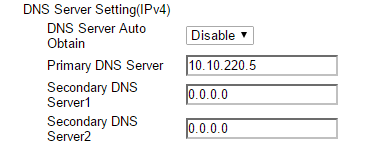
Next, you must manually enter the IP address of the Active Directory domain server system. You can do the following:
- In Administrator mode, select Network.
- Select TCP / IP from the left hand menu.
- Select the Disable option form the DNS Server Auto Obtain drop-down list.
- Enter the IP address of the Active Directory domain server system in the Primary DNS Server field.
See the following illustration for an example:
Configuring External Server Settings
Next, you should register an external server with the domain name of the Active Directory domain that will be used for authentication. Do the following:
-
In Administrator mode, select User Auth / Account Track.
-
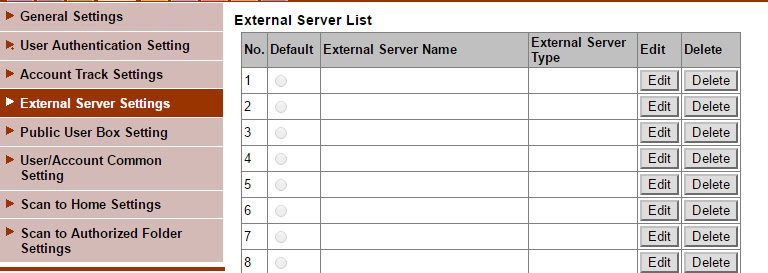
Select External Server Settings from the left hand menu.
-
Select the first external server slot; then select the Edit button. See the following illustration for an example:
-
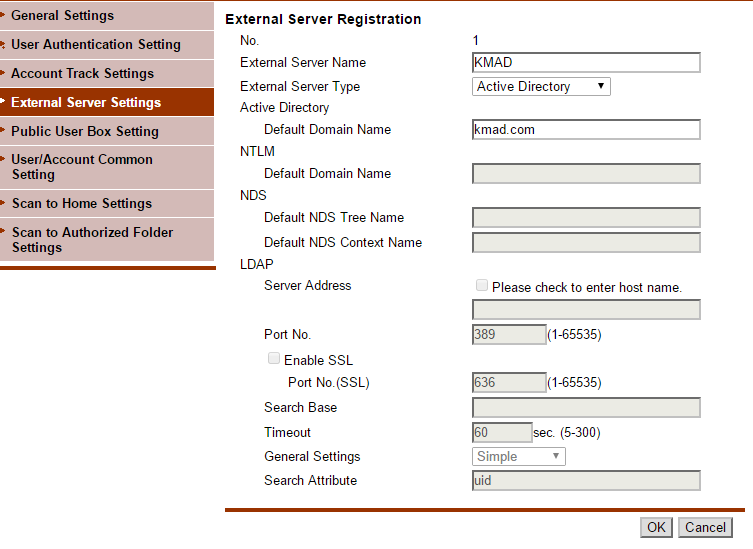
On the External Server Registration page, enter an external server name and default domain name of the Active Directory domain in the supplied fields. Please note that the External Server Name is a label that is displayed to the user only; it is not required to be the server name. See the following illustration for an example:
-
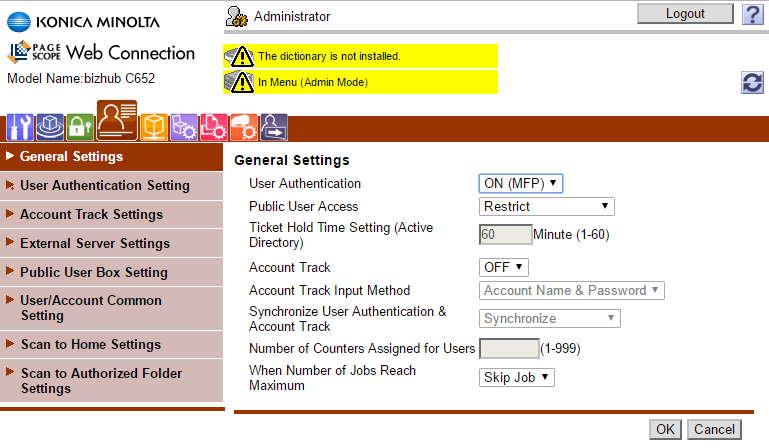
On the General Settings page, choose the ON (MFP) option from the User Authentication drop-down list, as in the following illustration:
Configuring Card Reader Authentication
Finally, you should configure the MFP settings so that authentication is performed in the LDAP server using the card ID registered in the authentication card. Do the following:
-
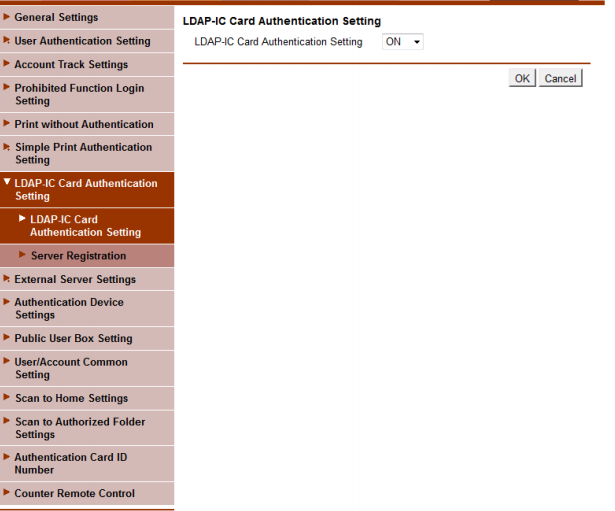
In Administrator mode, select User Auth/Account Track > LDAP-IC Card Authentication Setting > LDAP-IC Card Authentication Setting.
-
Choose the On option for the LDAP-IC Card Authentication Setting, as in the following illustration:
-
Configure the LDAP system you will be querying for card information, filling in the following fields:
- Server Address
- Search Base
- General Settings Authentication Type
- Login Name (which should be administrator)
- Password (you must first check the Password is changed box; then enter the administrator password)
- Domain Name
- Search Attribute. Please note that the attribute you enter here (i.e., pager) must match the attribute entered in the LDAP attribute for registering card data field in the Card Registration Tool’s LDAP Settings.
- User Name Attribute. Please note that the attribute you enter here must match the attribute entered in the LDAP attribute for acquiring user account name field in the Card Registration Tool’s LDAP Settings.
- External Server Connection. Specify the server registered when Configuring External Server Settings.
Configure LDAP Settings
After the card reader has been configured and the MFP has been set up for LDAP authentication, you must set up the LDAP Settings within the Dispatcher Phoenix Card Registration tool. This set up needs to be done only once. To configure the LDAP Settings, see the sections below.
LDAP Settings
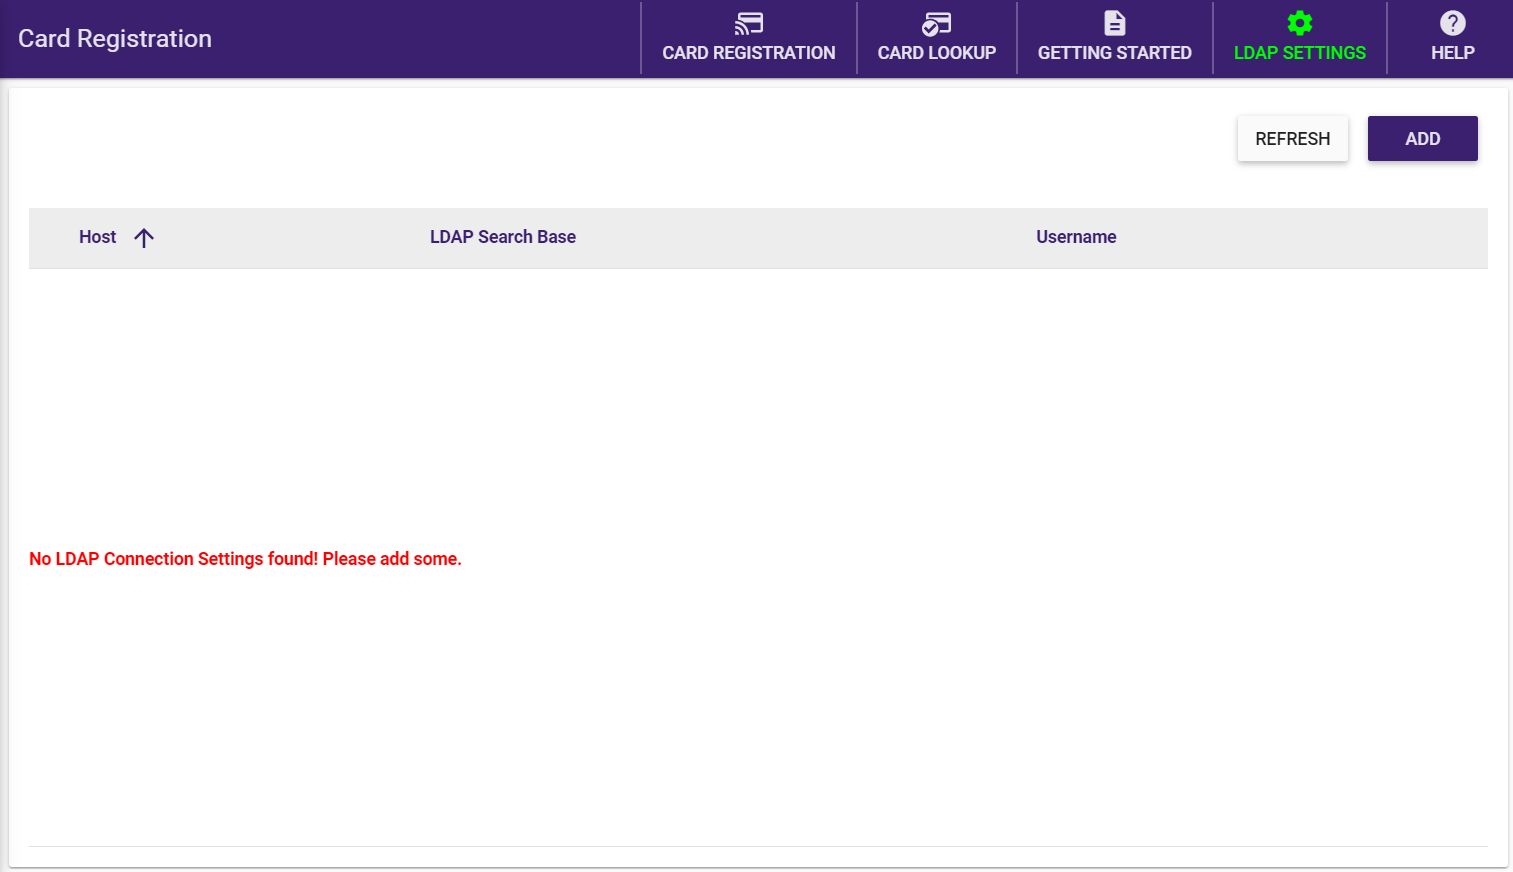
On the Card Registration Tool, select LDAP SETTINGS from the toolbar.
The LDAP Settings window appears, as in the following illustration:
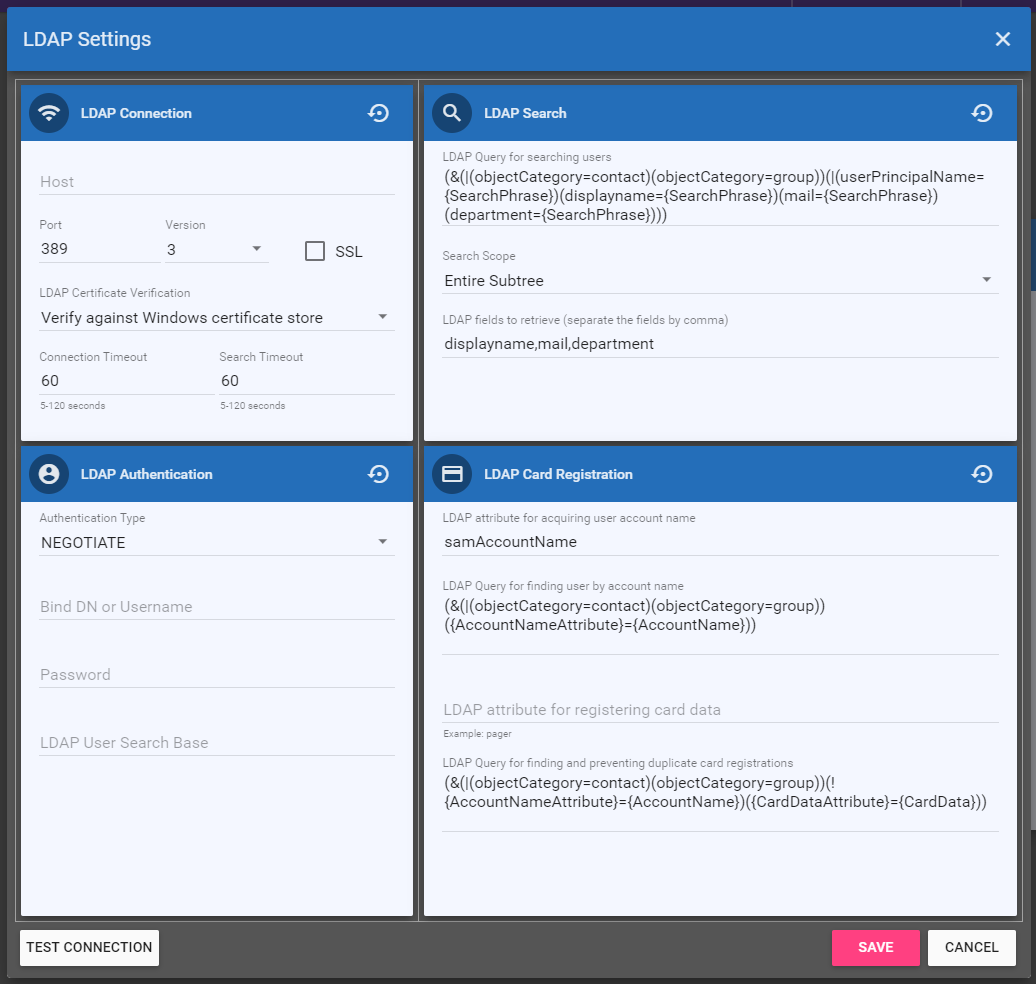
To add an LDAP connection, click the Add button, which opens the LDAP Settings modal, as in the following illustration:
LDAP Connection
On the LDAP Settings window, configure your LDAP server connection by entering the following information:
- Host – Enter the name of the server where LDAP is hosted.
- Port – Enter the LDAP server port.
- Version – Select the LDAP version from the drop-down list. Note that Version 3 (the default setting) is backward-compatible to versions 1 and 2. For this reason, we recommend you keep the default setting.
- SSL – To require the LDAP server to make an SSL-encrypted connection, select this box.
- LDAP Certificate Verification - If you check the box at the SSL field, use this field to specify your method of LDAP server certificate verification. You have the following options:
- Verify against Windows certificate store - This option verifies the LDAP server certificate using the certification authorities set in Windows. If you select this option, ensure a valid LDAP server certificate issued by a trusted certificate authority is installed on the domain server.
- Ignore verification, this is a trusted server - We recommend this option for self-signed certificates. This option accepts any certificate for a TLS connection.
- Connection timeout – Enter the maximum number of seconds to establish an LDAP connection. If no connection is made in the allotted time, the connection terminates.
- Search timeout – Enter the maximum number of seconds to search for LDAP data before abandoning the search.
LDAP Authentication
Specify authentication information about the LDAP Server by choosing/entering the following information:
-
Authentication Type - The drop-down menu provides the following options:
-
DIGEST
-
KERBEROS
-
NEGOTIATE - This is the default response. This option uses Microsoft Negotiate authentication for the connection.
-
NTLM
-
SIMPLE
Note: Due to Microsoft security enhancements, as of March, 2020, this option will not sustain a connection unless the SSL box is checked and a SSL certificate is installed on the domain server.
-
-
Bind DN or User Name - Enter the user on the external server permitted to search the LDAP directory within the defined search base. Note that the {user}@{domain} variables will be replaced with information coming from the MFP and are necessary to perform the search.
-
Password - Enter the bind password.
-
Base DN or Search Base - The search base must match the set up on the MFP.
LDAP Search
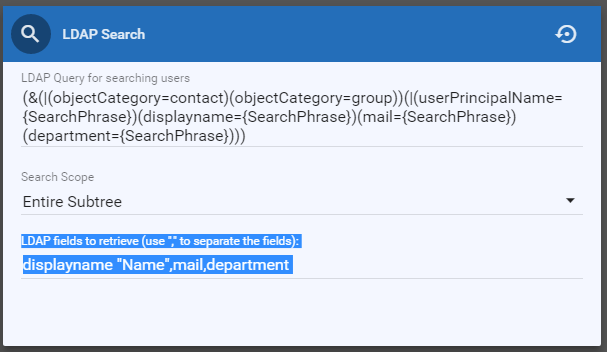
Enter properties necessary to search for the user in the LDAP server, using the following fields:
-
LDAP Query for searching users - In this field, enter a query that will search for the user in LDAP based on the characters that are entered in the Card Registration Tool’s Search field. If using Active Directory, the default LDAP Query will not need to be modified; however, if you are using a different implementation of LDAP, you may have to change this query to suit your server.
-
Search Scope - This is the starting point of the LDAP search. You have the following options:
- Base - Search only the entry at the specified root.
- One Level - Search all entries one level under the specified root.
- Entire Subtree - Search all entries at all levels under and including the specified root.
-
LDAP fields to retrieve - These are the attributes that will be returned from the LDAP server. You can add a friendly name to be displayed for the column header by enclosing it in quotes. For example: displayname “Name” will display “Name” in the column instead of “displayname”. See the illustration below for an example:

LDAP Card Registration
Enter attributes and queries necessary for registering the card data, using the following fields:
- LDAP Attribute for acquiring user account name - In this field, the attribute should match what was entered for the User Name Attribute when setting up Server Registration on the MFP.
- LDAP Query for finding user account by name - This field’s query is used to find the user account. If using Active Directory, this default query will not need to be modified.
- LDAP Attribute for registering card data - In this field, the attribute should match what was entered for the Search Attribute when setting up Server Registration on the MFP.
- LDAP Query for finding and preventing duplicate card registrations - This field’s query is used to prevent any duplicate card registrations. If using Active Directory, this default query will not need to be modified.
Restore - To restore any fields back to their default settings, click this button that appears at the top of each area, as in the following illustration:

TEST CONNECTION - Click this button to test your LDAP properties.
SAVE - Click this button when done.
Register Cards
To register cards, do the following:
-
On the Card Registration page, type in a search phrase to search for that user in LDAP. You can use the * wildcard character in your search.
-
Select the Find button (or press Enter) to begin searching for that user (or all users if you have entered *).
In the Search Results, icons next to user names appear to denote which users already have a card registered to them. See the following illustration for an example of the icon:

-
Select the appropriate user from the search results. An icon will appear next to the user name to denote that an ID card can be scanned and registered to that user. See the following illustration for an example of the icon:

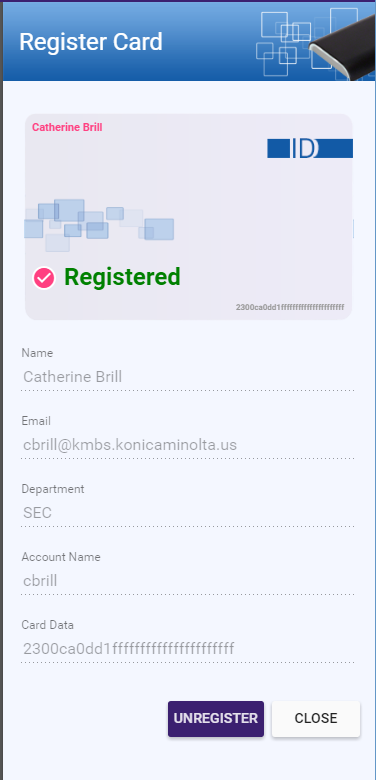
The Register Card area will appear on the right hand side of the page. See the following illustration for an example:

-
Scan the unregistered card using the Card Reader. The value of the card will immediately appear in the Scan ID card register field and the display will change, confirming the Card Registration. Now that card is paired with that user. See the following illustration for an example:
-
You can click the UNREGISTER button to remove this card registration from the user.
Look Up Card Registration
To check to see if a card has been registered, do the following:
-
Select CARD LOOKUP from the toolbar.
-
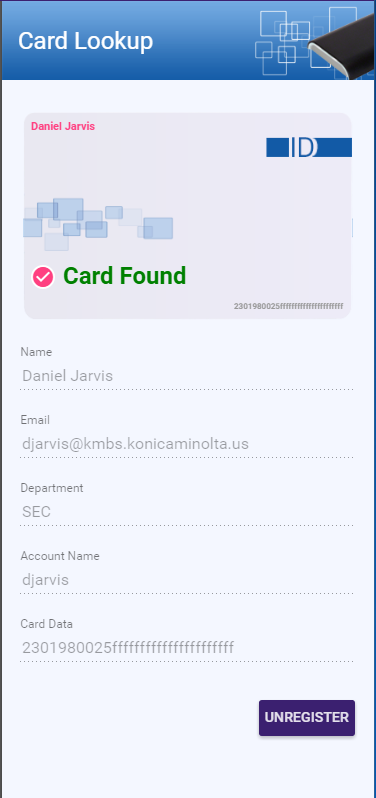
Scan the card using the Card Reader. The card’s ID value will appear in the empty field provided. If a user is registered with that card, information about that user will appear on the right hand side of the page, as in the following illustration:
-
To unregister the card for this particular user, select the UNREGISTER button.
-
If that card has not been registered yet for a user, a message will display at the bottom of the page, as follows:

Getting Started
To view important information about using this tool, select GETTING STARTED from the toolbar.

From this pop-up, you can do the following:
- Select CARD REGISTRATION to register cards.
- Select CARD LOOKUP to scan an ID card to verify who the card is registered to.
- Select LDAP SETTINGS to connect to your LDAP Directory and set up your search queries. This only has to be once, the first time you use this tool.
- Select HELP TOPICS to view help information about the tool.
Keyboard Shortcuts
Keyboard shortcuts are available for use.
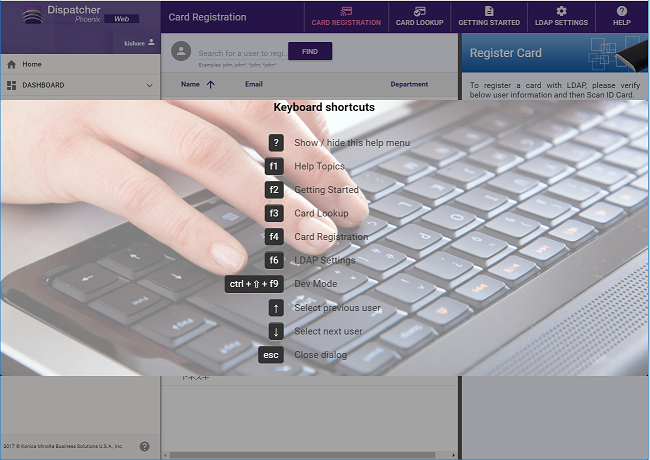
Select the Shift + ? keys to bring up a help menu that lists all the shortcuts that you can use. You can also access the keyboard shortcut help menu from the Help drop-down, as in the following illustration:

The following keyboard shortcuts are available for you:
- ? - Display/Hide this help menu
- f1 - Display Help Topics
- f2 - Display Getting Started information
- f3 - Go to the Card Lookup feature
- f4 - Go to the Card Registration feature
- f6 - Go to the LDAP Settings window
- ctrl + Up Arrow + f9 - Go into a Development mode with dummy LDAP data for demoing.
- Up arrow - Select the previous user listed
- Down arrow - Select the next arrow listed
- Esc - Close the Keyboard Shortcut help menu
